MEGAWHEELS S10 User manual

Thank you for purchasing our product. For optimum performance and safety,
please read these instructions carefully before operating the product.
Please keep this manual for future reference.
Read the information supplied by the manufacturer.
Wear personal protective equipment.
USER MANUAL
EN14619 Class A

1. GENERAL INFORMATION
2. PRODUCT OVERVIEW
2.1 General information
2.2 What you need to know
3. PRODUCT DESCRIPTION
3.1 Assemble the front wheel
3.2 Unfold
3.3 Assemble the handles
3.5 Fold
4. HOW TO RIDE
4.1 Ride
4.2 Display description
4.3 Front light description
4.4 Rear light description
5. SCOOTER SAFETY PRECAUTIONS
6. WEIGHT AND SPEED LIMITATIONS
6.1 Weight Restrictions
6.2 Speed Limits
7. OPERATING RANGE
8. BATTERY INFORMATION AND SPECIFICATIONS
8.1 Battery Specifications
8.2 BATTERY WARNING
9. CHARGING YOUR SCOOTER
10. INSPECTION, MAINTENANCE, AND STORAGE
11. SCOOTER SPECIFICATIONS
----------------------------------------------01
----------------------------------------------------02
------------------------------------------------------02
-------------------------------------------------02
-----------------------------------------------02
-----------------------------------------------02
------------------------------------------------------------------------03
----------------------------------------------------04
----------------------------------------------------------------------------04
-----------------------------------------------------------------05
---------------------------------------------------------------------------05
--------------------------------------------------------07
----------------------------------------------------08
-----------------------------------------------------08
-----------------------------------09
------------------------------------10
----------------------------------------------------------10
--------------------------------------------------------------------10
----------------------------------------------------------10
----------------11
--------------------------------------------------------11
------------------------------------------------------------11
--------------------------------------------12
-----------------13
--------------------------------------------13
CATALOG

1. GENERAL INFORMATION
01
Front Wheel
Motor
Kickstand
Charging Port
Deck
Rear Brake Rear Light
Hook Hole
Handle
Folding Wrench
Long Pole
LED Light
Buckle Lock
Accelerate Throttle
LCD Display
Electric Brake
Folding Hook

2. PRODUCT OVERVIEW 3. PRODUCT DESCRIPTION
02
2.1 General information 3.1 Assemble the front wheel
2.2 What you need to know
The original scooter is an intuitive, technologically advanced solution.
Using the latest technology and production processes, each scooter
undergoes strict testing for quality and durability. With its lightweight,
portable design, ease of use, range, and low carbon footprint.
1. Step on the base, lift the fork firmly to remove the base.
2. Remove the rubber plugs on both sides of the front fork, and unscrew
the front axle with the two 6mm hexagon wrenches in the package.
Before you first experience your scooter, please read the USER
MANUAL thoroughly and learn the basics to ensure your safety and the
safety of others. The power will be shut down if nobody operate in five
minutes, you need press power button before you ride.
WARNING: Failure to follow the basic instructions and safety
precautions listed in the USER MANUAL, can lead to damage to your
scooter, other property damage, serious bodily injury,and even death.
This appliance can be used by children aged from 8 years and above and
persons with reduced physical, sensory or mental capabilities or lack of
experience and knowledge if they have been given supervision or
instruction concerning use of the appliance in a safe way and understand
the hazards involved.
Children shall not play with the appliance. Cleaning and user maintenance
shall not be made by children without supervision.
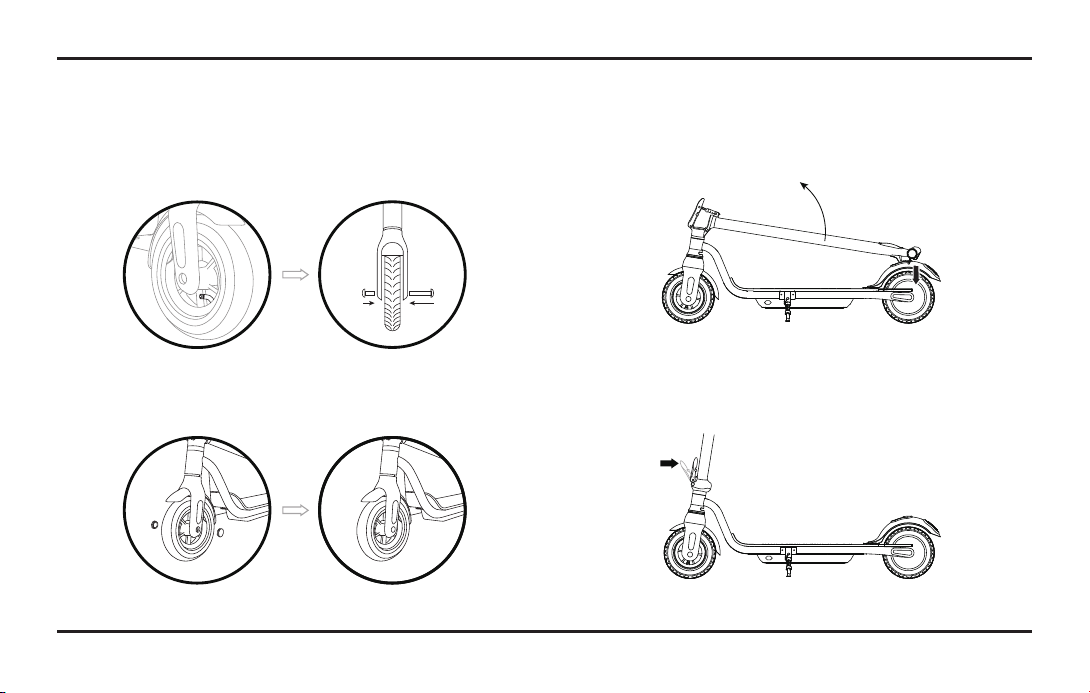
3.2 Unfold
03
1. Right hand presses down the back fender and the left hand pulls up the
long pole until folding hook gets out of the hook hole on back fender.
3. When installing the front wheel ( please pay attention to the direction
of the tread of the tire, as shown in the lower right or the inflation port
to the right), and tighten the front wheel axle.
4. Plug back the rubber plugs on both sides of the front fork. 2. Get the long pole stand up, then pull up the folding wrench towards
the upright pole and force it to stay close to upright pole

04
3.3 Assemble the handles 3.4 Fold
1. Right index finger lift the buckle lock up, push the folding wrench
outward with the thumb to put down the upright pole.
2. Press the upright pole down until the folding hook is fixed into the
hook hole on back fender.
Install the Handles and tighten the handles:
LR
RL
Before installing the handles, please make sure to differenciate the
left & right handles carefully.
Please see the difference of left & right handles from below images.

4. HOW TO RIDE
4.1 Ride
1. Turn on the Scooter by press the Power key for 2 seconds and check
the battery power.
Skillfully use the accelerate throttle to speed up or slow down when riding.
Warning: There is risk of falling down during learning, so make sure to wear helmet and protection kits all the time.
05
2. once the power is on it is safer to start riding with one foot on the deck
and give a kick by other foot to speed up the scooter to 5km/h, then
push accelerator and place the other foot on the deck, this is safer and
more controlled than pulling off with two feet on the deck as you will
have less control and stability with two feet on the deck.

4. Turn off the scooter when finish using the product by press the power
key for 3seconds.
3. To stop riding, release the throttle and use the electric brake to gradually
coast to a stop then step off the scooter one foot at a time. Be extra
cautions when dismounting for the first time.
Warning: If scooter has both electric brake and rear physic rear brake, the electric brake is prior to rear brake, which is only used as auxiliary
brake when electric brake does not work properly, or in an urgent situation, use the eletric brake and rear brake at the same time.
DO NOT step on rear brake for a long time, or it will break the tyre and fender.
Mechanism to reduce speed will get hot from continuous use, do not touch after braking.
06

07
Battery power 75%-100% power
When the icon is white, it is at low speed mode, max speed is 10km/h.
When the icon is yellow, it is middle speed mode, max speed is 20km/h.
When the icon is red, it is high speed mode, max speed is 25km/h.
When the icon is on, the front light and rear light are turned on,
When the icon is off, the front light and rear light are turned off.
Press 2sec to turn it ON / OFF.
When the scooter is on, turn on the front light and rear light by pressing the power button twice;
turn it off by pressing the power button twice again.
Speed level
Light status
Power key
50%-75% power 25%-50% power 0%-25% power
When the scooter is on, switch the speed modes at low speed, middle speed and high
speed by pressing this button
Mode key
4.2 Display description

08
4.3 Front light description
4.4 Rear light description
TURN ON TURN OFF
When the light is on,press
twice in short time to turn off the front light.
When the scooter is on ,press
twice in short time to turn on the front light;
TURN ON TURN OFF
When the light is on,press
twice in short time to turn off the rear light.
When the scooter is on ,press
twice in short time to turn on the rear light;
When we turn on the light,the rear light will be half bright,when we brake,the rear light will be fully bright.
When we turn off the light,the rear light is off.

09
5. SCOOTER SAFETY PRECAUTIONS
Failure to follow any of the following safety precautions can and may
lead to damage to your scooter, void your manufacturer warranty, lead
to property damage, cause serious bodily injury, and can lead to
death.
1. Please wear all appropriate safety and protective gear as previously
mentioned in the User Manual before operating the scooter.
2. Make sure to wear comfortable clothes and flat closed toe shoes when
operating your scooter.
3. Please carefully read the User Manual, which will assist in explaining the
basic working principles and provide tips on how to best enjoy your
scooter experience.
4. Do not try to open or modify your scooter, as doing so will vlid your
manufacturer warranty, and may cause failure to your device leading to
serious bodily injury or death.
5. Do not use the scooter to place yourself or anyone else and their
property in danger.
6. Use your best judgment to keep yourself out of dangerous situations with
your scooter.
7. Do not ride your scooter off of curbs, ramps, or attempt to operate in a
skate park, empty pool, or in any ways similar to a skateboard or scooter.
8. Do not abuse your scooter, doing so can damage your unit and cause
failure to the operating system leading to injury.
9. Do not ride in inclement weather: snow, rain, hail, sleek, on icy roads or
in extreme heat.
10. Do not turn sharply, especially at high speeds.
11. Do not ride in or near pools or other large bodies of water.
12. For Bumps and Uneven pavement-Bend your knees when riding on
bumpy or uneven pavement to absorb the shock and vibration and
help you keep your balance. If you are unsure if you can safely ride
on a specific terrain, step off and carry your scooter.
13. Do not operate the scooter in crowded areas.
14. Operate your scooter with extreme caution when indoors, especially
around people, property, and narrow spaces like doorways and other
narrow spaces.
15. Do not operate the scooter while talking, texting, or looking at your
phone.
16. Do not ride your scooter where it is not permitted.
17. Do not ride your scooter near motor vehicles or on public roads.
18. Do not climb or travel down steep hills with your scooter.
19. The scooter is intended for use by a single individual, DO NOT
attempt to operate the scooter with two or more people.
20. Do not carry anything while reding the scooter.
21. Individuals with lack of balance should not attempt to operate the
scooter.
22. Young children and the elderly should not operate the scooter without
proper instruction and supervision from a Certified scooter trainer.
23. At higher speeds, always take into consideration longer stopping
distances.

10
Maximum Weight: 120 kg.
6.1 Weight Restrictions
Max. Speed Limit: 10km/h , 20km/h , 25 km/h
6.2 Speed Limits
6. WEIGHT AND SPEED LIMITATIONS 7. OPERATING RANGE
Please notice the scooter can travel a distance of 17-22 km on a fully charged
battery in ideal conditions.The following are some of the major factors that
will affect the operating range of your scooter.
Terrain: A smooth, flat surface will increase your driving distance, while
driving uphill, as well as rough or uneven terrain will reduce your
distance significantly.
Weight: The weight of the user can affect driving distance, a lighter user
will have further range than a heavier user.
Ambient temperature: Please ride and store the scooter under
recommended temperatures, which will increase driving distance;
battery life, and overall performance of your scooter.
Maintenance: Reasonable battery charging and maintenance will
increase the distance. Overcharging the battery can reduce range.
Speed and Driving Style: Maintaining a moderate speed will increase
your distance; while travelling at high speeds for extended periods,
frequent starts, stops, idling, along with frequent acceleration and
deceleration will reduce your overall distance.
PLEASE NOTICE
Speed and weight limits are set for your own safety.
Please do not exceed the limits listed in the User Manual.

11
8. BATTERY INFORMATION AND SPECIFICATIONS
This section is intended to provide you basic information about your battery
and charger. Please read this section carefully to ensure you.
For user safety and to prolong the life of your battery, as well as improve
battery performance, please follow these instructions.
When the battery indicator shows lowbattery capacity, please charge
your battery 5 hours utilizing the charger that you received in your scooter
package. To fully recharge your battery please follow the instructions under
charging your scooter.
Battery Lithium Battery
6 months
-20 ℃- 25 ℃
5 % -95 %
0 ℃- 40 ℃
-15 ℃- 40 ℃
5 hours
36 V
Charging time
Voltage
Initial Capacity
Working Temperature
Charging Temperature
Storage Time
Storage Temperature
Storage Humidity
7500 mAh
8.1 Battery Specifications
8.2 BATTERY WARING
Failure to follow the Safety Precautions listed in the Battery Warning could
lead to serious bodily injury and death. Seek immediate medical attention
if you are exposed to any substance that is emitted from the battery.
• Do not attempt to modify, change, or replace your battery.
• Do not use your scooter if the battery begins to emit odor, overheats, or
begins to leak.
• Do not touch any leaking materials, or breathe fumes emitted.
• Do not allow children and animals to touch the battery.
• The battery contains dangerous substances, do not open the battery, or
insert anything into the battery.
• Please only use the charger provided by scooter.
• Do not attempt to charge the scooter if the battery has discharged or
emitted any substances. In that case, the battery should be abandoned
for safety.
• Please follow all local, state and federal laws in regards to recycling,
handling and disposing of Lithium Ion batteries.
• The scooter should only be shipped in its original packaging.
• Do not throw away your box as you need you scooter packaging for
future use.

9. CHARGING YOUR SCOOTER
Step 1: Ensure that the charging port is clean and dry.
Step 2: Plug the charger into the power socket, then connect the cable
with the power supply (100V~240V; 50,60Hz), make sure the
light on the charger is lit GREEN.
Step 3: Male DC connector plug into the charging port ofthe scooter. The
indicator light on the charger should change to RED, indicating
that your scooter is now, being charged. When the RED indicator
light on your charger turns to GREEN then your scooter is fully
charged. A full charge typically occurs within 5 hours.
Step 4: Please unplug the charger from your scooter and from the power
outlet.
12
IMPORTANT NOTES ABOUT CHARGING
NOTE
Only the indicator light on the charger will tell you the status of the
battery during charging.
If the green light on your charger does not turn RED when you plug it
tinto your scooter, it could mean you have to check the cables to
ensure you have a proper connection; or that your scooter is already
fully chaged. Push and hold your power button next to the charging
port to check the status of your battery in the display.
• Do not overcharge, as this will affect the life of the battery.
• The best charging temperatures are between 0°~40°. Extreme cold
and extreme heat will prevent your battery from charging fully.
• Make sure to unplug your charger before standing on or operating
you scooter, as this can be very dangerous.
• Use only the scooter charger that you received in your box.

13
11. INSPECTION, MAINTENANCE, AND STORAGE
10. SCOOTER SPECIFICATIONS
Your scooter requires routine inspection and maintenance.This chapter
escribes maintenance steps and important operating tips.Before you perform
the following operations, ensure the power and charging cable is disconnected.
Inspecting and Cleaning your scooter
Disconnect the charger and turn off your scooter.
Routinely check the body of the scooter and tires for damage or excessive wear.
Avoid using water or other liquids and cleaners on the scooter for cleaning.Wet
a clean cloth with clean soapy water, rinse the cloth thoroughly, and wipe the
body of the scooter making sure that water does not get into the power button,
charging port, the foot mats, or tires.
Storing your scooter
Fully charge your battery before storing.
If you are storing your scooter for an extended period of time, please fully
charge your scooter at least once every three month.
If the ambient temperature of the storage location is below 0°, please do not
charge.You must bring the scooter into a warmer environment before charging.
Check under Battery Information and Specifications for more details.
To prevent dust from getting into your scooter, try wrapping it or sealing it with
its original packaging.
Store your scooter indoors, in a dry and suitable temperature.
• Net Weight: 11.9 kg
• Load: 120 kg
• Max. Speed Limit: 10km/h , 20km/h , 25 km/h
• Range: 17-22 km
• Max. Climbing Limit: 20 degree
• Battery: Lithium-ion, 7.5 Ah, 36 V
• Charging time: 5 hours
• Power Requirement: AC 100-240V / 50-60Hz
• Size (fold): 1046 x 430 x 480 mm
• Size (unfold): 1046 x 430 x 1180 mm
• Tire: Front air tyre, back motor is solid tyre.
NOTE
Users who disassemble the scooter will forfeit their right of warranty.

Thank you for the purchase of your new scooter, and thank for taking the time to read the User Manual.We hope that the information that
you obtained from this manual will help you safely operate,maintain and enjoy your scooter for years to come.We appreciate your
consideration and sincerely hope you enjoy and share your scooter experience with all of your friends, family members, and loved ones.
Thank you and welcome to the scooter movement!
Enjoy your scooter!
Merci d'avoir acheté notre produit. Pour des performances et une sécurité optimale,
veuillez lire attentivement ces instructions avant d’utiliser le produit.
Veuillez garder ce manuel pour référence future.
Lisez les informations fournies par le fabricant.
Portez un équipement de protection individuelle.
MANUEL D’UTILISATION
EN14619 Class A

1. INFORMATIONS GÉNÉRALES
2. PRÉSENTATION DU PRODUIT
2.1 Informations générales
2.2 Ce que vous devez savoir
3. DESCRIPTION DU PRODUIT
3.1 Assembler la roue avant
3.2 Comment déplier
3.3 Comment assembler
3.4 Comment plier
4. COMMENT CONDUIRE
4.1 Comment conduire
4.2 Description de l'écran LCD
4.3 Description du phare
4.4 Description du feu arrière
5. CONSIGNES DE SECURITE DU SCOOTER
6. LIMITES DE POIDS ET DE VITESSE
6.1 Limites de poids
6.2 Limites de vitesse
7. PLAGE DE FONCTIONNEMENT
8. INFORMATIONS SUR LA BATTERIE ET SPÉCIFICATIONS
8.1 Spécifications de la batterie
8.2 AVERTISSEMENT DE LA BATTERIE
9. Recharger votre scooter
10. INSPECTION, MAINTENANCE ET STOCKAGE
11. SPÉCIFICATIONS DU SCOOTER
----------------------------------------01
----------------------------------------02
--------------------------------------------------02
------------------------------------------------02
-------------------------------------------02
-------------------------------------------------02
-----------------------------------------------------------03
------------------------------------------------------04
--------------------------------------------------------------04
---------------------------------------------------05
-------------------------------------------------------05
----------------------------------------------07
----------------------------------------------------08
-----------------------------------------------08
------------------------09
------------------------------------10
---------------------------------------------------------------10
--------------------------------------------------------------10
-----------------------------------------10
--11
------------------------------------------------11
------------------------------------------11
----------------------------------------------------12
-----------------13
--------------------------------------13
CATALOGUE

1. INFORMATIONS GÉNÉRALES
01
Roue avant
Moteur
Béquille
Port de charge
Deck
Frein arrière Feu arrière
Trou de crochet
Poignée
Boucle de verrouillage
Longue perche
Lampe LED
Clé pliante
Accélérateur
Écran LCD
Frein électrique
Folding Hook

2. PRÉSENTATION DU PRODUIT 3. DESCRIPTION DU PRODUIT
02
2.1 Informations générales 3.1 Assembler la roue avant
2.2 Ce que vous devez savoir
Le scooter d'origine est une solution intuitive et à la pointe de la technolo-
gie. Utilisant les dernières technologies et procédés de production, chaque
scooter est soumis à des tests rigoureux en matière de qualité et de
durabilité. Avec sa conception légère et portable, sa facilité d'utilisation, sa
portée et son faible empreinte carbone.
1. Étape sur la base, soulevez fermement la fourche avant pour retirer la
base.
2. Retirez les bouchons en caoutchouc des deux côtés de la fourche avant
et dévissez l'essieu avant avec les deux clés hexagonales de 6 mm de
l'emballage.
Avant de vous familiariser avec votre scooter, veuillez lire attentivement le
MANUEL DE L’UTILISATION et apprendre les bases pour assurer votre
sécurité et celle des autres. L'alimentation sera coupée si personne ne fait
fonctionner le scooter dans cinq minutes, vous devez appuyer sur le
bouton d'alimentation avant de rouler.
ATTENTION : Si vous ne respectez pas les instructions de base et
les consignes de sécurité énumérées dans le MANUEL DE L'UTILISAT-
TION, vous risquez d'endommager votre scooter, d'autres dommages
matériels, de graves blessures, voire la mort.
Table of contents
Languages:
Other MEGAWHEELS Scooter manuals


