Meicheng CMX-12 User manual

CMX-12
HD/SD Digital AV Mixer
Operation Manual
CMX-12
http://www.meicheng.com.tw

Disclaimers
The information in this manual has been carefully checked and
is believed to be accurate. meicheng assumes no responsibility
for any infringements of patents or other rights of third
parties which may result from its use.
meicheng assumes no responsibility for any inaccuracies
that may be contained in this document. meicheng also makes no
commitment to update or to keep current the information contained
in this document.
meicheng reserves the right to make improvements to this
document and/or product at any time and without notice.
Copyright Notice
No part of this document may be reproduced, transmitted,
transcribed, stored in a retrieval system, or any of its part translated
into any language or computer file, in any form or by any means
- electronic, mechanical, magnetic, optical, chemical, manual,
or otherwise - without express written permission and consent from
meicheng.
© Copyright 2010 by meicheng.
All Rights Reserved.
Version 1.0 December 2010
Trademark Acknowledgments
All products or service names mentioned in this document may be
trademarks of the companies with which they are associated.

Safety Precautions
Please read all instructions before attempting to unpack or install or
operate this equipment, and before connecting the power supply.
Please keep the following in mind as you unpack and install this
equipment:
Always follow basic safety precautions to reduce the risk of
fire, electrical shock and injury to persons.
To prevent fire or shock hazard, do not expose the unit to rain,
moisture or install this product near water.
Never spill liquid of any kind on or into this product.
Never push an object of any kind into this product through
module openings or empty slots, as you may damage parts.
Do not attach the power supply cabling to building surfaces.
Do not allow anything to rest on the power cabling or allow it to
be abused by persons walking on it.
To protect the equipment from overheating, do not block the
slots and openings in the module housing that provide
ventilation.
Revision History
Version No Date Summary of Change
VS1 20101201 Add HDCP Description

Table of Contents
1
2
3
3
3
4
5
6
7
8
9
10
11
11
12
13
16
17
18
18
18
19
20
21
22
1. Introduction ……………………..……………………...…........….…….
2. Features …………………………………………......……........…...……
3. Major Operating Controls and Their Functions …………………..….
■ POSITION/TIME ............................................................................
■ FUNCTIONS ..................................................................................
■ MODE CONTROL ........................................................................
■ DIGITAL EFFECTS ..........................................................................
■ ADJUST .........................................................................................
■ VIDEO SOURCE SELECT ...............................................................
■ VIDEO/AUDIO MIXER ..................................................................
■ AUDIO LEVEL ...............................................................................
■ REAR PANEL .................................................................................
4. Basic Operations ………..............................……...……..............……
A Input signal selection and Back color Selection .....................
B VIDEO MIX ...................................................................................
C VIDEO WIPE ................................................................................
D Picture-In-Picture .......................................................................
E KEY ...............................................................................................
F AUTO FADE/WIPE Selection ........................................................
G DIGITAL EFFECT ..........................................................................
H AUDIO MIXER ..............................................................................
I OSD ADJUST ..................................................................................
5. Connector and Installation ..................…………..........…..…....…...
6. Specications ....................................................................................
7. Acronyms ……………...……........……............................................…

1. Introduction
This high definition HD/SD digital AV Mixer.
Each input BUS supports 6 inputs (2 x HDMI,
2 x Component, 2 x S-Video and Composite
video) and also Background Color for special
efficiancy. The output supports 1 x HDMI, 2
x Component, 2 x S-Video and Composite
video, it also supports position adjustment and
recording.
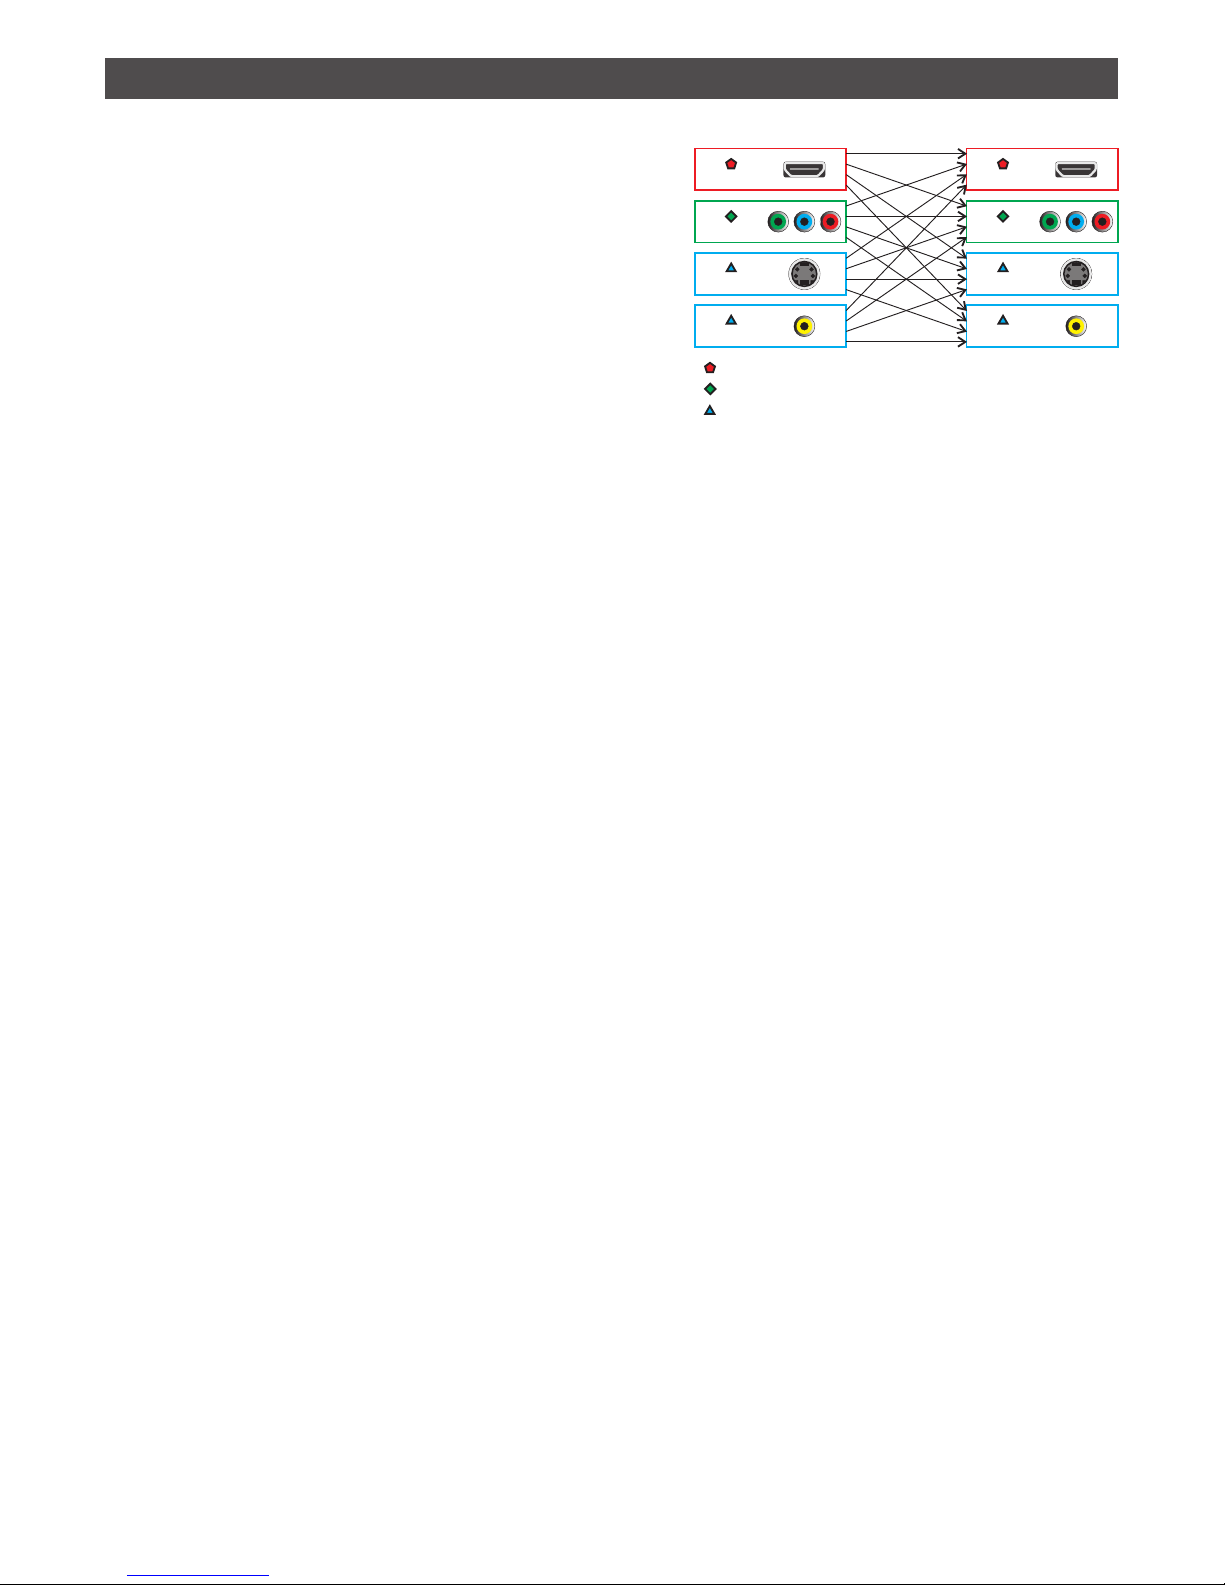
The output supports HD/SD resolution for
example, NTSC, NTSC-4.43, PAL, PAL-M, PAN-N,
SECAM, 480p, 576p, 720p 50/60, 1080i 50/60.
The output resolution can auto adjust to
consistency resolution, please refer to the
diagram on the right side.
Component
S-Video
Composite
HDMI
Component
S-Video
Composite
HDMI
Input Output
Digital video--480i,576i,480p,576p,720p50,720p60,1080i50,1080i60
Analog video--NTSC,NTSC4.43,PAL,PAL-M,PAL-N,SECAM
Analog video--480i,576i,480p,576p,720p50,720p60,1080i50,1080i60
1

2. Features
Selective size and position for digital effects area and PIP windows.
Automatic fade and wipe with speed preset control.
Digital effects- Still,Mosaic,Paint,Negative.
96 wipe patterns.
Chroma key & Luminance key.
High Picture Quality.
3x8 back color.
Joystick control for digital effect position.
Fade control for Video and Audio.
Video and Audio mixing.
Two HDMI source inputs.
Two Component source inputs.
Two Composite and S-Video source inputs.
One HDMI recording outputs.
Two Component recording outputs.
One Composite and S-Video recording outputs.
One Composite and S-Video preview outputs(OSD).
Auxiliary audio input.
Microphone input and headphone output.
Picture in Picture control.(3 window sizes)
Each A/B BUS can adjust the Contrast / Brightness / Color / HUE / Detail &
Aspect Ration.
Supports Lip-Sync delay up to 170ms.
Composite supports 3D comb filter and YC separation.
Motion and Edge Adaptive De-interlacing.
Note: When receiving content that has HDCP encryption there will be no
video output except for HDMI output port.
2

3. Major Operating Controls and Their Functions
n
POSITION/TIME
AUDIO FOLLOW
AUTO / WIPE
START
ON
-15
L
AUDIO
LEVEL R
DB
DB
-10 -5 -3 +3 +4+20 +1-1
-15 -10 -5 -3 +3 +4+20 +1-1
INPUT A
MAX
MIN
INPUT B
MAX
MIN
AUX
MAX
MIN
MIC
MAX
MIN
VIDEO
MAX
MIN
VIDEO/AUDIO MIXERVIDEO SOURCE SELECT
BACK
COLOR
SD INPUT 2SD INPUT 1HD INPUT 2HD INPUT 1HDMI 2HDMI 1
DIGITAL EFFECTS ADJUSTFUNCTIONS MODE CONTROL
KEYMIX1/41/31/2
PIP
COLOR
WIPE
EDGE
MULTIREVERSEONE-WAY
B-KEY 1/2L-KEY 1/2
1/2 1/3 1/4
A SOURCE B SOURCE
STILL
TIME
POSITION
MIN MAX
CMX-12
VIDEO EFFECTS MIXER
DEMO
ADJUST
SCAN
NEGATIVEPAINT MOSAIC
B
A
A
B
ON
Time Control
For adjusting the transition time of Auto Fade function and Auto take function.
Joystick control
This joystick control has two functions controls the position of the Square wipe
pattern and P-IN-P picture.
n
FUNCTIONS
AUDIO FOLLOW
AUTO / WIPE
START
ON
-15
L
AUDIO
LEVEL R
DB
DB
-10 -5 -3 +3 +4+20 +1-1
-15 -10 -5 -3 +3 +4+20 +1-1
INPUT A
MAX
MIN
INPUT B
MAX
MIN
AUX
MAX
MIN
MIC
MAX
MIN
VIDEO
MAX
MIN
VIDEO/AUDIO MIXERVIDEO SOURCE SELECT
BACK
COLOR
SD INPUT 2SD INPUT 1HD INPUT 2HD INPUT 1HDMI 2HDMI 1
DIGITAL EFFECTS ADJUSTFUNCTIONS MODE CONTROL
KEYMIX1/41/31/2
PIP
COLOR
WIPE
EDGE
MULTIREVERSEONE-WAY
B-KEY 1/2L-KEY 1/2
1/2 1/3 1/4
A SOURCE B SOURCE
STILL
TIME
POSITION
MIN MAX
CMX-12
VIDEO EFFECTS MIXER
DEMO
ADJUST
SCAN
NEGATIVEPAINT MOSAIC
B
A
A
B
ON
AUDIO FOLLOW
AUTO / WIPE
START
ON
-15
L
AUDIO
LEVEL R
DB
DB
-10 -5 -3 +3 +4+20 +1-1
-15 -10 -5 -3 +3 +4+20 +1-1
INPUT A
MAX
MIN
INPUT B
MAX
MIN
AUX
MAX
MIN
MIC
MAX
MIN
VIDEO
MAX
MIN
VIDEO/AUDIO MIXERVIDEO SOURCE SELECT
BACK
COLOR
SD INPUT 2SD INPUT 1HD INPUT 2HD INPUT 1HDMI 2HDMI 1
DIGITAL EFFECTS ADJUST
FUNCTIONS
MODE CONTROL
KEYMIX
1/41/31/2
PIP
COLOR
WIPE
EDGE
MULTIREVERSEONE-WAY
B-KEY 1/2L-KEY 1/2
1/2 1/3 1/4
A SOURCE B SOURCE
STILL
TIME
POSITION
MIN MAX
CMX-12
VIDEO EFFECTS MIXER
DEMO
ADJUST
SCAN
NEGATIVEPAINT MOSAIC
B
A
A
B
ON
1) 1!
One-way wipe button.
Reverse wipe button.
Multiple wipe button.
Straight wipe button.
Split wipe button.
Corner wipe button.
Diagonal wipe button.
Triangle wipe button.
Square wipe button.
3

n
MODE CONTROL
AUDIO FOLLOW
AUTO / WIPE
START
ON
-15
L
AUDIO
LEVEL R
DB
DB
-10 -5 -3 +3 +4+20 +1-1
-15 -10 -5 -3 +3 +4+20 +1-1
INPUT A
MAX
MIN
INPUT B
MAX
MIN
AUX
MAX
MIN
MIC
MAX
MIN
VIDEO
MAX
MIN
VIDEO/AUDIO MIXERVIDEO SOURCE SELECT
BACK
COLOR
SD INPUT 2SD INPUT 1HD INPUT 2HD INPUT 1HDMI 2HDMI 1
DIGITAL EFFECTS ADJUSTFUNCTIONS MODE CONTROL
KEYMIX1/41/31/2
PIP
COLOR
WIPE
EDGE
MULTIREVERSEONE-WAY
B-KEY 1/2L-KEY 1/2
1/2 1/3 1/4
A SOURCE B SOURCE
STILL
TIME
POSITION
MIN MAX
CMX-12
VIDEO EFFECTS MIXER
DEMO
ADJUST
SCAN
NEGATIVEPAINT MOSAIC
B
A
A
B
ON
AUDIO FOLLOW
AUTO / WIPE
START
ON
-15
L
AUDIO
LEVEL R
DB
DB
-10 -5 -3 +3 +4+20 +1-1
-15 -10 -5 -3 +3 +4+20 +1-1
INPUT A
MAX
MIN
INPUT B
MAX
MIN
AUX
MAX
MIN
MIC
MAX
MIN
VIDEO
MAX
MIN
VIDEO/AUDIO MIXERVIDEO SOURCE SELECT
BACK
COLOR
SD INPUT 2SD INPUT 1HD INPUT 2HD INPUT 1HDMI 2HDMI 1
DIGITAL EFFECTS ADJUSTFUNCTIONS
MODE CONTROL
KEYMIX
1/41/31/2
PIP
COLOR
WIPE
EDGE
MULTIREVERSEONE-WAY
B-KEY 1/2L-KEY 1/2
1/2 1/3 1/4
A SOURCE B SOURCE
STILL
TIME
POSITION
MIN MAX
CMX-12
VIDEO EFFECTS MIXER
DEMO
ADJUST
SCAN
NEGATIVEPAINT MOSAIC
B
A
A
B
ON
1@ 1#
1$ 1%
1^ 1&
Wipe button
For selecting the wipe effect.
PIP button
Picture in picture mode can be selected by pressing this button.
Mix(Fade) button
Press this button to select the fade In/Out mode.
KEY button
This button allows you to tune in a best performance point for the blue key
and luma key effects.
EDGE button
Press WIPE button, can select sharp edge / soft edge or color edge.
COLOR button
Press color edge, can select eight different color of frame.
4

n
DIGITAL EFFECTS
AUDIO FOLLOW
AUTO / WIPE
START
ON
-15
L
AUDIO
LEVEL R
DB
DB
-10 -5 -3 +3 +4+20 +1-1
-15 -10 -5 -3 +3 +4+20 +1-1
INPUT A
MAX
MIN
INPUT B
MAX
MIN
AUX
MAX
MIN
MIC
MAX
MIN
VIDEO
MAX
MIN
VIDEO/AUDIO MIXERVIDEO SOURCE SELECT
BACK
COLOR
SD INPUT 2SD INPUT 1HD INPUT 2HD INPUT 1HDMI 2HDMI 1
DIGITAL EFFECTS ADJUSTFUNCTIONS MODE CONTROL
KEYMIX1/41/31/2
PIP
COLOR
WIPE
EDGE
MULTIREVERSEONE-WAY
B-KEY 1/2L-KEY 1/2
1/2 1/3 1/4
A SOURCE B SOURCE
STILL
TIME
POSITION
MIN MAX
CMX-12
VIDEO EFFECTS MIXER
DEMO
ADJUST
SCAN
NEGATIVEPAINT MOSAIC
B
A
A
B
ON
AUDIO FOLLOW
AUTO / WIPE
START
ON
-15
L
AUDIO
LEVEL R
DB
DB
-10 -5 -3 +3 +4+20 +1-1
-15 -10 -5 -3 +3 +4+20 +1-1
INPUT A
MAX
MIN
INPUT B
MAX
MIN
AUX
MAX
MIN
MIC
MAX
MIN
VIDEO
MAX
MIN
VIDEO/AUDIO MIXERVIDEO SOURCE SELECT
BACK
COLOR
SD INPUT 2SD INPUT 1HD INPUT 2HD INPUT 1HDMI 2HDMI 1
DIGITAL EFFECTS
ADJUSTFUNCTIONS MODE CONTROL
KEYMIX1/41/31/2
PIP
COLOR
WIPE
EDGE
MULTIREVERSEONE-WAY
B-KEY 1/2L-KEY 1/2
1/2 1/3 1/4
A SOURCE B SOURCE
STILL
TIME
POSITION
MIN MAX
CMX-12
VIDEO EFFECTS MIXER
DEMO
ADJUST
SCAN
NEGATIVEPAINT MOSAIC
B
A
A
B
ON
* ( 2) 2! 2@
2# 2$ 2% 2^ 2&
A-bus digital effect ON button.
A-bus Still button and osd left adjust.
A-bus Paint button and osd right adjust.
2A-bus Negative button and osd up adjust.
2@A-bus Mosaic button and osd down adjust.
2#B-bus digital effect ON button.
2$B-bus Still button.
2%B-bus Paint button.
2^B-bus Negative button.
2&B-bus Mosaic button.
5

n
ADJUST
AUDIO FOLLOW
AUTO / WIPE
START
ON
-15
L
AUDIO
LEVEL R
DB
DB
-10 -5 -3 +3 +4+20 +1-1
-15 -10 -5 -3 +3 +4+20 +1-1
INPUT A
MAX
MIN
INPUT B
MAX
MIN
AUX
MAX
MIN
MIC
MAX
MIN
VIDEO
MAX
MIN
VIDEO/AUDIO MIXERVIDEO SOURCE SELECT
BACK
COLOR
SD INPUT 2SD INPUT 1HD INPUT 2HD INPUT 1HDMI 2HDMI 1
DIGITAL EFFECTS ADJUSTFUNCTIONS MODE CONTROL
KEYMIX1/41/31/2
PIP
COLOR
WIPE
EDGE
MULTIREVERSEONE-WAY
B-KEY 1/2L-KEY 1/2
1/2 1/3 1/4
A SOURCE B SOURCE
STILL
TIME
POSITION
MIN MAX
CMX-12
VIDEO EFFECTS MIXER
DEMO
ADJUST
SCAN
NEGATIVEPAINT MOSAIC
B
A
A
B
ON
AUDIO FOLLOW
AUTO / WIPE
START
ON
-15
L
AUDIO
LEVEL R
DB
DB
-10 -5 -3 +3 +4+20 +1-1
-15 -10 -5 -3 +3 +4+20 +1-1
INPUT A
MAX
MIN
INPUT B
MAX
MIN
AUX
MAX
MIN
MIC
MAX
MIN
VIDEO
MAX
MIN
VIDEO/AUDIO MIXERVIDEO SOURCE SELECT
BACK
COLOR
SD INPUT 2SD INPUT 1HD INPUT 2HD INPUT 1HDMI 2HDMI 1
DIGITAL EFFECTS
ADJUST
FUNCTIONS MODE CONTROL
KEYMIX1/41/31/2
PIP
COLOR
WIPE
EDGE
MULTIREVERSEONE-WAY
B-KEY 1/2L-KEY 1/2
1/2 1/3 1/4
A SOURCE B SOURCE
STILL
TIME
POSITION
MIN MAX
CMX-12
VIDEO EFFECTS MIXER
DEMO
ADJUST
SCAN
NEGATIVEPAINT MOSAIC
B
A
A
B
ON
2*
2(
3)
2Adjust button
When LED switched off, the SDP review output side will show AB-bus / output
source and output format. When LED illuminate, the suer can press 19 20 21
and 22 buttons to adjust the values.
2(DEMO button
When LED illuminate, the auto DEMO will switch to ON and the system will auto
sequence Demo 96 wipe patterns, press 1 TIME button to adjust the auto
sequence.
3)SCAN button
Press SCAN button for 3 seconds, the system will enter into SCAN function and
will SCAN the input ports from 1 to 6 and record each port's format to the
system.
6

n
VIDEO SOURCE SELECT
AUDIO FOLLOW
AUTO / WIPE
START
ON
-15
L
AUDIO
LEVEL R
DB
DB
-10 -5 -3 +3 +4+20 +1-1
-15 -10 -5 -3 +3 +4+20 +1-1
INPUT A
MAX
MIN
INPUT B
MAX
MIN
AUX
MAX
MIN
MIC
MAX
MIN
VIDEO
MAX
MIN
VIDEO/AUDIO MIXERVIDEO SOURCE SELECT
BACK
COLOR
SD INPUT 2SD INPUT 1HD INPUT 2HD INPUT 1HDMI 2HDMI 1
DIGITAL EFFECTS ADJUSTFUNCTIONS MODE CONTROL
KEYMIX1/41/31/2
PIP
COLOR
WIPE
EDGE
MULTIREVERSEONE-WAY
B-KEY 1/2L-KEY 1/2
1/2 1/3 1/4
A SOURCE B SOURCE
STILL
TIME
POSITION
MIN MAX
CMX-12
VIDEO EFFECTS MIXER
DEMO
ADJUST
SCAN
NEGATIVEPAINT MOSAIC
B
A
A
B
ON
AUDIO FOLLOW
AUTO / WIPE
START
ON
-15
L
AUDIO
LEVEL R
DB
DB
-10 -5 -3 +3 +4+20 +1-1
-15 -10 -5 -3 +3 +4+20 +1-1
INPUT A
MAX
MIN
INPUT B
MAX
MIN
AUX
MAX
MIN
MIC
MAX
MIN
VIDEO
MAX
MIN
VIDEO/AUDIO MIXER
VIDEO SOURCE SELECT
BACK
COLOR
SD INPUT 2SD INPUT 1HD INPUT 2HD INPUT 1HDMI 2HDMI 1
DIGITAL EFFECTS ADJUSTFUNCTIONS MODE CONTROL
KEYMIX1/41/31/2
PIP
COLOR
WIPE
EDGE
MULTIREVERSEONE-WAY
B-KEY 1/2L-KEY 1/2
1/2 1/3 1/4
A SOURCE B SOURCE
STILL
TIME
POSITION
MIN MAX
CMX-12
VIDEO EFFECTS MIXER
DEMO
ADJUST
SCAN
NEGATIVEPAINT MOSAIC
B
A
A
B
ON
3*
3!
3(
3@
4)
3#
4!
3$
4@
3%
4#
3^
4$
3&
3!3*Used to select Source1,HDMI1.
3@3( Used to select Source2,HDMI2.
3#4) Used to select Source3,HD input 1.
3$4! Used to select Source4,HD input 2.
3%4@ Used to select Source5,SD input 1. When connecting both S-Video and CV
at the same the time S-Video will be the first priority source to be display.
3^4# Used to select Source5,SD input 2. When connecting both S-Video and
Video at the same the time S-Video will be the first priority source to be
display.
3& A-bus back color select, can select one out of eight colors.
4$ B-bus back color select, can select one out of eight colors.
7

n
VIDEO/AUDIO MIXER
AUDIO FOLLOW
AUTO / WIPE
START
ON
-15
L
AUDIO
LEVEL R
DB
DB
-10 -5 -3 +3 +4+20 +1-1
-15 -10 -5 -3 +3 +4+20 +1-1
INPUT A
MAX
MIN
INPUT B
MAX
MIN
AUX
MAX
MIN
MIC
MAX
MIN
VIDEO
MAX
MIN
VIDEO/AUDIO MIXERVIDEO SOURCE SELECT
BACK
COLOR
SD INPUT 2SD INPUT 1HD INPUT 2HD INPUT 1HDMI 2HDMI 1
DIGITAL EFFECTS ADJUSTFUNCTIONS MODE CONTROL
KEYMIX1/41/31/2
PIP
COLOR
WIPE
EDGE
MULTIREVERSEONE-WAY
B-KEY 1/2L-KEY 1/2
1/2 1/3 1/4
A SOURCE B SOURCE
STILL
TIME
POSITION
MIN MAX
CMX-12
VIDEO EFFECTS MIXER
DEMO
ADJUST
SCAN
NEGATIVEPAINT MOSAIC
B
A
A
B
ON
AUDIO FOLLOW
AUTO / WIPE
START
ON
-15
L
AUDIO
LEVEL R
DB
DB
-10 -5 -3 +3 +4+20 +1-1
-15 -10 -5 -3 +3 +4+20 +1-1
INPUT A
MAX
MIN
INPUT B
MAX
MIN
AUX
MAX
MIN
MIC
MAX
MIN
VIDEO
MAX
MIN
VIDEO/AUDIO MIXER
VIDEO SOURCE SELECT
BACK
COLOR
SD INPUT 2SD INPUT 1HD INPUT 2HD INPUT 1HDMI 2HDMI 1
DIGITAL EFFECTS ADJUSTFUNCTIONS MODE CONTROL
KEYMIX1/41/31/2
PIP
COLOR
WIPE
EDGE
MULTIREVERSEONE-WAY
B-KEY 1/2L-KEY 1/2
1/2 1/3 1/4
A SOURCE B SOURCE
STILL
TIME
POSITION
MIN MAX
CMX-12
VIDEO EFFECTS MIXER
DEMO
ADJUST
SCAN
NEGATIVEPAINT MOSAIC
B
A
A
B
ON
4%
4^
4&
5$5#5@5!
4(
5)
4*
4%A-bus LED indicator.
4^B-bus LED indicator.
When VIDEO slider move to A-bus the A-bus's LED will illuminate and move the
slider to B-bus the B-bus's LED will illuminate. When slider move in between A-bus
and B-bus the two LED will alternate illuminatd. When in Auto/Wipe the status
will be the same condition.
4&VIDEO slide.
Wipe, PIP and Key effects could be controlled by this Video slide which moves
A/B bus outputs horizontally or vertically.
4*AUDIO FOLLOW.
When turn on the Audio Follow A/B bus's sound indicator will follow the
VIDEO slider movement. When turn off the Audio Follow, the audio indicator
will become independent to adjust from 5! and 5@.
4(AUTO/WIPE.
AUTO FADE/WIPE can be performed with START 5) button when the button
4( is set to ON.
5)START button.
Automatic MIX and WIPE operation can be performed by pressing the START
button. Transition time can be adjusted via TIME . When transition time
lapsed, the LED goes off.
5!INPUT A:Controls the audio level of the input A.
5@INPUT B:Controls the audio level of the input B.
5#AUX:Controls the audio level of the Auxiliary input.
5$MIC:Controls the audio level of the Microphone input.
8

n
AUDIO LEVEL
5%
AUDIO FOLLOW
AUTO / WIPE
START
ON
-15
L
AUDIO
LEVEL R
DB
DB
-10 -5 -3 +3 +4+20 +1-1
-15 -10 -5 -3 +3 +4+20 +1-1
INPUT A
MAX
MIN
INPUT B
MAX
MIN
AUX
MAX
MIN
MIC
MAX
MIN
VIDEO
MAX
MIN
VIDEO/AUDIO MIXERVIDEO SOURCE SELECT
BACK
COLOR
SD INPUT 2SD INPUT 1HD INPUT 2HD INPUT 1HDMI 2HDMI 1
DIGITAL EFFECTS ADJUSTFUNCTIONS MODE CONTROL
KEYMIX1/41/31/2
PIP
COLOR
WIPE
EDGE
MULTIREVERSEONE-WAY
B-KEY 1/2L-KEY 1/2
1/2 1/3 1/4
A SOURCE B SOURCE
STILL
TIME
POSITION
MIN MAX
CMX-12
VIDEO EFFECTS MIXER
DEMO
ADJUST
SCAN
NEGATIVEPAINT MOSAIC
B
A
A
B
ON
AUDIO FOLLOW
AUTO / WIPE
START
ON
-15
L
AUDIO
LEVEL R
DB
DB
-10 -5 -3 +3 +4+20 +1-1
-15 -10 -5 -3 +3 +4+20 +1-1
INPUT A
MAX
MIN
INPUT B
MAX
MIN
AUX
MAX
MIN
MIC
MAX
MIN
VIDEO
MAX
MIN
VIDEO/AUDIO MIXERVIDEO SOURCE SELECT
BACK
COLOR
SD INPUT 2SD INPUT 1HD INPUT 2HD INPUT 1HDMI 2HDMI 1
DIGITAL EFFECTS ADJUSTFUNCTIONS MODE CONTROL
KEYMIX1/41/31/2
PIP
COLOR
WIPE
EDGE
MULTIREVERSEONE-WAY
B-KEY 1/2L-KEY 1/2
1/2 1/3 1/4
A SOURCE B SOURCE
STILL
TIME
POSITION
MIN MAX
CMX-12
VIDEO EFFECTS MIXER
DEMO
ADJUST
SCAN
NEGATIVEPAINT MOSAIC
B
A
A
B
ON
5%Audio level indicator.(Audio level)
This indicator shows the audio output level of REC out 1 and REC out 2.
9

n
REAR PANEL
DC INPUT
12V 3.0A
R1 R1R2 R2 R R1L1 L1L2 L2 L L1 L2
Pr
Pb V S
V S
Y
R2
V SPr
Pb
Y
V SPr
Pb
Y
HDMI 1 HDMI 2
Pr
Pb
Y
AUX INPUT
SD INPUT 1
SD INPUT 2
SD AUDIO INPUTHD AUDIO INPUT
HD OUTPUT 1
HD OUTPUT 2
HD INPUT 1
HD INPUT 2
AUDIO OUTPUT
SD OUTPUT
SD PREVIEW
HDMI OUTPUTHDMI INPUT
5* 5( 6) 6! 6@ 6# 6$
6% 6^ 7! 7^6* 7#7) 7%6& 7@6( 7$
5*Source 3 HD audio input 1.
5(Source 4 HD audio input 2.
6)Source 5 SD audio input 1.
6!Source 6 SD audio input 2.
6@Auxiliary Audio input Jack.
6#Recording out 1 Audio output Jack.
6$Recording out 2 Audio output Jack.
6%Source 1 HDMI input 1.
6^Source 2 HDMI input 2.
6&Source 3 HD Y-PB-PR Video input 1.
6*Source 4 HD Y-PB-PR Video input 2.
6(Source 5 SD Video and YC input 1.
7)Source 6 SD Video and YC input 2.
7!HDMI output for monitor.
7@Recording out 1 HD Y-PB-PR Video output jack.
7#Recording out 2 HD Y-PB-PR Video output jack.
7$SD PREVIEW out(OSD) Video and YC output jack.
7%SD Recording out Video and YC output jack.
7^DC INPUT 12V 2.0A.
10

4. Basic Operations
Press the power switch on the rear panel to the ON Position. The LED's on the
operation panel light up and the unit is now in inital mode for operation.
AUDIO FOLLOW
AUTO / WIPE
START
ON
-15
L
AUDIO
LEVEL R
DB
DB
-10 -5 -3 +3 +4+20 +1-1
-15 -10 -5 -3 +3 +4+20 +1-1
INPUT A
MAX
MIN
INPUT B
MAX
MIN
AUX
MAX
MIN
MIC
MAX
MIN
VIDEO
MAX
MIN
VIDEO/AUDIO MIXERVIDEO SOURCE SELECT
BACK
COLOR
SD INPUT 2SD INPUT 1HD INPUT 2HD INPUT 1HDMI 2HDMI 1
DIGITAL EFFECTS ADJUSTFUNCTIONS MODE CONTROL
KEYMIX1/41/31/2
PIP
COLOR
WIPE
EDGE
MULTIREVERSEONE-WAY
B-KEY 1/2L-KEY 1/2
1/2 1/3 1/4
A SOURCE B SOURCE
STILL
TIME
POSITION
MIN MAX
CMX-12
VIDEO EFFECTS MIXER
DEMO
ADJUST
SCAN
NEGATIVEPAINT MOSAIC
B
A
A
B
ON
A.Input signal selection and Back color Selection
1. Slide the Video slide 4& to the A-bus position.
A-bus LED 4% will illuminate, B-bus LED will turn off.
2. Press any of the Source 1 to Source 6 and Back color button.
You will see the corresponding picture on the screen.
3. Press a Back Color button to select the back color you need.
Any of the 8 Back Colors-BlueRedMagentaGreenCyanYellowWhiteBlack.
can be selected by reapeatedly pressing the Back color selection button
3&.
4. The same procedures apply to the B-bus.
* When the selected input source is not connected with source input or
HDCP protection, the image will show with Blue screen.
11

AUDIO FOLLOW
AUTO / WIPE
START
ON
-15
L
AUDIO
LEVEL R
DB
DB
-10 -5 -3 +3 +4+20 +1-1
-15 -10 -5 -3 +3 +4+20 +1-1
INPUT A
MAX
MIN
INPUT B
MAX
MIN
AUX
MAX
MIN
MIC
MAX
MIN
VIDEO
MAX
MIN
VIDEO/AUDIO MIXERVIDEO SOURCE SELECT
BACK
COLOR
SD INPUT 2SD INPUT 1HD INPUT 2HD INPUT 1HDMI 2HDMI 1
DIGITAL EFFECTS ADJUSTFUNCTIONS MODE CONTROL
KEYMIX1/41/31/2
PIP
COLOR
WIPE
EDGE
MULTIREVERSEONE-WAY
B-KEY 1/2L-KEY 1/2
1/2 1/3 1/4
A SOURCE B SOURCE
STILL
TIME
POSITION
MIN MAX
CMX-12
VIDEO EFFECTS MIXER
DEMO
ADJUST
SCAN
NEGATIVEPAINT MOSAIC
B
A
A
B
ON
2 4
3
1
B.VIDEO MIX
AUDIO FOLLOW
AUTO / WIPE
START
ON
-15
L
AUDIO
LEVEL R
DB
DB
-10 -5 -3 +3 +4+20 +1-1
-15 -10 -5 -3 +3 +4+20 +1-1
INPUT A
MAX
MIN
INPUT B
MAX
MIN
AUX
MAX
MIN
MIC
MAX
MIN
VIDEO
MAX
MIN
VIDEO/AUDIO MIXERVIDEO SOURCE SELECT
BACK
COLOR
SD INPUT 2SD INPUT 1HD INPUT 2HD INPUT 1HDMI 2HDMI 1
DIGITAL EFFECTS ADJUSTFUNCTIONS
MODE CONTROL
KEYMIX
1/41/31/2
PIP
COLOR
WIPE
EDGE
MULTIREVERSEONE-WAY
B-KEY 1/2L-KEY 1/2
1/2 1/3 1/4
A SOURCE B SOURCE
STILL
TIME
POSITION
MIN MAX
CMX-12
VIDEO EFFECTS MIXER
DEMO
ADJUST
SCAN
NEGATIVEPAINT MOSAIC
B
A
A
B
ON
AUDIO FOLLOW
AUTO / WIPE
START
ON
-15
L
AUDIO
LEVEL R
DB
DB
-10 -5 -3 +3 +4+20 +1-1
-15 -10 -5 -3 +3 +4+20 +1-1
INPUT A
MAX
MIN
INPUT B
MAX
MIN
AUX
MAX
MIN
MIC
MAX
MIN
VIDEO
MAX
MIN
VIDEO/AUDIO MIXERVIDEO SOURCE SELECT
BACK
COLOR
SD INPUT 2SD INPUT 1HD INPUT 2HD INPUT 1HDMI 2HDMI 1
DIGITAL EFFECTS ADJUSTFUNCTIONS MODE CONTROL
KEYMIX1/41/31/2
PIP
COLOR
WIPE
EDGE
MULTIREVERSEONE-WAY
B-KEY 1/2L-KEY 1/2
1/2 1/3 1/4
A SOURCE B SOURCE
STILL
TIME
POSITION
MIN MAX
CMX-12
VIDEO EFFECTS MIXER
DEMO
ADJUST
SCAN
NEGATIVEPAINT MOSAIC
B
A
A
B
ON
2
1
3
4
Reset the operation panel to initial mode:
1. Press the MIX button 1$.
2. Press one of the A-bus selection button.
3. Press one of the B-bus selection button.
4. Mix effect could be controlled by Video slide 4& which sliding A to B or B to A.
12

C.VIDEO WIPE
AUDIO FOLLOW
AUTO / WIPE
START
ON
-15
L
AUDIO
LEVEL R
DB
DB
-10 -5 -3 +3 +4+20 +1-1
-15 -10 -5 -3 +3 +4+20 +1-1
INPUT A
MAX
MIN
INPUT B
MAX
MIN
AUX
MAX
MIN
MIC
MAX
MIN
VIDEO
MAX
MIN
VIDEO/AUDIO MIXERVIDEO SOURCE SELECT
BACK
COLOR
SD INPUT 2SD INPUT 1HD INPUT 2HD INPUT 1HDMI 2HDMI 1
DIGITAL EFFECTS ADJUSTFUNCTIONS
MODE CONTROL
KEYMIX
1/41/31/2
PIP
COLOR
WIPE
EDGE
MULTIREVERSEONE-WAY
B-KEY 1/2L-KEY 1/2
1/2 1/3 1/4
A SOURCE B SOURCE
STILL
TIME
POSITION
MIN MAX
CMX-12
VIDEO EFFECTS MIXER
DEMO
ADJUST
SCAN
NEGATIVEPAINT MOSAIC
B
A
A
B
ON
AUDIO FOLLOW
AUTO / WIPE
START
ON
-15
L
AUDIO
LEVEL R
DB
DB
-10 -5 -3 +3 +4+20 +1-1
-15 -10 -5 -3 +3 +4+20 +1-1
INPUT A
MAX
MIN
INPUT B
MAX
MIN
AUX
MAX
MIN
MIC
MAX
MIN
VIDEO
MAX
MIN
VIDEO/AUDIO MIXERVIDEO SOURCE SELECT
BACK
COLOR
SD INPUT 2SD INPUT 1HD INPUT 2HD INPUT 1HDMI 2HDMI 1
DIGITAL EFFECTS ADJUSTFUNCTIONS MODE CONTROL
KEYMIX1/41/31/2
PIP
COLOR
WIPE
EDGE
MULTIREVERSEONE-WAY
B-KEY 1/2L-KEY 1/2
1/2 1/3 1/4
A SOURCE B SOURCE
STILL
TIME
POSITION
MIN MAX
CMX-12
VIDEO EFFECTS MIXER
DEMO
ADJUST
SCAN
NEGATIVEPAINT MOSAIC
B
A
A
B
ON
2
1
5
3
4
6
Reset the operation panel to initial mode:
1. Press the WIPE button 1@.
2. Press one of the A-bus selection button.
3. Press one of the B-bus selection button.
4. WIPE effect could be controlled by Video slide 4& which moves A/B bus
outputs Horizontally or vertically.
5. Press 1^ EDGE butten to select frame sharp edge / soft edge / color edge.
6. When frame color is "color edge, press 1& COLOR button to select one out
of eight colors to display.
13

n
WIPE PATTERN Selection:
Six wipe modes can be selected as
follows:
1. Press the straight wipe button
repeatedly, Four patterns are
available.
2. Press the corner wipe button
repeatedly, Four patterns are
available.
3. Press the diagonal wipe button
repeatedly, Four patterns are
available.
4. Press the triangle wipe button
repeatedly, Four patterns are
available.
AUDIO FOLLOW
AUTO / WIPE
START
ON
-15
L
AUDIO
LEVEL R
DB
DB
-10 -5 -3 +3 +4+20 +1-1
-15 -10 -5 -3 +3 +4+20 +1-1
INPUT A
MAX
MIN
INPUT B
MAX
MIN
AUX
MAX
MIN
MIC
MAX
MIN
VIDEO
MAX
MIN
VIDEO/AUDIO MIXERVIDEO SOURCE SELECT
BACK
COLOR
SD INPUT 2SD INPUT 1HD INPUT 2HD INPUT 1HDMI 2HDMI 1
DIGITAL EFFECTS ADJUST
FUNCTIONS
MODE CONTROL
KEYMIX
1/41/31/2
PIP
COLOR
WIPE
EDGE
MULTIREVERSEONE-WAY
B-KEY 1/2L-KEY 1/2
1/2 1/3 1/4
A SOURCE B SOURCE
STILL
TIME
POSITION
MIN MAX
CMX-12
VIDEO EFFECTS MIXER
DEMO
ADJUST
SCAN
NEGATIVEPAINT MOSAIC
B
A
A
B
ON
1) 1!
1 3 5
2 4 6
5. Press the split wipe button 1)
repeatedly, Four patterns are
available.
6. Press the square wipe button 1!
repeatedly.
Four patterns below are available.
Each pattern position in this section
could be set by joystick .
14

n
MULTIPLE PATTERN Selection:
AUDIO FOLLOW
AUTO / WIPE
START
ON
-15
L
AUDIO
LEVEL R
DB
DB
-10 -5 -3 +3 +4+20 +1-1
-15 -10 -5 -3 +3 +4+20 +1-1
INPUT A
MAX
MIN
INPUT B
MAX
MIN
AUX
MAX
MIN
MIC
MAX
MIN
VIDEO
MAX
MIN
VIDEO/AUDIO MIXERVIDEO SOURCE SELECT
BACK
COLOR
SD INPUT 2SD INPUT 1HD INPUT 2HD INPUT 1HDMI 2HDMI 1
DIGITAL EFFECTS ADJUSTFUNCTIONS
MODE CONTROL
KEYMIX
1/41/31/2
PIP
COLOR
WIPE
EDGE
MULTIREVERSEONE-WAY
B-KEY 1/2L-KEY 1/2
1/2 1/3 1/4
A SOURCE B SOURCE
STILL
TIME
POSITION
MIN MAX
CMX-12
VIDEO EFFECTS MIXER
DEMO
ADJUST
SCAN
NEGATIVEPAINT MOSAIC
B
A
A
B
ON
AUDIO FOLLOW
AUTO / WIPE
START
ON
-15
L
AUDIO
LEVEL R
DB
DB
-10 -5 -3 +3 +4+20 +1-1
-15 -10 -5 -3 +3 +4+20 +1-1
INPUT A
MAX
MIN
INPUT B
MAX
MIN
AUX
MAX
MIN
MIC
MAX
MIN
VIDEO
MAX
MIN
VIDEO/AUDIO MIXERVIDEO SOURCE SELECT
BACK
COLOR
SD INPUT 2SD INPUT 1HD INPUT 2HD INPUT 1HDMI 2HDMI 1
DIGITAL EFFECTS ADJUST
FUNCTIONS
MODE CONTROL
KEYMIX
1/41/31/2
PIP
COLOR
WIPE
EDGE
MULTIREVERSEONE-WAY
B-KEY 1/2L-KEY 1/2
1/2 1/3 1/4
A SOURCE B SOURCE
STILL
TIME
POSITION
MIN MAX
CMX-12
VIDEO EFFECTS MIXER
DEMO
ADJUST
SCAN
NEGATIVEPAINT MOSAIC
B
A
A
B
ON
AUDIO FOLLOW
AUTO / WIPE
START
ON
-15
L
AUDIO
LEVEL R
DB
DB
-10 -5 -3 +3 +4+20 +1-1
-15 -10 -5 -3 +3 +4+20 +1-1
INPUT A
MAX
MIN
INPUT B
MAX
MIN
AUX
MAX
MIN
MIC
MAX
MIN
VIDEO
MAX
MIN
VIDEO/AUDIO MIXERVIDEO SOURCE SELECT
BACK
COLOR
SD INPUT 2SD INPUT 1HD INPUT 2HD INPUT 1HDMI 2HDMI 1
DIGITAL EFFECTS ADJUSTFUNCTIONS MODE CONTROL
KEYMIX1/41/31/2
PIP
COLOR
WIPE
EDGE
MULTIREVERSEONE-WAY
B-KEY 1/2L-KEY 1/2
1/2 1/3 1/4
A SOURCE B SOURCE
STILL
TIME
POSITION
MIN MAX
CMX-12
VIDEO EFFECTS MIXER
DEMO
ADJUST
SCAN
NEGATIVEPAINT MOSAIC
B
A
A
B
ON
4
13
2
3 3
6
5
4
1. Press the wipe button 1@.
2. Press the straight wipe button for example.
3. Press the multi button repeatedly to have the desired multiplication.
Four patterns are available.
4. Press one of the A-bus selection button.
5. Press one of the B-bus selection button.
6. Operate the video slide 4&.
* The same procedures apply to other patterns.
n
ONE-WAY WIPE:
1. Press the wipe button 1@.
2. Press the straight wipe button for example.
3. Press the one-way button.
4. Press one of the A-bus selection button.
5. Press one of the B-bus selection button.
6. Operate the video slide 4&.
n
REVERSE WIPE:
1. Press the wipe button 1@.
2. Press the straight wipe button for example.
3. Press the Reverse button.
4. Press one of the A-bus selection button.
5. Press one of the B-bus selection button.
6. Operate the video slide 4&.
A bus B bus
* The wipe scene moves
the same way every time
the control is operated.
A bus B bus
* The wipe scene moves
the reverse direction
every time the control is
operated.
15

D.Picture-In-Picture
AUDIO FOLLOW
AUTO / WIPE
START
ON
-15
L
AUDIO
LEVEL R
DB
DB
-10 -5 -3 +3 +4+20 +1-1
-15 -10 -5 -3 +3 +4+20 +1-1
INPUT A
MAX
MIN
INPUT B
MAX
MIN
AUX
MAX
MIN
MIC
MAX
MIN
VIDEO
MAX
MIN
VIDEO/AUDIO MIXERVIDEO SOURCE SELECT
BACK
COLOR
SD INPUT 2SD INPUT 1HD INPUT 2HD INPUT 1HDMI 2HDMI 1
DIGITAL EFFECTS ADJUST
FUNCTIONS
MODE CONTROL
KEYMIX
1/41/31/2
PIP
COLOR
WIPE
EDGE
MULTIREVERSEONE-WAY
B-KEY 1/2L-KEY 1/2
1/2 1/3 1/4
A SOURCE B SOURCE
STILL
TIME
POSITION
MIN MAX
CMX-12
VIDEO EFFECTS MIXER
DEMO
ADJUST
SCAN
NEGATIVEPAINT MOSAIC
B
A
A
B
ON
5
AUDIO FOLLOW
AUTO / WIPE
START
ON
-15
L
AUDIO
LEVEL R
DB
DB
-10 -5 -3 +3 +4+20 +1-1
-15 -10 -5 -3 +3 +4+20 +1-1
INPUT A
MAX
MIN
INPUT B
MAX
MIN
AUX
MAX
MIN
MIC
MAX
MIN
VIDEO
MAX
MIN
VIDEO/AUDIO MIXERVIDEO SOURCE SELECT
BACK
COLOR
SD INPUT 2SD INPUT 1HD INPUT 2HD INPUT 1HDMI 2HDMI 1
DIGITAL EFFECTS ADJUSTFUNCTIONS
MODE CONTROL
KEYMIX
1/41/31/2
PIP
COLOR
WIPE
EDGE
MULTIREVERSEONE-WAY
B-KEY 1/2L-KEY 1/2
1/2 1/3 1/4
A SOURCE B SOURCE
STILL
TIME
POSITION
MIN MAX
CMX-12
VIDEO EFFECTS MIXER
DEMO
ADJUST
SCAN
NEGATIVEPAINT MOSAIC
B
A
A
B
ON
4
AUDIO FOLLOW
AUTO / WIPE
START
ON
-15
L
AUDIO
LEVEL R
DB
DB
-10 -5 -3 +3 +4+20 +1-1
-15 -10 -5 -3 +3 +4+20 +1-1
INPUT A
MAX
MIN
INPUT B
MAX
MIN
AUX
MAX
MIN
MIC
MAX
MIN
VIDEO
MAX
MIN
VIDEO/AUDIO MIXERVIDEO SOURCE SELECT
BACK
COLOR
SD INPUT 2SD INPUT 1HD INPUT 2HD INPUT 1HDMI 2HDMI 1
DIGITAL EFFECTS ADJUSTFUNCTIONS MODE CONTROL
KEYMIX1/41/31/2
PIP
COLOR
WIPE
EDGE
MULTIREVERSEONE-WAY
B-KEY 1/2L-KEY 1/2
1/2 1/3 1/4
A SOURCE B SOURCE
STILL
TIME
POSITION
MIN MAX
CMX-12
VIDEO EFFECTS MIXER
DEMO
ADJUST
SCAN
NEGATIVEPAINT MOSAIC
B
A
A
B
ON
2
1
3
4
Press the operation panel to initial mode:
1. Slide the video slide fully to the B-bus position.
2. Press one of the A-bus selection button.
3. Press one of the B-bus selection button.
4. Press the PIP button f.
5. PIP mode changes by selecting ~ buttons.
. Shows sub-picture in 1/2 size without edge.
. Shows sub-picture in 1/3 size without edge.
. Shows sub-picture in 1/4 size without edge.
. Shows sub-picture in 1/2 size with edge.
. Shows sub-picture in 1/3 size with edge.
. Shows sub-picture in 1/4 size with edge.
6. Other PIP features:
1. 3 PIP sizes selectable for sub-picture PIP channel.
2. The color of the edge can be changed by pressing back color select
button .
3. When you slide the video slide to the A-bus position PIP picture
dissolves into back ground scene.
4. Sub-picture PIP channel may be placed into different positions by
oystick w.
A bus
Edge
B bus 1/2
A bus
Unedge
B bus 1/2
16
Table of contents