Memorex MyVideo MCC221 User manual


Contents
IMPORTANT SAFETY INSTRUCTIONS ................................................ 3
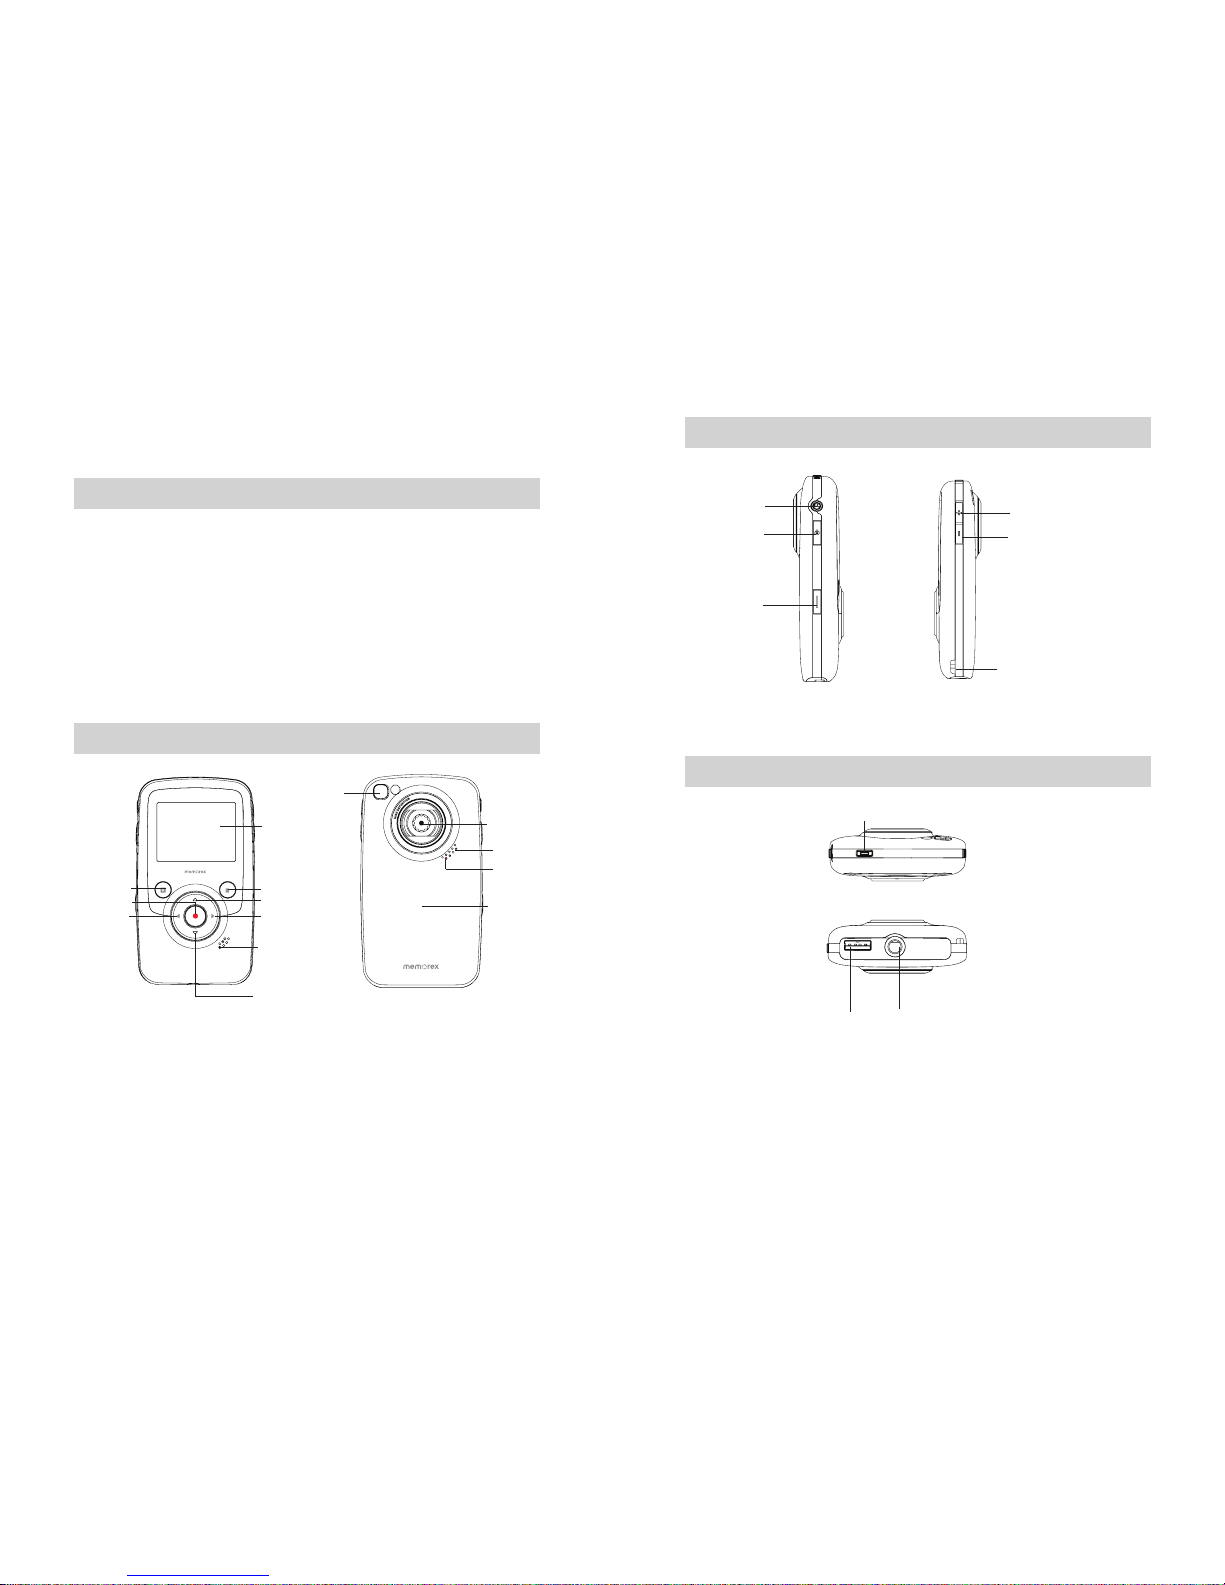
Section 1 Getting to Know MyVideoTM .................................................. 4
Section 2 Getting Started....................................................................... 6
Section 3 Preview Mode......................................................................... 9
Section 4 Playback Mode..................................................................... 13
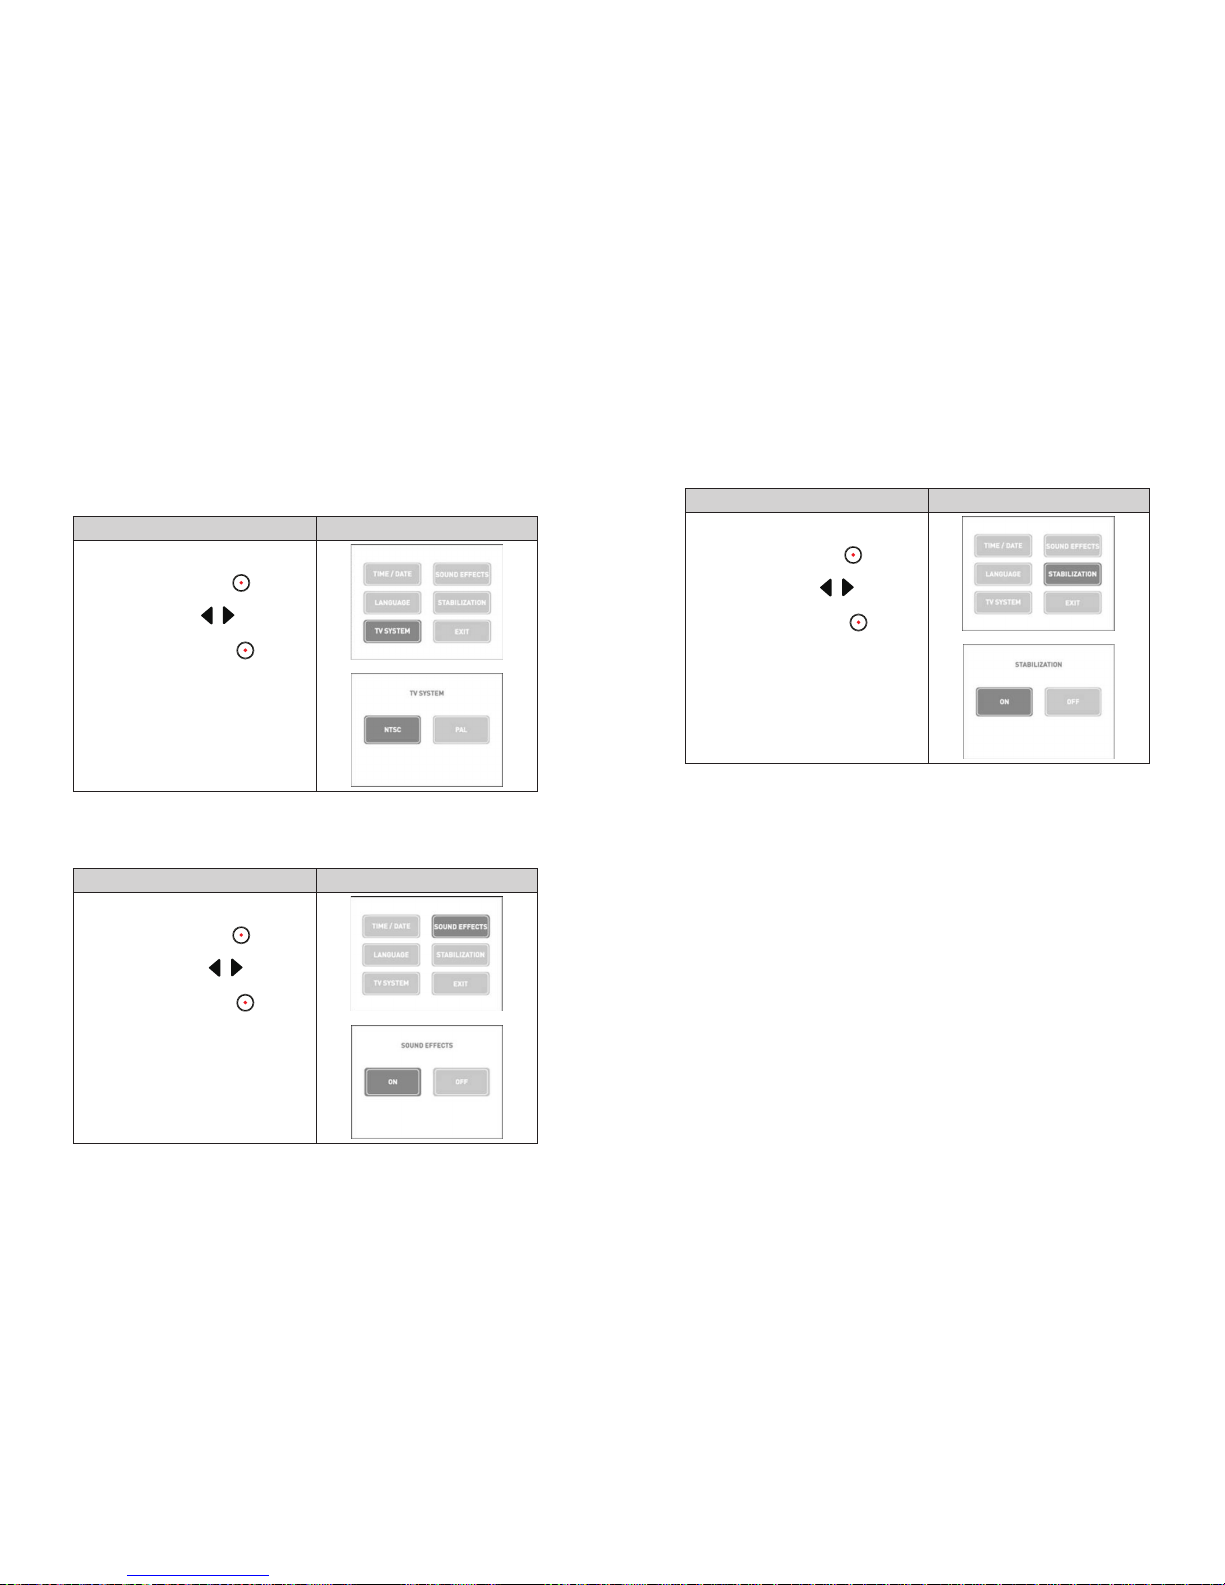
Section 5 Setting Your Camcorder .................................................... 16
Section 6 Viewing Videos and Photos on a TV.................................. 20
Section 7 Viewing Videos and Photo on PC or Mac.......................... 21
Section 8 Specications and System Requirements........................ 22
Section 9 Troubleshooting .................................................................. 24
IMPORTANT SAFETY INSTRUCTIONS
FCC WARNING
This equipment has been tested and found to comply with the limits for a Class B digital device, pursuant
to Part 15 of the FCC Rules. These limits are designed to provide reasonable protection against harmful
interference in a residential installation. This equipment generates, uses, and can radiate radio frequency
energy, and if not installed and used in accordance with the instructions, may cause harmful interference
to radio communications. However, there is no guarantee that interference will not occur in a particular
installation. If this equipment does cause harmful interference to radio or television reception, which can be
determined by turning the equipment off and on, the user is encouraged to try to correct the interference
by one or more of the following measures:
Reorient or relocate the receiving antenna.•
Increase the separation between the equipment and receiver.•
Connect the equipment to an outlet on a circuit different from that to which the receiver is connected.•
Consult the dealer or an experienced radio/TV technician for help.•
This device complies with Part 15 of the FCC Rules. Operation is subject to the following conditions:
This device may not cause harmful interference.•
This device must accept any interference received, including interference that may cause undesired•
operation.
Modicationsnotauthorizedbythemanufacturermayvoiduser’sauthoritytooperatethisdevice.•
SAFETY PRECAUTIONS
Be sure to observe the following precautions when using the camera/camcorder:
Never try to take pictures or use the built-in display when operating a motor vehicle or while walking.•
Never try to open the case of the camera/camcorder or attempt your own repairs. Always leave service•
toauthorizedrepairfacilities.
Keep the camera/camcorder away from water and other liquids, and never let it get wet. Never use•
when it is raining or snowing.
Should foreign matter or water get into the camera/camcorder, immediately turn the power off and•
contactyourlocalauthorizedservicecenter.
Physical damage and malfunction of this camera/camcorder can cause the data stored in its memory to•
be deleted. Be sure to always keep backup copies of data by transferring to a personal computer.
In an environment with electrostatic discharge, the user may have to reset the camera/camcorder by•
removing the battery, and then reinserting it.
Do not leave the camera/camcorder in places subject to extremely high temperatures, such as a sealed•
vehicle or in direct sunlight.
Remove the rechargeable battery pack when the camera/camcorder is not used for long periods of time.•
Dispose of rechargeable battery pack in a manner that complies with applicable laws.•
Do not place the camera/camcorder in unstable locations, such as a sloping surface or unstable table•
where the camera/camcorder may fall.
Do not touch or press on the display or lens.•
IMPORTANT: DONOT usethecamera/camcorder while it’s charging as rechargeable batteries can
explode in rare instances while charging.
This Class B digital apparatus complies with Canadian ICES-003.•
Cet appareil numérique de la classe B est conforme à la norme NMB-003 du Canada.•

4
EN
5EN
Section 1
Getting to Know My VideoTM
Standard Accessories
Unpack the package and make sure all standard accessories listed below are included:
MyVideo•TM Camcorder
AV Cable (•PART NO.0950A7356L-A03L*)
Lithium-ion Rechargeable Battery (•PART NO.084-07042L-020*)
Quick Start Guide•
Software Installation Insert•
Warranty card•
Strap (•PART NO.221-04350L-B01*)
Pouch (•PART NO.2560A7355L-A02*)
Front & Rear View
Mirror*:Frameyourreectiontophotographorrecordyourself
Left Button
Playback/ Play/
Pause Button
Right Button
Screen
Delete Button
Up Button/Zoom In
Speaker
Down Button/Zoom Out
Record/ Enter Button
Self Portrait
Mirror*
Microphone
Lens
Recording
indicator
Battery Cover
BATTERY COVER PART NO.6086A9932L-A02*
*Consumer Replaceable Part
(See page 23 to order.)
Side View
Top View and Bottom View
Battery Latch
Batt
USB port Tripod Mount
USB Latch
USB AV
AV out port
Strap Hook
Power Button Decrease Button
(Volume & Exposure)
Increase Button
(Volume & Exposure)

6
EN
7EN
Section 2
Getting Started
Loading the Battery
Before using the MyVideoTM , you must load Lithium-ion
rechargeable battery
Push battery latch to remove cover.1.
Insert the battery following to the correct polarity marks2.
( + or -).
Close the battery cover firmly.3.
Note
When the battery is absent or low, the date and•
time will be reset. See page 17 to set date/ time.
Charging your battery
Fully charge the supplied battery before using the MyVideoTM
for the first time.
Extend the USB port: Press the USB latch and the USB arm pops out automatically.
Connect MyVideoTM to the open USB port on your PC or Mac.
Retract the USB port: Press and release the USB latch and push the USB arm backward until it locked.
Press
Two charging modes are available:
1. Normal Charging Mode: When MyVideoTM is plugged to a computer, it is in normal charging mode.
Note: LCD will be turned off after 5 seconds. Press any button [except Record/ Enter button ( )] to
turn on the LCD again. (Normal charging time is approximately 12 hours.)
Normal Charging & Data Transferring Mode Battery charging completed
Note
Product is not intended for children. Use caution when extending USB port to avoid injury.•
3
2
1
2. Express charging Mode: In normal charging mode, press Record/Enter Button ( ) to switch to
express charging mode. Press again to return to Normal Charging Mode (Express charging time is
approximately 4.5 hours to fully charge the battery)
Express charging mode
Important
Fully charge your new battery for the first time using the Normal Charge Mode.•
NOTE: During Express Charging Mode, camcorder will not able to transfer files to computer.
Safely Remove from Computer (PC)
Note
To avoid damage to the unit or data loss, always follow the procedure listed below before•
disconnecting the unit from the USB port on your computer.
While in Normal Charging Mode, using your mouse,1. double-click Safely
Remove Hardware icon ( ) on the tasktray.
From the “Safely Remove Hardware” window (shown lower right), select “USB Mass Storage2.
Device” and click the “Stop” button. The “Stop a Hardware Device” window will pop up. Click “OK”.
When the “Safe to Remove Hardware” window is displayed, you may remove the unit from the USB
cable or remove the USB cable from the computer.
Note
If the “Safely Remove Hardware” icon is not displayed on the tasktray, please double click on
[My Computer]. Right click on [Memorex] and left click on [Eject]. Then it is safe to remove unit
from the computer.
To retract the USB: Press and release the USB latch and push the USB arm backward.
Hand Strap and Tripod Usage
To use hand strap: Attach the strap to the strap hook. Place your hand through the strap loop to•
prevent the camcorder from damage by being dropped.
To use tripod (Optional): Place the camcorder on a tripod to support and stabilize the camera and•
allow stabilized recording of videos and photos.

8
EN
9
EN
Turning the Camcorder On/Off and Getting Started
To turn on the camcorder: Press the Power Button to turn it on.•
To turn off the camcorder: Press and hold the Power Button for one second.•
To record video: In Preview Mode, press Left/Right Buttons (• / ) repeatedly until the Video
Recording icon ( ) is displayed on the screen. Then, press Record/ Enter Button ( ) to take
videos. Press Record/ Enter Button ( ) again to stop.
To take a photo : In Preview Mode, press Left/Right Buttons (• / ) repeatedly until the Photo
Recording icon ( ) is displayed on the screen. Then, press Record/ Enter Button ( ) to
capture image.
To view stored videos and photos, press Playback Button• ( ) to switch to Playback Mode. Press
Left/Right Buttons ( / ) to view the previous/next video/photo. Press Playback Button ( ) to
play/pause recorded video. Press Record/ Enter Button ( ) to return to Preview Mode.
Note
To conserve battery power, the camcorder will turn itself off automatically after idle for•
two minutes.
Section 3
Preview Mode
Button Function
Direction Button
Right Button/Left Button:
While in Preview mode, switch between Video Record Mode, Photo
Capture Mode, and Menu Mode.
Up Button: Zoom In.
Down Button: Zoom Out.
Record/ Enter Button:
Press to start/stop video recording or to capture photo.1.
In Playback Mode, press to return to Preview Mode.2.
3. In Menu Mode, press to enter setting option screen.
4. Validate the setting then return the menu mode.
Increase Button :
In Preview Mode: press increase exposure value.1.
In Playback Mode, press to increase volume.2.
Decrease Button :
In Preview Mode: press decrease exposure value.1.
In Playback Mode, press to decrease volume.2.
Playback Button:
In Preview Mode, press to switch to Playback Mode.1.
Press to play/pause recorded video.2.
Delete Button:
Press to enter to delete screen.1.
Power Button: Press to turn on the camcorder. Press and hold for one
second to turn off the camcorder.

10
EN
11
EN
LCD Monitor Information
The indicator shown below may display on LCD when videos and pictures are recorded:
(1)
Video Resolution
VGA (640 x 480, 30fps)
Photo Resolution
640 x 480 (VGA)
(2) Stabilization
(3)
1350
Number of photos that can still be taken.
01:28:06
01:28:06
Recording time of video that can still be taken at current resolution
00:00:12
Recording time of video during video recording
(4)
Battery: full power
Battery: medium power
Battery: low power
Battery: power empty
(5)
Zoom meter:
1X~2X (2X Digital zoom)
Exposure compensation value
Video Recording
Press Left/Right Buttons (• / ) repeatedly until the Video Recording icon ( ) is displayed on
the screen. The icon will appear in the center of LCD around 2 seconds then move to the right-top
corner.
Press Record/ Enter Button (• ) to take videos. When a video is recording, a time indicator will on
LCD monitor. Press Record/ Enter Button ( ) again to stop.
Press Playback Button (• ) to switch to Playback Mode. Press Left/Right Buttons ( / ) to
view the previous/next video/photo. Press Playback Button ( ) to play/pause recorded video.
Photo Recording
Press Left/Right Buttons (• /) repeatedly until the Photo Recording icon ( ) is displayed in
the center of LCD around 2 seconds then move to the right-top corner.
Press Record/ Enter Button (• ) to capture image.
Press Playback Button (• ) to switch to Playback Mode. Press Left/Right Buttons ( /) to
view the previous/next video/photo.
Using Exposure Function
Adjust the exposure value to change the amount of light that the camcorder will receive when taking•
videos/photos or while in Preview Mode.
To• adjust the exposure value:
Use Increase/Decrease Buttons (1. ) to adjust preferred EV (Exposure Value). The exposure
bar will automatically disappear after 2 seconds.
Press Record/ Enter Button (2. ) to take videos/photos.
Using Zoom Function
The zoom magnifies images• while in Preview Mode, recording videos or taking photos.
To zoom in/out, press the Up/Down Button1. ( ). It can be set from 1X to 2X
(2X Digital zoom).
Press Record/ Enter Button (2. ) to take videos/photos.

12
EN
13 EN
Using Delete Function
Delete function works in both Preview and Playback modes.•
In Preview or Record Mode, press Delete Button• ( ) to delete the current/ latest video or photo.
In Playback mode, press Left/Right Buttons (• /) to switch to the previous/next video/photo.
Then press Delete Button ( ) to delete the video or photo.
Operation Display Screen
Press Delete Button1. () to enter the delete screen.
Move between [Yes], [No], and [All] by using Left/2.
Right Buttons ( /).
Press Record/ Enter Button3. ( )toconrm
[Yes], [No], or [All]. Or Press Delete Button ( )
to cancel the operation.
Section 4
Playback Mode
Button Function
The Buttons have the following functions in Video and Photo Playback Modes.
Direction Button
Right Button:
1. Go to the next video/photo.
2. While the video is playing, press to stop playing and switch
to the next video.
Left Button:
1. Go to the previous video/photo.
2. While the video is playing, press to stop playing and switch
to the previous video.
Record/ Enter Button: Press to return to Preview Mode.
Increase Button : Press to increase volume.
Decrease Button : Press to decrease volume.
Playback Button: Press to play/pause recorded video.
Delete Button:
Press to enter to delete screen.1.

14
EN
15 EN
LCD Monitor Information
Indicators on the LCD screen while in Playback Mode:
(1)
Video Resolution
VGA (640 x 480, 30fps)
Photo Resolution
640 x 480 (VGA)
(2)
Play
Pause
Stop
(3)
50/99
Current Number of photo/ Total number of photos.
01:28:06
01:28:06
Video playback time
(4)
Fully Charged
Partially Charge
Low power
Empty - Charge Need
(5) Volume
Operations for Playback Mode
P• ress Playback Button ( ) to switch to Playback Mode.
Press• Left/Right Buttons ( /) to view the previous/next video/photo.
Press• Record/ Enter Button ( ) to return to Preview Mode.
Press Delete Button• ( ) to delete the current video or photo.
Video Playback
When in Playback Mode, press• Left/Right Buttons ( /) to select the desired video that you
want to view.
Press Playback Button (• ) to play/pause recorded video.
While the video is playing, press Left/Right Buttons (• /) to stop playing and switch to the
previous/next video.
Use Increase/Decrease Buttons (• ) to adjust volume.
Photo Review
When in Playback Mode, Press• Left/Right Buttons ( /) to view the photo.

16
EN
17 EN
Section 5
Setting Your Camcorder
Operations for Menu Mode
Operation Display Screen
Press Left/Right Buttons1. ( /) repeatedly until the
SETTINGS screen appears.
Press2. Record/ Enter Button ( ) to enter Menu
main screen.
Use Direction Button to move between options.3.
Press4. Record/ Enter Button ( ) to enter submenu
of each option.
Press Right/Left Buttons (5. /) to select the setting
options, then press Record/ Enter Button ( ) to
validate and return to Menu Mode main screen.
In Menu Mode main screen, select option Exit to back6.
to Preview Mode.
SETTINGS menu options
Menu Mode
Time/Date•
Language (English as default)•
TV System (NTSC as default)•
Sound Effects (ON as default)•
Stabilization(OFFasdefault)•
Exit•
Menu Mode Submenu Settings
Time/Date
Operation Display Screen
In1. Menu Mode main screen, use Direction Button
to select [TIME/DATE].
Press2. Record/ Enter Button ( ) to enter the
submenu.
Move between date or time items by using Left/3.
Right Buttons ( /). Adjust the number
of date or time by using Up/Down Buttons
( ).
Press4. Record/ Enter Button ( ) to accept
your changes and return to Menu Mode main
screen.
Note
Ifthe24hourmodechangesto12hourmode,besuretochecktheAMorPMindicatorsto
make sure you have set the hour correctly.
Language
Use this option to select your preferred of user interface language.
Operation Display Screen
In1. Menu Mode main screen, use Direction Button
to select [LANGUAGE].
Press2. Record/ Enter Button ( ) to enter the
submenu.
Use Direction Button to choose the language3.
options.
Press4. Record/ Enter Button ( )toconrm
and return to Menu Mode main screen.
Available languages:
English (Default)
French
Spanish

18
EN
19 EN
TV System
Make sure the appropriate TV standard of your area is selected – either NTSC or PAL.
ThewrongTVsystemsettingmaycauseimagetoicker.
NTSC standard: USA, Canada, Japan, South Korea and Taiwan etc.
PAL standard: UK, Europe, China, Australia, Singapore and Hong Kong etc.
Operation Display Screen
In1. Menu Mode main screen, use Direction Button
to select [TV-SYSTEM].
Press2. Record/ Enter Button ( ) to enter the
submenu.
Use Left/Right Buttons (3. /) to choose NTSC
(60Hz)orPAL(50Hz).
Press4. Record/ Enter Button ( ) to validate
and return to Menu Mode main screen.
Sound Effects
Enable or disable operation sound.
Operation Display Screen
In1. Menu Mode main screen, use Direction Button
to select [SOUND EFFECTS].
Press2. Record/ Enter Button ( ) to enter the
submenu.
Use Left/Right Buttons (3. /) to choose On
or Off.
Press4. Record/ Enter Button ( ) to validate
and return to Menu Mode main screen.
Stabilization
Selectstabilizationtoshootsmoothvideo.
Operation Display Screen
In1. Menu Mode main screen, use Direction Button
to select [STABILIZATION].
Press2. Record/ Enter Button ( ) to enter the
submenu.
Use Left/Right Buttons (3. /) to choose On
or Off.
Press4. Record/ Enter Button ( ) to conrm
and return to Menu Mode main screen.

20
EN
21 EN
Section 6
Viewing Videos and Photos on a TV
Connecting to a TV
ConnectoneendoftheAVcabletoyourcamcorder’sAVOutport.1.
Connect the other end of the cable to a television.2.
Video In (Yellow) and Audio In (White) marked “mono” or “L”.
The steps for viewing stored pictures and video on a TV are exactly the same as for viewing them3.
oncamcorder’sLCDmonitor.
( 4 : 3 )
Note
TheLCDPanelonthecamcorderdoesnotdisplaywhenconnectedtoaTV.
MakesuretoselectthecorrectTVSystemsettingaspage18.
Section 7
Viewing Videos and Photo on PC or Mac
Video and Photo Editing Software
ArcSoftTM MediaImpression2 editing software is embedded in the internal memory of MyVideoTM .
TotransferimagestocomputerandviewtheUserGuide,thesoftwaremustbeinstalleduponrst
use when connecting MyVideoTM to your PC or Mac through USB port.
ArcSoft• TM MediaImpression2 is a user-friendly application that helps you manage your media,
burn your video to CD/DVD, and upload your videos/photos easily to YouTubeTM or FaceBookTM.
Note
MoredetailedInstructionsandHelpmenufortheeditingsoftwarecanbefoundwithinthe•
programonceinstallationiscomplete.Clickonthe“Extra”buttononthetitlebarandselect
“Help” to open the ArcSoft™ instruction manual.
TodownloadPhotoorVideolesfromcamcorder:Youcanalsoopenthedrivelabelled•
“Memorex”andsimplydraganddropthelesinsidethefolder“DCIM\100MEDIA”.
For more information about the ArcSoft™ MediaImpression2 software. Please visit the web site
http://mediaimpression.arcsoft.com for more information.
All other trademarks are the property of their respective owners.

22
EN
23 EN
Section 8
Specications and System Requirements
Specication
Image sensor VGA CMOS sensor
Operation modes Video record, Photo capture
Lens f=3.89mm; F2.4
Focus range Full Range
Zoom 1X~2X (2X Digital)
Shutter Electronic
LCD monitor 2.0”LCD (Measured diagonally)
Storage media Built-in 2GB memory (200MB of memory is used for system software)
Record up to 2 hours of video or capture up to 20,000 photos.
Image resolution 640 x 480 (VGA)
Video resolution VGA 640X480(30fps)
Power Source USB Power
Battery Recording Time 5 hours
Exposure +1EV~ -1EV
File format Picture: JPG (Baseline)
Video: MOV
Image play Single Image
Speaker 1 x 8 ohm
PC interface USB 2.0 Port
TV out NTSC/PAL Selectable
Battery Lithium-ion Rechargeable Battery (NP-60, 3.7V 1050mAh)
Dimension 4.19(H) x 2.36(W) x 0.71(D) inches
Weight 0.16 lb (without battery)
Minimum System Requirement
Windows:
Microsoft Windows XP/Vista•
PentiumIV3.0GHzorequivalentAMDAthlon•
Intel ® Core™ 2 Duo CPU E6300 processor•
(or higher recommended), AMD Athlon 64 X2
3800+ or higher for HD Video
512 MB RAM (1GB recommended)•
300 MB available hard disk space•
NVIDIA FX5200 or ATI 9200 (or higher)•
1024 x 768 pixels, 32-bit color monitor•
Macintosh:
Mac OS 10.3, 10.4, 10.5•
PowerPCG4800MHzprocessororIntel•
processor
512 MB RAM•
150 MB available hard disk space•
800 × 600 pixels, 16-bit color monitor•
Note
TheLCDscreenismanufacturedusingextremelyhigh-precisiontechnologysoover99.99%of
the pixels are operational for effective use. However, some tiny black and/or bright dots (white,
red,blueorgreen)mayappearontheLCDscreen.Thesedotsareanormalresultofthe
manufaturing process, and do not affect the recording quality.
Reset the Camcorder
If the camcorder acts erratically, reset it by removing the battery. Then reload the battery and turn on
the camcorder again.
Formatting the Camcorder
WARNING!
The contained video/photo editing software may lost by formatting the camcorder.
Donotformatthiscamcorderunlessitstopsworkingandyouareinstructedtodosoby
technical support personnel.
To format the camcorder:
Press the USB latch down and the USB arm pops out automatically.1.
Connect the camcorder to the computer.2.
Double click on [My Computer], then right click [Memorex] and left click on [Format].3.
Atthe“Format”window,click[OK]toconrmandthecamcorderwillstarttoformat(seegure4.
below).Whennished,click[OK]toclosetheFormatwindow.
Format window for
“Memorex”
Note
Makesureyouhaveselected"FAT32"atthelesystempull-downmenu;otherwise,after
formatting,thecamerawillnotworkproperly.Then,click[OK]toconrmandthecamcorder
willstarttoformat.Whennished,click[Close]toclosetheFormatwindow.
For Firmware Upgrade
PleasevisitourWebsiteatwww.memorex.comtocheckifthereisnewrmwareavailable.
IMPORTANT NOTE:Beforeupgradingthermware,pleaseback-upallofyourmedialesonyour
computer. After upgrading, format the unit to complete the upgrade procedure.
FOR ADDITIONAL SET-UP OR OPERATING ASSISTANCE, PLEASE VISIT OUR WEBSITE AT:
WWW.MEMOREX.COM
FOR CONSUMER REPLACEABLE PART(S), SEE PART NUMBER(S) ON PAGE 4, AND THEN
CONTACT OUR PARTS FULFILMENT CENTER, FOX INTERNATIONAL AT: 1-800-321-6993.

24
EN 25 SP
Section 9
Troubleshooting
Troubleshooting
Symptom Possible Cause Solution
Camcorder will not turn on. Power is off. Press the Power button for one
second to turn on. (see page 8)
Battery pack is weak or dead. Recharge the battery pack.
(see page 6–7)
Images or photos
are poor quality.
Poor lighting. Take picture in better lighting
and/or adjust the EV setting.
(see page 11)
Lens is dirty. Clean lens with a soft cloth.
Subject or camcorder moved as
picture was taken.
Hold the camcorder steady until
picture is taken.
Can’ttakevideo/photo. Memory is full. Delete some photos/videos.
(see page 12)
Power is off. Press the Power button for one
second to turn on. (see page 8)
Why do some of my indoor
pictures look blurry and dark?
Camcorder extends pictures
exposure time under low
light/ indoor condition.
Keep camera (and photographed
subject)steadyforseveralseconds
when taking pictures.
How do I charge battery? When camcorder is plugged to a
computer, it is in normal charging
mode as well as the USB storage
device, then LCD will be turned
off after 5 seconds.
In normal charging mode, press
Record/ Enter Button () to
switch to express charging mode.
(see page 6–7)
Contenido
INSTRUCCIONES IMPORTANTES DE SEGURIDAD .......................... 26
Sección 1 Conociendo MyVideo™....................................................... 27
Sección 2 Comienzo............................................................................. 29
Sección 3 Modo de Vista Previa.......................................................... 32
Sección 4 Modo de Reproducción...................................................... 36
Sección 5 Congurando su Videocámara.......................................... 39
Sección 6 Viendo Videos y Fotos en TV ............................................ 43
Sección 7 Viendo Videos y Fotos en una PC..................................... 44
Sección 8 Especicaciones y Requerimientos del Sistema ............ 45
Sección 9 Resolución de Problemas.................................................. 47

26
SP
27 SP
MEDIDAS DE SEGURIDAD IMPORTANTES
ADVERTENCIA FCC
Este equipo ha sido probado y cumple con los límites de un aparato Clase B de acuerdo a la Parte 15
delasregulacionesFCC.Estoslímitesestándiseñadosparaproveerunaprotecciónrazonablecontra
interferenciasdañinaseninstalacionesresidenciales.Esteequipogenera,utilizaypuederadiarenergía
de radio frecuencia, y si no está instalado y utilizado de acuerdo a las instrucciones, puede causar
interferencias dañinas a las comunicaciones radiales. Sin embargo, no hay garantía que la interferencia
no ocurrirá en alguna instalación en particular. Si este equipo causa interferencia dañina a la recepción de
radio o televisión, lo cual puede ser determinado apagando y prendiendo el equipo, se alienta al usuario
de tratar de corregir la interferencia de una o más con las siguientes medidas:
Reoriente o reubique la antena receptora.•
Aumente la separación entre el equipo y el receptor•
Conecte el equipo a un tomacorriente en un circuito diferente al que está conectado el receptor.•
Consulte al distribuidor o solicite ayuda a un técnico de radio/TV.•
Este aparato cumple con la Parte 15 de las Regulaciones FCC. Su funcionamiento está sujeto a las
siguientes condiciones:
Este aparato no debe causar interferencias dañinas•
Este aparato debe aceptar cualquier interferencia recibida, inclusive interferencia que pueda causar un•
funcionamiento inadecuado.
Modicacionesnoautorizadasporelfabricanteanularáelpoderdelusuarioparaoperarelaparato.•
PRECAUCIONES DE SEGURIDAD
Asegúrese de observar las siguientes precauciones cuando use la cámara/ camcorder.
Nuncatratedetomarfotosoutilizarelequipocuandoestémanejandounvehículooestécaminando.•
Nuncatratedeabrirlacajadelacámara/comcorderointenterealizarsuspropiasreparaciones.Deje•
elservicioalossitiosespecializadosdereparación.
Mantenga la cámara/camcorder fuera del alcance de agua y otros líquidos, nunca deje que se moje.•
No lo use cuando llueva o nieve.
Si le entra agua o cualquier material extraño a la cámara/comcorder, apáguela inmediatamente y•
contactealcentrodeservicioautorizadolocal.
Daño físico o mal funcionamiento de la cámara/comcorder puede causar que la data acumulada en su•
memoriaseborre.Asegúresesiempredemantenercopiasderespaldodeladatatransriéndolaasu
computadora personal.
En un ambiente de descarga electrostática, el usuario debe resetear la cámara/ camcorder removiendo•
las baterías y volviéndolas a insertar.
No deje la cámara/camcorder en lugares sujetos a temperaturas altas, como vehículos cerrados o•
debajodeluzdirectasolar.
Remueva la batería recargable cuando la cámara/comcorder no está en uso por períodos largos de tiempo.•
Deshágase de las baterías recargables de acuerdo a las normas legales.•
Nocoloquelacámara/comcorderensitiosinestables,comosuperciesresbaladizasomesasinestables•
donde se podrían caer.
No toque ni presione sobre los lentes•
IMPORTANTE: NO use la cámara/ camcorder cuando se estén cargando las baterías ya que aunque
raramente podrían explotar
EsteaparatodigitalClaseBcumpleconlosrequisitosCanadiensesICES-003.•
CetappareilnumériquedelaclasseBestconformeàlanormeNMB-003duCanada.•
Sección 1
Conociendo MyVideo™
Accesorios Standard
Desempaque el contenido y asegúrese que todos los accesorios standard listados a continuación
estén incluidos:
Cámara/Comcorder•
Cable AV (PARTE NO.0950A7356L-A03L*)•
Baterías recargables de iones de litio (PARTE NO.084-07042L-020*)•
GuíaRápidaparaComenzar•
El encarte de la instalación del Software•
Tarjeta de garantía•
Correa (PARTE NO.221-04350L-B01*)•
Estuche (PARTE NO.2560A7355L-A02*)•
Vista de Frente y Reverso
Espejo*:Enmarcasureejoparafotograarseograbarseustedmismo.
Botón
Izquierdo
Botón de
Reproducción/
Inicio/Pausa
Botón Derecho
Pantalla
Botón para Borrar
Botón hacia arriba/
Zoom hacia adentro
Altavoz
Botón de Abajo/
Zoom hacia fuera
Botón de Grabación/
Inicio
Espejo
Autoretrato*
Micrófono
Lentes
Indicador de
grabación
Cubierta de
Bateria
CUBIERTA DE BATERIA PARTE NO.6086A9932L-A02*
*Partereemplazableparaelconsumidor
(Vea página 46 para ordenar)

28
SP
29 SP
Vista Lateral
Vista de Abajo y de Arriba
Pestillo de Batería
Batt
Puerto USB Montura para Trípode
Pestillo USB
USB AV
Puerto de
salida AV
Gancho de la
Correa
Botón de
encendido/apagado Botón para Disminuir
(Volumen/ Exposición)
Botón para Aumentar
(Volumen/ Exposición)
Sección 2
Comienzo
Cargando la Bateria
Antes de usar su MyVideoTM, debe recargar las baterías de
iones de litio recargables.
Empuje el pestillo de batería para remover la cubierta1.
Inserte la batería siguiendo las marcas de polaridades2.
correctas ( + o -).
Cierrelacubiertadebateríarmemente3.
Nota
-Cuandonotienebateríaolacargaesmuybaja,•
eldíaylahorasevanaresetear.Vealapágina40
paraajustardía/hora.
Cargando su Bateria
Recargue completamente la batería suministrada antes de usar su MyVideoTMporprimeravez.
ExtiendaelpuertoUSB:PresioneelpestilloUSByelbrazodeUSBsaleautomáticamente.
Conecte su MyVideoTM al puerto abierto USB en su PC o MAC
RetraigaelpuertoUSB:PresioneylibereelpestilloUSByempujeelbrazoUSBhaciaatráshastaque
se cierre.
Press
Dos modos de recargar están disponibles:
1. Modo Normal de Carga: Cuando su MyVideoTM está enchufada a la computadora, es un modo
normal de carga
Nota: LCD se apagará después de 5 segundos. Presione cualquier botón [excepto botón de Grabar/
Inicio ( )] para prender LCD de nuevo. ( El tiempo normal de carga es de aproximadamente 12 horas )
CARGADO
10
CARGANDO
PROGRAMACIÓN CARGANDO
Press to enter
TRANSFIRIENDO
CARGANDO
HORA / FECHA
CARGANDO
adiós bienvenido
2008 10 12
AM2412
AÑO
12/24 HR MIN AM/PM
MES DIA
CARGADO
10
CARGANDO
PROGRAMACIÓN CARGANDO
Press to enter
TRANSFIRIENDO
CARGANDO
HORA / FECHA
CARGANDO
adiós bienvenido
2008 10 12
AM2412
AÑO
12/24 HR MIN AM/PM
MES DIA
Modo Normal & de carga del normal; Modo de
transferencia de los datos
Modo de Batería cargada completa
Nota
ElProductonoesparaniños.UseprecaucióncuandoextiendaelpuertoUSBparaevitarlesiones.•
3
2
1

30
SP
31 SP
Modo de carga Expresa: En el modo de recarga normal, presione el botón Grabar/Inicio ( ) (para
cambiar a modo de carga expresa. Presione de nuevo para regresar al modo de carga Normal (El
modo de carga expresa tarda aproximadamente 4.5 horas para completar la carga de batería).
CARGADO
10
CARGANDO
PROGRAMACIÓN CARGANDO
Press to enter
TRANSFIRIENDO
CARGANDO
HORA / FECHA
CARGANDO
adiós bienvenido
2008 10 12
AM2412
AÑO
12/24 HR MIN AM/PM
MES DIA
Express charging mode
Importante
CargarcompletamentesubateríaporprimeravezenelmodoNormaldeCarga.•
NOTA: Durante el modo de carga expresa, la cámara/camcorder no podrá transferir archivos a
la computadora
Remoción Segura de la Computadora
Nota
Paraevitardañosalaunidadopérdidadedata,siempresigalosprocedimientoslistados•
abajo antes de desconectar la unidad del puerto USB en su computadora.
MientrasestáenelMododeCargaNormal,utilizandoelmouse,hagadobleclicksobreeliconode1.
Remoción Segura de Hardware ( ) en la bandeja de tareas (tasktray) .
Desde la ventana de Remoción Segura de Hardware (se muestra en la parte inferior derecha ),2.
seleccione “USB Mass Storage Device” y haga click en el botón de “Stop”. La ventana de “Stop a
Hardware Device” va a aparecer. Haga click en “OK”. Cuando la ventana de “Remoción Segura de
Hardware”aparezca,ustedpodráremoverlaunidaddelcableUSBoremoverelcableUSBdela
computadora.
Nota
Sieliconode“RemociónSeguradeHardware”noapareceenlabandejadetareas,favorhaga
dobleclicken[MyComputer].Clickderechosobre[Memorex]yclickizquierdosobre[Eject].
Entoncesahoraesseguroremoverlaunidaddelacomputadora.
PararetraerelUSB:PresioneylibereelpestilloUSByempujeelbrazoUSBhaciaatrás.
Correa de mano y Uso del Trípode
Para usar la correa de mano: Amarre la correa al gancho de la correa. Coloque su mano dentro del•
lazoparaevitarquesecaigalacámara.
Para usar un trípode (Opcional ). Coloque la cámara sobre el trípode para su soporte y•
estabilizaciónygrabelosvideosyfotosdeformaestable.
Comienzo y Apagado/Encendido de su Videocámara
Para encender la videocámara. Pulse el botón para encenderlo.•
Para apagar su Videocámara: Presione y mantenga el Botón de encendido/apagado por un•
segundo.
ParagrabarVideo:Enelmodode“vistaprevia”presionelosbotonesIzquierda/Derecha•
(/) repetidamente hasta que el icono de Grabar Video ( )aparezcaenlapantalla.
Entonces, presione el botón Grabar/Inicio ( ) para tomar video. Presione el botón ( )
Grabar/Inicio de nuevo para detener.
Paratomarunafoto:Enelmodode“vistaprevia“,presionelosbotonesIzquierda/Derecha•
(/) repetidamente hasta que el icono de grabar foto ( )aparezcaenlapantalla.Presione
el botón Grabar/Inicio ( ) entonces para capturar la imagen
Para ver videos y fotos almacenados, presione el botón de Reproducción• ( ) para cambiar
al modo de Reproducción. ( / )PresionelosbotonesIzquierda/Derecha ( ) para iniciar/
pausar el video grabado. Presione el botón Grabar/Inicio ( ) para regresar al modo de
“vista previa”.
Nota
Paraconservarlacargadelabatería,suVideocámaraseapagaráautomáticamente•
despuésdedosminutossinuso.

32
SP
33
SP
Sección 3
Modo de Vista Previa
Función del Botón
Botón de Dirección
Botón Derecho/Botón Izquierdo:
En el modo de “vista previa” cambia entre el modo de Grabación
de Video, Modo de Captura de Fotos y Modo Menú.
Botón de arriba Zoom hacia adentro.
Botón de abajo: Zoom hacia fuera
Botón de Grabación/Inicio:
1. Presione para iniciar/detener grabación de video o captura de foto.
2. En el modo de Reproducción, presione para regresar al modo de
Vista Previa.
3. En el modo de Menú, presione para entrar a la pantalla de configuración
de opciones.
4. Valide la configuración y regrese al modo menú.
Botón de Aumento:
1. En el modo de Vista Previa: presione para aumentar el valor
de la exposición.
2. En el modo de Reproducción, presione para aumentar el volumen
Botón para disminuir:
1. En el modo de Vista Previa: presione para disminuir el valor
de la exposición
2. En el modo de Reproducción, presione para disminuir el volumen.
Botón de Reproducción:
1. En el modo de “Vista Previa”, presione para cambiar al modo de
Reproducción.
2. Presione para grabar/pausar video grabado.
Botón para Borrar:
Presione para entrar y borrar la pantalla1.
Información del Monitor LCD
El indicador que se muestra abajo podrá aparecer en LCD cuando los videos y fotos
se estén grabando.
(1)
Resolución del Video
VGA (640 x 480, 30fps)
Resolución de la Foto
640 x 480 (VGA)
(2) Estabilización
(3)
1350
Número de fotos que todavía se pueden tomar.
01:28:06
01:28:06
Tiempo de grabación de video que todavía se puede tomar con la
resolución actual
00:00:12
Tiempo de grabación de video durante la grabación de video
(4)
Batería: carga completa
Batería: media carga
Batería: carga baja
Batería: sin carga
(5)
Metros de Zoom
1X~2X (2X zoom Digital)
Valor de la compensación de exposición
Botón de encendido/apagado: Presione para girar la videocámara.
Presione y mantenga por un segundo para apagar su Videocámara

34
SP
35 SP
Grabando Video
Presione Botones Izquierda/Derecha (• / ) repetidamente hasta que el icono de Grabación
de Video ( ) se muestre en la pantalla. El icono aparecerá en el centro del LCD alrededor de
2 segundos luego muévase a la esquina superior derecha.
Presione Botón Grabar/Inicio (• ) para tomar videos. Cuando un video se está grabando, el
indicador de tiempo se aparecerá en el monitor LCD. Presione Botón ( ) Grabar/Inicio de nuevo
para detener.
Presione el Botón de Reproducción (• ) para cambiar al Modo Reproducción. Presione Botones
Izquierda/Derecha ( /) para ver el video/la foto previa/siguiente. Presione el Botón de
Reproducción ( ) para reproducir/pausar el video grabado.
Grabación de Fotos
Presione Botones Izquierda/Derecha (• /) repetidamente hasta que el icono de grabación
de Fotos ( ) se muestre en el centro del LCD alrededor de 2 segundos luego muévase a la
esquina superior derecha ( ).
Presione el Botón de Reproducción (• )para cambiar al Modo Reproducción. Presione Botones
Izquierda/Derecha ( /) para ver el video/la foto previa/siguiente
Uso de la Función de Exposición
Ajuste el valor de la exposición para cambiar la cantidad de luz que la cámara recibe cuando está•
tomando videos/fotos o mientras esté en Modo de Vista Previa.
Para ajustar el valor de exposición:•
Use los botones de Aumento/Disminución (1. ) para ajustar EV preferido (Valor de Exposición).
La barra de exposición desaparecerá automáticamente después de 2 segundos.
Press Record/ Enter Button (2. ) to take videos/photos.
Uso de la Función de Zoom
El zoom magnifica imágenes mientras está en el modo Vista Previa, grabando o tomando fotos.•
Para zoom hacia adentro/afuera, presione el botón1. ( ) Arriba/Abajo . Puede ajustarse
desde 1X a 2X (2X zoom Digital) .
Presione Botón Grabar/Inicio (2. ) para tomar videos/fotos.
Uso de la Función de Borrar
La función de Borrar trabaja con ambos modos Vista Previa y Reproducción.•
En el modo de Vista Previa o Grabación, presione el botón de Borrar (• ) para borrar el video/la
foto anterior/actual.
En el modo de Reproducción, presione Botones Izquierda/Derecha (• /) para cambiar al
video/ foto previo/siguiente. Luego presione el botón de Borrar ( ) para borrar el video/la foto.
Operación Muestra en Pantalla
Presione Botón de Borrar1. ( ) para entrar
borrar pantalla
Muévase entre [Si], [No] y [Todas] usando2.
Botones Izquierda/Derecha ( /).
Presione el Botón Grabar/Inicio (3. ) para
confirmar [Si], [No], o [Todas]. O presione el
Botón de Borrar ( ) para cancelar la operación

36
SP
37 SP
Sección 4
Modo de Reproducción
Función del Botón
Los Botones tienen las siguientes funciones en los Modos de Reproducción de Video y Foto
Botón de dirección
Botón Derecho:
1. Va al próximo video/foto
2. Mientras el video se está reproduciendo, se presiona para
detener reproducción y cambiar para el próximo video.
Botón Izquierdo:
1. Va al video/ foto anterior
2 .Mientras el video se está reproduciendo, se presiona para
detener reproducción y cambiar para el video anterior.
Botón Grabar/Inicio: Presione para regresar al modo
de Vista Previa
Botón de Aumento: Presione para aumentar volumen
Botón de Disminución: Presione para disminuir el volumen
Botón de Reproducción: Presione para reproducir/pausar
video grabado
Botón de Borrar
Presione para entrar a borrar la pantalla1.
Información Monitor LCD
Indicadores en la pantalla LCD mientras está en el Modo de Reproducción
(1)
Resolución del Video
VGA (640 x 480, 30fps)
Resolución de Foto
640 x 480 (VGA)
(2)
Reproducir
Pausa
Detener
(3)
50/99
Número actual de foto/ Número total de fotos.
01:28:06
01:28:06
Tiempo de Reproducción del Video
(4)
Carga Completa
Carga parcial
Carga baja
Vacío-Necesidad de recarga
(5) Volumen

38
SP
39 SP
Operaciones para el Modo de Reproducción
Presione Botón de Reproducción• ( ) para cambiar a Modo de Reproducción.
PresioneBotonesIzquierda/Derecha• ( /) para ver video/foto anterior/siguiente
Press Record/ Enter Button• ( ) to return to Preview Mode.
Presione Botón de Borrar• ( ) para borrar el video o foto actual
Reproducción de Video
CuandoestáenelMododeReproducción,presioneBotonesIzquierda/Derecha• (/) para
seleccionar el video que se desea ver.
Presione Botón de Reproducción (• ) para reproducir/pausar video grabado.
Mientraselvideoestérodando,presioneBotonesIzquierda/Derecha(• /) para detener
reproducción y cambiar al video previo/siguiente.
Utilice Botones de Aumento/Disminución (• ) para ajustar volumen
Revisión de Fotos
EnelmododeReproducción,presioneBotonesIzquierda/Derecha• ( /) para ver la foto
deseada.
Sección 5
Congurando su Videocámara
Operaciones para el Modo Menú
Operación Pantalla
PresioneBotonesIzquierda/Derecha(1. /)
repetidamentehastaqueaparezca
“PROGRAMACIÓN”(“Conguración”)
Presione Botón grabar/Inicio2. ( ) para entrar a la
pantalla de Menú principal.
PROGRAMACIÓN
Presione para entrar
Use el Botón de Dirección para moverse entre las3.
opciones
Presione Botón de Grabar/Inicio (4. ) para entrar al
submenú de cada opción.
PresioneBotonesIzquierda/Derecha(5. /) para
seleccionarlasopcionesdeconguración,luego
presione Grabar/Inicio () para validar y regresar
al Modo de pantalla de Menú principal.
En el Modo de pantalla de Menú principal, seleccione la6.
opción Salida (Exit) para regresar al Modo Vista Previa
Conguración de las opciones de menú:
Modo de Menú
Hora/Día•
Idioma (Inglés por descarte)•
Sistema de TV (NTSC por descarte)•
Efectos de sonido (ON por descarte)•
Estabilización(OFFpordescarte)•
Salida•
Table of contents
Languages:
Other Memorex Camcorder manuals