Meowingtons JUNGLE GYM CAT TREE User manual

JUNGLE GYM CAT TREE CONDO INSTRUCTIONS
NOTE: 2-person assembly required. It is suggested that you have a Building Buddy to help you assemble this tree (and maybe a glass of wine).
And no matter what your Building Buddy says, yes, you do need the instructions. If you’re more of a visual person, check out our instructional
video at https://www.meowingtons.com/pages/help
PARTS LIST
A1
A2
B1
B2
K
M
N
P
B3
C
D
E
QF
G
H
J
–Base Platform
–Playpen Platform
–Playpen Side Panel
–Playpen Side Panel
–Support Bracket (x1)
–Hammock (x1)
–Sisal Scratch Pad (1)
–Felt Platform Pads (x3)
–Playpen Back Panel
–Playpen Bars (x6)
–Curved Panel
–Top Platform
–Faux Fur Cushion (x1)–Scratching Pole (x1)
–Support Beam (x1)
–Hammock Platform (x1)
–Support Brackets (x2)
On Base Platform (A1), Insert
Wooden Dowels (Rx4) into
innermost center holes. Then, taking
Playpen Side Panel (B1), insert
Barrel Nuts (Wx2) into bottom side
holes of the Side Panel (B1). Align
Barrel Nuts (W) so the holes align
with the Base Platform (A1). TIP:
Use Cross-Head screwdriver to hold
the Barrel Nut in place or to rotate
and realign Barrel Nut if necessary.
Attach Playpen Side Panel (B1) onto
LEFT side of Base Platform (A1) by
lining up Dowels (R) with the holes
and attach with S Bolts.
Repeat Step 2 to attach Playpen
Side Panel (B2) onto Base Platform
(A1) on the opposite side parallel
to Side Panel (B1).
Insert Wooden Dowels (Rx4) into top
and bottom holes of Playpen Back
Panel (B3), and attach to Base Platform
(A1) by lining up Wooden Dowels (R)
with the holes on both Parts.
Insert Playpen Bars (C) into
indicated holes in Base Platform
(A1). Finish tightening Bolts on top
of Playpen Platform (A2).
Insert Barrel Nuts (Wx4) into TOP
outer side holes of both Playpen
Side Panel (B1) and Playpen Side
Panel (B2). Insert Wooden Dowels
(Rx4) into top of Playpen Side Panel
(B1) and Playpen Side Panel (B2).
Taking Playpen Platform (A2), Align
holes with the Wooden Dowels (R)
in Playpen Side Panel (B1) and
(B2) and Playpen Back Panel (B3)
and gently press down. Insert S
Bolts (x4) through top of Playpen
Platform (A2) into Playpen Side
Panel (B1) and Playpen Side Panel
(B2). Lightly tighten bolts using
Allen Wrench (Y) while keeping
Barrel Nuts (W) aligned using
Cross-Head screwdriver. DO NOT
FULLY TIGHTEN BOLTS.
Stand Curved Panel (D) upright
with Circular Opening positioned
at top; Attach Curved Panel (D) to
Side Panel (B1) with V Bolts (x4)
by aligning the holes on both parts.
Attach Scratching Pole (F) to top of
Playpen Platform (A2) with U Bolt
(x1) by aligning holes and screwing
on the Pole with a clockwise
twisting motion.
Insert Hammock Platform (H) into
the horizontal slot in Curved Panel
(D), and push all the way through.
Attach the inserted end of Hammock
Platform (H) to top of Scratching
Pole (F) using U Bolt (x1) and
tighten with Larger Allen Wrench (Z).
Attach bottom of Support Beam
(G) to Playpen Platform (A2) with
S Bolt (x1). Attach top of Support
Beam (G) to top of Curved Panel
(D) with V Bolt (x1).
STEP 1
STEP 2
STEP 3
STEP 6
STEP 4
STEP 5
STEP 7
STEP 8 STEP 10
STEP 9
R –12 PCS S –18 PCS T –4 PCS U –2 PCS V –5 PCS W –8 PCS X –4 PCS Y –1 PCS Z –1 PCS 1 –1 PCS
Wooden Dowels 6*35 mm 6*16 mm 10*35 mm 6*30 mm Barrel Nut Cap Nut Allen Wrench Larger Allen Wrench Wall Anchor Strap
3 –1PCS
2 –1PCS 4 –1PCS
Anchor Bolt Washer
Screw Anchor
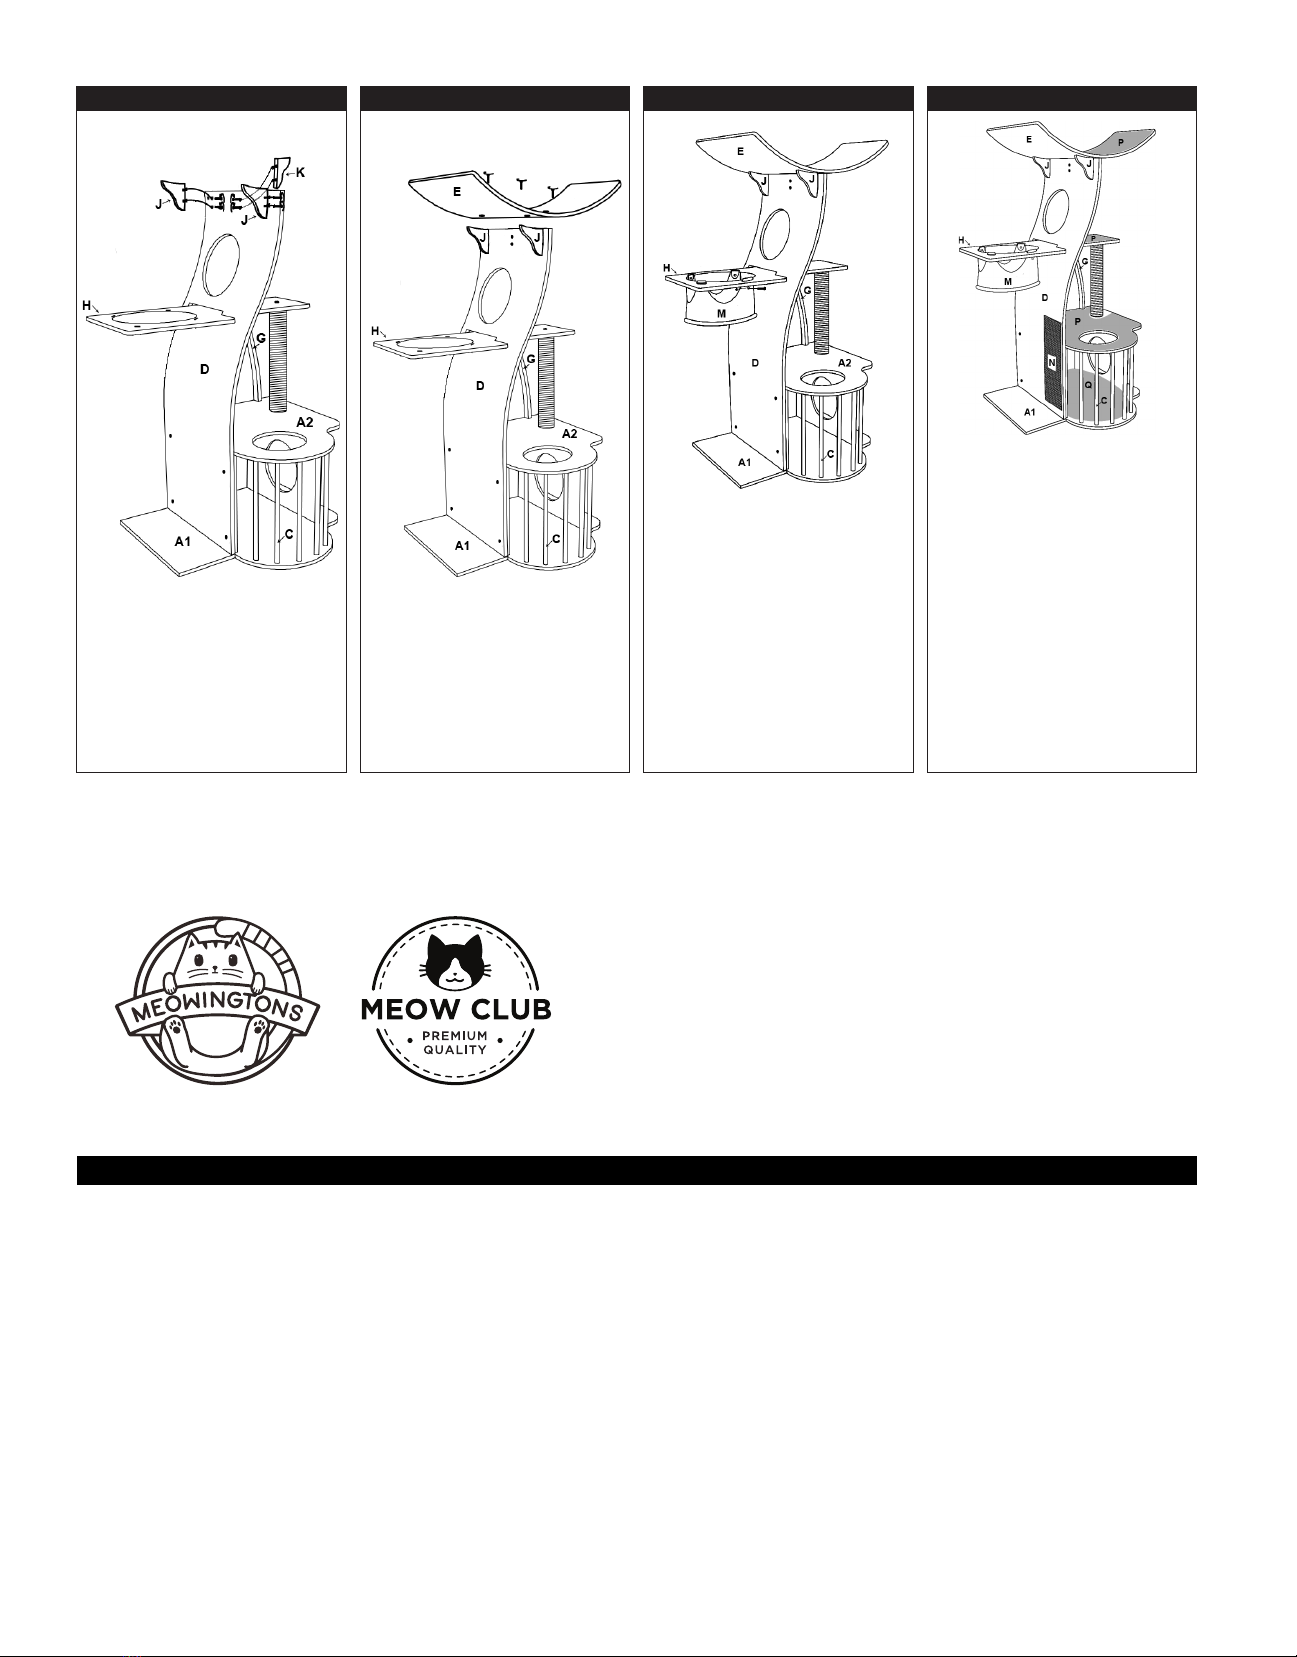
Attach both Support Brackets (J)
with S Bolts (x4) to the Hammock
Side of Curved Panel (D) above the
Circular Opening. Attach Support
Bracket (K) with S bolts (2) to
the opposite Scratch Pole side of
Curved Panel (D).
Align Top Platform (E) with holes
in Support Brackets (J) and (K)
and attach with S Bolts (x3). The
L-shaped cut out of Top Platform (E)
should be positioned over the top of
the Scratching Pole (F).
To Install Hammock (M): Insert
one of the Hammock straps
from the bottom into one of the
slots around Circular Opening
on Hammock Platform (H). Loop
strap around the slot so the two
holes on the Hammock Strap are
overlapping. Insert T Bolt (x1) into
hole on hammock strap from the
outside and screw on Cap Nut (X)
from the inside until tight. Repeat
for remaining 3 hammock straps.
Attach Sisal Scratch Pad (N) to
the outside of Curved Panel (D)
by aligning onto the pre-attached
Velcro strips. Attach all Felt Platform
Pads (P) to Playpen Platform (A2),
Hammock Platform (H) and Top
Platform (E) by aligning onto pre-
attached Velcro strips. Insert Faux
Fur Cushion (Q) into Playpen Box.
For your safety, also install Wall
Anchor Strap (1) by wrapping Strap
around the top of Support Beam
(G). Insert Screw Anchor (2) into
wall. Then, insert Anchor Bolt (3)
and Washer (4) through Wall Anchor
Strap (1) and into Screw Anchor (2).
STEP 11 STEP 12 STEP 13 STEP 14
Need assistance? We’re here to help!
Call us TOLL FREE at 1-844-CAT-MEOW (228-6369)
View instructional video at
https://www.meowingtons.com/pages/help
Give your Building Buddy a high ve - your Tree is now ready for use! Ensure all parts are connected and securely locked into position.
Be sure to read below warnings and labels. Attach Wall Anchor Strap for your own safety.
WARNINGS & CAUTIONS
Keep all tools and instructions in a safe place for future reference.
Follow the instructions carefully and make sure to complete each step.
This cat tree is intended for cat use only, please keep children away.
Keep all small parts away from children/pets to avoid choking hazards.
Use Wall Anchor Strap to secure the cat tree to the wall.
Never climb, rock, shake, step, or hang on the cat tree.
Place your cat tree indoors, away from direct sunlight or damp areas.
Cat trees should be placed on a at, level surface for stability.
Check your cat tree often for loose screws or parts that might
need re-tightening.
If your cat tree gets torn or damaged, please discard it.
The product photo may vary slightly from your fully assembled cat tree
as this product is continually being enhanced.
●
●
●
●
●
●
●
●
●
●
●
PLEASE READ AND FOLLOW ALL WARNINGS AND INSTRUCTIONS TO AVOID PET INJURY OR PROPERTY DAMAGES.
We’d love to see your cats enjoying the tree!
Please tag us in any photos on Instagram @meowingtonsco and/or Facebook @MeowingtonsInc


