Merging Ramses MSC Operation instructions

Tu t o r i a l g u i d e

No part of this documentation may be reproduced in any form whatsoever or be stored in
any data retrieval system without prior written permission of the copyright owners.
This documentation is supplied on an as-is basis. Information contained within this docu-
mentation is subject to change at any time without notice and must not be relied upon.
All company and product names are ™ or Registered Trademarks ® of their respective
owners.
Merging Technologies manufacturers importers or dealers shall not be liable for any inci-
dental damages including personal injury or any other damages caused by improper use
or operation of the hardware or software.
Merging Technologies makes no warranties express or implied regarding this software, its
quality, performance, merchantability or fitness for a particular purpose. The software is
supplied “as is” you, the purchaser, are assuming the entire risk of the results of using this
Merging Technologies software.
In no circumstances will Merging Technologies, its owners, directors, officers, employees
or agents be liable to you for any consequential, incidental or indirect loss or damages
including loss of time, loss of business, loss of profits, loss of data or similar resulting from
the use of or inability to use the Merging Technologies hardware and or software or for
any defect in the hardware software or documentation.
© Copyright Merging Technologies Inc. 2007. All rights reserved
Merging Technologies
Le Verney 1070 Puidoux Switzerland
Tel: +41 21 946 04 44 •Fax: +41 21 946 04 45
www.merging.com

3
Ramses MSC Tutorial Guide :
Introduction 7
Scope 7
Terminology 8
The Basics 9
How to turn your console on 9
How to turn your console off 9
How to load your project 9
Important Fader Panel Indicators 10
The Active Screen (Touch Screen) 11
Channel Page Main Indicators 12
Navigation Buttons 14
Terminology 14
Inject 14
Hold 15
Undo/Redo 15
How to Store an Ergonomic Spread 16
How to store an Ergonomic Spread into a hotkey 16
How to Recall an Ergonomic Spread from a hotkey 16
EQ Section 17
Aux Section 19
How to select an Aux 19
How to select another Aux Bank 19
How to turn the selected Aux on/off 19
How to change the send level of the selected Aux 19
How to set the Pre-Post status of the selected Aux 19
How to set the In Place (IP) status of the selected Aux 19
Pan 20
Upper and Lower Active Panels 21
How to assign a channel to mix bus(stem) or deselect from mix busses(mix cut) 21
How to Assign a Signal to Group Busses 22
Other Functions on the Lower Active Panel 22
Plugins 23
Modifiers 24
Modifier 25
Ramses MSC Tutorial Guide : Contents

4
Ramses MSC Tutorial Guide :
Modifier Memory Buttons25
How to copy parameters from one channel to another 25
Solo 26
Transport Controls 27
The Main Transport Controls 27
How to manually enter a number into the Timecode Display 27
How to reset the display to 00.00.00.00 27
How to reset the display to Active Mode at any time 28
How to capture a TimeCode location while the display is in active mode 28
How to store a TimeCode location 28
How to locate to the currently displayed TimeCode location 28
How to locate to a stored TimeCode location 28
How to initiate 'Cycle' mode 28
Quick Locator Controls 29
How to store a TimeCode location into a Quick Locate memory button 29
How to locate to a TimeCode location stored in a Quick Locate Button 29
Monitoring 30
How to turn the volume of the monitors up or down 30
How to select an Internal Mix Bus to the monitors and Master Meters 30
How to select an External Source to the monitors and Master Meters 30
How to solo any Speaker Output 30
How to Dim the speakers 31
How to set the Dim level 31
How to select a different speaker set 31
How to fold-down the current Monitor set to a down-mix (mono) 31
How to switch the monitors to a predetermined reference level 31
How to set the reference level for your monitors 31
Fader and Mute etc. Grouping 32
How to find out which channels are grouped 32
How to make a new group 32
How to update the relationship between fader levels of group members 32
How to add/remove members from a group 32
How to make a mute group 33
Templates (Console Setups) 34
How to change to a different SET 34
How to copy a SET from one location to another 34
How to initialise a SET 34

Ramses MSC Tutorial Guide
5
Ramses MSC Tutorial Guide
Ramses MSC Tutorial Guide
Document number: 01-04
Date: 21-October-2007
For Ramses Console™ Software V1.5.3.2646 or higher
PRELIMINARY

Ramses MSC Tutorial Guide :
Ramses MSC Tutorial Guide 6
This page left blank intentionally

Ramses MSC Tutorial Guide 7
Ramses MSC Tutorial Guide : Introduction
Introduction
This is the guide for people who don't like guides. It aims to get you mixing as
quickly as possible, as well as introduce you to the primary concepts that the
Ramses Console uses in its operation.
For more detail on the operation of your Ramses Console, please refer to the User
Reference Manual available from your Ramses Console dealer or download it at:
www.merging.com
Scope
This guide is written for Ramses Console software version V1.5.3.2646. Although most of what is outlined
here will be relevant to other versions of the software, please check with your dealer to determine if there is
a more recent version available.
Please note also, that this manual is designed to familiarise you with your Console and does not cover the
functionalities of Pyramix.
Important Note:
This tutorial manual does not cover the two main options of Ramses namely:
•Arcoption
• Edit Bay option
Please refer to the related documents for information about those options.
Ramses MSC Tutorial Guide 8
Ramses MSC Tutorial Guide : Terminology
Terminology
For the purpose of all Ramses Console™ documentation we use the following terms:
Channel -
A mixer channel on the audio engine represented by the controls on the Ramses
Console™. This can also refer to bus masters such as Mix or Aux Bus Masters.
Slot or Physical Channel Slot
The physical channel controls present in your Ramses Console™. You will either have
8,16 or 24 of these, depending on the model and configuration of your console. A Slot
can have any channel selected to it.
Ergonomic Spread
The collection of channels/paths currently present on the console. An Ergonomic
Spread can be stored, recalled, modified etc…
Touch Screen Button
Refers to an area of the touch screen that must be touched to perform a function, not a
hardware button.
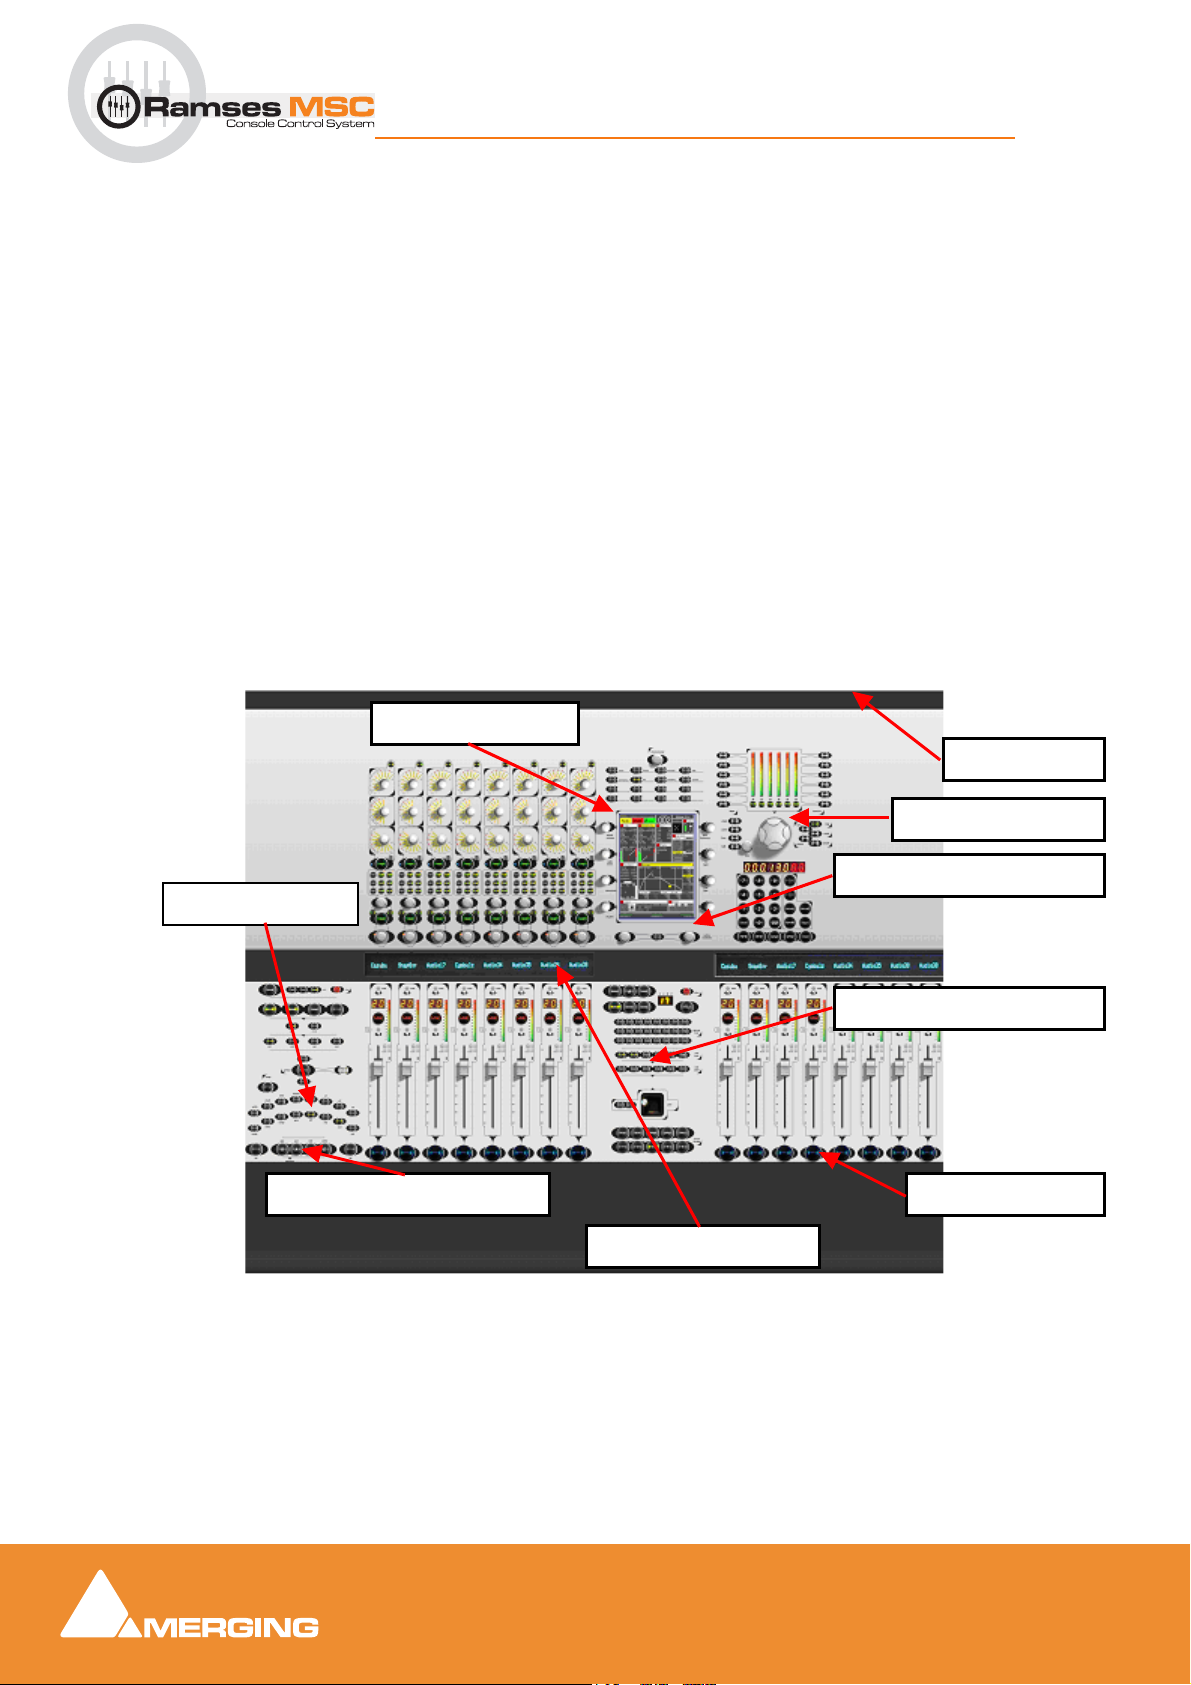
ACTIVE SCREEN
FADER DISPLAYS
NAVIGATION BUTTONS
EXPERT PANEL
HOLD BUTTONS
LOWER ACTIVE PANEL
UPPER ACTIVE PANEL
MONITOR PANEL
ON BUTTON

Ramses MSC Tutorial Guide 9
Ramses MSC Tutorial Guide : The Basics
The Basics
How to turn your console on
Assuming the Console has been correctly installed and is plugged into mains power - simply pressing the
black 'on' button on the right side of the Ramses rear panel will power on the console. The boot process
will take approximately one to two minutes.
How to turn your console off
Press the SYSTEM Button on the Upper Active Panel, then press the SHUTDOWN Active Screen Touch
Button, then confirm by pressing the CONFIRM Active Screen Touch Button.
How to load your project
Once your Console is booted, you should be able to load a project in Pyramix and start mixing. Note it is
important that the console is fully powered up before you load your project.
Please refer to the application notes specific to your engine (also available from the above website) for
guidelines as to how to best set up Ramses within the networked environment.

Ramses MSC Tutorial Guide 10
Ramses MSC Tutorial Guide : Important Fader Panel Indicators
Important Fader Panel Indicators
FADER DISPLAY
This usually shows you the channel
number or name and can display
other information depending on the
console mode such as EQ curves etc.
SOLO TOUCHPOINT AND
INDICATOR
Touch this to solo a channel. The indi-
cator will light to indicate the channel
is in solo
CHANNEL TYPE INDICATORS
G is lit when channel is a Group VCA Master
within Pyramix project. (To be implemented)
A is lit when channel is a Aux Bus Master.
M is lit when channel is a Mix Bus Master.
E will be lit for future purposes
When none is lit - channel is normal audio
channel.
HOLD BUTTON
Press this button to lock this channel
in its slot.
It will now stay in place regardless of
Ergonomic Spread recall, undo, etc…
functions
INJECT TOUCH POINT
Touch this point and then, whilst hold-
ing it, swap channels, aux, busses,
paste EQ/dyn, track arm and many
other functions.
ARMED TRACK INDICATOR
CHANNEL METER
MUTE BUTTON
CHANNEL NUMBER
AUTOMATION STATE INDICATORS
NULL INDICATORS
FADER

Ramses MSC Tutorial Guide 11
Ramses MSC Tutorial Guide : The Active Screen (Touch Screen)
The Active Screen (Touch Screen)
The blue touch screen in the Upper Active Panel gives you access to the more 'set and forget' type
parameters for the currently active channel. It can also be used to set system parameters, call special
functions etc. but most of the time it will display channel parameters.
If the Active Screen is currently displaying a System page, you can return to the channel display at any time
by pressing the EXIT Touch Button at the bottom of the display.
When the main Channel Page is shown, the four dual-concentric encoders arranged on either side of the
screen are dedicated to controlling EQ and Dynamics parameters. Each encoder’s current function will be
labelled on the screen adjacent to the controls.
The three controls below the Active Screen; the Active Encoder, the Active Button and the Active Knob
are modal i.e. they change function and generally follow whichever control has last been touched on a
channel strip, or whatever parameter is touched on the Active Screen (highlighted). The parameters they
currently control are displayed at the bottom of the Active Screen. In this way, any parameter on the
Active Screen can be selected by touching the screen and then updated using the Active controls. Try it -
touch a parameter on the Active Screen and turn the Active Encoder. Now try pressing the Active But-
ton.
Ramses MSC Tutorial Guide 12
Ramses MSC Tutorial Guide : The Active Screen (Touch Screen)
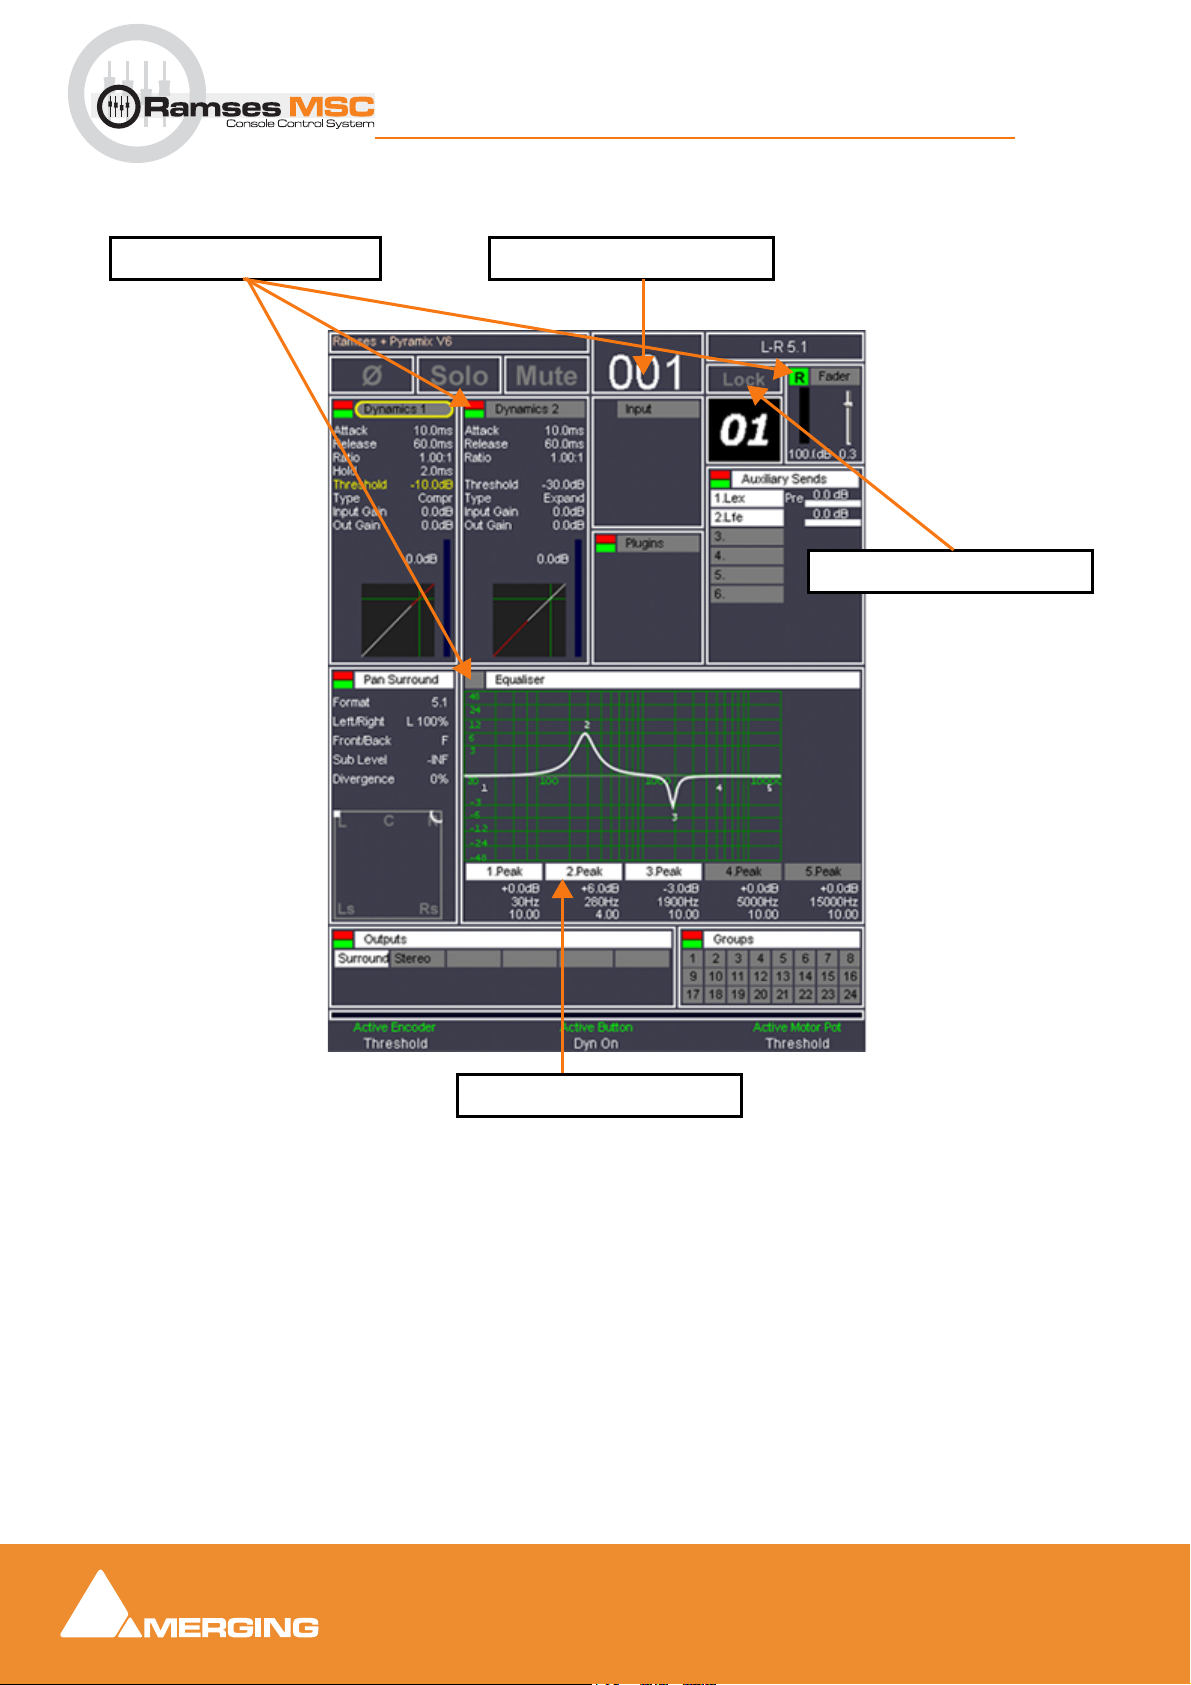
Channel Page Main Indicators
Channel Strip NumberAutomation Status
Channel Strip Lock
EQ Band Selection

Ramses MSC Tutorial Guide 13
Ramses MSC Tutorial Guide : The Active Screen (Touch Screen)
EQ and Dynamics in Main Channel Page
Assuming Showcode is set to False in the relevant configuration page then the Main Channel Page
remains visible when the EQ or Dynamics areas are touched. These areas are then highlighted to indicate
that the dual concentric controls are active.
DYNAMICS
Top = Attack
Ring = Release
Top = Ratio
Ring = Hold
Top = Threshold
Ring = Type
Top = Input Gain
Ring = Output Gain
EQ
Top = gain
Ring = frequency
Top = Q
Ring = Type
Fine Tune On / Off Bypass
Ramses MSC Tutorial Guide 14
Ramses MSC Tutorial Guide : Navigation Buttons
Navigation Buttons
Terminology
Selection of channels is referred to as channel slots to avoid confusion with a Pyramix channel/strip.
A fader layout refers to an Ergonomic Spread (fader layouts)
There are several ways of getting the channels you need to see in front of you.
• by recalling one of the 8 (previously stored) ergonomic spreads
• by using the bank (left & right) navigation
• by using the fader nudge (left & right) navigation
•byinjecting/swapping a channel into a slot
Tips & Tricks
• To reset the console to its initial state, press Bank left a few times
• To modify a bus aux/mix quickly, press AUX and hold, add your change and release
•Nudge and Bank are also valid for navigating through aux/mix busses
Inject
Inject enables you to quickly select a single channel into any available slot.
Simply hold your finger on a channel Inject Touch Point, and Bank/Nudge left or right through the avail-
able channels. You can also use the Inject Touch Point to interrogate settings on several channels (EQ's)
seeking for a desired preset. In this way you can interrogate dozens of channels quickly without shifting
your focus.
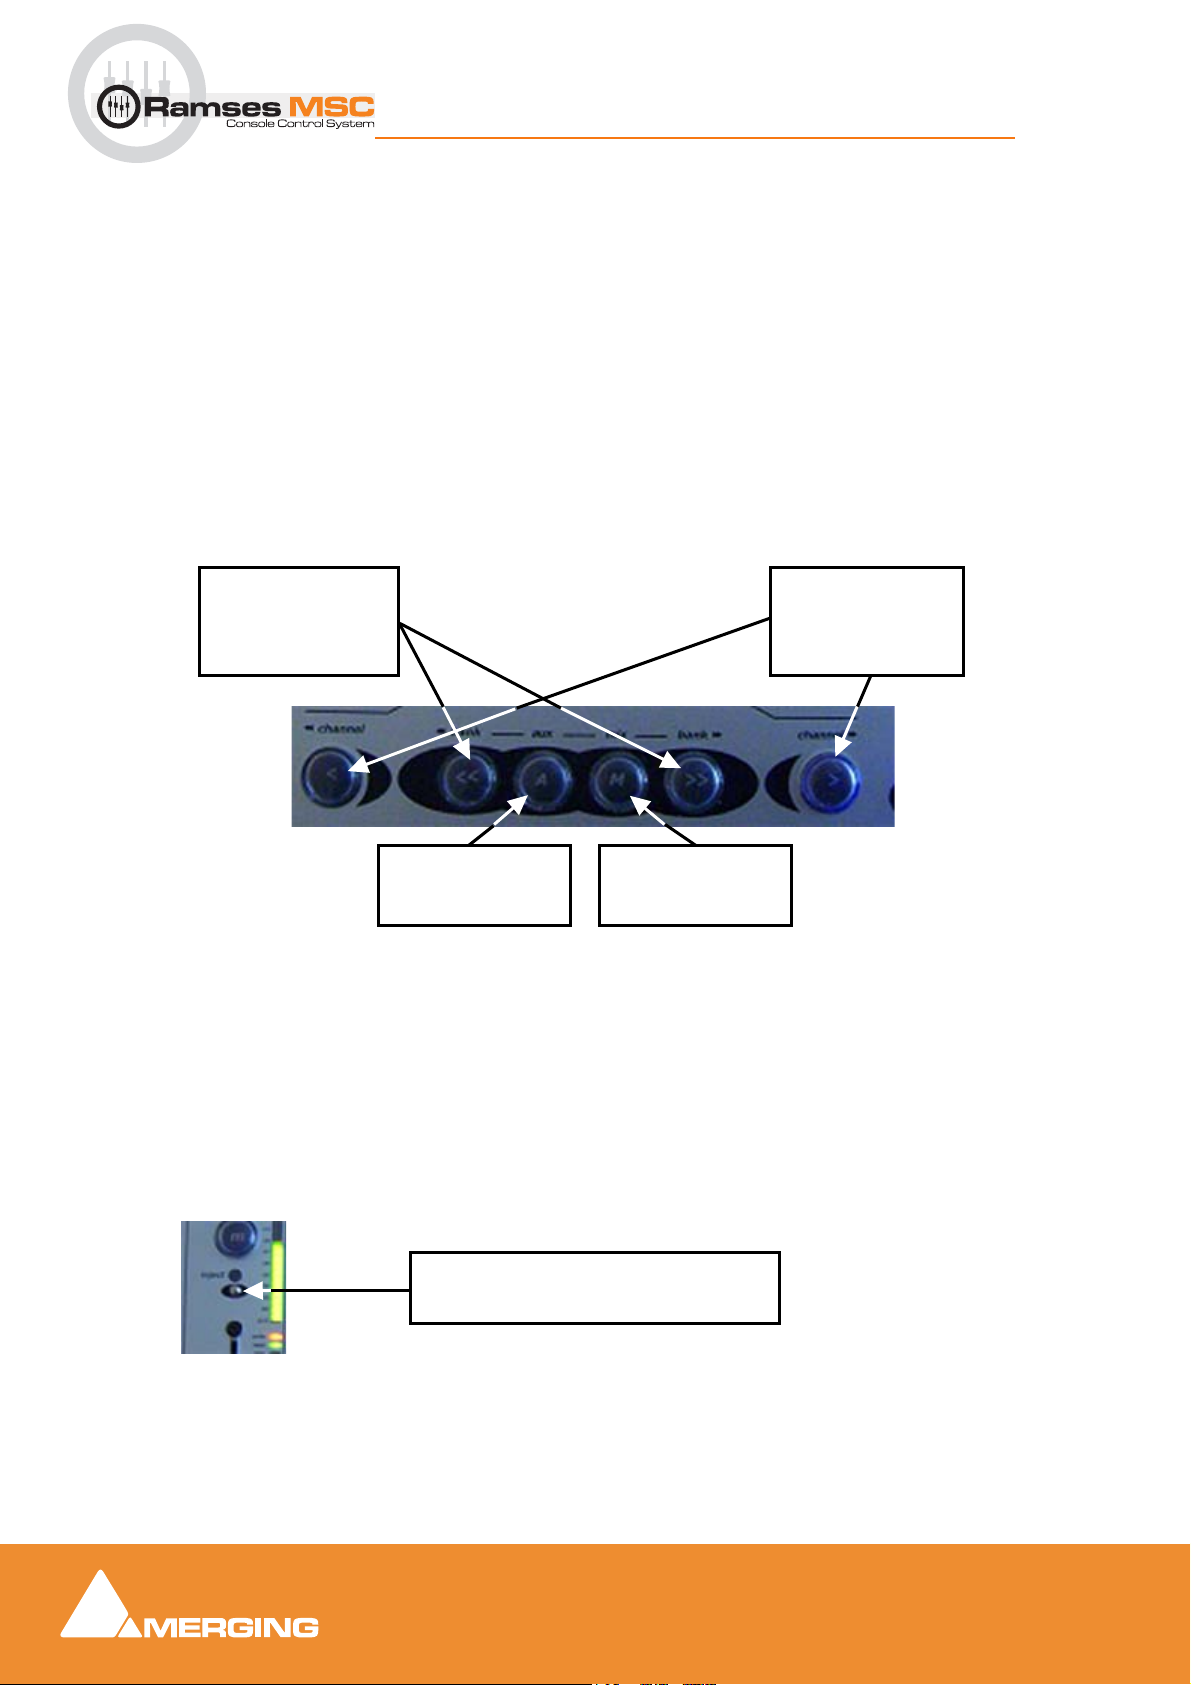
BANK L/R
Nudges from one
bank (8 channels) to
another. (Also valid
for aux & mix busses)
MIX BUSSES
Recalls Master Mix
busses
AUX BUSSES
Recalls Master Aux
busses
CHANNEL L/R
Nudges from one
channel to another
(also valid for aux &
mix busses)
Place and hold your finger on an Inject
Touch Point and then Bank/Nudge to
the desired channel to place in this slot

Ramses MSC Tutorial Guide 15
Ramses MSC Tutorial Guide : Navigation Buttons
Tips & tricks:
• To swap the channels selected into Slots 4 and 8; touch the Inject Points on the two Slots at
the same time and - the channels touched are swapped.
• To inject an aux/mix bus into a slot; hold Inject and then press AUX A and Bank/Nudge up to
the desired bus - release Inject and AUX A. Note that the blue Aled indicates that it is an Aux
Master bus
Hold
The large blue Hold buttons at the bottom of each channel slot allow channels to be locked into their phys-
ical slots. Press a Hold Button (or wipe across it with the heel of your palm) and now the channel selected
will NOT move! It will stay selected to that slot regardless of any other action such as Inject, Bank or
Nudge, recalling an Ergonomic Spread, Undo etc… This is useful for Master busses or anything else
you want to ensure instant access to.
Undo/Redo
The Undo/Redo buttons refer only to Ergonomic Spreads. They are in no way related to actual mixer
parameters. So pressing Undo recalls that last Ergonomic Spread you had in front of you. There are 100
levels of Undo and Redo. Use this to quickly get back to the channels you had a second ago.
Note: Hold buttons over-ride the Undo/Redo and Recall of Ergonomic Spreads.
Ramses MSC Tutorial Guide 16
Ramses MSC Tutorial Guide : Navigation Buttons
How to Store an Ergonomic Spread
If you have an Ergonomic Spread in front of you that you like and wish to recall at will, you can either save
it into one of the four Hot-keys (erg 1 - 4) on the Expert Panel (for one-touch recall), or into four memories
(erg 5 - 8) using the MOD (modifier) button (for two-touch recall).
How to store an Ergonomic Spread into a hotkey
Press the Store button on the Expert Panel and then press the Hotkey (erg 1 - 4) you wish to store the
Spread into. You can tell which Hotkeys contain Spread information since, once in Store mode, any Hotkey
with an Ergonomic Spread Stored will be illuminated. The same applies for the 4 ergonomic spreads (erg 5
- 8) using the mod key. Hold mod, press store and then select and press the desired Hotkey.
How to Recall an Ergonomic Spread from a hotkey
Simply press the relevant Hotkey (for erg 1 - 4) and the mod button and Hotkey for erg 5 - 8.
Note: This does not over-ride channels with Hold buttons lit.
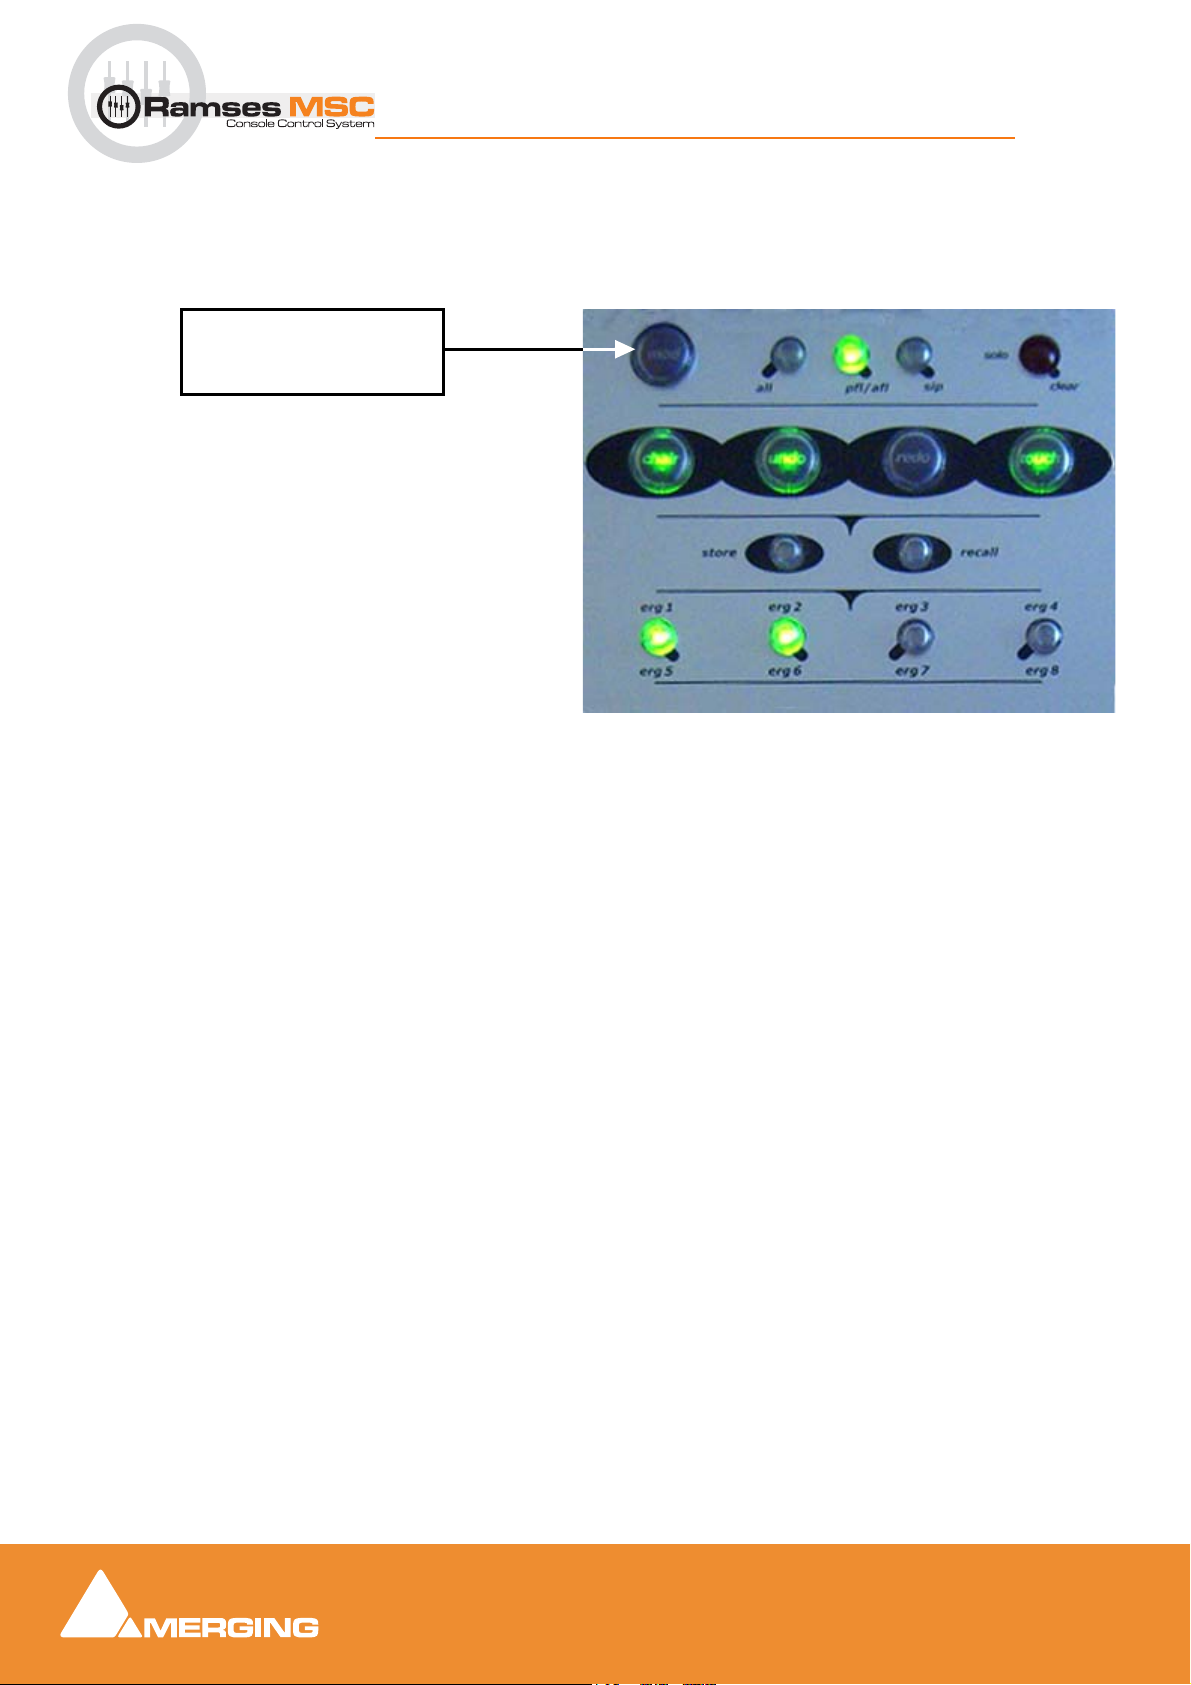
MOD
Modifier button for Ergonomic
Spreads and more

Ramses MSC Tutorial Guide 17
Ramses MSC Tutorial Guide : EQ Section
EQ Section
Each Channel Strip has a series of dedicated EQ controls. There are three Dual Concentric Encoders, the
top of which control the gain and the bottom the frequency for each band. The settings of each EQ band
are displayed using the EQ Fans around each encoder.
EQ Fans
The number of LED's lit in
each “spoke” represents the
degree of cut or boost applied
by this band of EQ. When
cutting, the spoke grows from
the rim towards the centre of
the EQ Fan, when boosting
the spoke grows from the
centre towards the rim. The
exact amount of cut or boost
is displayed on the Active
Screen (see chart below).
Shelf
The low pass Shelving Button switches the
top band of EQ to a shelving type filter. This
also changes the EQ Fan display to Shelving
mode.
Shelf
The high pass Shelving Button switches the
bottom band of EQ to a shelving type filter.
This also changes the EQ Fan display to
Shelving mode.
Master EQ
The Master EQ Button toggles the entire EQ
section in/out of the signal path.
LPF Indicator
The LPF Indicator is lit whenever the LPF Fil-
ter is engaged - This parameter is controlled
through the Active Panel (see below).
Out of Range
The Out Of Range Indicators are lit when the
frequency selected is outside the EQ Fan's
display range.
Rim Light
A Rim Light is lit whenever
this band of EQ is engaged.
green indicates no cut/boost,
red indicates cut and yellow
indicates boost. Each spoke
is lit whenever the selected
frequency is the same as or
higher than the frequency
marked next to the spoke.
More Indicator
The 'More' Indicator is lit
whenever there is more EQ
applied than is displayed by
the channel strip EQ controls
- such as additional bands of
EQ.
HPF Indicator
The HPF Indicator is lit whenever the HPF Fil-
ter is engaged - This parameter is controlled
through the Active Panel (see below).
EQ Fan Spoke Display
No Spoke LEDs illuminated = No Cut or Boost Applied
1 Spoke LEDs illuminated = up to 1.99 dB Cut or Boost
2 Spoke LEDs illuminated = 2 to 3.99 dB Cut or Boost
3 Spoke LEDs illuminated = 4 to 5.99 dB Cut or Boost
4 Spoke LEDs illuminated = 6 to 9.99 dB Cut or Boost
5 Spoke LEDs illuminated = 10 to 14.99 dB Cut or Boost
6 Spoke LEDs illuminated = more than 15 dB Cut or Boost

Ramses MSC Tutorial Guide 18
Ramses MSC Tutorial Guide : EQ Section
For access to EQ controls additional to those on the channel strip, such as Q, band in/out and Filter con-
trols - use the Active Panel. Please see: The Active Screen (Touch Screen) on page 11.
Tips & tricks:
• to change the "Q" factor directly from the strip you can use the dual-concentric encoder. Sim-
ply press and hold "mod" then turn the top encoder to change the "Q" factor of the EQ band.

Ramses MSC Tutorial Guide 19
Ramses MSC Tutorial Guide : Aux Section
Aux Section
The Aux section allows control over 12 discreet Aux Sends per channel (1 to 8 channels), and 6 Sends for
N-1 Mixes and/or Talkbacks You can also see the settings for all Aux's on the Active Screen. Please see:
The Active Screen (Touch Screen) on page 11.
The sends are divided into into three banks (A,B,C) A & B are for standard Aux's and bank C is used for N-
1 (mix minus) Mixes and talkback (please refer to the monitor section of the Pyramix User Manual)
How to select an Aux
Press its Aux Select Button - the yellow Selected indicator will light above that button.
How to select another Aux Bank
Press its Aux Bank Button - the yellow Selected indicator will light above that button.
How to turn the selected Aux on/off
Press the Aux Button.
How to change the send level of the selected Aux
Turn the Aux Knob.
How to set the Pre-Post status of the selected Aux
Press the PF (Pre Fader) button (lit = pre fader).
How to set the In Place (IP) status of the selected Aux
Press the IP (In Place) button (lit = in place). Refer to Pyramix Manual for more details.
AUX PRE FADER BUTTON
AUX BANK A-B-C SELECT
BUTTONS
AUX SELECT INDICATORS
(1-6)
AUX KNOB
AUX IN PLACE BUTTON
AUX SELECT BUTTONS
(1-6)
AUX BANK SELECT A-B-C
INDICATORS
AUX ON/OFF BUTTON

Ramses MSC Tutorial Guide 20
Ramses MSC Tutorial Guide : Pan
Pan
The Pan encoder on the channel strip allows pan control from left to right in the pan field. For surround
panning, use the Joystick on the Active Panel. Please see: How to Pan using the Joystick on page 21
. Divergence and LFE controls can also be updated from the Active Panel.
The channel strip Pan encoders display surround information as well as the left to right position. There will
always be a single LED to indicate the left to right position - this LED travels from 9 o'clock to 3 o'clock
across the top of the encoder. If there is any front to back information, the bottom 5 LED's below this line
display this position.
Additionally:
• If there is no front-to-back information, the bottom front-to-back LEDs will not be lit.
• If the pan position is all the way to the front, the bottom front-to-back LEDs will not be lit.
• If there is front-to-back information but the pan position is all the way to the left, only the left
front-to-back LED will be lit.
• If there is front-to-back information but the pan position is all the way to the right, only the right
front-to-back LED will be lit.
THESE LEDS SHOW LEFT TO RIGHT POSITION
THESE LEDS SHOW FRONT TO BACK POSITION
Table of contents
Popular Music Mixer manuals by other brands


ALLEN & HEATH
ALLEN & HEATH MixWizard Series user guide

SteelSeries
SteelSeries Spectrum quick start guide

Behringer
Behringer X32 DIGITAL MIXER quick start guide

Total Recall VR
Total Recall VR TRVR Audio Mixer quick start guide

Topp Music Gear
Topp Music Gear MXI Series user manual

Phonic
Phonic POWERPOD 1860 Plus user manual