Merlaud DRS 849 L-M Instruction Manual
DOCUMENT NON CONTRACTUEL SPECIFICATIONS SUBJECT TO MODIFICATIONS
MERLAUD
9 rue de La Briqueterie - P.A.E. des FAUVETTES - 95330 DOMONT (FRANCE)
erlaud
NOTICE D’UTILISATION ET DE DEPANNAGE / OPERATION & MAINTENANCE INSTRUCTIONS
PUPITRES D’APPELS / PAGING DESKS DRS 849 L-M
Code 2615
DO3-51-2615-DRS849L_M-V190505 Page 1/7
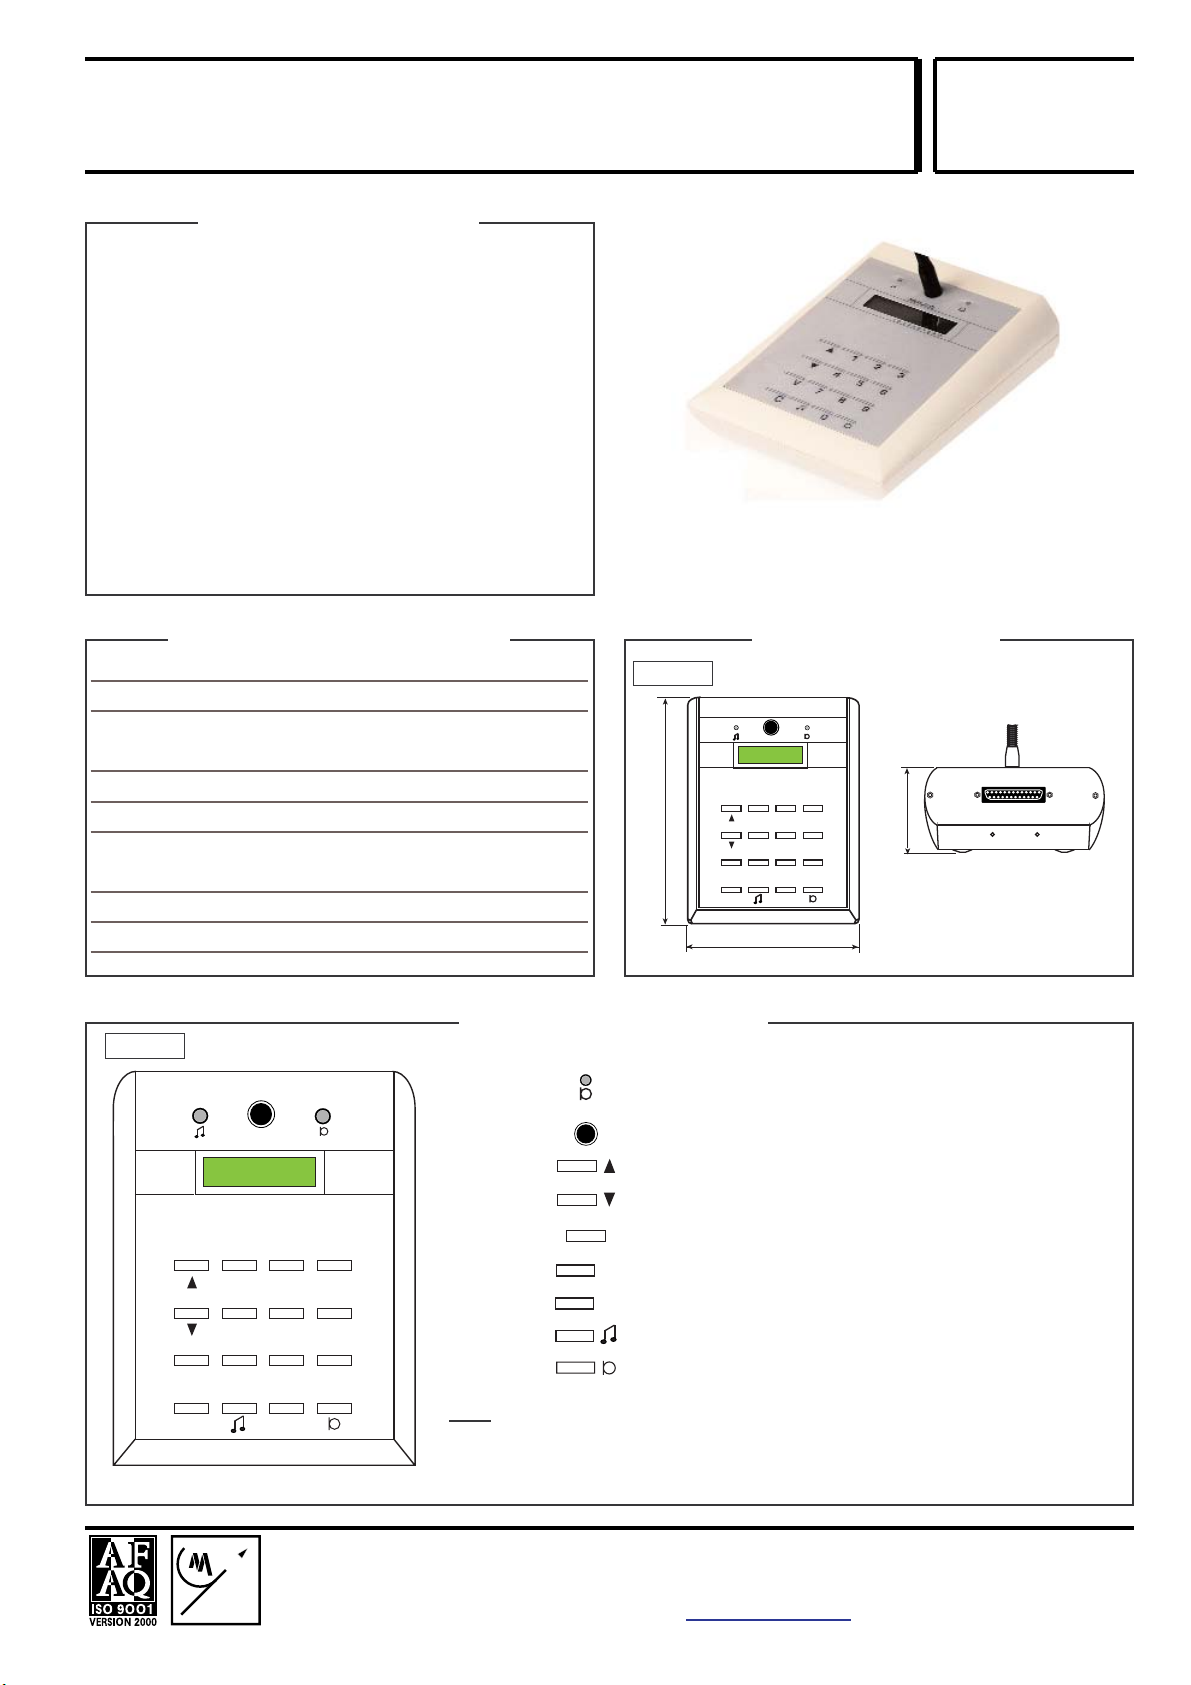
SPECIFICATIONS / SPECIFICATIONS
• Clavier Tactile pour la sélection de zones
• Afficheur LCD pour la signalisation.
• Préamplificateur
• Carillon numérique avec Led de signalisation
• Pupitre entièrement surveillé à partir de la capsule Micro, compatible
avec les exigences de la norme 60849.
• Soft keypad for zone selection
• LCD display
• Preamplifier
• Digital chime with signaling Led
• Fully monitored including the microphone head in conformity with
European standard 60849 for Emergency Evacuation system.
DESCRIPTION / DESCRIPTION
DRS849L-M
Code 2615
Sortie -10dB / Sym avec transfo
Output -10dB / Sym with transformer
Bande passante / Bandwidth 100-12000Hz
Clavier souple / Soft touch keypad 4 x 4
Afficheur LCD - 1 ligne 16c
Display LCD - 1 ligne 16c
Alimentation / DC supply 24V CC
Consommation / Consumption 250mA
1
4
7V
C
2
5
8
0
3
6
9
Merlaud
1 2 3 4 5 6 7 8 9 10
1 : Led carillon ou micro / Chime or
Talk Led
2 : Micro ADU400 / Mic ADU400
4 : Navigation Haut / Selection button
5 : Navigation Bas / Selection button
6 : numérotation 0 à 9 / Push button
7 : Validation / Validation
8 : Annulation / Cancel
9 : Carillon / Chime push to talk
10 : Appel Micro / Mic push to talk
PANNEAU AVANT / FRONT PANEL
0 - 9
V
C
1
4
7V
C
2
5
8
0
3
6
9
Merlaud
1 2 3 4 5 6 7 8 9 10
75 mm
150 mm
200 mm
DIMENSIONS / DIMENSIONS
Fig :1
Fig :2
NB :
Led 1 clignotante Carillon ON > Led 1 fixe Micro ON
Led 1 Blinking = Chime on going > Led On = Microphone switched ON
MERLAUD
9 rue de La Briqueterie - P.A.E. des FAUVETTES - 95330 DOMONT (FRANCE)
erlaud
NOTICE D’UTILISATION ET DE DEPANNAGE / OPERATION & MAINTENANCE INSTRUCTIONS
PUPITRES D’APPELS / PAGING DESKS DRS 849 L-M
Code 2615
DO3-51-2615-DRS849L_M-V190505 Page 2/7
DOCUMENT NON CONTRACTUEL SPECIFICATIONS SUBJECT TO MODIFICATIONS
MAN918
DRS 849
SE849DRS
P1 P2 P3 P4 P5 P6 P7 Type MAN918
Code 3300
DB9 M
DB9 M
DB25 F
DB9M
DB9F
DB9F
RS
DB25M
MATRICE
PUPITRE PUPITRE
Masse Terre
ST1
FUS 1
500mA
RL1
RL2
CA1
CA1
Appel
surveillØ Appel non
surveillØ
DB9 F
DB9 M
V4 V5
CORDON Code : 2568 CORDON Code : 2569
1234
6789
5
DB9M VERS
SE849DRS
’PUPITRE’
Code : 2569
DRS849LM > SE849 DRS
DB9M VERS
SE849DRS
’RS’
Masse
Masse
GND
Rx+
Tx-
Tx+
Rx-
BF
BF
BF
BF
+24V
+24V
+24V
Rx-
Tx+
Tx- Pupitre
Num
Ana
Ana
Num
Pupitre
Pupitre
Pupitre
Rx+
DB25F VERS
DRS 849
432
16 15 14
165
817
87
20 19 18
10 9
22 21
12 11
823
13
25 24
1234
6789
5
Bleu
Rouge
Blanc
Tresse
Vert
Blanc
Rouge Bleu
Vert
Blanc
Marron Marron
Blanc
Blanc
Bleu
Blanc
Bleu
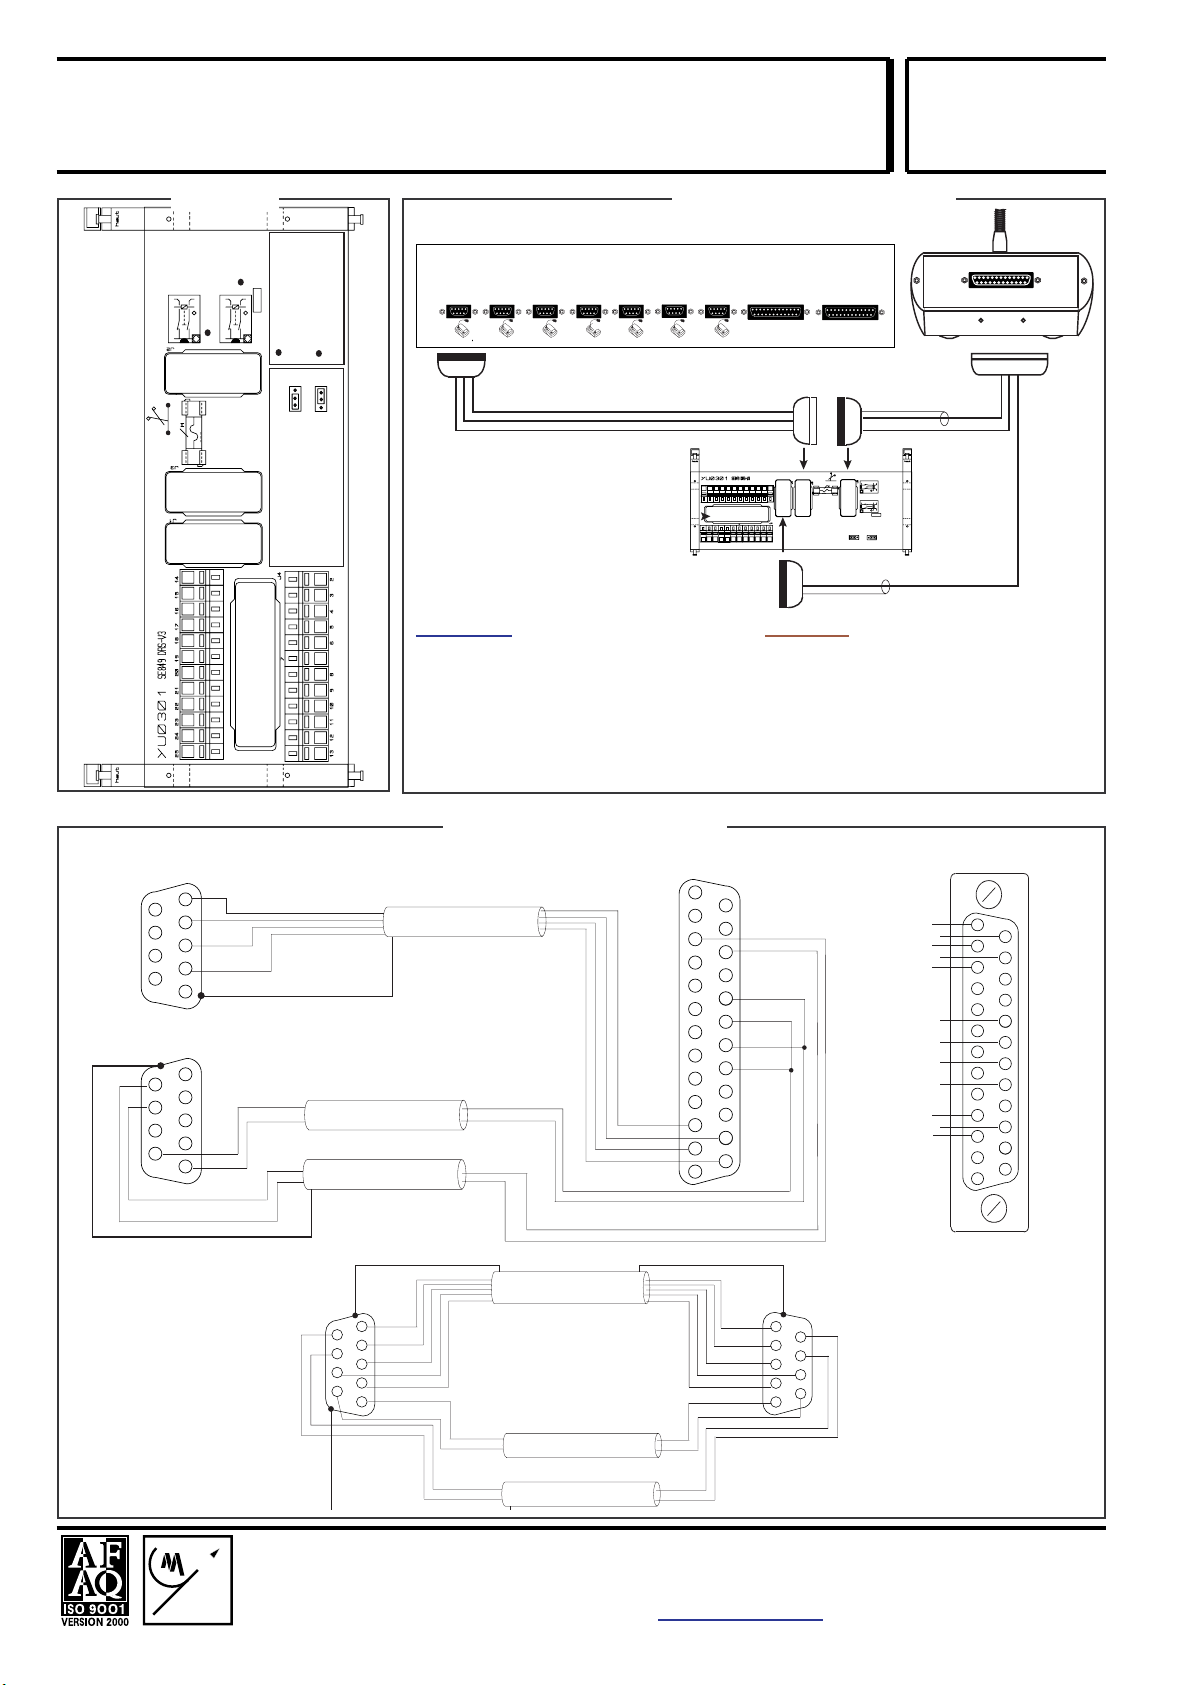
INSTALLATION / INSTALLATION
CONNEXIONS / CONNECTIONS
DB9M
DB9F
DB9F
RS
DB25M
MATRICE
PUPITRE PUPITRE
Masse Terre
ST1
FUS 1
500mA
RL1
RL2
CA1
CA1
Commande SURVEILLEE
Surveillance of Control line
Commande non SURVEILLEE
No Surveillance of Control line
D6
D6 Led ON
Pas de DEFAUT
No Faults
Led ON
Commande active
Control active
D7
D7
SE849DRS
BF- sortie - 3
Blindage BF - 4
TX- - 11
RX- - 12
Gnd pour RS - 13
BF+ sortie - 16
Gnd Alim Ana - 18
+24V Alim Ana - 19
Gnd Alim Num- 20
+24V AliM Num - 21
TX+ - 24
RX+ - 25
10 11 12
23 24 25
1389
822
67
19 20 21
45
17 18
23
816
1
14 15
DB25M DRS849
VERS
SE849DRS
DB9F
VERS
MAN 918
DB9M
Masse
BF
BF
DEFAUT
+24V
5432
9876
1
Code : 2568
MAN918 > SE849 DRS
1234
6789
5
Pup Rx-
Pup Tx+
Pup Tx-
Pup Rx+
Masse
BF
BF
DEFAUT
+24V
Pup Rx-
Pup Tx+
Pup Tx-
Pup Rx+
Blanc
Bleu
Blanc
Bleu
Rouge
Blanc
Tresse
T
Bleu
Vert
Noir
Bleu
Tresse
Vert
Blanc
Rouge
Noir
Blanc
Marron
Marron
Blanc
Attention! :
- La cavalier CA1 doit être en position :
Commande non surveillée
- Ne pas Oublier de configuer les
entrées en utilisant l’interface MANCOM
Caution! :
- Jumper CA1 should be in position :
No Surveillance of Control line
- Do not forget to configure Inputs using
MANCOM interface.

DOCUMENT NON CONTRACTUEL SPECIFICATIONS SUBJECT TO MODIFICATIONS
MERLAUD
9 rue de La Briqueterie - P.A.E. des FAUVETTES - 95330 DOMONT (FRANCE)
erlaud
NOTICE D’UTILISATION ET DE DEPANNAGE / OPERATION & MAINTENANCE INSTRUCTIONS
PUPITRES D’APPELS / PAGING DESKS DRS 849 L-M
Code 2615
DO3-51-2615-DRS849L_M-V190505 Page 3/7
CONFIGURATION / CONFIGURATION
YU4825
Y0300-V2
YU0303
YU0302
Fig :5
Réglage volume Micro
Mic Level control
Réglage volume Carillon
Chime Level control
DB25M

MERLAUD
9 rue de La Briqueterie - P.A.E. des FAUVETTES - 95330 DOMONT (FRANCE)
erlaud
NOTICE D’UTILISATION ET DE DEPANNAGE / OPERATION & MAINTENANCE INSTRUCTIONS
PUPITRES D’APPELS / PAGING DESKS DRS 849 L-M
Code 2615
DO3-51-2615-DRS849L_M-V190505 Page 4/7
DOCUMENT NON CONTRACTUEL SPECIFICATIONS SUBJECT TO MODIFICATIONS
A INSTALLATION
1. Destination
Pupitre d'appels à commande numérique. Il est compatible
avec les exigences de la norme 60849 pour la surveillance. Il
permet une sélection de zones par clavier et afficheur à travers
une liaison série.
2.CONFIGURATION
cf Page 2
3.BRANCHEMENTS
cf Page 2
4.RÉGLAGES
4.1. Niveau du Signal Audio 'Microphone' :
cf Page 3
4.2. Niveau du Carillon
cf page 3
5.PROGRAMMATION
5.1. Numéro d'affectation (adresse) :
Il est possible de relier plusieurs pupitres à un PC ou à une
matrice type MAN918.
Pour permettre de dialoguer individuellement avec chaque
pupitre, il faut lui affecter une adresse spécifique et unique.
Celui qui reconnaît son adresse, répondra à une requête.
Pour changer le numéro d'affectation :
- Taper sur le clavier le code 130 puis sur la touche 'V' pour
valider et renter dans le mode de programmation
- Le numéro actuel s'affiche
- Saisir le numéro désiré (1 à 9) puis sur la touche 'V' pour
valider
- Le pupitre redémarre.
NB :
- Il faut vérifier que l'équipement qui gère les pupitres est
configuré pour reconnaître le numéro d'affectation du pupitre.
5.2. Affectation des CODES (MAN918 uniquement) :
Il est possible d’affecter des fonctions (Groupement de zones,
Sélection de la source Musique et commutation des 3 contacts
de sorties 22? 23 et 24) aux codes 105 à 124. Voir la notice de
l’outil de configuration MANCOM.
A INSTALLATION
1. Destination
Digital paging desk compliant with EN 60849 standard
requirements as it is fully monitored. It allows a selection
of zones per keyboard with display through a serial link.
2. CONFIGURATION
cf Page 2
3. CONNECTIONS
cf Page 2
4. LEVEL CONTROLS
4. 1. ' Microphone' Audio Signal level
cf Page 3
4. 2. Chime level
cf Page 3
5. PROGRAMMING
5. 1. Address number assignment
It is possible to connect several desks to a PC or to a standard
matrix MAN918.
in order to be able to communicate with each paging desk individually,
a specific number must be assigned to each paging desk.
the paging desk can reply to any request only he have
identified this specific number .
To change the number of assignment:
- Enter using the keyboard code 130 then validate by the key ' V' :
- The current number is displayed
- Enter the desired number (1 to 9) then push on the key ' V' to validate
- The desk starts again.
NB:
- It should be checked that the equipment which manages the
desks is configured to recognize the number of assignment of
the desk.
5. 1. Codes assignment (ONLY with MAN918)
It is possible to assign different functions (one grouping, Music
source selection and 3 output contacts switching) to the codes
from 105 to 124.
DOCUMENT NON CONTRACTUEL SPECIFICATIONS SUBJECT TO MODIFICATIONS
MERLAUD
9 rue de La Briqueterie - P.A.E. des FAUVETTES - 95330 DOMONT (FRANCE)
erlaud
NOTICE D’UTILISATION ET DE DEPANNAGE / OPERATION & MAINTENANCE INSTRUCTIONS
PUPITRES D’APPELS / PAGING DESKS DRS 849 L-M
Code 2615
DO3-51-2615-DRS849L_M-V190505 Page 5/7
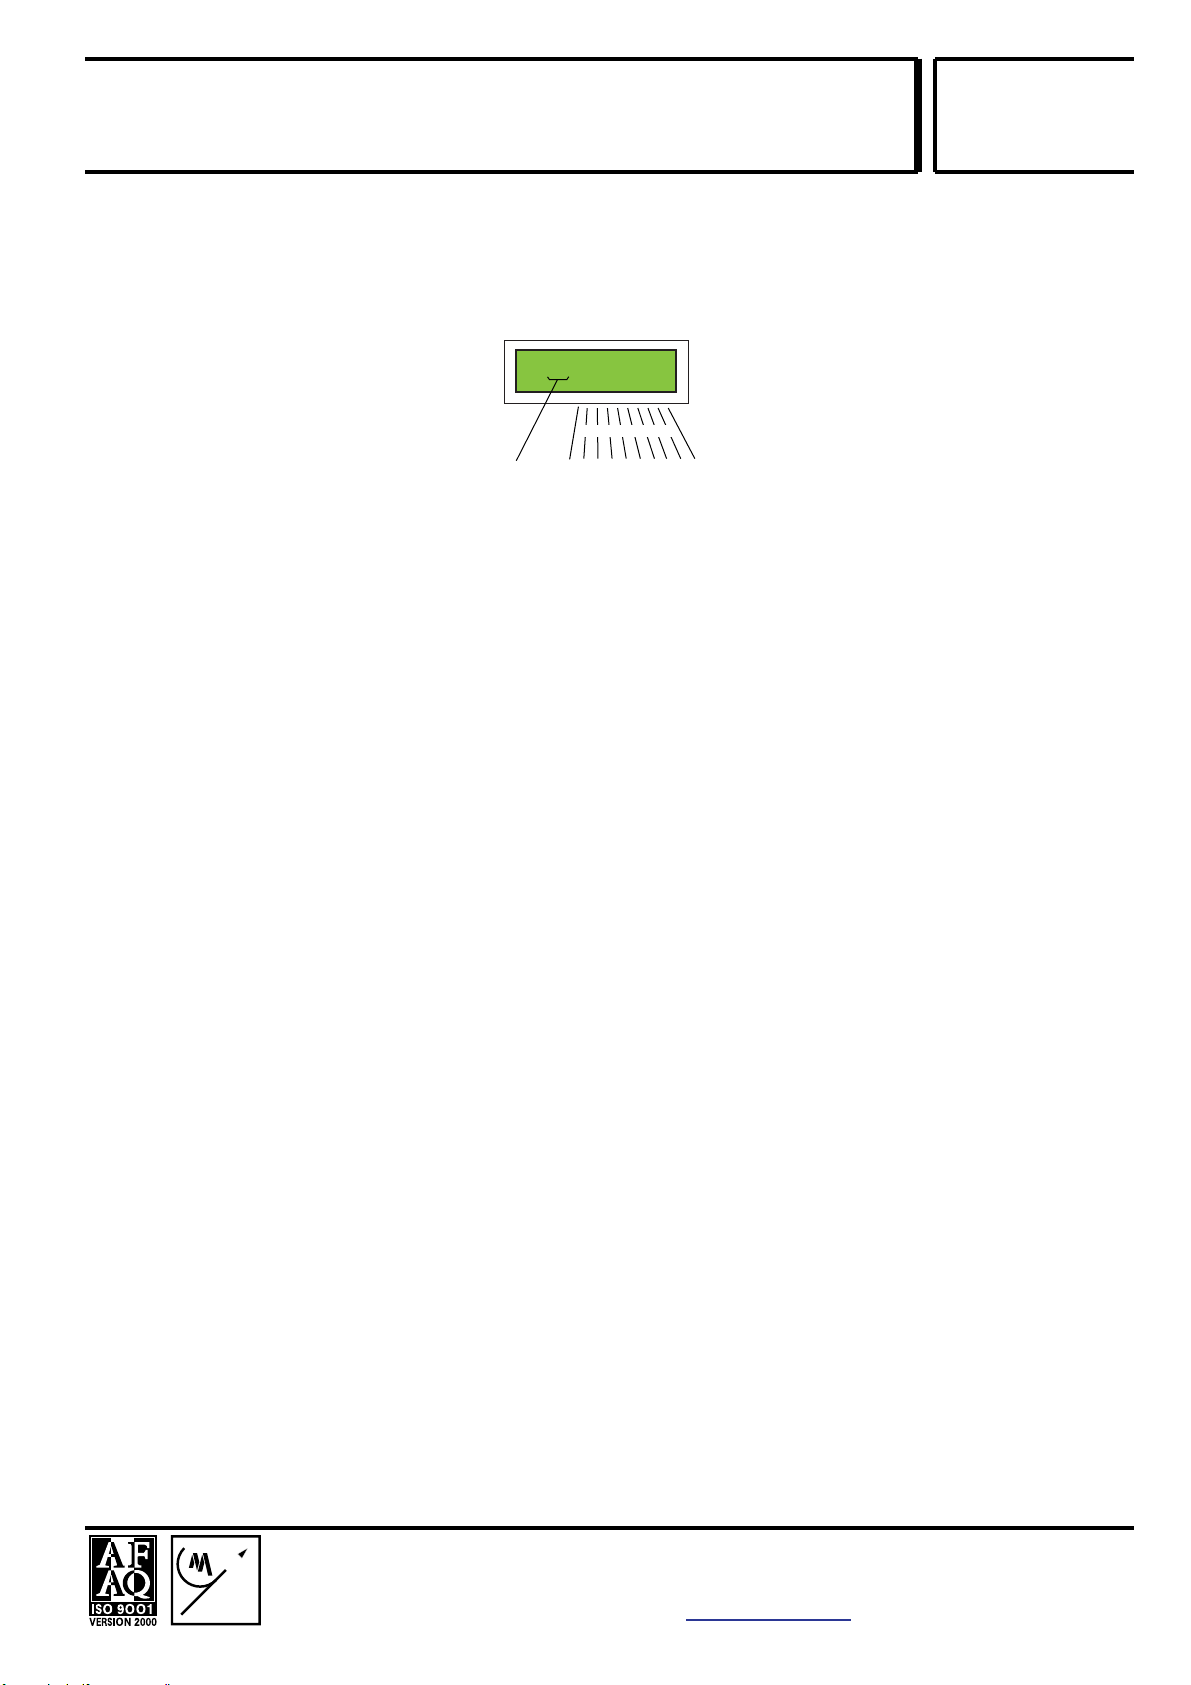
6.AFFICHAGE
6.1 Description :
L'afficheur comprend une Ligne de 16 caractères. Il est
possible d'afficher l'état de 90 zones. Chaque ligne permet
d'afficher l'état de 10 zones comme suit :
- Caractères fixes 1 à 3 et 6 : Z = > xx :
- Caractères 4 et 5 (xx) pour le Groupe
de zones :
0 0 = zones 1 à 10
1 0 = zones 11 à 20
2 0 = zones 21 à 30
3 0 = zones 31 à 40
4 0 = zones 41 à 50
5 0 = zones 51 à 60
6 0 = zones 61 à 70
7 0 = zones 71 à 80
8 0 = zones 81 à 90
- Caractères 7 à 16 pour les zones : ils prennent les valeurs 1
à 9 en fonction du numéro de la source qui occupe la zone et
la valeur 'q' si la Musique est configurée sur ces zones. La
valeur 'X' s'affiche sur le pupitre qui occupe la zone.
- Caractère 7 correspond à : zone1 si xx = 00, zone11 si xx =
10, zone21 si xx=20, …, zone81 si xx=80
- Caractère 8 correspond à : zone2 si xx = 00, zone12 si xx =
10, zone22 si xx=20, …, zone82 si xx=80
- Caractère 9 correspond à : zone3 si xx = 00, zone13 si xx =
10, zone23 si xx=20, …, zone83 si xx=80
- Caractère 10 correspond à : zone4 si xx = 00, zone14 si xx =
10, zone24 si xx=20, …, zone84 si xx=80
- Caractère 11 correspond à : zone5 si xx = 00, zone15 si xx =
10, zone25 si xx=20, …, zone85 si xx=80
- Caractère 12 correspond à : zone6 si xx = 00, zone16 si xx =
10, zone26 si xx=20, …, zone86 si xx=80
- Caractère 13 correspond à : zone7 si xx = 00, zone17 si xx =
10, zone27 si xx=20, …, zone87 si xx=80
- Caractère 14 correspond à : zone8 si xx = 00, zone18 si xx =
10, zone28 si xx=20, …, zone88 si xx=80
- Caractère 15 correspond à : zone9 si xx = 00, zone19 si xx =
10, zone29 si xx=20, …, zone89 si xx=80
- Caractère 16 correspond à : zone10 si xx = 00, zone20 si xx
= 10, zone30 si xx=20, …, zone90 si xx=80
6. DISPLAY
6. 1 Description:
The display panel includes a line of 16 characters. It is possible
to display the state of 90 zones. Each line allows to display the
status of 10 zones as follows:
- Fixed characters 1 to 3 and 6: Z = >
xx:
- Characters 4 and 5 (xx) for the
Group of zones:
0 0 = zones 1 to 10
1 0 = zones 11 to 20
2 0 = zones 21 to 30
3 0 = zones 31 to 40
4 0 = zones 41 to 50
5 0 = zones 51 to 60
6 0 = zones 61 to 70
7 0 = zones 71 to 80
8 0 = zones 81 to 90
- Characters 7 to 16 for the zones: they take values 1 to 9
according to the number of the source which occupies the zone
and the value ' q' if the Music is configured on these zones. The
value ' X' is displayed on the desk which occupies the zone.
- Character 7 corresponds to: zone1 if xx = 00, zone11 if xx =
10, zone21 if xx=20…, zone81 if xx=80
- Character 8 corresponds to: zone2 if xx = 00, zone12 if xx =
10, zone22 if xx=20…, zone82 if xx=80
- Character 9 corresponds to: zone3 if xx = 00, zone13 if xx =
10, zone23 if xx=20…, zone83 if xx=80
- Character 10 corresponds to: zone4 if xx = 00, zone14 if xx =
10, zone24 if xx=20…, zone84 if xx=80
- Character 11 corresponds to: zone5 if xx = 00, zone15 if xx =
10, zone25 if xx=20…, zone85 if xx=80
- Character 12 corresponds to: zone6 if xx = 00, zone16 if xx =
10, zone26 if xx=20…, zone86 if xx=80
- Character 13 corresponds to: zone7 if xx = 00, zone17 if xx =
10, zone27 if xx=20…, zone87 if xx=80
- Character 14 corresponds to: zone8 if xx = 00, zone18 if xx =
10, zone28 if xx=20…, zone88 if xx=80
- Character 15 corresponds to: zone9 if xx = 00, zone19 if xx =
10, zone29 if xx=20…, zone89 if xx=80
- Character 16 corresponds to: zone10 if xx = 00, zone20 if xx
= 10, zone30 if xx=20…, zone90 if xx=80
1 2 3 4 5 6 7 8 9 10
Groupe de zones
0 0 : Zones 1 2 3 4 5 6 7 8 9 10
1 0 : Zones 11 12 13 14 15 16 17 18 19 20
2 0 : Zones 21 22 23 24 25 26 27 28 29 30
3 0 : Zones 31 32 33 34 35 36 37 38 39 40
4 0 : Zones 41 42 43 44 45 46 47 48 49 50
5 0 : Zones 51 52 53 54 55 56 57 58 59 60
6 0 : Zones 61 62 63 64 65 66 67 68 69 70
7 0 : Zones 71 72 73 74 75 76 77 78 79 80
8 0 : Zones 81 82 83 84 85 86 87 88 89 90
z=>xx: . . . . . . . . . .
zones correspondantes
MERLAUD
9 rue de La Briqueterie - P.A.E. des FAUVETTES - 95330 DOMONT (FRANCE)
erlaud
NOTICE D’UTILISATION ET DE DEPANNAGE / OPERATION & MAINTENANCE INSTRUCTIONS
PUPITRES D’APPELS / PAGING DESKS DRS 849 L-M
Code 2615
DO3-51-2615-DRS849L_M-V190505 Page 6/7
DOCUMENT NON CONTRACTUEL SPECIFICATIONS SUBJECT TO MODIFICATIONS
6.2 Défilement de l'affichage :
Dès qu'une zone est occupée, à l'exception d'une occupation
par l'entrée 'Musique', le premier caractère de l'afficheur 'Z'
clignote. Pour visualiser chaque ensemble de 10 zones sur
l'afficheur utiliser les touches < et >.
NB : Le rétro-éclairage est éteint au repos et se met en route
dès qu'une touche est appuyée puis s’éteint automatiquemnet
après un laps de temps.
7.FONCTIONNEMENT
7.1. Démarrage :
Dès que le pupitre est branché la version du logiciel s'affiche,
puis le numéro d'affectation du pupitre et finalement l'état des
zones occupées.
7.2. Dialogue avec la centrale :
Dès qu'un pupitre est branché à la centrale et que celle ci est
configurée correctement l'interrogation des pupitres connectés
est permanente. Les pupitres sont 'Escalve' de la centrale de
sonorisation. La centrale interroge les pupitres pour récupérer
les requêtes de commutations et pour signaler aux pupitres
l'état des zones. Le protocole de dialogue prévoit plusieurs
interrogations successives ainsi qu'un temps de latence entre
les différentes interrogations. Afin de limiter le trafic, le
rafraîchissement des pupitres s'effectue lors du démarrage du
système, d'un changement d'état des commutations ou suite à
un redémarrage du pupitre.
7.3. Correspondance des Boutons :
Le clavier comprend 10 chiffres allant de 0 à 9. La
correspondance des boutons est fonction de la méthode de
gestion des claviers par la centrale de sonorisation.
7.3.1. Utilisation avec MAN918
7.3.1.1 Zones Individuelles :
Le numéro saisi sur le clavier correspond au numéro de la
zone : 1 = zone 1, 2 = zone 2, 3 = zone 3,…
7.3.1.2 Zones Groupées :
- 91 correspond à un appel groupé sur les zones 1 à 18
- 92 correspond à un appel groupé sur les zones 19 à 36
- 93 correspond à un appel groupé sur les zones 37 à 54
- 94 correspond à un appel groupé sur les zones 55 à 72
- 95 correspond à un appel groupé sur les zones 73 à 90
- 96 correspond à un appel général
- 105 à 124 selon programmation
7.3.2. Utilisation avec un PC équipé de l'application
'Process'
Le numéro saisi sur le clavier correspond à la zone ou au
groupe de zones selon la configuration du logiciel. Les
numéros autorisés sont de 1 à 90.
6. 2 Scrolling of the display:
As soon as a zone becomes "busy", unless its is due to "Music"
the input ', the first character of the display ' Z' flickers. To
visualize each group of 10 zones on the display, use the keys
< and >.
NB: background lighting is off at rest and will turn on as soon
as a key is pushed then turns off again automatically after a
lapse of time.
7. OPERATION
7. 1. Starting:
As soon as the desk is connected the version of the software is
displayed, then the number of assignment of the desk and
finally the status of the occupied zones.
7. 2. Communication with the central rack :
As soon as a desk is connected to the central rack which must
be correctly configured, the interrogation of the connected
desks is permanent. The desks are ' slave ' with respect to the
central rack.
The central rack communicates with the desks to receive the
requests of commutations and to transmit to the desks the
zones status. The protocol of dialogue provides for several
successive interrogations as well as a latency time between the
various interrogations. In order to limit the traffic, the refresh of
the desks is carried at startup, during a change of
commutations status or following a restarting of the desk.
7. 3. Correspondence of the Buttons:
The keyboard includes 10 digits ( from 0 to 9). The
correspondence of the buttons is a function of the method of
management of the keyboards by the central rack.
7. 3. 1. Use with MAN918
7. 3. 1. 1 Individual Zones:
The number entered on the keyboard corresponds to the
number of the zone: 1 = zone 1, 2 = zone 2, 3 = zone 3…
7. 3. 1. 2 Group of zones:
- 91 corresponds to a general call on zones 1 to 18
- 92 corresponds to a general call on zones 19 to 36
- 93 corresponds to a general call on zones 37 to 54
- 94 corresponds to a general call on zones 55 to 72
- 95 corresponds to a general call on zones 73 to 90
- 96 corresponds to a general call
- 105 to 124 depending on programming
7. 3. 2. Use with a PC equipped with the application '
Process'
The number entered on the keyboard corresponds to the zone
or the group of zones according to the configuration of the
software. The authorized numbers are 1 to 90.

DOCUMENT NON CONTRACTUEL SPECIFICATIONS SUBJECT TO MODIFICATIONS
MERLAUD
9 rue de La Briqueterie - P.A.E. des FAUVETTES - 95330 DOMONT (FRANCE)
erlaud
NOTICE D’UTILISATION ET DE DEPANNAGE / OPERATION & MAINTENANCE INSTRUCTIONS
PUPITRES D’APPELS / PAGING DESKS DRS 849 L-M
Code 2615
DO3-51-2615-DRS849L_M-V190505 Page 7/7
7. 4. zones selection and Calls
7. 4. 1. 1.Multiple selection
- Enter the number of the zone desired then validate by
pressing on the key ' V '. If the zone is free and accepted by
central station the letter ' X' is displayed in the location
corresponding to the selected zone.
- Enter successively the numbers of zone and validate at the
end of each data entry.
- Press on the Micro button, (or the Chime button to start the
chime before calls), and keep button pushed to page from
microphone Pilot Led will blink during Chime broadcast and
then to red for paging. As soon as the key is released, the pilot
led will turn off , the microphone is then cut off while the zone
selection set up remains valid.
- Push on "Cancel" button to release the zones. All letters ' X'
disappear from the display if the cancellation is accepted by the
central rack.
7. 4. 1. 2. Single selection
- Seize the number of the desired zone. Code 96 corresponds
to a General Call (all zones)
- Press on the Micro button, (or the Chime button to start the
chime before calls), and keep button pushed to page from
microphone Pilot Led will blink during Chime broadcast and
then to red for paging. As soon as the key is released, the pilot
led will turn off, the microphone is then cut off while the zone
selection set up remains valid. Press on
- Push on "Cancel" button to release the zones. All letters ' X'
disappear from the display if the cancellation is accepted by the
central rack
NB: In the case of general Call, it is enough that Only one zone
at least is free to carry out the call.
7. 5. Messages broadcast:
7. 5. 1. Use with MAN918
- Enter number 102 then validate using ' V' to broadcast
Evacuation on all zones.
- Enter number 103 then validate using ' V' to broadcast
Information Message 2 on all zones.
- Enter number 104 then validate using ' V' to stop messages
broadcast and to release all zones.
NB: While pressing on the "C" button ' zones are released but
the message continues to run (during the next commutation of
zones the message will not diffuse from the very start.
7.4. Sélection de zones et Appels
7.4.1.1. Sélection Multiple
- Saisir le numéro de la zone souhaitée puis valider en
appuyant sur la touche 'V'. Si la zone est libre et acceptée par
la centrale de sonorisation un 'X' s'affiche dans la case
correspondante à la zone sélectionnée.
- Répéter la saisie des numéros de zone successivement en
validant à la fin de chaque saisie.
- Appuyer sur le bouton Micro, ou le bouton Carillon pour faire
précéder l’appel par un carillon, et le maintenir enfoncé pour
effectuer des appels à partir du microphone. La Led de
signalisation de 'Parole' s'allume en rouge pour signaler que la
parole est possible ou clignote pendant la diffusion du carillon
puis en vert . Dès que la touche est relâchée, la led () s'éteint
et le microphone est coupé mais la sélection de zones est
toujours active.
- Appuyer sur le bouton d'Annulation pour terminer tous les
appels et libérer les zones. Tous les 'X' disparaissent de
l'afficheur si la commande est acceptée par la centrale.
7.4.1.2. Sélection Unique
- Saisir le numéro de la zone souhaitée ou du groupement
- Appuyer sur le bouton Micro, ou le bouton Carillon pour faire
précéder l’appel par un carillon, et le maintenir enfoncé pour
effectuer des appels à partir du microphone. La Led de
signalisation de 'Parole' s'allume en rouge pour signaler que la
parole est possible ou clignote pendant la diffusion du carillon
puis en vert . Dès que la touche est relâchée, la led () s'éteint
et le microphone est coupé mais la sélection de zones est
toujours active.
- Appuyer sur le bouton d'Annulation pour terminer tous les
appels et libérer les zones. Tous les 'X' disparaissent de
l'afficheur si la commande est acceptée par la centrale.
NB : Dans le cas d'un Appel général il suffit qu'UNE seule zone
au moins soit libre pour effectuer l'appel.
7.5. Diffusion des Messages :
7.5.1 Utilisation avec MAN918 :
- Saisir le numéro 102 puis valider 'V' pour diffuser le Message
1 d'Evacuation sur l'ensemble des zones.
- Saisir le numéro 103 puis valider 'V' pour diffuser le Message
2 d'Information sur l'ensemble des zones.
- Saisir le numéro 104 puis valider 'V' pour arrêter la diffusion
des messages et libérer l'ensemble des zones.
NB : En appuyant sur le bouton 'C' les zones sont libérées mais
le message continue de diffuser (lors de la prochaine
commutation de zones le message ne diffusera pas dès le
début).
Other manuals for DRS 849 L-M
1
This manual suits for next models
1
Table of contents
Popular Stereo System manuals by other brands


 Service manual")


Sony
Sony CMT-LS1 - Micro Hi Fi Component System operating instructions

Philips
Philips FW390C Specifications

Philips
Philips MCL701/93 quick start guide

Califone
Califone 4-Person Spirit Learning Center 1776PLC-6 Specifications

Harman Kardon
Harman Kardon MAESTROKITCHEN MK100 Service manual

NAIM
NAIM MU-SO quick start guide