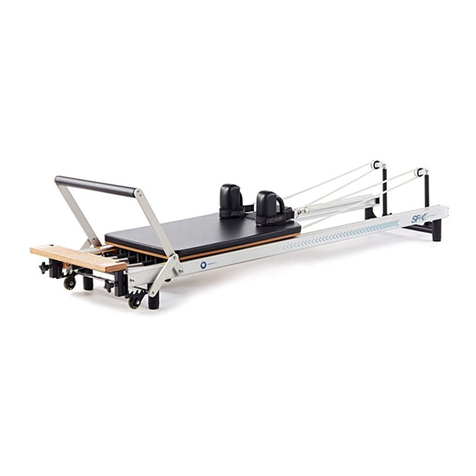
Merrithew SPX Max Reformer with Vertical Stand Configuration guide

For video assembly instructions,
visit: merrithew.com/eq-assembly
Please review this important assembly, safety and warranty information about your
new MERRITHEW™SPX®Max Reformer with Vertical Stand and keep it handy for future reference.
OWNER’S MANUAL SUPPLEMENT
SPX®Max Reformer
with Vertical Stand

SPX®Max Reformer with Vertical Stand Owner’s Manual Supplement
2
Safety & Usage
WARNING: As with any athletic activity, the use of exercise
equipment involves risk of injury, damage and/ or death. By choosing
to use MERRITHEW™equipment, you and/or your clients/patients
assume responsibility for that risk, not the people who sold you the
equipment, distribute and/or manufacture it.
Care and caution must be taken, as there are some inherent dangers
when using any exercise equipment.
For inexperienced or first-time users, Pilates equipment should only
beused under the supervision of a trained professional.
wStanding or lowering the Reformer requires two people. We recommend you
have someone to assist and spot you when standing the Reformer upright.
wWhen standing and storing this Reformer, choose a low traffic area, away
from children, pets, windows and mirrors.
wSelect a level area of the room to store your Reformer, making sure
the floor in the storage area is a solid flat surface (softer surfaces such
as carpet, sponge or other soft flooring are not recommended) and
is completely clear.
wTo prevent unsafe or improper use of MERRITHEW equipment, please
read all assembly and safety information thoroughly and follow directions
carefully. Contact the manufacturer if you have any questions or concerns.
wPlease also ensure that you and your clients/patients have received proper
instruction regarding the correct and safe use ofthis equipment.
BY USING THIS EQUIPMENT, YOU ACCEPT RESPONSIBILITY
FORYOUR OWN ACTIONS.
This supplement includes guidelines for setup and usage of the SPX®Max
Reformer with Vertical Stand. For further questions or technical assistance,
Part Identification
1 Floating Safety Tab (2)
2 Chrome Adjuster Bar
3 Footbar
4 Stand
IMPORTANT!
This SPX®Max Reformer model is equipped with a Vertical Stand,
allowing it to be stored in an upright position.
These instructions cover safe handling and storage of your equipment
with the Vertical Stand. For general Reformer assembly questions, and
detailed instructions, information and parts identification, please consult
your Owner’s Manual or refer to the SPXMax assembly video in the
customercare section ofmerrithew.com.
We advise you to consult the Large Equipment Inspection & Maintenance
Schedule in yourOwner’s Manual for the daily, weekly, and monthly
checklist that will keep your equipment in tip-top shape.
PLEASE READ THESE INSTRUCTIONS COMPLETELY
BEFOREBEGINNING.
Maintenance
& Safety Check
Like any fitness equipment, components aresubject to wear andstress.
Proper maintenance and timely replacement of your equipment
orcomponent parts is your responsibility as ithelps reduce the
riskofinjury.
We advise you to consult the Large Equipment Inspection & Maintenance
Schedule in the Owner’s Manual enclosed with your shipment or obtain a
copy online at merrithew.com/support/maintenance
FAILURE TO PERFORM RECOMMENDED SAFETY CHECKS, OR
USING THE MACHINE WITH IMPROPERLY ADJUSTED, BROKEN OR
WORN PARTS, COULD RESULT IN SERIOUS BODILY INJURY.
1
3
4
2

merrithew.com 3
To Stand the Reformer Upright
A
2Moving the Chrome Adjuster Bar [2], set the
footbar [3] into the lowest position.
5Position all five springs in the gearbar.
8Using your foot, pull out one leg of the Stand [4],
until it is fully folded out and in line with the
Reformer rail. Repeat for the Stand on the
other side.
It is strongly recommended that footwear
is worn during this step.
9Ensure that the Floating Safety Tabs [1] on
bothsides are hanging vertically just above the
Chrome Adjuster Bar [2]. Wiggle the Reformer
slightly to ensurethe Reformer is solidly set
inplace.
Besure toselect a level area when storing
yourReformer upright.
1If attached, first remove the Vertical Frame
or Accessory Boards such as a Jumpboard,
Cardio-Tramp, Rotational Diskboard, etc.
Refer to your Reformer Owner’s Manual
for instructions on removing the
VerticalFrame.
4Place the carriage stopper in the
secondposition.
7To stand the Reformer, lift the Reformerupwards,
while carefully moving one hand and then the
other, to the side rails. Continue lifting the
Reformer until it is fully upright and resting on
the Footbar [3] [fig. A].
Two people are required for this step.
When standing and storing this Reformer,
choose a low traffic area, away from
children, pets, windows and mirrors.
3Place the gearbar in the second position.
6Grasp the front end crossbar with both hands
and lift the Reformer. Keep the Reformer below
48"/122 cm (approximately waist-height) to
prevent the frame from making contact with
the floor. Roll the Reformer to the storage area.
Take care when lifting the Reformer to
avoid injury.

P00255 PM-ST11032 JAN16 ™/® Trademark or registered trademark of Merrithew Corporation, used under license. Printed in Canada. All rights reserved.
For assistance or any missing parts:
Call: 416-482-4050 x 264
Toll-free in North America 1-800-910-0001
Toll-free in United Kingdom 0800-328-5676
Email: [email protected]
IMPORTANT
Please keep this manual in a safe place.
To Lower the Reformer
2Holding the Reformer in place, use your foot
to push in one leg of the Stand, until it is
fully folded under the wooden platform.
Repeat for the Stand on the other side.
It is strongly recommended that footwear
is worn during this step.
5Continue lowering the Reformer. Bring to
waist-height to prevent the frame from making
contact with the floor, and roll the Reformer
toits destination.
1To prepare to lower the Reformer, position one
hand on each of the side rails of the Reformer.
Two people are required for this step.
4Shift one hand to grasp the front end crossbar,
then the other hand.
3Walk your hands up the rails as you back
up and lower the Reformer towards you.
Werecommend a second person assists
you in holding the Reformer.
6Reset the carriage stopper, footbar and springs
as desired and attach the Vertical Frame or
Accessory Boards if needed.
2200 Yonge Street, Suite 500, Toronto, ON M4S 2C6 phone 416.482.4050
Other Merrithew Home Gym manuals
