Met One Instruments EX-12 User manual

Met One Instruments, Inc.
1600 NW Washington Blvd.
Grants Pass, OR 97526
Telephone: (541) 471-7111
Facsimile: (541) 471-7116
www.metone.com
BAM 1020 Particulate Monitor Operation Manual - ©
Copyright 2020 Met One Instruments, Inc. All Rights Reserved
worldwide. No part of this publication may be reproduced, transmitted, transcribed, stored in a retrieval system, or translated
into any other language in any form without the express written permission of Met One Instruments, Inc.
EX-12 EXTERNAL BATTERY KIT
OPERATION MANUAL
EX-12-9800
R
EV
B

EX-12-9800 External Battery Kit Manual Rev B.docx Page 2
About this Document
This document describes the setup and use of the EX-12 external battery power kit for the Met
One Instruments model E-BAM V1, E-BAM V2 (with color touch screen), or E-Sampler
particulate monitors. Also refer to Section 3 of the E-Sampler manual, or Section 4 of the E-
BAM V1 manual.
The EX-12 kit provides battery power for temporary instrument deployments in remote areas
where AC power is not available and where solar power is not feasible. Due to the high cost of
shipping batteries, some users may find it preferable to configure their own battery power kit
based on locally available parts. In this case this document can be used as a free guide.
Battery Kit Parts
The EX-12 kit consists of heavy-duty, industrial grade items which are specifically selected for
continuous use and long life under a wide variety of field conditions.
12V Batteries: Part 390092 is a Universal Battery UB121100 (or equivalent) 12V, 110 Amp-
hour, deep cycle, sealed AGM type battery which weighs 67 lbs. The standard EX-12 kit
includes two of these batteries. They are D.O.T. approved for air transportation.
The batteries each come with two M8 terminal bolts and nuts. Met One supplies additional M8
wing nuts (part 601277). Install an M8 bolt onto each terminal with two flat washers and a hex
nut as shown. When you are ready to connect the battery to the instrument, use the split
washers and wing nuts to fasten the ring terminals on the battery power cable to the bolts.

EX-12-9800 External Battery Kit Manual Rev B.docx Page 3
Battery Charger: Part 390093 is a Samlex SEC-1230UL 12V, 30A, microprocessor
controlled battery charger which can charge and maintain a single battery, multiple batteries in
a parallel bank, or even up to three separate batteries independently at the same time.
It can also be configured as a 12V power supply to run a load directly with no battery, or as
backup UPS to both run a 12V DC load and charge a backup battery at the same time. The
charger is supplied with its own detailed manufacturer’s manual.
It can be configured for 120V 60Hz or 230V 50Hz AC input with an internal jumper. The default
setting should be 120V.
The charger has two small configuration switches on the bottom. When used to charge the
supplied AGM batteries, S1 should be OFF and S2 should be ON.
Battery Box: Part 390058 is a basic plastic battery box to keep the battery clean and dry in
the field. The box comes with a nylon strap that should be used to secure the lid when used
outdoors. Spare boxes of this type are available from marine, RV, or auto parts stores.
Battery Cables: Part 81489 is a basic set of alligator clip battery charging cables (8 AWG)
that connect the output of the charger to the battery. For basic battery charging, install the
black cable into the negative (-) output, and the red cable to the positive (+) output on the
bottom of the charger.
Part 9638 is an included external power cable which is required in order to connect the power
input of the E-BAM V1 or E-Sampler instrument to the battery. NOTE: The E-BAM V1 includes
a 9638 cable as a standard accessory. The cable has an inline 3AG size, 15 Amp, slow-blow
fuse (part 590842) near the battery end of the red positive wire.
Part 83246 is an external power cable which is required to connect the power input of the E-
BAM V2 instrument to the battery. NOTE: The E-BAM V2 includes an 83246 cable as a
standard accessory. The cable has an inline 3AG size, 10 Amp, slow-blow fuse (part 590869)
near the battery end of the red positive wire.
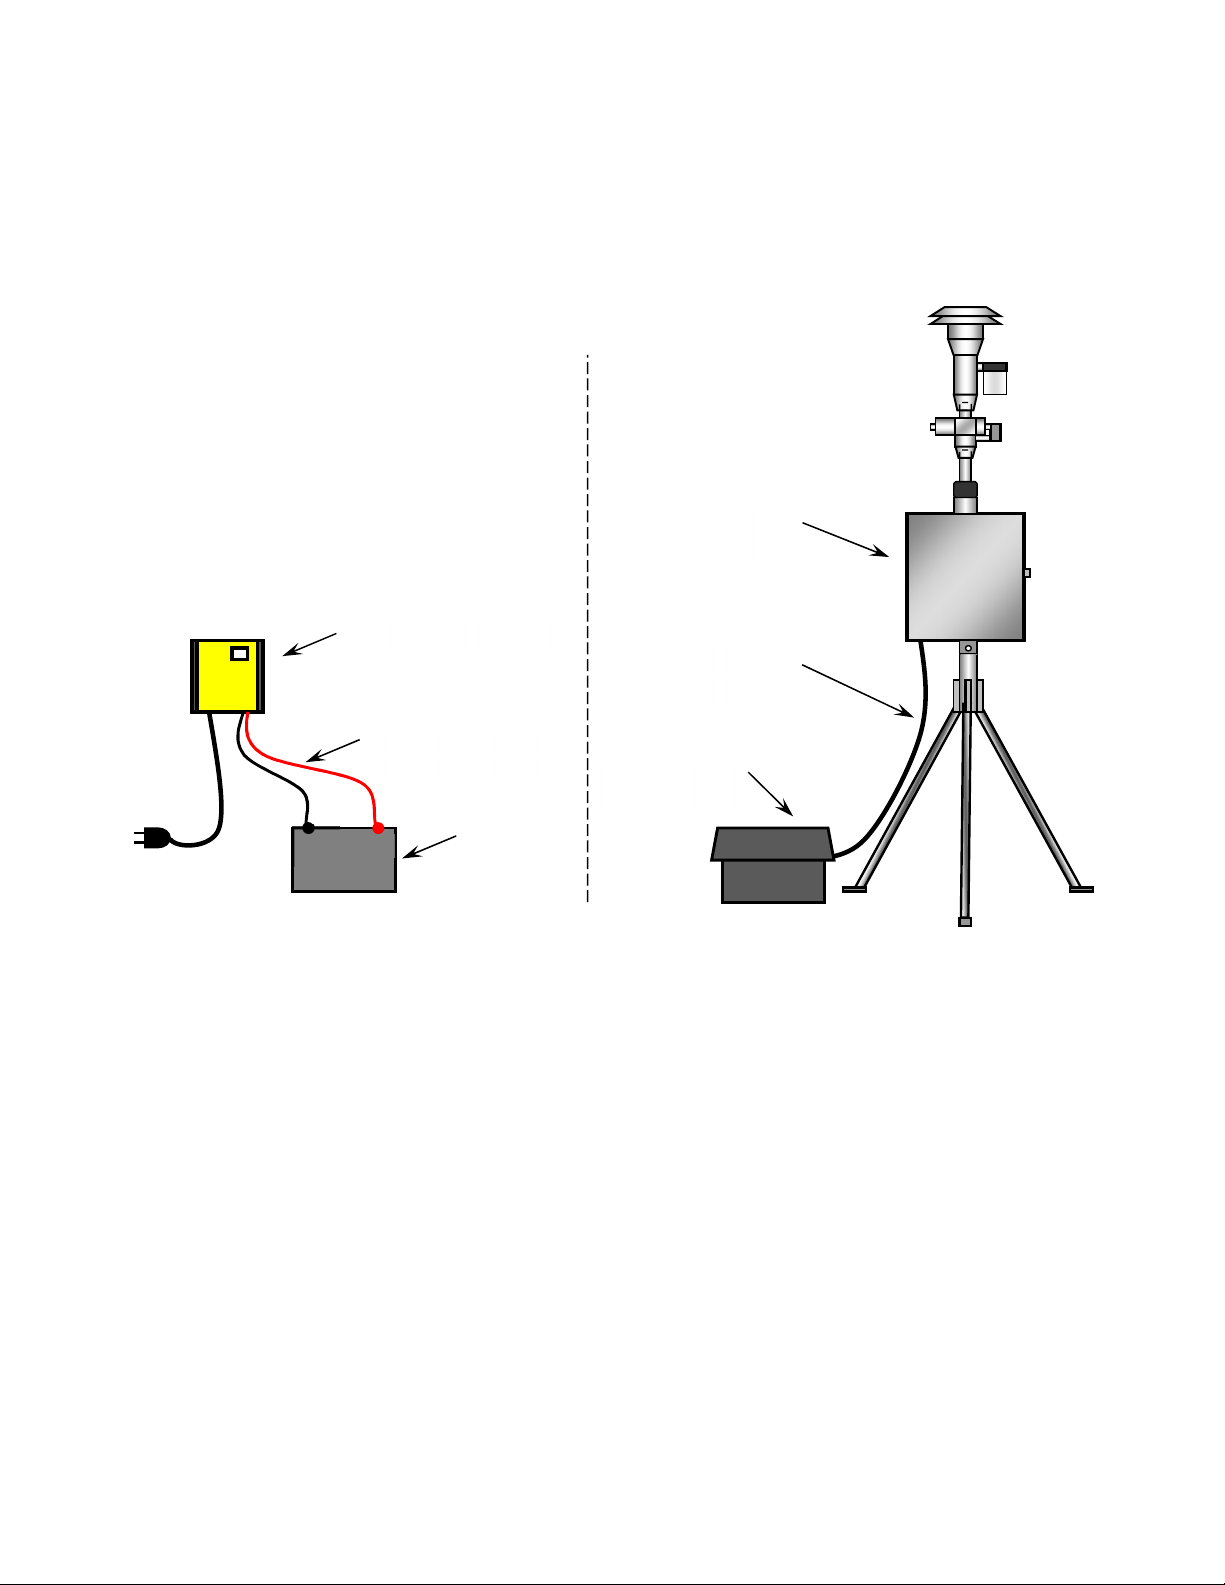
Standard Battery Power Configuration
In the standard EX-12 kit configuration, one of the batteries is located inside the battery box on
the ground and is connected to the E-BAM V1 or E-Sampler power input with the 9638
external battery cable or connected to the E-BAM V2 power input with the 83246 external
battery cable. The second battery is located in a shop or lab where it is recharged with the
battery charger. When the field battery is exhausted, the two batteries are manually swapped
by the site operator.
1. Make sure the charger is configured for the appropriate line voltage, battery type, and
charging mode. In a dry, well-ventilated area, connect the negative (–) output of the
charger to the battery negative with the black alligator clip cable, and the positive (+)
output to the battery positive with the red cable. Plug in the charger and charge the
battery for about 24 hours or until fully charged.
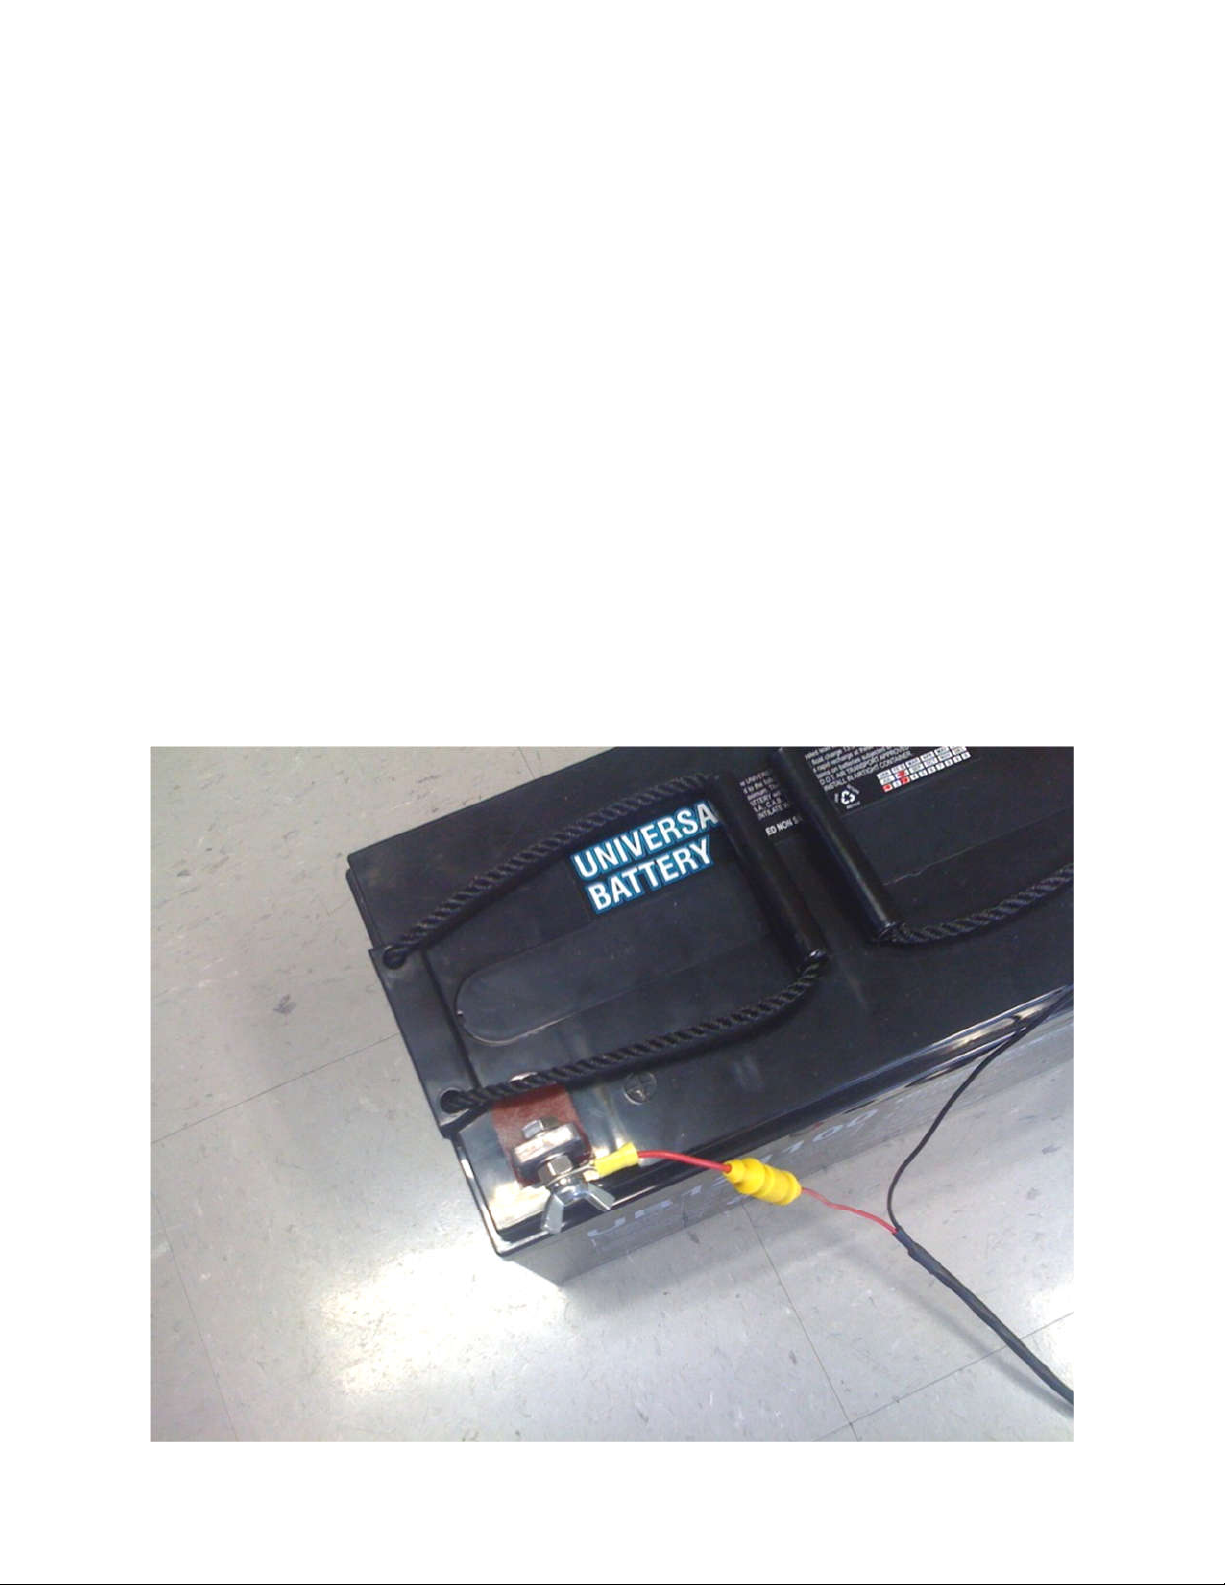
2. Disconnect the charged battery from the charger. Place the battery inside the battery
box. Connect the red wire of the external battery power cable to the battery positive with
a wing nut and split washer. Connect the black wire to the battery negative. Route the
cable out of the box and close the lid. Plug the connector on the external battery cable
into the power input on the bottom of the E-BAM or E-Sampler. The instrument should
power up immediately. Configure and operate the instrument as desired.

EX-12-9800 External Battery Kit Manual Rev B.docx Page 4
3. Connect the second battery to the charger and begin charging. It is usually best to leave
the second battery connected to the charger even after it is fully charged. The advanced
charger will not overcharge or degrade the battery if left connected.
4. Based on the estimated run time of the instrument and battery, swap the freshly
charged battery for the depleted battery and place the depleted battery on the charger.
This cycle can be repeated continuously. The charger is capable of charging the
depleted battery faster than the E-BAM or E-Sampler can deplete the charged one.
Tech note: The E-BAM will lose power and turn off for a moment when the battery is
disconnected for replacement. This will result in a small data gap and a power failure alarm in
the instrument. To prevent loss of power, the batteries can be swapped without losing power
as follows:
Before disconnecting the low battery, jumper the ring terminals on the battery end of the 9638
cable over to the terminals on the fresh battery (red to red, black to black) with a pair of double
ended alligator clip jumpers. This temporarily wires the two batteries in parallel. Then carefully
disconnect the 9638 cable from the low battery without dislodging the alligator clips. Connect
the cable to the fresh battery terminals, then remove the alligator clip jumpers. If done
carefully, power should be supplied to the instrument throughout the battery swap process.
Backup Power Supply Configuration
In the backup uninterruptable power supply (UPS) configuration, the battery charger is set in
power supply mode (switches S1 and S2 both OFF, see charger manual). Both the charger
and the instrument are connected to the battery at the same time. The charger will charge the
battery and run the instrument simultaneously. If AC power is lost, the battery will automatically
keep the instrument running until it is depleted or until AC power is restored.
9638 or 83246
External Battery
Cable
390092 Battery
& 390058 Box
390093 Battery Charger
390092
Battery
81489 Charger Cables
E-BAM or
E-Sampler
+
-

EX-12-9800 External Battery Kit Manual Rev B.docx Page 5
If this setup is to be used long term, we recommended replacing the supplied alligator clip
battery charger cables with appropriate 6 or 8 AWG battery cables with ring terminals.
The charger is not weatherproof, so the user will need to provide some kind of shelter. The
manufacturer does not recommend locating the charger in very close proximity to the battery,
or in a small enclosed area without proper ventilation. See the charger manual.
Backup Power Supply Configuration
Battery Run Time and Extended Run Time
The 110 Amp-hour deep-cycle batteries will last a very long time if they are not regularly
discharged by more than about 2/3 of their rated capacity, so for the run time calculations we
use a conservative value of 73.3 Amp-hours of available capacity per battery. Also be aware
that the current capacity of the batteries tends to reduce in cold weather when the temperature
is below about 40F or 5C.
E-BAM V1: The E-BAM V1 runs at about 2.9 Amps @ 12VDC (35 Watts) when sampling in
normal air with the inlet heater running. Run time per battery, per charge would be 25 hours
(73.3 / 2.9). One of these batteries will run the E-BAM for at least one day under most
conditions. In worst-case conditions with high dust concentrations where the pump is running
at full speed, the E-BAM draws about 4.0 Amps (48W) and one battery would last 18 hours
(73.3 / 4.0).
E-BAM V2: The E-BAM V2 runs at about 4.0 Amps @ 12VDC (48 Watts) when sampling in
normal air with the inlet heater running. Run time per battery, per charge would be 18 hours
(73.3 / 4.0). In worst-case conditions with high dust concentrations where the pump is running
9638 or 83246
External
Battery Cable
User-Supplied
Enclosure
Charger
8 AWG Wire
+
-

EX-12-9800 External Battery Kit Manual Rev B.docx Page 6
at full speed, the E-BAM V2 draws about 6.0 Amps (72W) and one battery would last 12 hours
(73.3 / 6.0).
E-Sampler: The E-Sampler runs at a worst-case continuous draw of about 1.1A @ 12VDC
(14W) when sampling with the inlet heater running. Run time per battery, per charge would be
67 hours (73.3 / 1.1). Note: The E-Sampler has the option of using a small internal 12V
battery. If an external battery is to be used with an E-Sampler, remove the internal battery so
that it does not try to charge itself from the external battery, possibly resulting in damage.
Using Multiple Batteries: Multiple batteries can be wired together in a parallel battery bank
to increase the run time of the instrument. The batteries must be of the exact same type,
voltage rating, and amp-hour rating, and should all be at similar charge levels when initially
connected together.
Connect the batteries together in parallel only. Use short red 6 AWG cables with appropriate
ring terminals to connect the positive terminals of all batteries together, and similar black
cables to connect the negative terminals of all batteries together. Connect the black wire of the
instrument external battery power cord to any of the battery negatives, and the red wire to any
of the battery positives. Any number of batteries can be wired in parallel, because the total
voltage will remain at the proper 12V, but the amp-hour current capacity values will add
together.
WARNING! Never wire the batteries together in series by connecting the positive of one
battery to the negative of another, because this will add the battery voltages together,
resulting in a total voltage level that will damage the instrument and/or charger. If you
are not sure how to correctly wire batteries together, consult an electrician or electronic
technician.
Storage and Maintenance
Lead-acid batteries like the ones in the EX-12 kit slowly self-discharge when stored for long
periods, even when completely disconnected. Eventually stored batteries can discharge to a
state where they cannot be recovered. Unused batteries should be recharged every few
months, or they can simply stay connected to the Samlex charger indefinitely. The batteries
are otherwise maintenance-free.
Two Batteries Wired in Series WRONG! Two Batteries Wired in Parallel CORRECT!
+ +
+
+
- -
-
-
To instrument
or charger
Table of contents
Other Met One Instruments Camera Accessories manuals