Metawatch SMARTWATCH SW12 User manual

Revision 1.0 10-Oct-2012
1 of 19
M
ETA
W
ATCH SMARTWATCH
U
SER
G
UIDE
FOR
STRATA
AND
FRAME
Model SW12

Revision 1.0 10-Oct-2012
2 of 19

Revision 1.0 10-Oct-2012
3 of 19
Contents
1
Introduction........................................................................................................................................................... 4
2
Starting Up ............................................................................................................................................................ 5
2.1
C arging your watc ....................................................................................................................................... 5
2.2
Watc Software Version................................................................................................................................. 6
2.3
Watc Button Map.......................................................................................................................................... 6
2.4
Watc First Boot and Setup ............................................................................................................................ 6
3
Pairing and Connecting......................................................................................................................................... 9
3.1
iP one ............................................................................................................................................................. 9
3.2
Android........................................................................................................................................................... 9
4
Using your watc ................................................................................................................................................ 11
4.1
Widgets......................................................................................................................................................... 11
4.2
Notifications ................................................................................................................................................. 11
4.3
Music ............................................................................................................................................................ 12
4.4
System Alerts................................................................................................................................................ 13
4.5
Staus Display ................................................................................................................................................ 14
5
Menu ................................................................................................................................................................... 15
5.1
Bluetoot ON / OFF (Button A)................................................................................................................... 15
5.2
Seconds ON / OFF (Button B)...................................................................................................................... 16
5.3
Exit Menu (Button C) ................................................................................................................................... 16
5.4
Link Alarm ON / OFF (Button D) ................................................................................................................ 16
5.5
Invert Display (Button E) ............................................................................................................................. 16
5.6
Turn on Lig t (Button F) .............................................................................................................................. 16
6
Updating your Firmware..................................................................................................................................... 17
6.1
Install your drivers........................................................................................................................................ 17
6.2
Install your drivers........................................................................................................................................ 17
7
Support................................................................................................................................................................ 18
8
Developers! Participate in t e Community ......................................................................................................... 19

Revision 1.0 10-Oct-2012
4 of 19
1 Introduction
T ank you for purc asing a MetaWatc smartwatc . T is document will elp you get started and answer common
questions.
You MetaWatc STRATA or FRAME smartwatc came wit t e following items in t e box.
• your watc
• a c arging clip (can also be used for updating your watc firmware)
• a microUSB cable
Let’s begin!
Revision 1.0 10-Oct-2012
5 of 19
2 Starting U
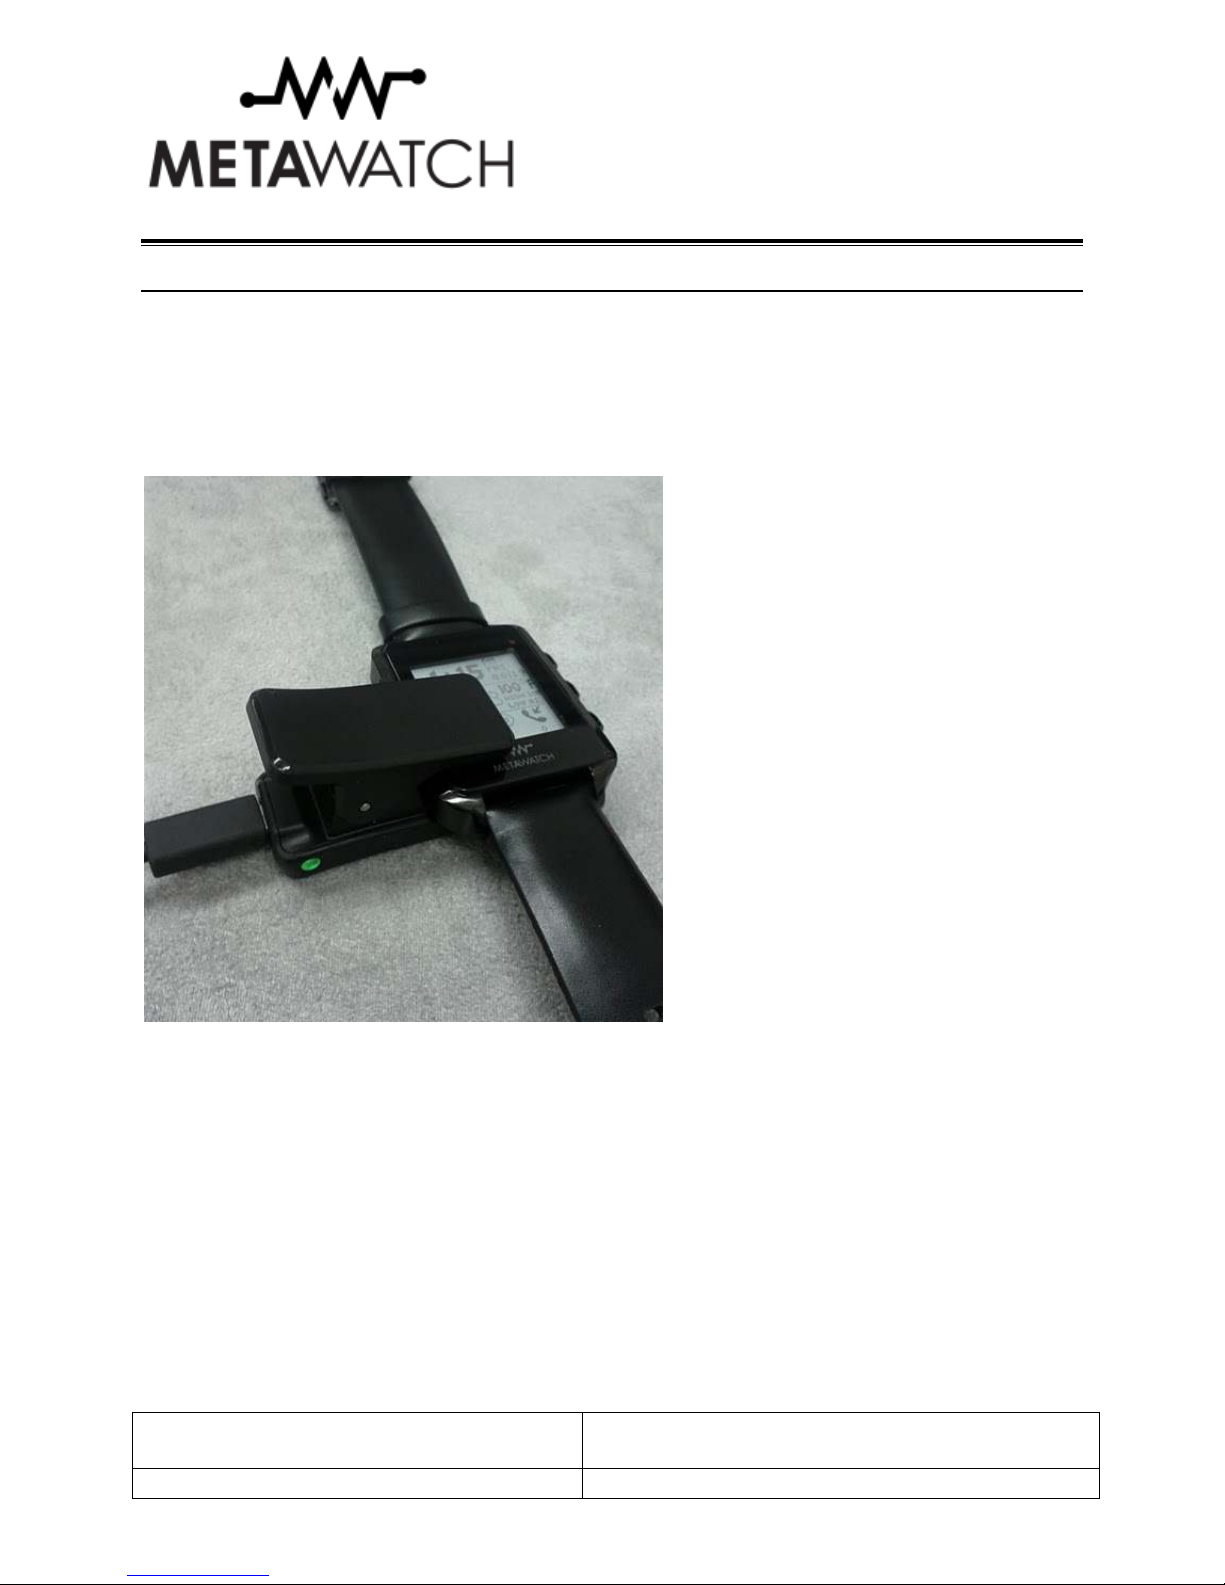
2.1 C
HARGING YOUR WATCH
Your MetaWatc smartwatc system comes wit a rec arging clip t at you can attac to t e watc by squeezing t e
USB end to open t e clip wider. T e watc can t en be inserted. T ere is a recessed area of t e watc w ere t e pin
area of t e clip will fit into. T e clip s ould grip t e watc snugly and securely, and bot t e top and bottom inside
edges of t e clip s ould be flus wit t e watc .
Connect t e clip to t e watc , plug in t e USB cable (a micro USB cable is supplied in t e box for you) and plug t e
ot er end into a USB power supply. W en t e clip as power, t e clip’s LED will turn on. T e watc is designed to
rec arge from t is micro USB port and also operate w ile c arging.
T e micro USB socket and USB cable of t e clip allows you to plug your watc into a USB ub or any 5V USB
power source to rec arge. Most car adapters and wall adapters t at are made for mobile p ones ave 5V DC output
and s ould be able to c arge your watc . W en connected to a USB port on a Personal Computer you will be able to
update t e software on your watc to t e latest versions.
Plug t e watc in and let it c arge to a full battery, w ic could take around 4 ours t e first time. If your watc is
c arging from an empty battery, t e watc s ould start running immediately after plugging in, it will not owever
continue to run w ile off of t e clip until t e battery as a sufficient c arge. W en t e watc software is running,
you s ould see a c arging indicator turn on in t e clock area after a several seconds.

Revision 1.0 10-Oct-2012
6 of 19
2.2 W
ATCH
S
OFTWARE
V
ERSION
Depending on your exact software version, t e instructions ere may be slig tly different.
2.3 W
ATCH
B
UTTON
M
AP
Buttons are labelled A-F clockwise starting from t e top rig t (2 o’clock). Depending on t e mode you are in, your
buttons may ave different functions. More on t at later.
2.4 W
ATCH
F
IRST
B
OOT AND
S
ETUP
Your watc s ould be c arged from t e previous step, if not, c eck t e Trouble S ooting section.
After t e watc starts-up for t e first time, it will be ready to be paired wit your iP one, Android or ot er supported
smartp one or device.
METAWATCH
A
F
E
D
A
C
F
B
C

Revision 1.0 10-Oct-2012
7 of 19
Before you pair, you can still use your MetaWatc smartwatc as watc . Use t e buttons below to set t e time
before you ave any connection from a p one. T e watc will continue to keep time for you.
METAWATCH
A:
Increment
Minutes
F:
Turn on
LED Lig t
E:
Increment
Hours
D:
Display
Status screen
A
C
F
B:
Increment
Day of t e
Week
C:
Enter Menu
Firmware
version
Serial
number
Watc ready
for pairing
request
Revision 1.0 10-Oct-2012
8 of 19
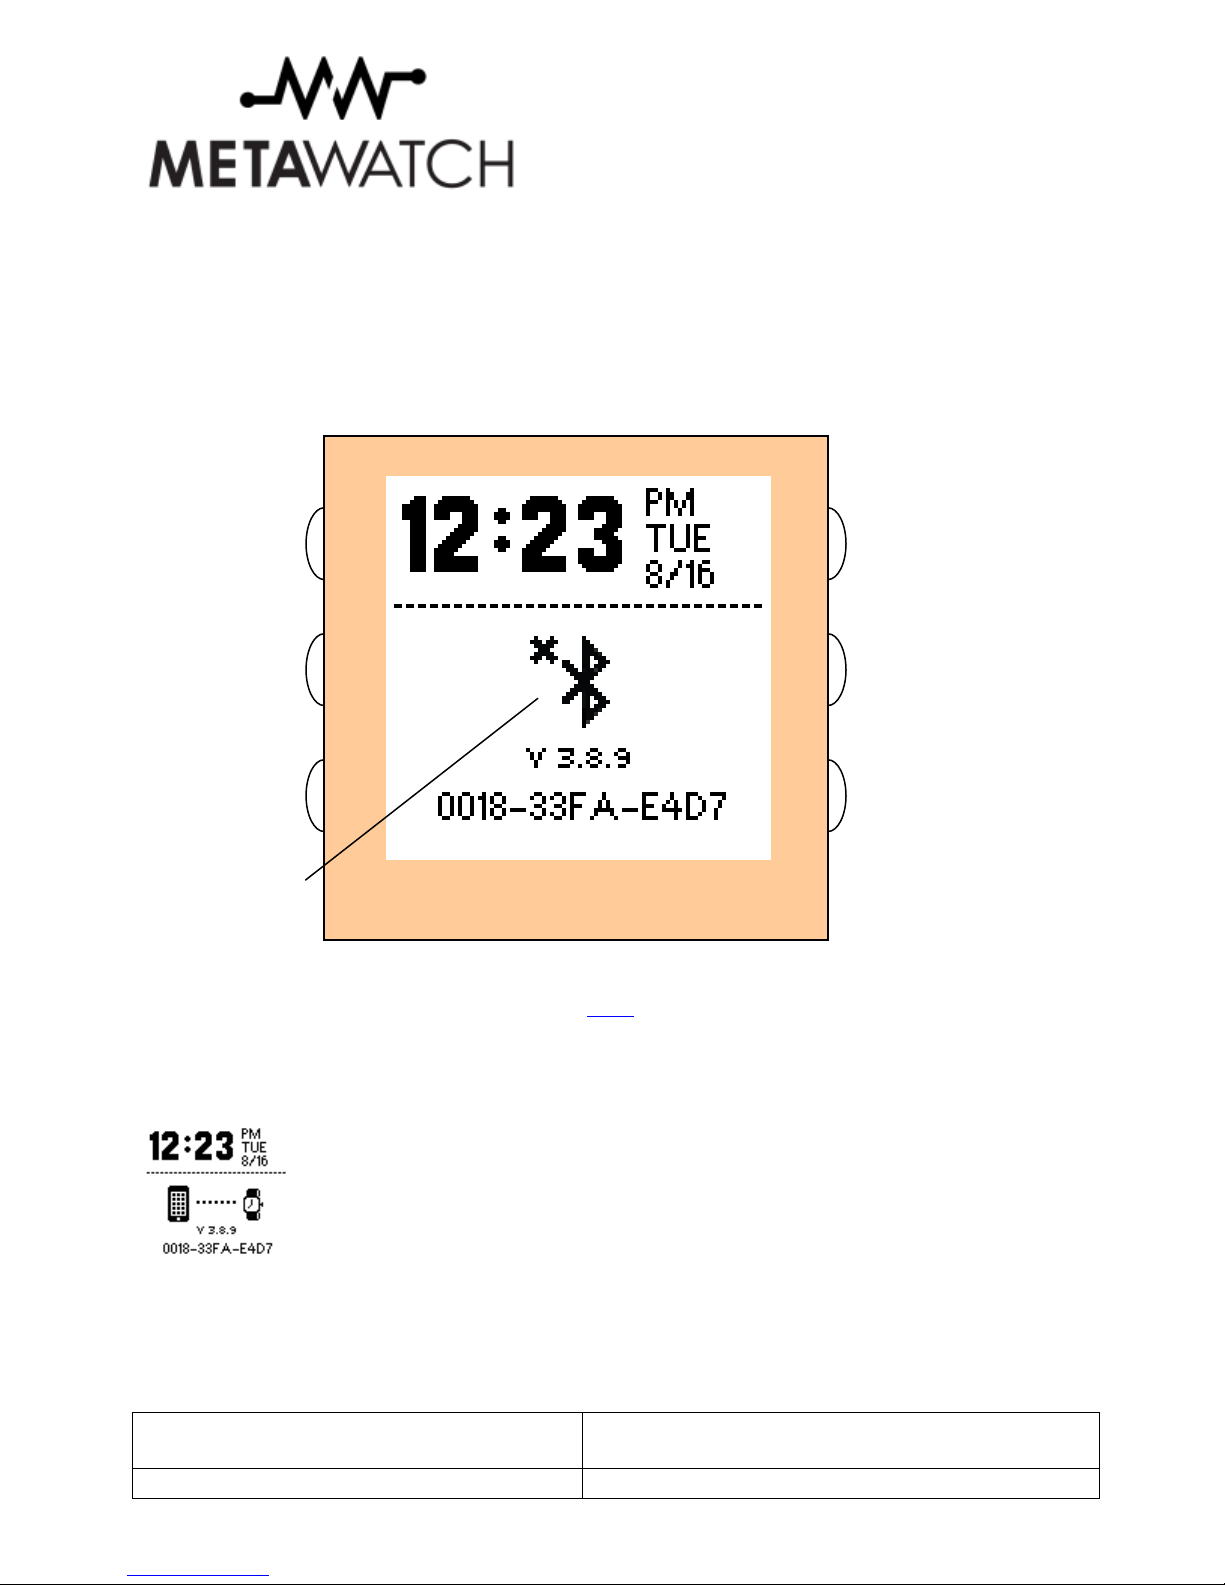
After a period of time wit no pairing request, t e watc will turn t e Bluetoot radio off to save power. T e button
assignment stays t e same.
Bluetoot can be turned back on via t e Menu. See t e Menu section.
W en you boot and you already ave a paired connection, t e first screen looks like t is:
METAWATCH
A:
Increment
Minutes
F:
Turn on
LED Lig t
E:
Increment
Hours
D:
Display
Status screen
A
C
F
B:
Increment
Day of t e
Week
C:
Enter Menu
Watc turned off
Bluetoot to save
power

Revision 1.0 10-Oct-2012
9 of 19
3 Pairing and Connecting
Make sure t e watc as Bluetoot ON before pairing.
3.1
I
P
HONE
Download and install t e MetaWatc Manager application from iTunes.
Make sure t e watc as Bluetoot ON on your watc and your p one before going to t e next step.
Open t e MetaWatc application, and tap “Connect”.
T e MetaWatc application will discover your watc and automatically connect. Your watc will remember your
p one and will not connect to any new p ones. Default widgets will be populated on your watc .
Next you need to make a connection from your iOS Bluetoot Settings (sorry, t is is necessary in iOS rig t now).
You s ould see t e watc in t e list of discoverable devices as “MetaWatc SW12”, simply tap on t e name to
connect and pair. If you don’t see t e name, back up, and try again. T e pairing code is four zeros. Enter “0000”
wit no quotes w en prompted.
Next you need to turn on iOS “S ow Notifications”. Tap t e Settings arrow next to t e name “MetaWatc SW12”,
in t is screen, turn t e “S ow Notifications” toggle to ON.
Now you are ready!
3.2 A
NDROID
Download t e MetaWatc Manager application from t e Google Play store.
Make sure t e watc as Bluetoot ON on your watc and your p one before going to t e next step.
Open t e MetaWatc application, go to “Menu->Settings->Select Watc ”.
A list of discoverable devices will be displayed. If you do not see t e watc at first, double c eck your Android
p one as Bluetoot set to ON and also t at t e watc as Bluetoot ON. If so and you still can not see t e watc ,
back out and try again.
Once you see t e watc in t e list of discoverable devices, simply tap on t e watc (c eck t e MAC address in t e
p one list matc es t e serial number your watc is displaying).
Next go “Back” and it “Menu->Start”. T e MetaWatc service will attempt to connect, if t e watc ad not been
paired previously, t en a pairing request will be displayed eit er as a pop-up menu or as an item in t e notification
bar.

Revision 1.0 10-Oct-2012
10 of 19
T e pairing code is four zeros. Enter “0000” wit no quotes. T e pairing s ould complete and t e MetaWatc
Manager will finis establis ing t e connection to t e watc .
You’re all set!

Revision 1.0 10-Oct-2012
11 of 19
4 Using your watch
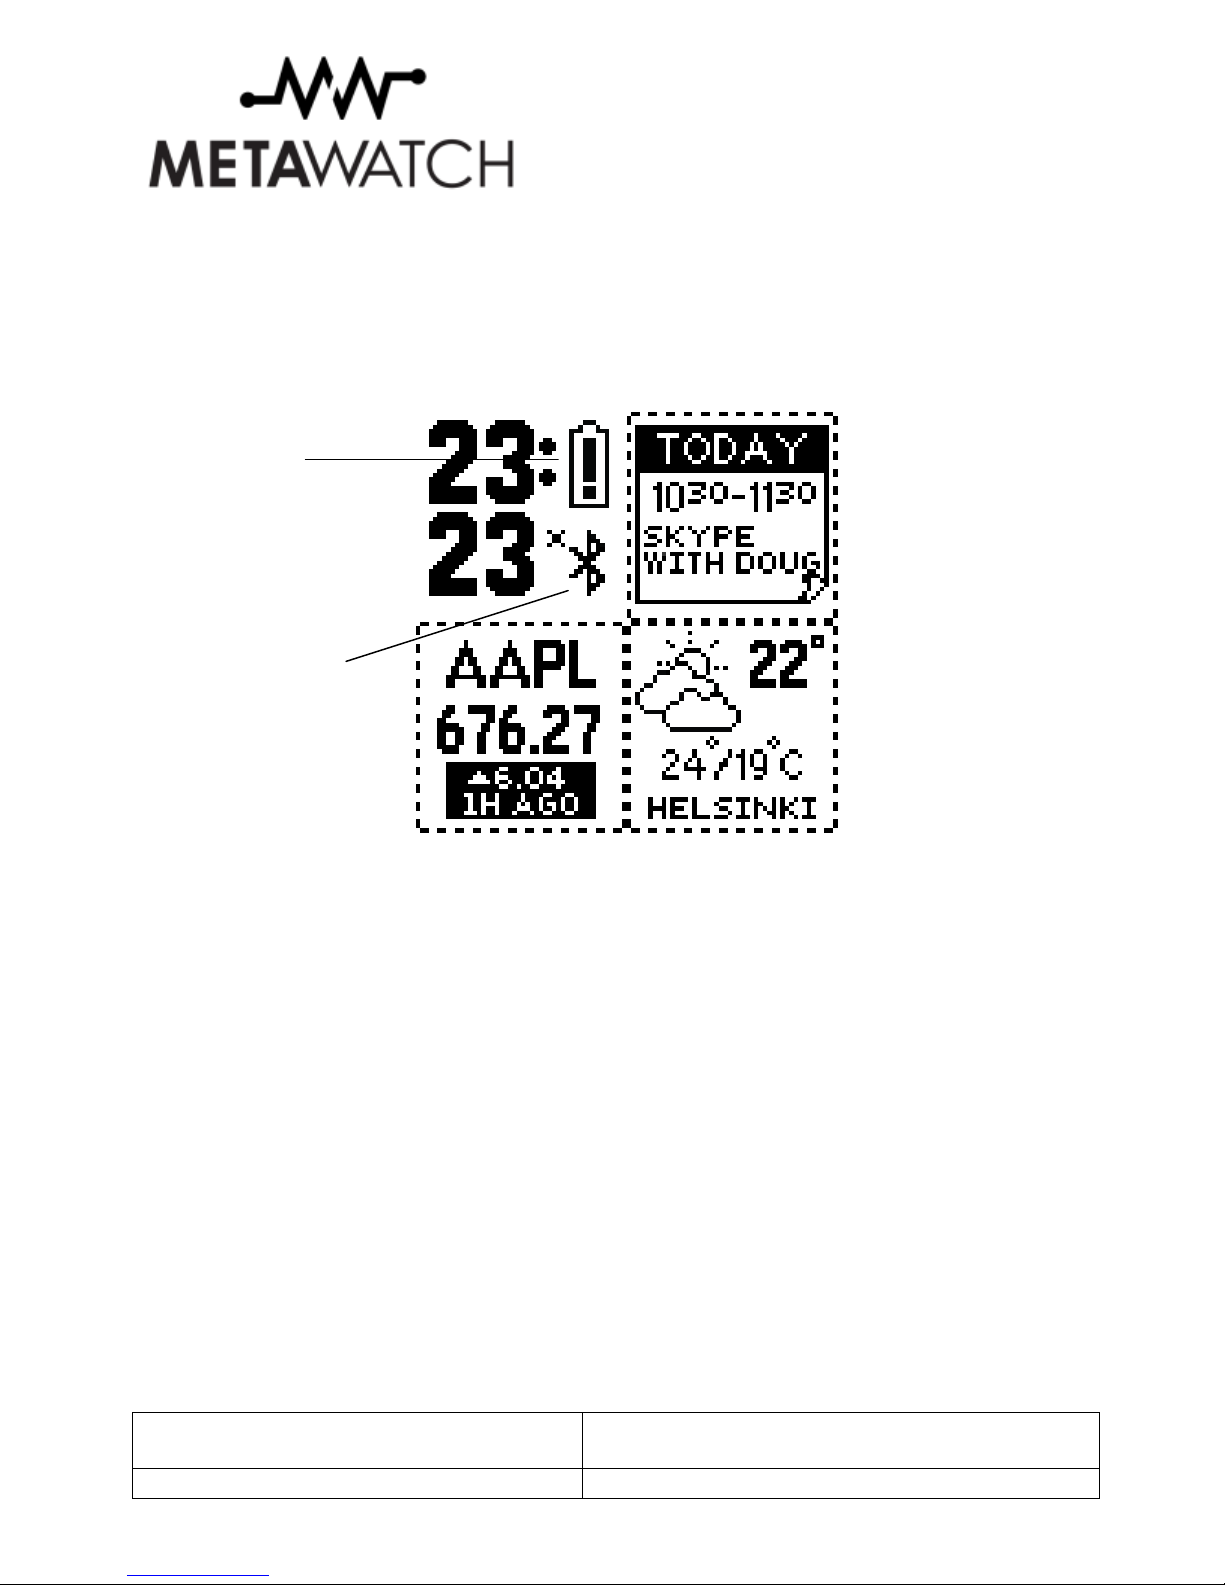
4.1 W
IDGETS
In t e MetaWatc Manger app, you can select up to four screens of widgets for your watc to save. T ese range
from clocks or calendar, to stock and weat er information. T ey give you glancabele information every time your
c eck your watc ! Use button B to cycle t roug all t e widget screens.
4.2 N
OTIFICATIONS
W en you receive a new notification, t at notification is given t e entire display for you to read t e information you
need. Use Button A, to exit from viewing t is notification, or do not ing and you will return to your Widget view
w en t e notification ends. Calendar, iMessage/SMS, and Caller ID are examples below.
METAWATCH
A:
Review last
notification
F:
Turn on
LED Lig t
E:
Go to
Music Mode
D:
Display
Status screen
A
C
F
B:
Go to next
Widget screen
C:
Enter Menu
Revision 1.0 10-Oct-2012
12 of 19
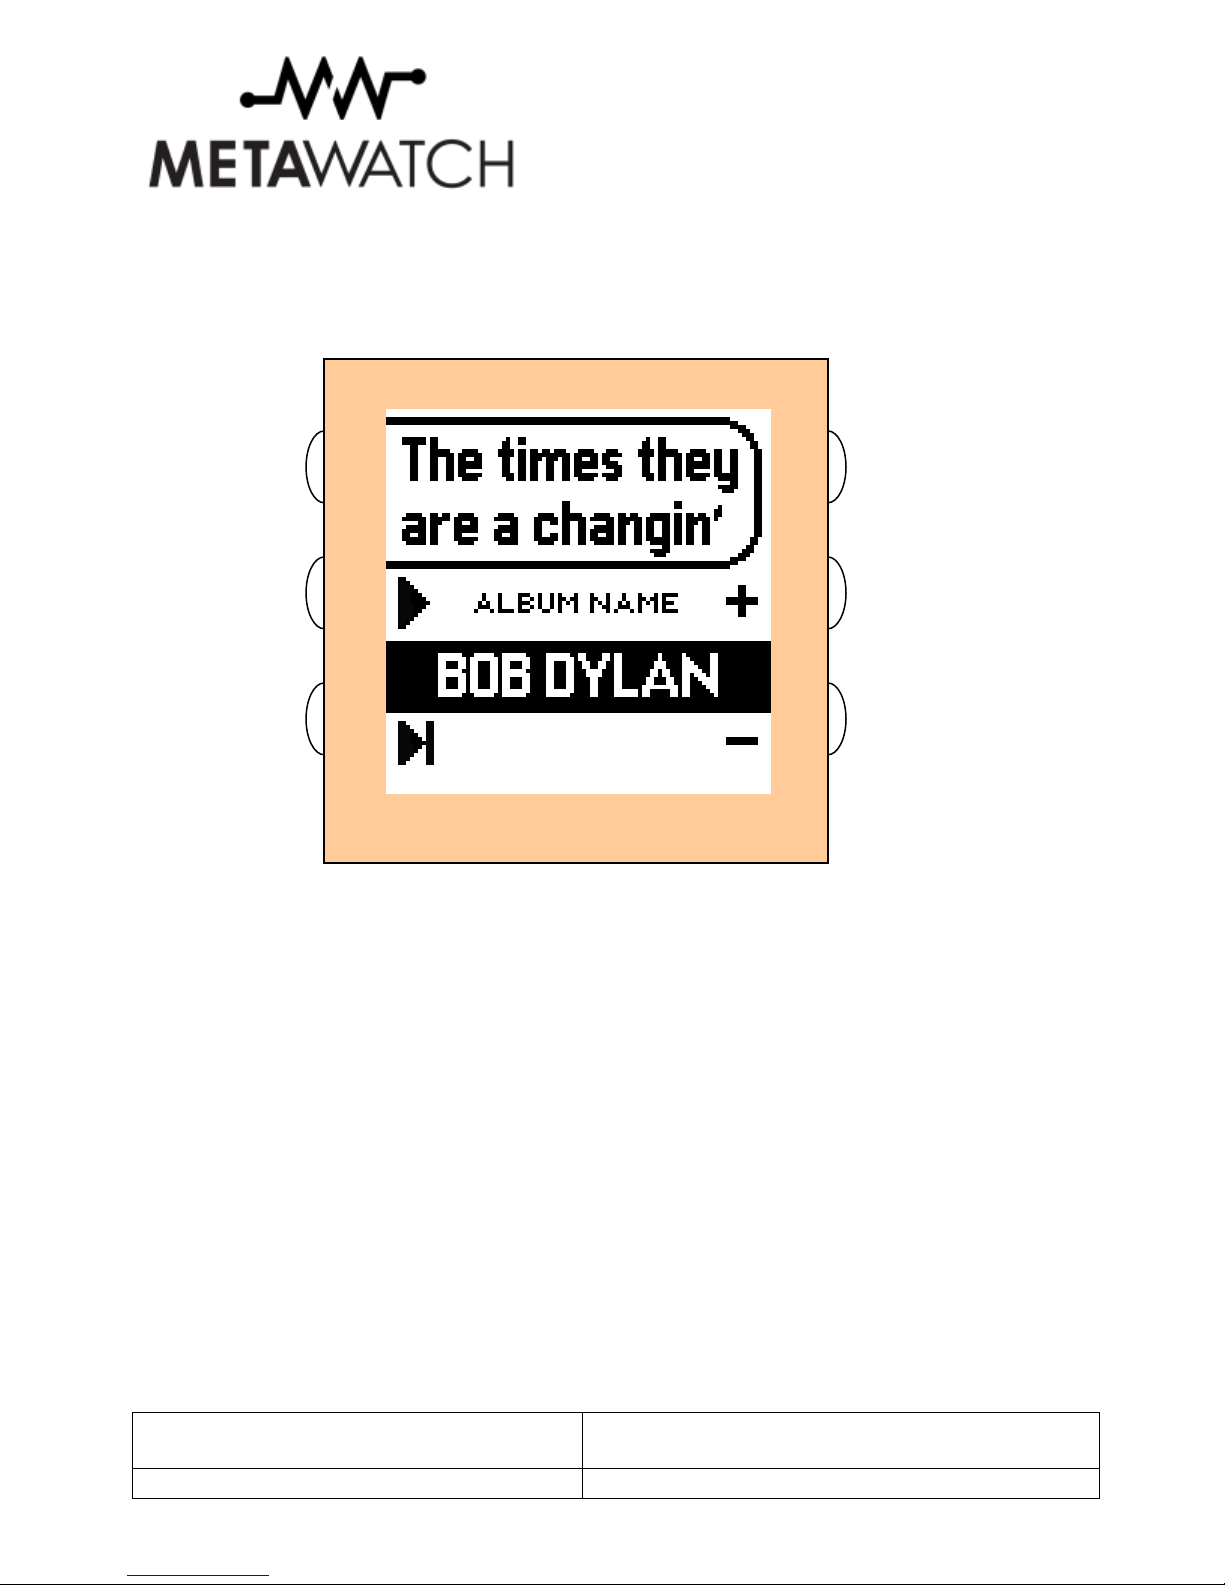
4.3 M
USIC
W en in music mode, t e current song, and artist name will be displayed. You can control t e playback of your
music using t e watc buttons.
METAWATCH
A:
Exit Music
Mode
F:
Turn on
LED Lig t
E:
Play
/Pause toggle
D:
Next Song
A
C
F
B:
Volume up
C:
Volume
down
Revision 1.0 10-Oct-2012
13 of 19
4.4 S
YSTEM
A
LERTS
T e clock widgets also can give you information about system alerts. Examples are low battery warnings, Bluetoot
off, or p one disconnected events. T ese serve as constant reminders t at t ere is a warning or alert from t e
system.
Low Battery
Warning
Bluetoot radio
OFF
Revision 1.0 10-Oct-2012
14 of 19
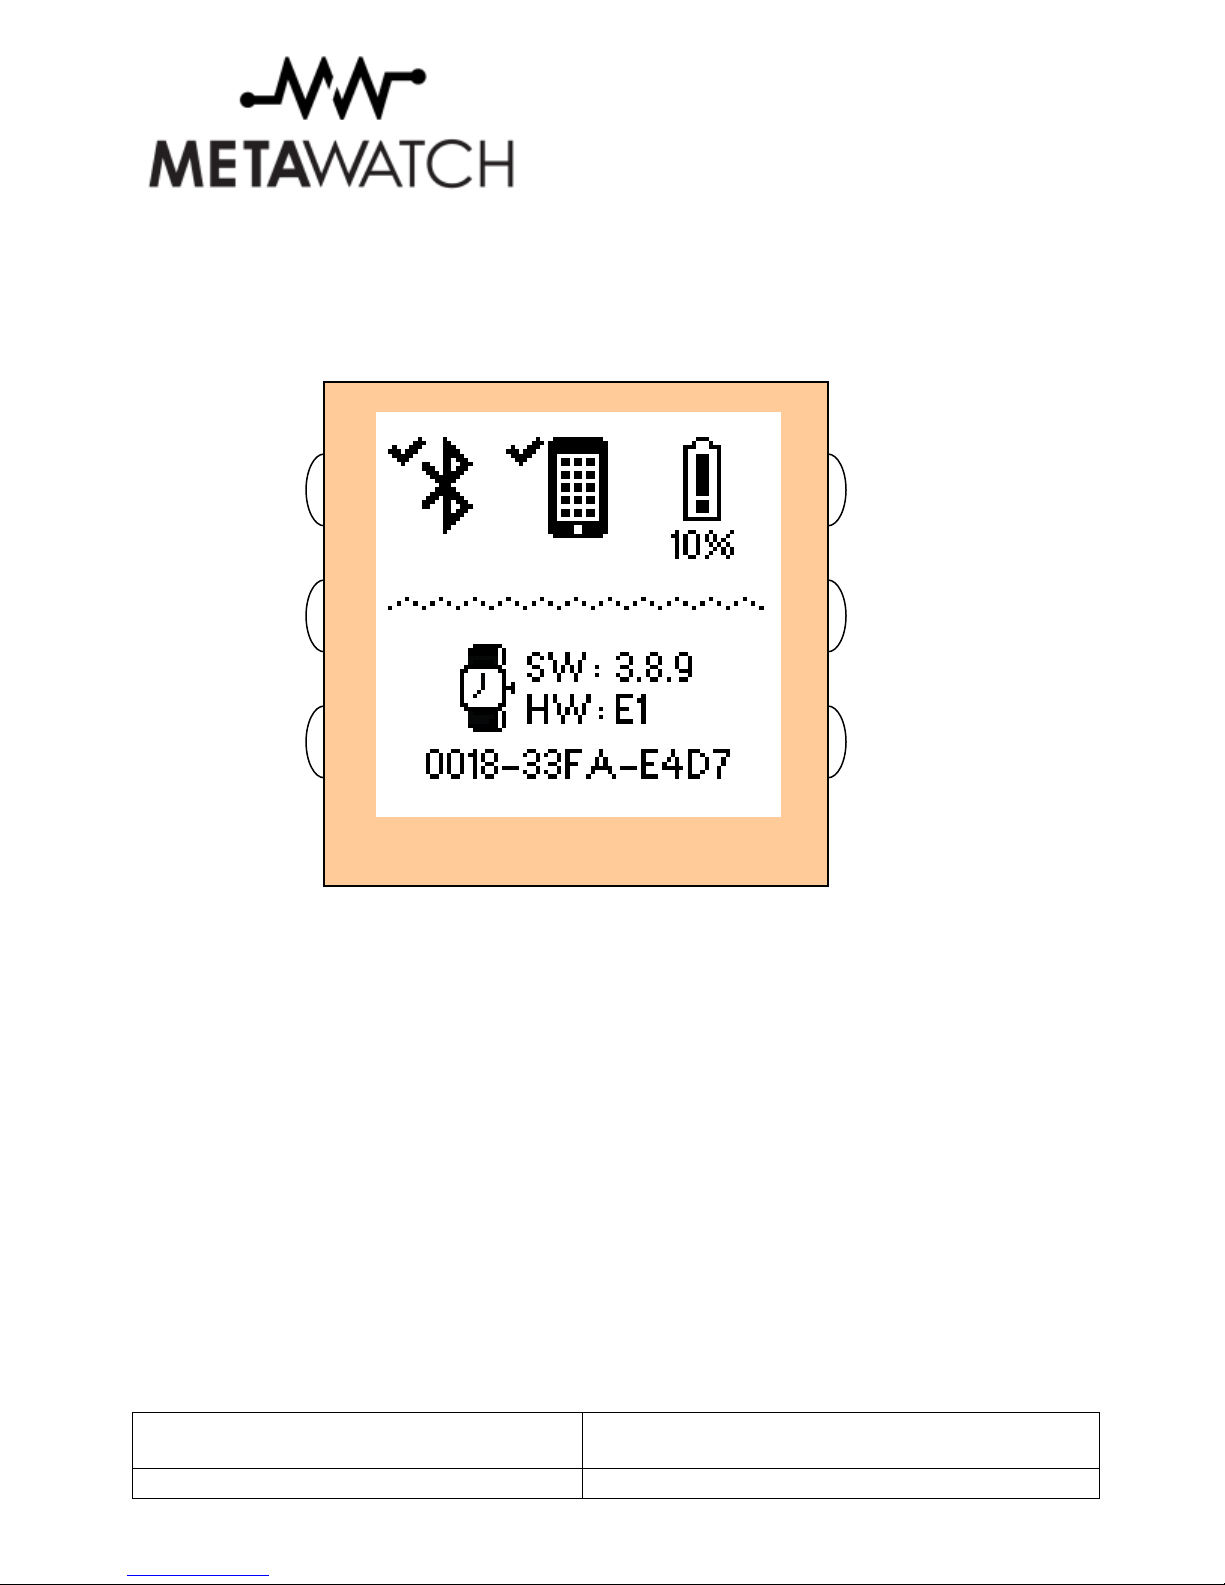
4.5 S
TAUS
D
ISPLAY
T e status display gives you some more detailed information about your watc . You can see t e status of t e
Bluetoot radio (ON / OFF), t e status of t e connection to your p one (ON / OFF / Warning), and t e detailed
battery level of t e watc .
T e Software (SW) and Hardware (HW) versions and serial number are also displayed ere.
METAWATCH
A:
Review last
notification
F:
Turn on
LED Lig t
E:
Go to
Music Mode
D:
Exit to
Widget view
A
C
F
B:
Exit to
Widget view
C:
Enter Menu
Revision 1.0 10-Oct-2012
15 of 19
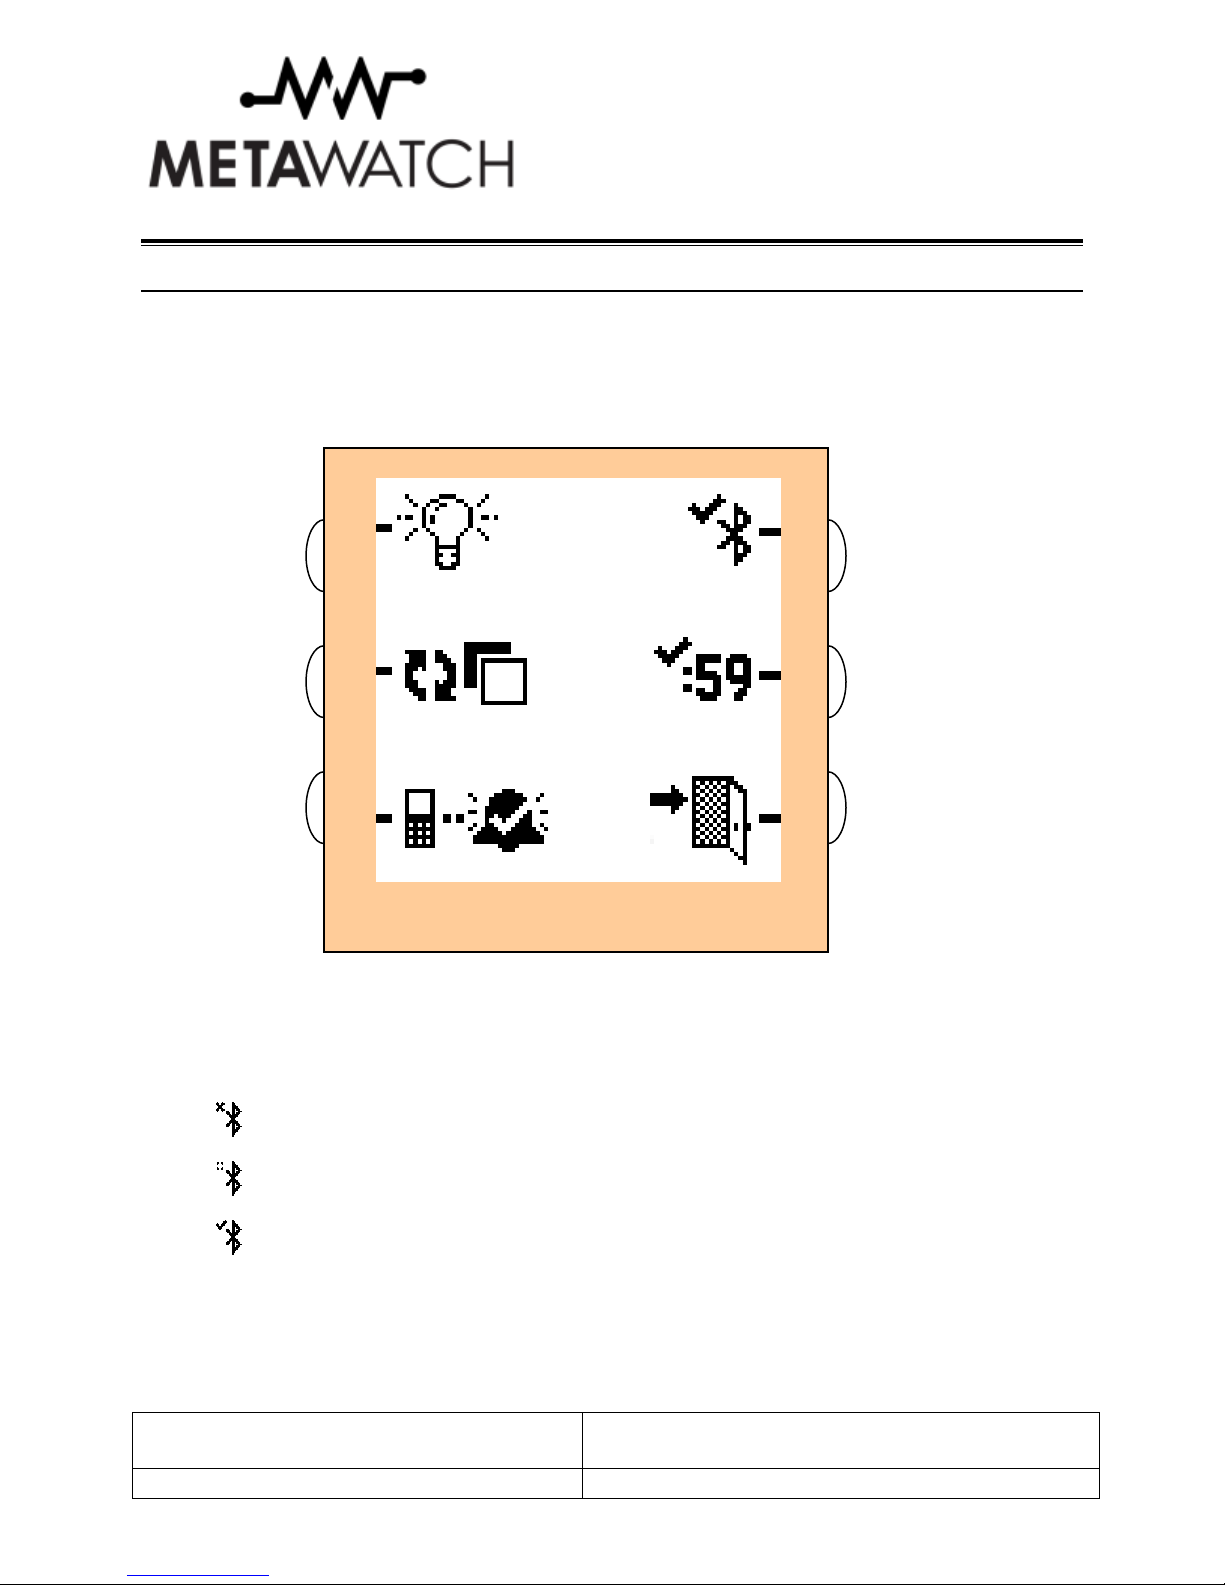
5 Menu
Your watc menu gives you access to common functions t at you mig t like access to, even wit out your p one.
Eac icon represents one function and can eit er be ON or OFF. For most of t ese settings, an “X” represents t e
OFF state, a “c eck” represents ON state. Pressing t e button next to t at icon will flip t at setting, and t e icon will
c ange to represent t e new state. T e effect of any c anges ere is immediate and t ere is no need to “save”
settings before exiting.
5.1 B
LUETOOTH
ON
/
OFF
(B
UTTON
A)
T e icon s ows you t e status of Bluetoot . T e Icon can be eit er
OFF
Loading
Or ON
W en turning ON, you will see t e “Loading” state for a s ort period of time. W en turning OFF, it will switc
immediately to t e OFF state.
METAWATCH
A:
Toggle
Bluetoot
ON/OFF
F:
Turn on
lig t
E:
Invert
entire display
D:
Toggle
link alarm
ON/OFF
A
C
F
B:
Toggle
Seconds Count
ON/OFF
C:
Exit Menu

Revision 1.0 10-Oct-2012
16 of 19
5.2 S
ECONDS
ON
/
OFF
(B
UTTON
B)
W en OFF, time is displayed in Hours and Minutes. T is is t e default state and gives you t e best power
consumption. W en ON, Hours, Minutes, and Seconds are displayed in t e clock area.
Seconds count updates t e display once per second and will reduce your battery life.
Not every watc face or clock can display a second’s count by design.
5.3 E
IT
M
ENU
(B
UTTON
C)
T is Exits t e menu and returns you to your Widget screen.
5.4 L
INK
A
LARM
ON
/
OFF
(B
UTTON
D)
W en ON (w ic is t e default), if your p one is too far from your watc and you lose t e connection, your watc
will vibrate to warn you your p one is left be ind. T is can be useful for not accidentally leaving your p one be ind
somew ere or for simply being aware of your connected status. A system icon in most clock areas will also remind
you of your disconnected status.
W en OFF, you will not be alerted by t e watc wit vibration, but t e system icon s owing t e disconnected status
will sill be displayed.
5.5 I
NVERT
D
ISPLAY
(B
UTTON
E)
T is will invert t e display of your watc . T e two states are “w ite on mirror” or “mirror on w ite”. Pressing t is
button will flip between t ese states. You mig t c ange t is to suit your mood or to improve display visibility is
some situations.
5.6 T
URN ON
L
IGHT
(B
UTTON
F)
T ere are no settings associated wit t is button, instead t is button will turn t e lig t ON for viewing t e display in
t e low lig t and dark conditions. T is button is available for use in most ot er watc modes as well.

Revision 1.0 10-Oct-2012
17 of 19
6 U dating your Firmware
6.1 I
NSTALL YOUR DRIVERS
First, unplug your clip from your PC
Next download drivers for your c arging clip – Windows, Mac, and Ubuntu Linux are supported. You can
download from ere, make sure you select from “Currently Supported VCP Drivers” section.
ttp://www.ftdic ip.com/Drivers/VCP. tm
Follow t e directions
6.2 I
NSTALL YOUR DRIVERS
After installing drivers, your clip will be given a COM port on your PC w en it’s plugged in.
Connect your clip and run t e MetaWatc Manager Update application.
T e software will reflas your watc and t en verify t e program in memory. You will get a success or failure. If
you run into trouble, t e old program is saved and can be loaded back on.

Revision 1.0 10-Oct-2012
18 of 19
7 Su ort
Please visit www.metawatc .com/support to get support information.

Revision 1.0 10-Oct-2012
19 of 19
8 Develo ers! Partici ate in the Community
You make us better. Help improve Meta Watc by reporting bugs, contributing your own code, requesting
en ancements, or just participating in t e discussion. Please visit t e Forums section of www.MetaWatc .org and
join t e community!
Other manuals for SMARTWATCH SW12
1
Table of contents
Other Metawatch Watch manuals


