Metene TD-4116 User manual

Blood Glucose Monitoring System
Owner’s Manual


English
Dear PHWHQH System Owner:
Thank you for choosing the PHWHQH TD-4116 Blood Glucose
Monitoring System. This manual provides important information to help
you to use the system properly. Before using this product, please read
the following contents thoroughly and carefully.
If you have other questions regarding this product, please contact the
local customer service or place of purchase.
Intended Use
The PHWHQH TD-4116 Blood Glucose Monitoring System is intended to
be used for the quantitative measurement of glucose (sugar) in fresh
capillary whole blood from the finger and alternative sites (palm,
forearm and upper arm). This blood glucose monitoring system is
intended to be used by a single person and should not be shared.
The PHWHQH TD-4116 Blood Glucose Monitoring System is intended for
self-testing outside the body (in vitro diagnostic use) by people with
diabetes at home as an aid to monitor the effectiveness of diabetes
control. This system should not be used for the diagnosis of or
screening for diabetes, nor for use on neonates.
AST in this system can be used only during steady-state blood glucose
conditions described in the section of “Alternative Site Testing (AST).”
Version 1.0 2019/07
311-4277300-xxx
IMPORTANT SAFETY PRECAUTIONS
READ BEFORE USE
y
The meter and lancing device are for single patient use. Do not
share them with anyone including other family members! Do not
use on multiple patients!
y
All parts of the kit are considered biohazardous and can
potentially transmit infectious diseases, even after you have
performed cleaning and disinfection.
For more information, please visit
“FDA Public Health Notification: Use of Fingerstick Devices on
More than One Person Poses Risk for Transmitting Bloodborne
Pathogens: Initial Communication” (2010)
http://wayback.archive-
it.org/7993/20170111013014/http://www.fda.gov/MedicalDevices/
Safety/AlertsandNotices/ucm224025.htm
“CDC Clinical Reminder: Use of Fingerstick Devices on More
than One Person Poses Risk for Transmitting Bloodborne
Pathogens” (2010)
http://www.cdc.gov/injectionsafety/Fingerstick-DevicesBGM.html
1. Use this device ONLY for the intended use described in this
manual.
2. Do NOT use accessories which are not specified by the
manufacturer.
3. Do NOT use the device if it is not working properly or if it is
damaged.

4. Do NOT use the equipment in places where aerosol sprays are
being used, or where oxygen is being administered.
5. Do NOT under any circumstances use the device on neonates or
infants.
6. This device does NOT serve as a cure for any symptoms or
diseases. The data measured is for reference only.
7. Before using this device to test blood glucose, read all instructions
thoroughly and practice the test. Carry out all the quality control
checks as directed.
8. Keep the device and testing equipment away from young children.
Small items such as the battery cover, batteries, test strips, lancets
and vial caps are choking hazards.
9. Do not use this instrument in close proximity to sources of strong
electromagnetic radiation, as this may interfere with the accurate
operation.
10.Proper maintenance and periodically control solution test are
essential to the longevity of your device. If you are concerned about
your accuracy of measurement, please contact your local customer
service or place of purchase for help.
KEEP THESE INSTRUCTIONS IN A SAFE PLACE

TABLE OF CONTENTS
BEFORE YOU BEGIN 1
Important Information 1
Test Principle 3
Contents of System 3
Meter Overview 4
Display Screen 5
Test Strip 5
SETTING THE METER 6
THE FOUR MEASURING MODES 7
BEFORE TESTING 8
Control Solution Testing 8
Performing a Control Solution Test 8
TESTING WITH BLOOD SAMPLE 10
Preparing the Lancing Device for Blood Testing 10
Preparing the Puncture Site 10
Performing a Blood Glucose Test 12
Alternative Site Testing 14
METER MEMORY 16
Reviewing Test Results 16
Reviewing Blood Glucose Day Average Results 16
DOWNLADING RESULTS TO A COMPUTER 17
Data transmission via cable 17
MAINTENANCE 18
Battery 18
Caring for Your Meter 19
Disinfecting Procedures 20
Caring for Your Test Strips 21
Important Control Solution Information 22
MEASUREMENT RESULT READINGS 23
Result Readings 23
Reference Values 24
Comparing Meter and Laboratory Results 24
SYSTEM TROUBLESHOOTING 26
Error Messages 26
Troubleshooting 27
SPECIFICATIONS 28


ϭ
BEFORE YOU BEGIN
Important Information
ySevere dehydration and excessive water loss may cause readings
which are lower than actual values. If you believe you are suffering
from severe dehydration, consult a healthcare professional
immediately.
yIf your blood glucose results are lower or higher than usual, and
you do not have any symptoms of illness, first repeat the test. If you
have symptoms or continue to get results which are higher or lower
than usual, follow the treatment advice of your healthcare
professional.
yUse only fresh whole blood samples to test your blood glucose.
Using other substances will lead to inaccurate results.
yIf you are experiencing symptoms that are inconsistent with your
blood glucose test results and you have followed all the instructions
given in this owner’s manual, contact your healthcare professional.
yThe device should not be used on severely hypotensive individuals
or patients in shock. Readings which are lower than actual values
may occur for individuals experiencing a hyperglycemic-
hyperosmolar state, with or without ketosis. Please consult the
healthcare professional before use.

Ϯ
yLimitation
The device should not be used on individuals in hyperglycemic-
hyperosmolar state, with or without ketosis; not for neonatal use;
not for use on critically ill patients.
This device is not intended for use in healthcare or assisted-use
settings such as hospitals, physician offices, or long-term care
facilities because it has not been cleared by FDA for use in these
settings, including for routine assisted testing or as part of glycemic
control procedures. Use of this device on multiple patients may lead
to transmission of Human Immunodeficiency Virus (HIV), Hepatitis
C Virus (HCV), Hepatitis B Virus (HBV), or other bloodborne
pathogens.

ϯ
Test Principle
Your system measures the amount of sugar (glucose) in whole blood.
The glucose testing is based on the measurement of electrical current
generated by the reaction of glucose with the reagent of the strip. The
meter measures the current, calculates the blood glucose level, and
displays the result. The strength of the current produced by the
reaction depends on the amount of glucose in the blood sample.
Contents of System
Your new blood glucose monitoring system kit includes:
Meter
Owner’s Manual
Protective Wallet
Quick Start Guide
Blood Glucose Test Strips
Lancing Device
Sterile Lancets
1 x 1.5 V AAA alkaline batteries
Test strips (c), control solutions (d), sterile lancets (e) or lancing device
(f) are not included in the kit. They must be purchased separately.
Please make sure you have those items needed for a blood glucose
test beforehand.
The USB cable is not provided in the kit but an accessory for the data
transmission feature connecting to your PC (see section Downloading
Results onto your Computer). Please contact local customer services
or the place of purchase for obtaining the cable.
NOTE:
If any items are missing from your kit or opened prior to use, please
contact local customer services or place of purchase for assistance.
ϰ
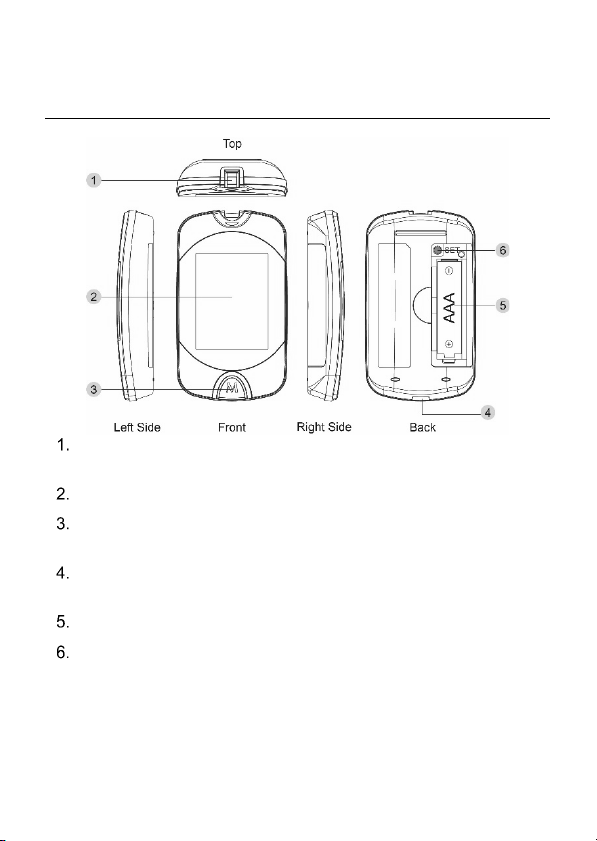
Meter Overview
Test Strip Slot & Strip Indicator ġ
Insert test strip here to turn the meter on for testing.
Display Screen
M Button (M)
Enter the meter memory and mute a reminder alarm.
Data Port
Transfer test results with a cable connection.
Battery Compartment
SET Button (S)
Enter and confirm the meter settings.

ϱ
Display Screen
Test Result
Ketone warning
Error Warning
Memory symbol
Control solution mode
QC – control solution test
Measurement modes
AC – before meal
PC – after meal
Gen – any time of day
Date
Time
Day average
Reminder alarms
Measurement unit
Low battery symbol
Test strip symbol
Blood drop symbol
Test Strip
NOTE:
The PHWHQH7' Blood Glucose Meter should only be used
with PHWHQH 7'Blood Glucose Test Strips. Using other test
strips with this meter can produce inaccurate results
Absorbent hole Test strip handle
Confirmation window Contact bars
Attention:
The front side of the test strip should
face up when inserting the test strip.
Test results might be wrong if the
contact bar is not fully inserted into the
test slot.

ϲ
SETTING THE METER
Before using your meter for the first time or if you change the meter
battery, you should check and update these settings.
Entering the Setting Mode (a)
Start with the meter off (no test strip inserted). Press SET (S).
Setting the date
The sequence of the date setting is: YEAR ɦMONTH ɦDAY.
With the YEAR/MONTH/DAY flashing in sequence, press M button
(M) until the correct year/month/day appears. Press S.
Setting the time format
Press Mto select the desired time format (12h or 24h). Press S.
Setting the time
With the Hour/Minute flashing in sequence, press Muntil the
correct hour/minute appears. Press S.
Deleting the memory
With “dEL” and a “ġġġġ” symbol on the display, press Mand
select “no” to keep the results in memory then press Sto skip. To
delete all the results, press Mand select “yes” to delete all
memory records.
ϳ
Setting the reminder alarm
Your meter has four reminder alarms. The meter will display
“OFF” and “ ”. If you don’t want to set an alarm, press Sto
skip this step.
To set an alarm, press Mto select “On”, then press S. With the
hour/minute flashing in sequence, press Mto select the correct
hour/minute. Press Sand go to the next alarm setting.
When the alarm beeps, you can press Mto silence it or insert a test
strip to begin testing; if you ignore it, the meter will beep for 2
minutes then switch off.
Congratulations! You have completed all settings!
NOTE:
y
These parameters can ONLY be changed in the setting mode.
y
If the meter is idle for 3 minutes during the setting mode, it will
switch off automatically.
THE FOUR MEASURING MODES
The meter provides you with four modes for measuring, General, AC,
PC and QC. You can switch between each mode by:
Start with the meter switched off. Insert a test strip to turn on the
meter. The screen will display a flashing blood drop and “Gen”.
Press M button to switch between General, AC, PC and QC mode.
ϴ
BEFORE TESTING
Control Solution Testing
Our Control Solution contains a known amount of glucose that reacts
with test strips and is used to ensure your meter and test strips are
working together correctly.
Do a control solution test when:
y
You first receive the meter
y
At least once a week to routinely check the meter and test strips
y
You begin using a new vial of test strips
y
You suspect the meter or test strips are not working properly
y
Your blood glucose test results are not consistent with how you feel,
or if you think the results are not accurate
y
Practicing the testing process
y
You have dropped or think you may have damaged the meter
Performing a Control Solution Test
To perform a control solution test, you will need: (b), (c) and (d).
Insert the test strip into the meter. There will be a strip light
indicating the test strip is inserted into the test slot. Wait for the
meter to display “ ” and “ ”.
Press M button to mark this test as a control solution test
With “QC” displayed, the meter will store your test result in memory
under “QC”. If you press Magain, the “QC” will disappear and this
test is no longer a control solution test.

ϵ
WARNING:
When doing the control solution test, you have to mark it so that the
test result will NOT mix with the blood glucose TEST RESULTS
stored in the memory. Failure to do so will mix up the blood glucose
test results with the control solution test results in memory.
Apply Control Solution (g)
Shake the control solution vial thoroughly before use. Squeeze
out a drop and wipe it off, then squeeze out another drop and
place it on the tip of the vial cap. Hold the meter to move the
absorbent hole of the test strip to touch the drop. Once the
confirmation window fills completely, the meter will begin counting
down. To avoid contaminating the control solution, do not directly
apply control solution onto a strip
Read and Compare the Result
After counting down to 0, the control solution test result will
appear on the display. Compare this result with the range printed
on the test strip vial and it should fall within this range. If not,
please read the instructions again and repeat the control solution
test.
NOTE:
y
The control solution range printed on the test strip vial is for
control solution use only. It is not a recommended range for your
blood glucose level.
y
See MAINTENANCE section for important information about
your control solutions.

ϭϬ
TESTING WITH BLOOD SAMPLE
WARNING:
To reduce the chance of infection:
yNever share a lancet or the lancing device.
yAlways use a new, sterile lancet. Lancets are for single use only.
yAvoid getting hand lotion, oils, dirt, or debris in or on the lancets
and the lancing device.
yWash and dry your hands thoroughly after handling the meter,
lancing device and test strips to prevent infection. For more
information, please refer to the “Cleaning and Disinfection”
section.
yIf the meter is being operated by a second person who is
providing testing assistance to the user, the meter and lancing
device should be decontaminated prior to use by the second
person.
Sharing the lancing device and lancets may increase the risk of
contracting infectious diseases. Lancing device must not be
used for more than one person.
Preparing the Lancing Device for Blood Testing
Please refer to the manufacturer’s instructions for the lancing device to
collect a blood sample.
Preparing the Puncture Site
Stimulating blood perfusion by rubbing the puncture site before blood
extraction significantly reduces variations between measurements.

ϭϭ
Please follow the suggestions below before obtaining a drop of blood:
yWash and dry your hands before starting.
ySelect the puncture site at fingertips or another body parts (please
see section “Alternative Site Testing” (AST) on how to select the
appropriate sites).
yClean the puncture site using cotton moistened with 70% alcohol
and let it air dry.
yRub the puncture site for about 20 seconds before penetration.
yUse a clear cap (included in the kit) while setting up the lancing
device.
Fingertip testing (h)
Press the lancing device’s tip firmly against the lower side of your
fingertip. Press the release button to prick your finger, then a click
indicates that the puncture is complete.
Blood from sites other than the fingertip (i)
Replace the lancing device cap with the clear cap for AST. Pull the
cocking control back until it clicks. When lancing the forearm, upper
arm, or hand, avoid lancing the areas with obvious veins because of
excessive bleeding.
NOTE:
yChoose a different spot each time you test. Repeated punctures
at the same spot may cause soreness and calluses.
yPlease consult your healthcare professional before you begin
AST.
yIt is recommended that you discard the first drop of blood as it
might contain tissue fluid, which may affect the test result.

ϭϮ
Performing a Blood Glucose Test
To perform a blood glucose test, you will need: meter (b), strip (c),
sterile lancet (f) and lancing device (e).
Insert the test strip to turn on the meter
Wait for the meter to display “ ” andġ“ ”.
Select the appropriate measuring mode by pressing M.
Obtaining a blood sample (j)
Use the pre-set lancing device to puncture the desired site. Wipe off
the first appeared drop of blood with a clean cotton swab. Gently
squeeze the punctured area to obtain another drop of blood. The
volume of blood sample must be at least 0.7 microliter (ȝL) of
volume. ( actual size). Be careful NOT to smear the blood sample.
Apply the Sample (k)
Gently apply the drop of blood to the absorbent hole of the test strip
at a tilted angle. Confirmation window should be completely filled if
enough blood sample has been applied. Do NOT remove your
finger until you hear a beep sound.

ϭϯ
NOTE:
y
Do not press the punctured site against the test strip or try to
smear the blood.
y
If you do not apply a blood sample to the test strip within 3
minutes, the meter will automatically turn off. You must remove
and reinsert the test strip to start a new test.
y
The confirmation window should be filled with blood before the
meter begins to count down. NEVER try to add more blood to the
test strip after the drop of blood has moved away. Discard the
used test strip and retest with a new one.
y
If you have trouble filling the confirmation window, please contact
your health care professional or the local customer service for
assistance.
Read Your Result
The result of the blood glucose test will appear after the meter
counts down to 0. This blood glucose result will automatically be
stored in the memory.
Remove the used test strip and lancet (l)
Remove the test strip by hand; throw the strip into a disposal
container. The meter will turn itself off automatically after the test
strip is removed.
Always follow the instructions in the lancing device package
insert when removing the lancet.
Other manuals for TD-4116
1
Table of contents
Other Metene Blood Glucose Meter manuals

Popular Blood Glucose Meter manuals by other brands

Contour
Contour NEXT ONE user guide

Trividia
Trividia True Metrix Instructions for use

Home Aide Diagnostic
Home Aide Diagnostic Easy Trak manual

Accu-Chek
Accu-Chek Aviva owner's booklet

Trividia
Trividia TRUEbalance Quick reference guide

SD Biosensor
SD Biosensor SD Gluco Navii Operations & Procedures Manual


