Metrum Acoustics Aurix User manual

Made by
ALL Engineering
Aurix on top of the Octave MKII
"
AuriX
AuriXAuriX
AuriX
" Headphone amplifier
User manual
last update 12-01-201

Made by
ALL Engineering
Introduction
The Aurix is a new way to preserve the integrity of the analogue signal.
During development it proved impossible not to make concessions if the designer would have utilized
one of the already established techniques. Therefore this particular route was abandoned and a
design was created where voltage gain is achieved via a so-called step-up transformer, instead of
transistors or tubes. Only two FET transistors are utilized to convert the signal from the step-up
transformer into power, which plays into the strength of these semiconductors.
By utilizing this method the Aurix has become a design free of concessions, where the integrity of the
sound of tube-amps is combined with the compact practicality of the transistors, without any of their
inherent flaws.
The Aurix is a 100% class A amplifier with a very high signal-to-noise ratio and almost no distortion.
Because feedback has not been implemented in the design the Aurix has no degradation of the
incoming signal in terms of dynamics and imaging.
In order to ensure the Aurix is flexible and applicable for most headphones it has two gain factors so
that both low and high impedance headphones can be utilized. Aside from that the Aurix is equipped
with two controllable analogue inputs that, in case no headphone is connected, can loop the signal
back to your hifi set. This allows the Aurix to be permanently installed in your hifi-set without you
ever having to switch the cables around.
The Aurix’s appearance is made the match the Octave Mk II, but works very well with all high-end
analogue sources such as the Hex DAC.

Made by
ALL Engineering
IMPORTANT SAFETY INSTRU TIONS
1. Read and keep these Instructions and warnings.
3. Follow all Instructions.
4. Do not use this apparatus near water.
5. Clean only with a dry cloth.
6. Do not install near any heat sources such as radiators, heat registers, stoves, or other apparatus
(including amplifiers) that produce heat.
7. Unplug this apparatus during lightning storms or when unused for long periods of time.
8. Refer all servicing to qualified service personnel. Servicing is required when the apparatus
has been damaged in any way, such as a power-supply cord or plug is damaged, liquid has
been spilled or objects have fallen into the apparatus, the apparatus has been exposed to
rain or moisture, does not operate normally, or has been dropped.
9. The HEX DAC must be placed on a firm, level surface where it is not exposed to dripping
or splashing.
10. Before making connections to to the dac, ensure that the power is off and other components
are in mute or stand-by mode. Make sure all cable terminations are of the highest quality,
free from frayed ends, short circuits, or cold solder joints.
11. THERE ARE NO USER SERVICEABLE PARTS INSIDE THE "Aurix" Headphone amplifier.
Please contact Acelec Engineering if you have any questions not addressed in this guide.
12. Acelec Engineering cannot be held accountable and/or responsible for any form of damage or
health issues inflicted to you, other people, pets, companies and non-living objects, that are caused
by any form of usage of the product which is not described in this manual.
13.By actually using this product and turning it on for the first time, you agree to these terms

Made by
ALL Engineering
What is in the Box
•The Aurix headphone amplifier
•Power cord (only Euro or USA based power cords)
•User manual
Made by
ALL Engineering
onnections
Warning!
Please connect your interconnects first before connecting the mains power cable!
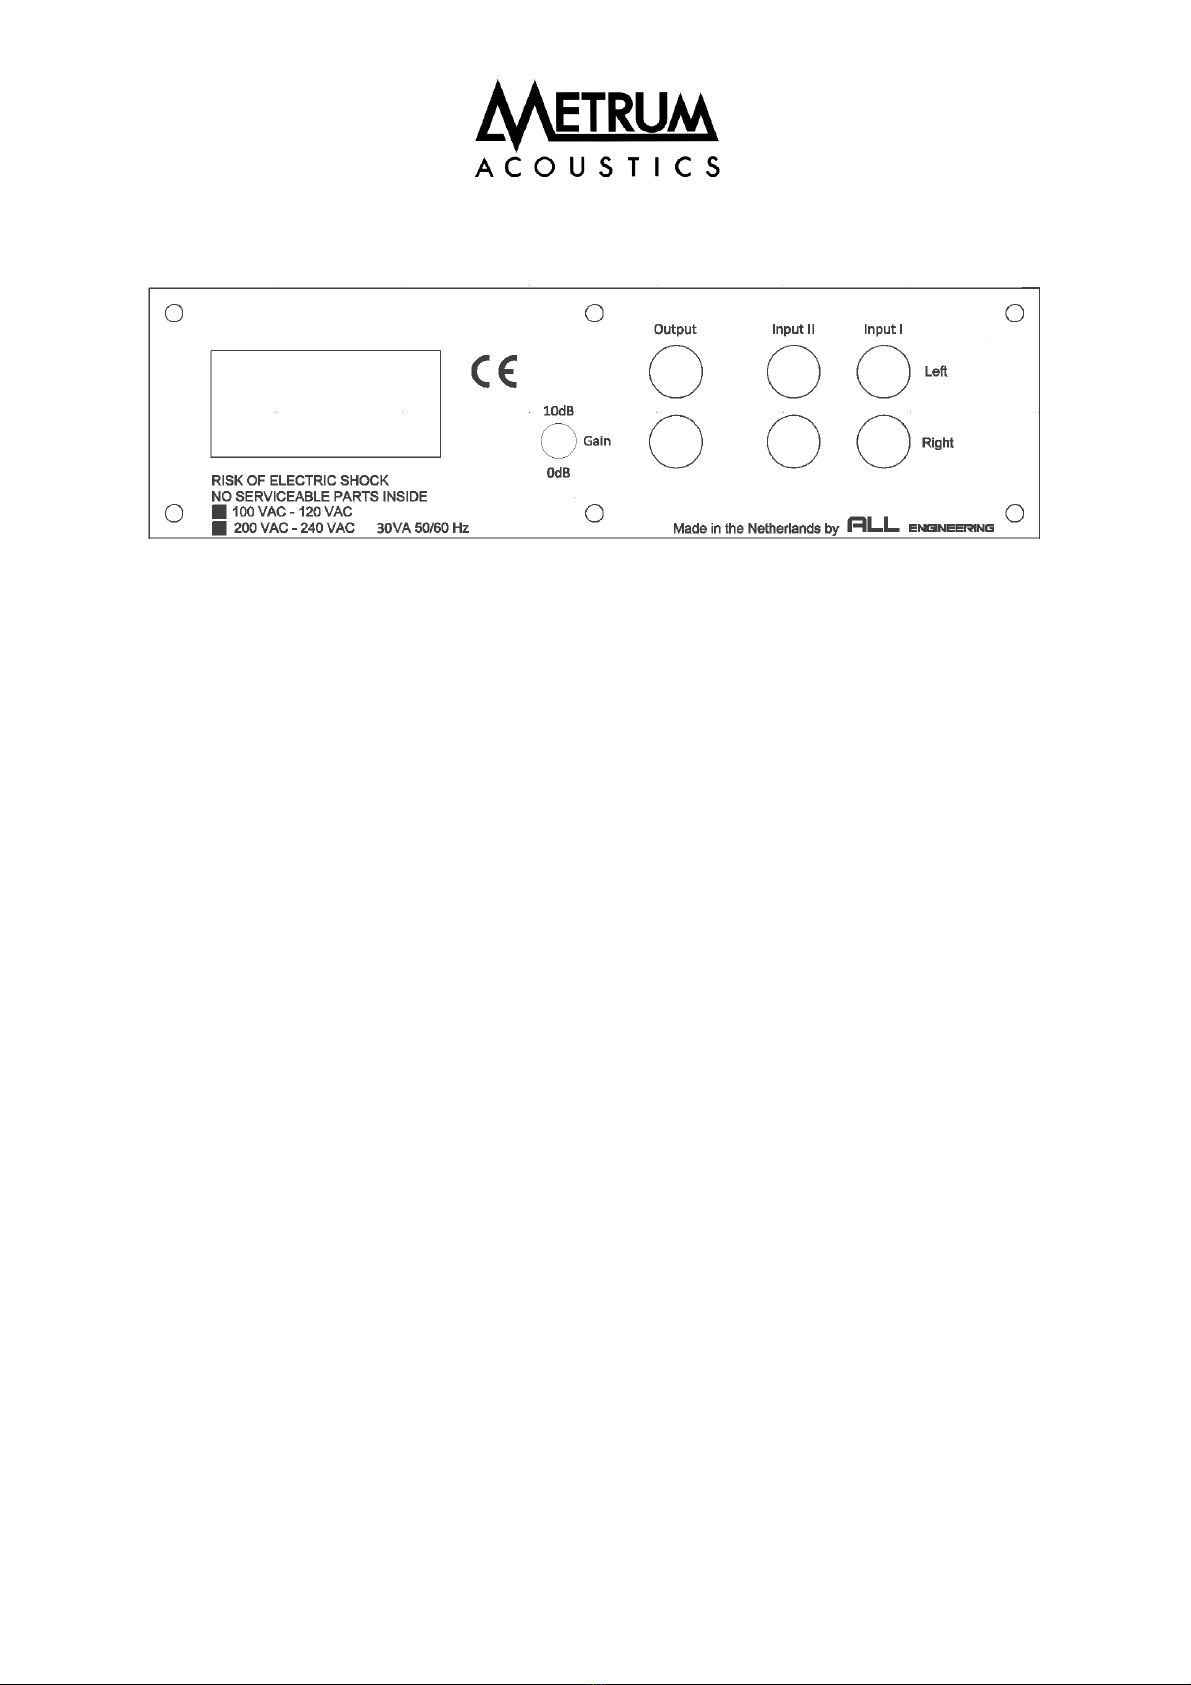
•orrect mains voltage: Please check at the back or the product it is properly set for the local
mains voltage.
•Line inputs: Input I and Input II are both selectable inputs for sources like a CD player , DAC
or other analogue sources.
•Output: Depending the selection made on the front panel, Input I or Input II should be
connected to the output as long no headhone is connected to the front connector and
therefore can loop the signal back to your HiFi set. This allows the Aurix to be permanently
installed in the system.
•Gain: Depending the properties of the used headphone you can set the amplification of the
unit by using the gain switch on the back panel. Headphones having an impedance of 300
Ohms or higher should use the 10 dB setting while lower impedance versions should use the
0 dB setting. However depending upon the efficiency of the used headphone the right gain
setting can differ so it is possible to set this gain to the most convenient setting.
•Mains inlet: Connect the supplied power cable (only Europe or USA styles of power cords )
to a grounded power outlet.

Made by
ALL Engineering
Operation
•Source selection: One button on the front of the Aurix can be used for both source selection
and standby . By pushing this button you will toggle from Standby to Input I , Input II and
back to Standby again. If a headphone is connected and one of the inputs is selected the
Aurix will release the connection after 5 seconds. If no headphone is connected, the selected
Input can loop the signal back to the output connectors on the backside of the Aurix and can
be connected to your HiFi set. This allows the Aurix to be permanently installed without
changing cables.
•Volume control: The volume control speaks for itself however, depending on headphone
sensivity, control range can be limited . By selecting another gain factor on the back of the
Aurix , control range of the volume control can be corrected.
Protection
A large part in the Aurix is used for protection of your valuable headphone and will be
available in the next situations:
•During switch on period of the Aurix the current in the Class A output section will be
increased. If all settings have their operational values, the release of the headphone
connection will be accomplished after 5 seconds.
•In case of a malfunction in one of the output channels there can be a risk of the presence of a
DC component and can lead to damage to the connected headphone. Protection circuit will
detect such errors and will disconnect the outcoming signal.

Made by
ALL Engineering
•If one of the selected inputs contains too much subsonic information the Aurix will
disconnect the front output connector. Mentioned protection is active below 10 Hz but is
only active on excessive levels. There is always some of subsonic information but in normal
conditions this will not trigger the protection circuit. However in a case that the volume
control is set almost fully clockwise the subsonic content will increase and might lead to
disconnecting the front output connector.

Made by
ALL Engineering
Technical specs:
Working principle: Class A amplifier by using step-up transformer.
Applicable headphones: 16 Ohms impedance or higher.
Power supply: Max 30 VA . Standby less than 3 VA
Voltage rating: 110/115V AC or 220/230 V AC 60/50Hz
Inputs: 2x line level inputs
Outputs: 1x loop back function on back panel.
1x headphone connection on front panel.
Output voltage: 2 Volts RMS to 16 Ohms
2,5 Volts RMS to 30 Ohms
6,5 Volt RMS to 600 Ohms
Frequency range: 5Hz to 60 kHz -3 dB.
Distortion: 0,01 % THD using 600 Ohm load max. output
0,5% THD using 16 Ohm load max. output
Noise: -120 dB related to 2 Volt RMS output
Output impedance: 3 Ohms
Size: WxHxD 190 x 60 x 245 mm
Gewicht: 2500 gram.
Subject to change without notice.
ALL Engineering
Ambachtsweg 4K
3953BZ Maarsbergen
The Netherlands
Tel: +31 (0)343437331
Email: info@metrum-acoustics.nl
Website: http://www.metrum-acoustics.nl
Table of contents
Other Metrum Acoustics Amplifier manuals


 user manual")


