Mi-Fires Mi-Kamado User manual

Installation and
Operation Manual
Version_1_01_2021_Mi-Kamado
www.mi-fires.com
MODEL:
Mi-Kamado
2
ABOUT YOUR MI-KAMADO
Like many of you, here at Mi-Flues we are also
extremely passionate about outdoor cooking
“It isn’t just a BBQ, it’s about
sharing an experience,
the enjoyment and being
together. The Kamado is
the heart of all this.”
Dating back 4000 years ago archaeologists
have discovered large clay vessels thought
to be early incarnations of the Mi-Kamado
ceramic cooker. Since then it has evolved in
many ways, removable lid, added draft door for
better heat control and the switch from wood
to charcoal as the primary fuel.
In Japan the Mi-Kamado was a round clay
pot with a removable domed lid designed for
steaming rice. The name ‘Mi-Kamado’ is, in fact,
the Japanese word for ’stove’ or ‘cooking range’.
This name was adopted by the Americans and
has now become a generic term for this style of
ceramic cooker.
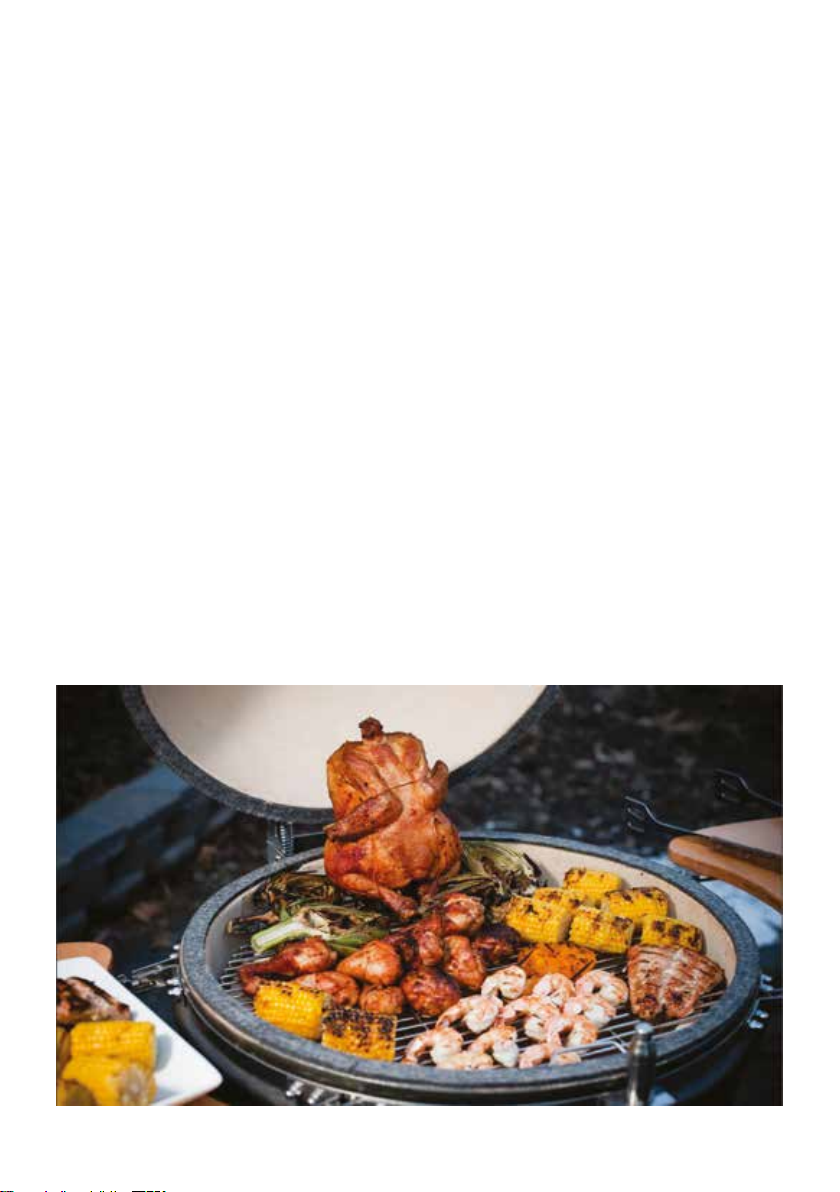
Mi-Kamado cookers are extremely versatile. Not
only can they be used for grilling or smoking but
also pizzas, bread, pies and cookies can be baked
effortlessly inside them. Due to their excellent
heat retention properties, high temperatures can
be achieved and maintained by precise control of
airflow via the top and bottom vents.
High temperatures are ideal for fast cooking
burgers and sausages whilst low heats will cook
larger joints over a longer period of time. Why not
try adding some wood chips to the charcoal or try
combining different flavour wood chips to make
your meats even more flavoursome.
Over the years, we have cooked on everything
from high-end stainless steel gas grills to
inexpensive briquette charcoal grills. If those were
our only choices I would pick the latter for one
simple reason; the taste. There is nothing better
than the mouth-watering taste of charcoal grilled
food. Fortunately there is a better option - the Mi-
Kamado Grill.
Our passion for that signature taste led to the
Mi-Kamado style of cooking. With Natural Lump
Charcoal, these ceramic grills are the prevailing
choice for cooking flexibility and temperature
range. When you compare the cooking
advantages and cost per use, our grills and
accessories are unmatched in their value.

3
Mi-Kamado
CONTENTS
Fundamentals & Assembled Mi-Kamado Grill .............................................. 4
Lighting your Mi-Kamado Grill...............................................................5
Cooking Temperature Guide................................................................ 6
Cooking Configuration: Baking............................................................. 7
Cooking Configuration: Roasting........................................................... 8
Cooking Configuration: Grilling............................................................. 9
Cooking Configuration: Smoking.......................................................... 10
Care & Maintenance ........................................................................11
Frequently Asked Questions............................................................... 12
Manufacturers Warranty................................................................... 16

4
Fire is the single most important ingredient in
successful Mi-Kamado cooking - and is made
from just three elements: oxygen, heat and
fuel. Learn how to control them, and you’ll
know how to control your fire.
The innovative grill design simplifies air control.
Adjustments to top and bottom vents make
it easy to add air to increase heat, or limit air to
reduce heat.
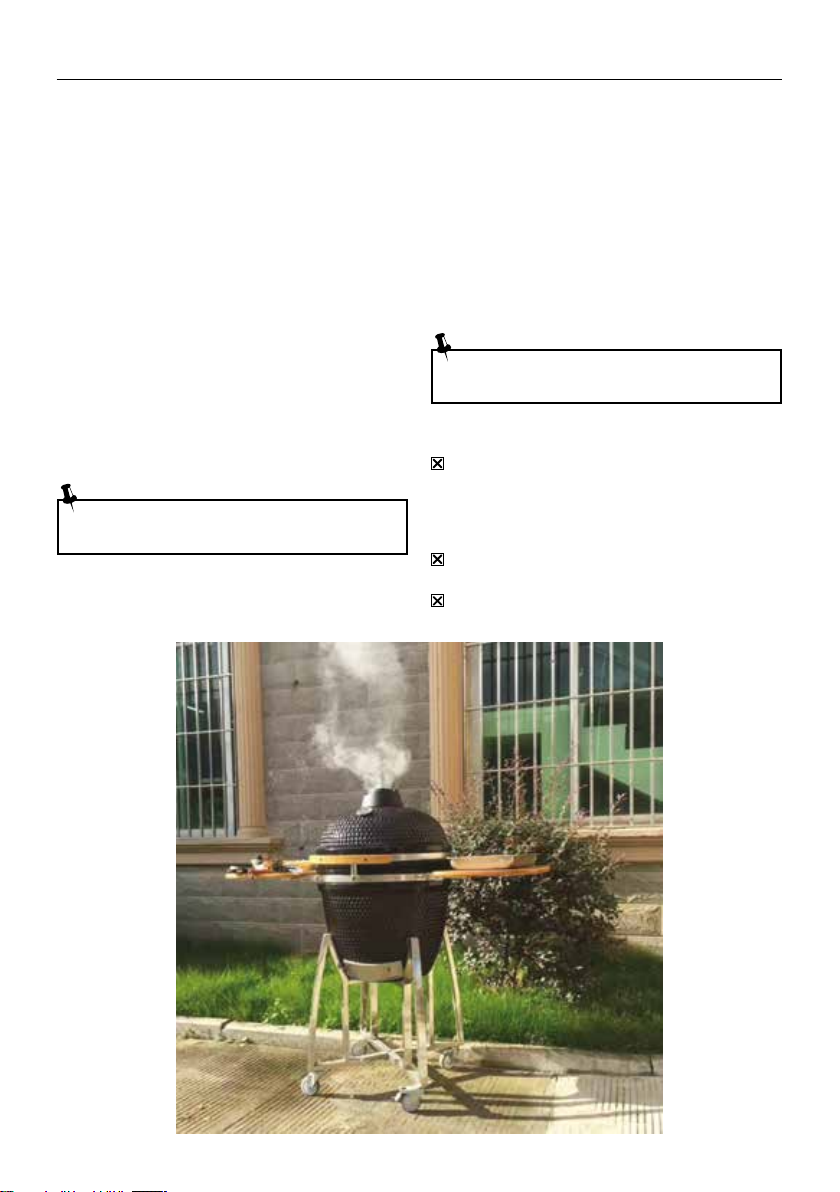
Smoke is the taste that can’t be mimicked or
faked. It transforms even the lowliest of meat
cuts, adds complexity, and makes a meal worth
remembering. Because the grill is charcoal
fuelled, everything you cook in it will come away
subtly changed by smoke, no matter which
technique you use. Smoke is the flavour we’re all
chasing.
Designed to make the most of smoke, the grills
efficient design gives you freedom to impart
flavour with just charcoal or with charcoal and
wood together.
The Divide and Conquer cooking system not only
makes it easy to control the precise distance from
the fire. It also allows various combinations for
multi-level cooking.
Think of different cooking surfaces as you do
your kitchen’s pots and pans. Or like your most
essential tools. Different materials (cast iron,
stainless steel, ceramic stone) hold and transfer
heat in unique ways. Finding the right heat trans-
fer - from flame to surface to food - is the key to
achieving a perfect finish, no matter what you’re
cooking.
One important attribute of the Ceramic Mi-
Kamado is its ability to set and accurately
maintain a desired temperature.
The Mi-Kamado has a two damper system that
facilitates easy heat control. By adjusting both
the top and bottom dampers, the heat inside the
Mi-Kamado can attain and hold temperatures
ranging from under 94°C to over 399°C.
This range should accommodate any cooking
needs - from low-temperature smoking to high-
heat searing. The thermometer installed on the
ceramic lid will provide accurate internal readings
without opening the lid.
A dual function metal top is included with each
Mi-Kamado. The daisy wheel design contains
openings that can be adjusted to allow more
or less air to “fine tune” the desired cooking
temperature. Opening the entire sliding metal
top will achieve high temperatures more quickly.
Already installed on the base of each Mi-Kamado
is a stainless steel draft door, which now has a
mesh panel for extra safety. (If you have an older
Mi-Kamado without the mesh, you have the
option of purchasing a replacement draft door
with the mesh.)
It is best to keep the mesh panel fully closed to
prevent hot ash or coals from popping out. As
with the dual function metal top, you can adjust
the draft door opening slightly to “fine tune” the
cooking temperature or open the solid door fully
to reach higher temperatures faster.
FUNDAMENTALS
5
LIGHTING
1. Light the charcoal with a fire starter cube or
two, chimney starter, electric starter or other
method.
2. Open the bottom draft door and leave the
dome up.
3. Wait 8-10 minutes for the charcoal to build a
small bed of embers.
4. Close the dome, open the top vent fully and
adjust the air flow as needed as you near the
target temperature.
CAUTION
DO NOT use lighter fluid, gas or other
combustible liquids. Liquid chemicals are
a fire hazard and they will impregnate the
ceramic material and impart an undesirable
taste to food.
DO NOT use “Instant Light” briquettes. It will
impart an undesirable taste.
DO NOT use briquette.
LIGHTING YOUR MIKAMADO GRILL
CHARCOAL & AIR FLOW
1. Build a mound of charcoal that starts just
below the holes in the side of the fire box with
the peak of the mound just below the top of the
fire ring.
2. Build the mound with large chunks at the
bottom and smaller ones as you build it.
Dumping charcoal directly into the fire box will
allow small pieces to block the air holes in the
fire grate, which can prevent you from reaching
grilling and searing temperatures.
3. Charcoal can be relit 2-3 times for multiple
cooking. Use the ash tool to stir the used
charcoal, so the ashes will drop through
the fire grate. Add 1/3 new charcoal to the
existing charcoal and build a new mound.
This works well for roasting and grill
temperatures. A full fire box of only fresh
charcoal is recommended for smoking and
searing temperatures.
CHARCOAL TIP: You can’t have too much
charcoal, but you can have too little.
LIGHTING TIP: Never use lighter fluid or
any other combustible liquid.

6
LOW TEMPERATURE COOKING GUIDE
•Light the lump charcoal according to the
instructions on Page 5. DO NOT move or stoke
the coals once lit.
•Open the bottom vent fully and leave the lid
open for about 10 minutes to build a small bed
of hot embers.
•Monitor the Mi-Kamado until it has risen to the
desired temperature.
•Fully close the bottom vent to maintain the
temperature.
You are now ready to use the Mi-Kamado for
cooking on.
SMOKING GUIDE
•Follow the instructions above as if you were
starting a slow cook.
•Monitor the Mi-Kamado until it has risen to the
desired temperature.
•Leave the bottom vent slightly open.
•Close the top vent and continue to check the
temperature for a few more minutes.
•Using heat resistant gloves sprinkle the wood
chips in a circle over the hot charcoal.
You are now ready to use the Mi-Kamado to
smoke on.
COOKING TEMPERATURE GUIDE
SMOKING TIP: Soak your wood chips or
cooking planks in water for 15 minutes
to prolong the smoking process.
HIGH TEMPERATURE COOKING GUIDE
•Light the lump charcoal according to the
instructions on page 5.
•Close the lid and fully open the top and bottom
vents.
•Monitor the Mi-Kamado until it has risen to
the desired temperature. See below for a
temperature cooking guide.
•Close the top vent half way and continue to
check the temperature for a few more minutes.
You are now ready to use the Mi-Kamado for
cooking on.
IMPORTANT
When opening the lid at high temperatures it
is essential to LIFT THE LID ONLY SLIGHTLY,
allowing air to enter slowly and safely,
preventing any back draft or flare-ups that
may cause injury.
ALWAYS use heat resistant gloves when
handling hot ceramics or cooking surfaces.
7
COOKING CONFIGURATION: BAKING
MIKAMADO GRILL: BAKING
The top vent has two cast iron disks that are
attached by a screw.
The top disk with the small holes is called a “daisy
wheel” and it’s used for low temperature cooking
(smoking) when the bottom disk completely
covers the opening.
For baking, it’s best to use the bottom disk for
achieving your desired temperature.
STEPS
1. When the 100% Natural Lump Charcoal is
fully lit, secure the Heat Deflector legs in the
notches of the fire ring and place the ceramic
plate in the top position.
2. Place the Pizza Stone on top of the Heat
Deflector. Close the dome and allow the plates
to preheat for 10 minutes.
3. Make sure the bottom draft door is fully
open. Open the top vent fully and monitor
the temperature until it reaches your desired
temperature.
3. Close the top vent half way, wait 1-2 minutes
and check the temperature.
4. Adjusting the top vent by either closing it more
(lower temperature) or opening it more (higher
temperature) by a ¼ inch can change the
temperature as much as 25°F.
5. Monitor the temperature during cooking and
if you notice that the temperature has moved
outside your desired range, adjust the top vent
in very small increments.
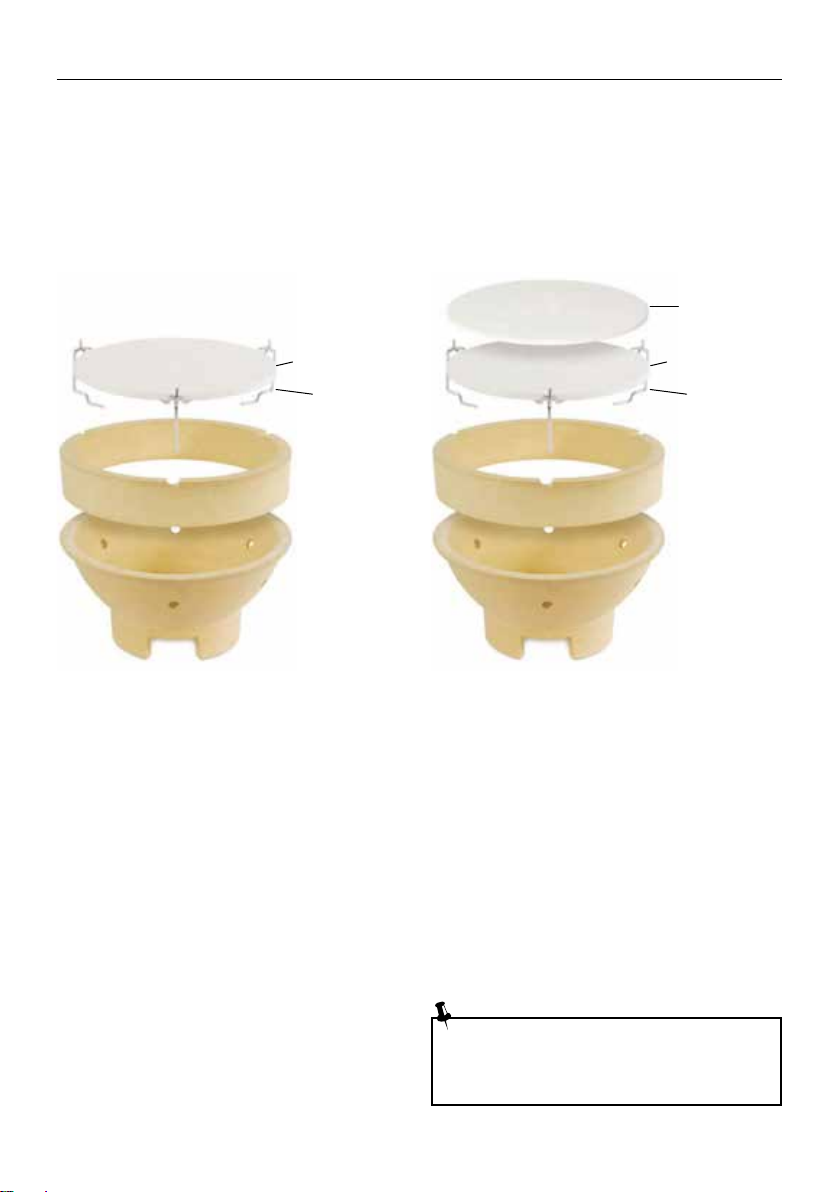
BAKING (Figure 1)
Use this configuration for heating foods that can
be cooked in ceramic or metal containers like
casseroles and hot appetizers.
A pizza cannot be baked directly on the Heat
Deflector. The bottom crust will burn.
Accessories: Heat Deflector (HD) and Elevator
(EV)
BAKING (Figure 2)
The perfect configuration for baking pizza,
cookies or bread.
Accessories: Heat Deflector (HD) and Elevator
(EV) and Pizza Stone
COOKING TIP: If you’re baking a pizza,
sprinkle corn meal on Pizza Stone just
before adding you pizza to prevent it
from sticking.
Elevator Elevator
Heat Deflector Heat Deflector
Pizza Stone

8
COOKING CONFIGURATION: ROASTING
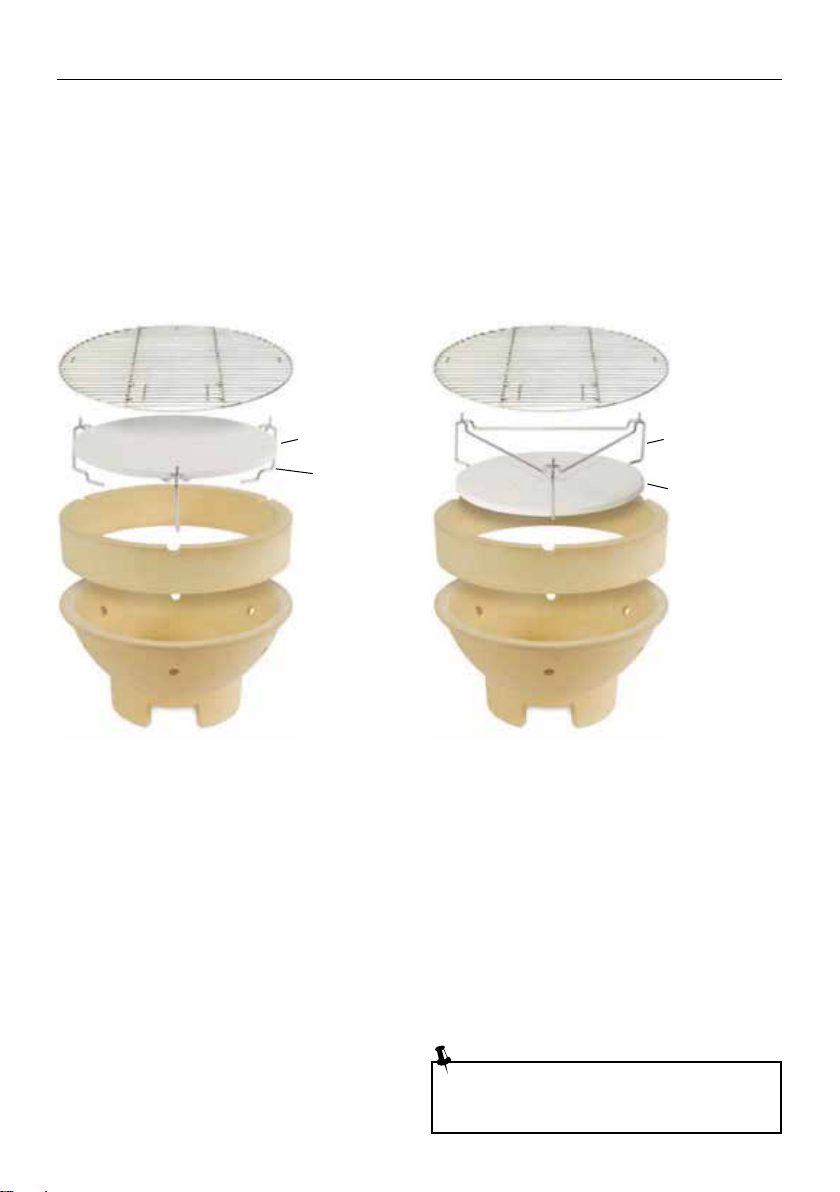
ROASTING (Figure 1)
This configuration works well for roasting
chicken (with or without a Chicken Stand), turkey
or other foods with indirect heat. Use this set up
if you do not use a drip pan.
It’s also a better set up than Figure 2 for adding
wood chips.
Accessories: Heat Deflector (HD) and Elevator
(EV)
ROASTING (Figure 2)
This configuration works just as well as Figure 1,
but it allows you to use a drip pan between the
Heat Deflector and cooking grate.
Accessories: Heat Deflector (HD) and Elevator
(EV)
MIKAMADO GRILL: ROASTING
The top vent has two cast iron disks that are
attached by a screw.
The top disk with the small holes is called a “daisy
wheel” and it’s used for low temperature cooking
(smoking) when the bottom disk completely
covers the opening.
For roasting, it’s best to use the bottom disk for
achieving your desired temperature.
STEPS
1. When the 100% Natural Lump Charcoal is
fully lit, secure the Heat Deflector legs in the
notches of the fire ring and place the ceramic
plate in the top or bottom position.
The bottom position should be used if you want
to place a drip pan between the Heat Deflector
and the cooking grate.
You will not damage the ceramic plate if you
allow the drippings to fall onto it.
2. Place the cooking grate on top of the Heat
Deflector, and close the dome.
3. Make sure the bottom draft door is fully
open. Open the top vent fully and monitor
the temperature until it reaches your desired
temperature.
4. Close the top vent half way, wait 1-2 minutes
and check the temperature.
5. Adjusting the top vent by either closing it more
(lower temperature) or opening it more (higher
temperature) by a ¼ inch can change the
temperature as much as 25°F.
6. Monitor the temperature during cooking and
if you notice that the temperature has moved
outside your desired range, adjust the top vent
in very small increments.
Elevator
Elevator
Heat Deflector
Heat Deflector

9
COOKING CONFIGURATION: GRILLING
GRILLING (Figure 1)
This configuration is the standard way of grilling
on your Mi-Kamado Grill. Great for steaks,
hamburgers, chicken breasts or anything you
want to cook directly over the 100% Natural
Lump Charcoal.
Accessories: None.
Heat Deflector
GRILLING (Figure 2)
If you’re grilling delicate foods like seafood, fish
or vegetables you can use the Heat Deflector
metal stand to raise the food higher in your Mi-
Kamado Grill.
Moving food away from the direct heat prevent
the outside from charring as much as Figure 1.
To simulate Figure 2 without a Heat Deflector,
you can use a Mi-Kamado Grill Expander.
Accessories: Heat Deflector (HD)
MIKAMADO GRILL: GRILLING
For grilling, it is easier to achieve your desired
temperature by keeping the draft door fully open
and only adjusting the top vent.
The top vent has two cast iron disks that are
attached by a screw. The top disk with the small
holes is called a “daisy wheel” and it’s used for
low temperature cooking (smoking) when the
bottom disk completely covers the opening.
For grilling, it’s best to use the bottom disk for
achieving your desired temperature.
STEPS
1. Allow the 100% Natural Lump Charcoal to fully
light (15 minutes), then close the dome.
2. Make sure the bottom draft door is fully
open. Open the top vent fully and monitor
the temperature until it reaches your desired
temperature.
3. Close the top vent half way, wait 1-2 minutes
and check the temperature.
4. Adjusting the top vent by either closing it more
(lower temperature) or opening it more (higher
temperature) by a ¼ inch can change the
temperature as much as 25°F.
5. Monitor the temperature during cooking and
if you notice that the temperature has moved
outside your desired range, adjust the top vent
in very small increments.
10
COOKING CONFIGURATION: SMOKING
SMOKING (Figure 1)
This configuration works well for smoking
Boston butts, brisket, ribs other foods with
indirect heat. Use this set up if you do not use a
drip pan.
It’s also a better set up than Figure 2 for adding
wood chips. Food will tend to cook faster with
this set up.
Accessories: Heat Deflector (HD) and Elevator
(EV)
SMOKING (Figure 2)
This configuration is the standard choice for low-
temperature cooking with indirect heat. Use this
set up if you use a drip pan.
Accessories: Heat Deflector (HD) and Elevator
(EV)
Elevator
Elevator
Heat Deflector
Heat Deflector
MIKAMADO GRILL: SMOKING
For smoking, it’s best to close the bottom draft
door down to a 2 inch opening. Control the air
flow with the top vent by fully closing the bottom
disk and use the “daisy wheel” (the top disk with
the small holes).
STEPS
1. When the 100% Natural Lump Charcoal is
fully lit, secure the Heat Deflector legs in the
notches of the fire ring and place the ceramic
plate in the top or bottom position. The bottom
position should be used if you want to place
a drip pan between the Heat Deflector and
cooking grate. You will not damage the ceramic
plate if you allow the drippings to fall onto it.
2. Place the cooking grate on top of the Heat
Deflector, and close the dome.
3. Close the bottom draft door down to a 2 inch
opening.
4. Close the top vent and turn the daisy wheel so
it is fully open. Wait 5-10 minutes and check the
temperature.
5. Adjusting the daisy wheel by either closing it
more (lower temperature) or opening it more
(higher temperature) and wait 1-2 minutes for
the temperature to adjust. If the temperature is
still to too high, close the draft door another ¼
to ½ inch.
6. Monitor the temperature during cooking and
if you notice that the temperature has moved
outside your desired range, adjust the top
vent and/or bottom draft door in very small
increments.
COOKING TIP: When smoking, the
temperature will stabilize in about
an hour.
11
Your Mi-Kamado is made of quality materials,
so general care and maintenance is minimal.
The best way to protect your Mi-Kamado from
the elements is with the Grill Cover (included).
REMOVING ASHES
Occasionally, you will need to remove the ashes
underneath the fire box. Your Mi-Kamado includes
an ash tool and here are the steps for removing
ashes from a grill in a cart and a grill table:
STEPS
1. If there is partially used charcoal in the grill, stir
the charcoal so any ash in the fire box will drop
down.
2. Open the bottom draft door, and place a small
container under the opening to catch the ash.
For grill tables, use a dustpan, paper plate or
newspaper to catch the ash.
3. Insert the ash tool through the draft door and
pull the ash out into the container.
Optional: Remove the cooking grate, fire ring and
fire box from the grill, and use a small scoop to
remove the ash.
4. Reinsert the internal components.
GRILL BANDS
Check the position and tightness of the bands at
the beginning of each grilling season or annually.
If the bands are in the proper position:
Use a 10mm wrench and Allen wrench to check
the tightness of each band connector. You should
not be able to easily turn the Allen wrench while
holding the nut in place. If loose, tighten firmly.
If a band is not centred on the gasket material:
Loosen the band enough to push it back in place.
You can also place a block of wood on top of the
band and lightly tap the wood with a hammer
until the band is in position. Tighten the band
connector with a 10mm wrench and Allen wrench.
MOLD
If your Mi-Kamado Grill is not used for an extended
period of time, moisture can be trapped inside the
grill and you may see areas of mould or mildew on
the cooking grate or internal ceramics.
This can easily be eliminated, because Mi-Kamado
are self-cleaning.
CARE & MAINTENANCE
SELFCLEANING YOUR MIKAMADO :
1. Add charcoal, light it and allow the grill to heat
to a temperature of 315°C for 15 minutes with
the dome closed.
2. Allow the grill to cool down completely.
3. Before cooking, brush the cooking grate with
a standard grill brush. You can also use a soft
bristle brush on the ceramics to remove any
residue.
ADJUSTING THE TENSION OF YOUR BIG
HINGE
Over time, the hinge on your hinge may need to
have the tension adjusted. This will ensure that
the least amount of effort is required to fully raise
the dome, and that it remains stationary when
fully open.
Adjusting the Tension:
1. Place the dome in the “closed” position.
2. Facing the back of the grill, use a 10mm Allen
wrench to tighten the two largest bolts located
on the lower back of the hinge case.
3. Check that the dome remains stationary in the
“fully open” position. If not, close the dome,
tighten the two bolts and recheck.
HEAT DEFLECTOR AND PIZZA STONE
Care and Cleaning of the Ceramic Plates
1. Allow ceramics to cool completely before
cleaning and indoor storage.
2. Wipe off food material with a brush and store
inside in a dry place.
TIPS
■ Do not place on tables or surfaces that are not
heat-resistant.
■ Do not use either ceramic plate to cook with on
a stove top.
■ Do not season with olive oil or other cooking
oils.
■ Do not use cleaning chemicals or soap and
water.
■ Do not soak in water. It may cause it to crack
with the next use.
Do not use bleach or other cleaning
products. It will add an unpleasant
taste to food.
12
Follow these safety guidelines at all times:
1. DO NOT move your Mi-Kamado while
cooking or if hot ashes are present in the
grill.
2. DO NOT use your Mi-Kamado indoors or in an
enclosed area. For outdoor use only, unless
for commercial use by a licensed restaurant
professional in a properly ventilated area
approved by building officials.
3. DO NOT use combustible liquids to light your
Mi-Kamado. Use only firelighters complying
to EN 1860-3.
SAFETY
4. Keep children and pets away while using
your Mi-Kamado grill.
5. DO NOT remove your Mi-Kamado from the
cart or approved grill table and place it on a
wooden deck, table or other surface. It can
damage the surface or cause a fire.
6. Wait until the ashes are completely cool
before removing them from your grill and
disposing of them.
If you operate your grill, then deprive the fire of
oxygen by closing the top and bottom air vents,
a sudden surge of flame called a “flashback” can
occur if you suddenly open the dome of the grill.
This occurs due to the sudden exposure to
IMPORTANT: HOW TO AVOID A “FLASHBACK” WHEN COOKING
oxygen, which causes a brief but intense amount
of white heat.
To prevent a flashback, open both vents and wait
5 seconds, then raise the dome about 1 inch for
2-3 seconds, then fully open the dome.
FREQUENTLY ASKED QUESTIONS
How do I adjust the Mi-Kamado to reach a given
temperature and then maintain it?
One important attribute of the Ceramic Mi-
Kamado is its ability to set and accurately maintain
a desired temperature. The Mi-Kamado has a two
damper system that facilitates easy heat control.
By adjusting both the top and bottom dampers,
the heat inside the Mi-Kamado can attain and hold
temperatures ranging from under 94°C to over
399°C
This range should accommodate any cooking
needs - from low-temperature smoking to high-
heat searing. The thermometer installed on the
ceramic lid will provide accurate internal readings
without opening the lid.
A dual function metal top is included with each
Mi-Kamado. The daisy wheel design contains
openings that can be adjusted to allow more or less
air to “fine tune” the desired cooking temperature.
Opening the entire sliding metal top will achieve
high temperatures more quickly.
Already installed on the base of each Mi-Kamado is
a stainless steel draft door, which now has a mesh
panel for extra safety. (If you have an older Mi-
Kamado without the mesh, you have the option
of purchasing a replacement draft door with the
mesh.)
It is best to keep the mesh panel fully closed to
prevent hot ash or coals from popping out. As
with the dual function metal top, you can adjust
the draft door opening slightly to “fine tune” the
cooking temperature or open the solid door fully
to reach higher temperatures faster.
How much charcoal do I need to achieve
maximum temperature?
To achieve maximum temperature, the Mi-
Kamado requires no more than a ¾ full fire
bowl. Less than a ¾ full fire bowl will reduce the
maximum temperature that can be achieved but
will not reduce the burn time.
To achieve the best results, it is recommended to
use Lump Charcoal which allows lighting ease,
longer/hotter burning and can be reused.
WARNING DO NOT USE LIGHTER FLUID TO
IGNITE CHARCOAL. Ceramic grills will absorb
lighter fluids retaining the smell and flavour.
Am I doing something wrong if I open my Mi-
Kamado and flames come out?
If you’ve been cooking at temperatures above
149°C, be very careful when opening the lid. First
raise the lid an inch or two and pause to “burp” it
before raising the lid completely. This will allow the
sudden rush of oxygen to burn safely inside the Mi-
Kamado and not as a flashback which could startle
you and possibly cause injury.

13
Do not use any chemicals to treat the mould!
The ceramics can absorb the chemicals and
emit dangerous fumes when the Mi-Kamado is
in use thereafter.
Why use a ceramic cooker instead of a steel
BBQ or cooker?
Flavour! Moisture! Ease of use! Reliability!
Enjoyability! Ceramic does not rust away. Ceramic
materials, stones, tiles and clays have natural
insulation properties and for thousands of years
they have always been used in making the very
best Kilns, Tandoori, Pizza, Bread ovens etc.
Natural ceramics help seal in the moisture and
flavour of your food, creating a taste comparison
that steel BBQs and ovens can not compare with.
They hold consistent long cooking times, we are
talking all day cooking unattended with one load
of charcoal, no temperature fluctuations, no need
to check the cooker regularly or refuel just to cook
a long roast.
They are safe to touch the outside when cooking, it
will get hot but you will not get burnt by touching
the outside. A steel kettle or gas BBQ would
certainly burn you if touched during a long hot
cook.
They seal in moisture and improve food quality and
tastes, due to the natural insulation and flavours of
the Mi-Kamado ceramics. Steel cookers tend to
dry food out and do not contribute to the flavour or
moisture retention of the food.
Mi-Kamado do not rust away.
Are the ceramics Mi-Kamado faster or slower to
cook with?
Both! Once the charcoal is glowing and the lid
down the heat really cranks up fast, and because
you are cooking in a dome you cook all sides at
once so cooking is quicker and more efficient, you
only need to turn food once.
On the other hand with a small amount of charcoal
and plenty of time you get the unit to cook ultra
slowly at very low temps which is great for slow
roasts and smoking.
What about cleaning?
Welcome to the worlds first self cleaning out door
cooker BBQ! Well as close as!
We have no fat or grease trays to collect disgusting
mess that always overflow make mess and leave
smelly gunk everywhere. We burn our fat and
mess as we cook! Simple really, even marinades
melted cheese on the inner walls of the cooker etc
all burn away at high temp.
We do not have fat and grease build up on our
metal BBW hood, because we do not have one,
What are the procedures for replacing a worn
gasket?
Should the gasket eventually show signs of
excessive wear, it can be easily replaced following
these simple steps:
The Mi-Kamado should be completely cool before
attempting to work on the gasket.
Remove the old gasket with a flat-edged scraper
or box cutter.
Clean the rim of the base and lid with acetone
(preferred) or rubbing alcohol and let dry for at
least 30 minutes. The surface must be totally clean
for the new gasket to adhere.
The new gasket is self-adhesive but you can use a
spray adhesive to ensure a good seal. If using the
spray adhesive, spray a small amount around the
rim of the base and lid. Allow this to set for about 2
minutes to become tacky.
Remove the backing from the gasket and press
firmly down onto the rim. Bend the gasket around
the rim as you press down. Do not stretch the
gasket; there is ample material for the top and
bottom rim of the Ceramic Mi-Kamado.
Allow the adhesive to cure for 24 hours with the lid
closed before using the Mi-Kamado.
If the gasket should loosen, glue it back on with
Embers glue or another household adhesive.
One of the Mi-Kamado ceramic pieces has a
crack. What should I do?
The fire ring and fire box often develop superficial
fissures or small cracks. This is due to normal aging
of ceramics and will not affect the cooking results
or durability of your Mi-Kamado.
Should the ceramic ever break apart, it can usually
still be used for cooking until a repair can be made.
Any of our ceramic parts can be easily repaired
with the use of a heat resistant epoxy.
Look for a high temperature, non-toxic epoxy,
available at most home centre or hardware
stores. Follow the instructions that come with the
product. The repaired part should be ready within
a few hours.
Mould has grown in my Mi-Kamado. How can I
remove it safely?
Mould is naturally in the air around us virtually
all the time. When it settles in a warm, moist
environment, such as the interior of the Mi-
Kamado, it can readily grow and spread. When this
occurs you will actually see the mould.
To eliminate it, just light the Mi-Kamado and bring
the temperature up to 232°C and allow the Mi-
Kamado to “cook” for about 30 minutes. Then close
the vents to put out the fire; after it cools down use
a wire brush to remove any leftover mould residue.

14
They are ideal for roasting, baking and smoking. Its
modern design and variety of colours adapts to all
styles.
It stands out for its versatility to be portable and
have multiple options of use. Its superior access to
bake pizza, optimizes performance.
Cooking in a Mi-Kamado has many advantages,
since you can make all the recipes you would
make in a wood or charcoal oven, such as roasting,
baking and smoking any type of meats, poultry,
fish, pizzas, breads, rice and vegetables. You can
regulate your temperature on the go as never has
been achieved in any kitchen that runs on wood
and / or charcoal. In addition its design allows
cooking of dozens of hours with a uniform heat
distribution.
The Mi-Kamado to be of ceramic generate a humid
and warming heat, leaving the foods much more
juicy.
The Mi-Kamado Pizza has separate calibrated
control systems for smoking and grilling. Located
in both the top and bottom grill, ideal for maximum
control over the entire temperature range (low
temperatures for smoking and high temperatures
for roasting).
again fat slatters etc will be burnt away at high
temp cooking!
A soft wet cloth to wipe dust from the exterior once
every now and then, a BBQ brush the grids when
hot, turn them over occasionally do clean the other
side. There is nothing to clean on the inside of the
oven as it burns off naturally at high temp, no fat
or grease trays.
After a few sessions of cooking remove the ash
with the supplied tool, (add the ash to your organic
compost!) Cleaning the ash out will ensure the
airflow which means easier better burning with
more precise temperature control.
If you really wanted to be kind to your Mi-Kamado
Grill Dome you could put a good stainless oil
on the stainless components a few times a year
depending on the conditions of where its is eg.
near the beach more often. A good car polish
on the outer to ensure its gleam and shine is
protected.
That’s all there is to it! Too simple really, compare
that to all the steel gas cookers on the market at
any price bracket, or even your oven at home!
Designed to work with charcoal, built with high
quality ceramic materials and strength.
FREQUENTLY ASKED QUESTIONS CARE & MAINTENANCE
Q: Can Mi-Kamado tip over when I open the
dome?
A: Mi-Kamado are constructed of high-quality
ceramic with the thickest wall design in the
industry, so a lot of weight is redistributed
when opening the lid.
To mitigate the risk of tipping, care must be
taken when lifting the dome to install the
fire bowl. There is a slight risk of tipping if the
interior fire bowl is not installed, as it serves as
a counterweight. However, with the fire bowl
installed, there is a very low risk of tipping.
For this reason, among others, we strongly
recommend never removing the fire bowl
from your Mi-Kamado. The cart with two
locking casters also reduces movement and
provides superior stability. For ease of lifting,
the design incorporated two heavy-duty lid
springs to deliver the lowest dome lift-weight
in the industry.
Q: Do I have to cover my Mi-Kamado?
A: It is recommended that Mi-Kamado be
covered when not in use to protect them from
the elements and improve life span.
IMPORTANT: Wait until your grill is fully
cooled before covering to prevent damage to
the glaze and cover.
Q: I uncovered my grill and there is a white
powder on the exterior. Is this normal?
A: While covering your Mi-Kamado is
recommended, you should allow the grill to
fully cool before covering. Covering the grill
when still hot/warm (particularly in extreme
cold), can cause the ceramic to condensate.
This causes the white powder formation on
the exterior. If condensation occurs, simply
wipe down the entire grill with a damp cloth
and allow it to cool fully before covering in the
future.
Q: How do I remove old gaskets?
A: Remove old gaskets with a flat-edged scraper.
Clean the rim of the base and lid with acetone
(preferred) or rubbing alcohol. If necessary,
soak any remaining gasket material with
acetone and scrape away. Let dry for at least
30 minutes; the surface must be totally clean
for the new gasket to adhere.
NOTE: Do NOT remove the dome lid to remove
or replace gaskets.
Q: Should I remove the dome lid when replacing
the gaskets?
A: No. The lid does not need to be removed to
replace the gaskets.

15
Q: How do I apply my new gaskets?
A: Start by removing a small section of paper from
back of the felt strip to expose the adhesive.
Press the gasket firmly down onto the rim
removing paper as needed. Bend the gasket
around the rim as you press down, being
careful not to let the gasket material hang over
the inside edge of the rim. Do not stretch the
gasket. Trim any excess material. If your gasket
should detach, you can glue it back on with
any common household adhesive.
Q: Should I take the fire bowl out when cleaning
my grill?
A: No. We strongly recommend against
removing the fire bowl to clean it. Due to the
size and fragility of the fire bowl, it can be
easily dropped and fractured (not covered
under warranty). If you are looking for a more
thorough clean, keep the fire bowl in the grill
and use an ash rake or shop-vac to clean out
the ash.
IMPORTANT: it is recommended that all Mi-
Kamado be fully cooled before covering to
prevent damage to the glaze.

16
1 Years for all ceramic parts, 180 days for all metal
parts, 30 days for side shelves, temperature
gauge. Non-transferable to subsequent owners.
All quality parts should be reported once it
happened, and all replacements quantities should
be collected before the next order, replacements
will be delivered together with the next shipping.
CERAMIC WARRANTY
Mi-Kamado carries 1 years Warranty on all
ceramic parts used to manufacture the Mi-
Kamado Grill. Mi-Kamado warrants that all part(s)
are free of defects in material and workmanship,
for the length of use and ownership of the original
purchaser.
The finish of your Mi-Kamado may appear to have
crack lines. This is not cracking of the ceramic.
This is known as crazing and is caused by the
different expansion rates between the glaze
finish and the clay.
The spider-web pattern of cracking is different
from a break in the aspect that it cannot be felt
on the surface, unless using a fingernail; however,
it does become more visually apparent when the
surface is dusty or magnified. While these may
appear as imperfections, crazing does not affect
the performance or life span of your Mi-Kamado;
therefore, not a warranty issue. The process of
crazing effectively increases the toughness of the
unit.
During the term of the limited warranty, Mi-
Kamado’ obligation shall be limited to furnishing
a replacement for covered, replacements will be
sent with next shipping.
180 DAYS WARRANTY ON METAL PARTS
Mi-Kamado carries a one year warranty on all
metal and cast iron parts used to manufacture the
Mi-Kamado. Mi-Kamado warrants that all part(s)
are free of defects in material and workmanship,
for the length of use and ownership of the original
purchaser.
High temperatures, excessive humidity, chlorine,
industrial fumes, chemicals, fertilizers, lawn
pesticides and salt are some of the substances
that can affect metal parts. For these reasons,
the warranty DOES NOT COVER RUST OR
OXIDIZATION.
VOID OF WARRANTY
The use or abuse of this product for purposes
other than that for which it is designed will void
the warranty.
Damage caused by lack of proper use, assembly,
maintenance or installation is not covered. The
pouring of lighter fluid or other liquids on your
grill will void this warranty. This could result in
damage or serious injury to the user of the Mi-
Kamado Grill, and result in excessive damage to
the grill and its many parts and components.
EXEMPTIONS OF LIMITED LIFETIME
WARRANTY
This warranty is based on normal and domestic
use and service of the product. Damages or
breakage caused by accidents, natural disasters,
unauthorized attachments or modifications, or
damage during transport are also not covered.
Warranty does not cover damage from wear and
tear, such as scratches, dents, dings, chips or
minor cosmetic cracks. These aesthetic changes
of the grill do not affect its performance.
Burning poor or low-quality charcoal may void
the warranty.
Manufacturer shall in no event be liable for any
special, indirect, consequential or other damages
of any nature whatsoever in excess of the original
purchase price of this product.
Some locales do not allow the exclusion or
limitation of incidental or consequential
damages, or limitations of implied warranties,
so the limitations or exclusions set forth in this
warranty may not apply to you.
Mi-Kamado is not be liable for transportation
charges, labour costs, or export duties.
MANUFACTURERS WARRANTY

17

www.mi-fires.com
MI-Flues Ltd
Taymin Business Park
Mitcham Road
Blackpool, Lancashire
FY4 4QN
sales@mi-flues.com
sales@mi-fires.com
Table of contents
Popular Grill manuals by other brands

Barbecook
Barbecook JOYA BC-CHA-1066 manual

GE
GE Gas Grill Use and care guide

Silvercrest
Silvercrest SKGE 2000 C3 operating instructions

cecotec
cecotec Rock'nGrill Multi 2400 UltraRapid instruction manual

Vermont Castings
Vermont Castings VANGUARD G54001 Assembly manual

Fahrenheit Technologies
Fahrenheit Technologies Grilla Grills GR-500-A Operator's manual


