microjig MATCHFIT Dado Stop Pro MF-1004 User manual

Read the Important Safety Disclaimers in this manual prior to use.
Keep manual for future reference.
DADO STOP PRO
Instruction Manual v1.1
MATCHFIT, Dovetail Clamp, and Dado Stop are trademarks of MICROJIG. Patent Pending.
A true MICROJIG innovation. MATCHFIT Dovetail Clamp designed in the USA, made in
Taiwan. MATCHFIT Dado Stop and Setup Gauge made in the USA. © 2017 • MICROJIG.com
Have questions? Need support? Contact MICROJIG directly.
Phone: 1-855-RIP-SAFE International: 1-407-696-6695
Email: support@microjig.com
Online: MICROJIG.com/support
Become an MJ Insider: MICROJIG.com/newsletter
MODEL # MF-1004
16 1
Read the Important Safety Disclaimers in this manual prior to use.
Keep manual for future reference.
DADO STOP PRO
Instruction Manual v1.1
MATCHFIT, Dovetail Clamp, and Dado Stop are trademarks of MICROJIG. Patent Pending.
A true MICROJIG innovation. MATCHFIT Dovetail Clamp designed in the USA, made in
Taiwan. MATCHFIT Dado Stop and Setup Gauge made in the USA. © 2017 • MICROJIG.com
Have questions? Need support? Contact MICROJIG directly.
Phone: 1-855-RIP-SAFE International: 1-407-696-6695
Email: [email protected]
Online: MICROJIG.com/support
Become an MJ Insider: MICROJIG.com/newsletter
MODEL # MF-1004

Get started with the fastest, most precise
way to cut dados.
Watch the instructional video: MICROJIG.com/dadostoppro
Your MATCHFIT Dado Stop Pro
includes one of each:
Setup Gauge
SG-133
Dado Stop
DS-333
Dovetail Clamp
DVC-538
Our 3-Year Warranty protects you against any
manufacturer defects.
Please mail the provided registration card or complete the
registration online at:
MICROJIG.com/support/warranty-registration
Get more out of your table saw.
Get detailed information on how to tune up your table saw
sent directly to your inbox when you become an MJ Insider.
Go to MICROJIG.com/newsletter and enter your email
address to subscribe today.
Introduction ..................................... 4
Operation Precautions & Safety ....................5-6
Align your Blade.................................. 7
Preparing the Setup Gauge for Dados...............8-9
Making Dados with the Dado Stop
Step 1: Setting the Blade Kerf ................. 10
Step 2: Setting Inlay Material Width............. 10
Step 3: Cutting the Dado. . . . . . . . . . . . . . . . . . . . . . 11
Dado Stop as a Crosscut Stop ..................... 12
Using the Setup Gauge for your Dovetail Clamp Projects
Step 1: Cutting the Clearance Slot .............. 13
Step 2: Routing the Dovetail Groove ............ 13
MATCHFIT Dovetail Clamps .....................14-15
TABLE OF CONTENTS

4
INTRODUCTION
Congratulations on your purchase of
the MATCHFIT Dado Stop Pro.
We know your projects are a labor of love just like our
products are to us. That’s why we put ourselves in your
workshop, imagining every way you’ll use and experience
our family of products. Throughout your projects, you’ll
feel the difference our intelligent engineering and carefully
selected materials make. We make the complex world of
woodworking simpler, so you can work safer. We’re always
moving forward so you always work smarter.
WORK SMARTER.
5
OPERATION PRECAUTIONS & SAFETY
SAFETY WARNING! Your MATCHFIT Dado Stop Pro
is designed to be used in conjunction with a table saw. Make
sure you are familiar with the operation of your saw before
attempting any of the techniques presented within this
manual. MICROJIG Inc. assumes no liability for any product
not manufactured by it. The user must take all necessary
precautions when operating a table saw or any other tools as
recommended by their manufacturers and as required by any
prudent tool user.
All components must be
inspected for damage and
securely fastened before every
use. Stop using the tool if any
damage occurs.
In table saw operations, the
rip fence must be securely
locked parallel to the saw
blade.
When using the Dado Stop
Pro in conjunction with any
other tool, refer to that
owner’s manual first, read
and follow all instructions and
safety information.
Always wear safety glasses
and hearing protection. Follow
all shop safety practices.
It is the sole responsibility of
the purchaser of this product
to ensure that any third party
reads and agrees to all safety
precautions prior to use of
this tool.
Use saw blades that are
designed for the intended
cutting operation.
Do not use this product while
under the influence of drugs,
alcohol or any medication.
PROPER USE

6
OPERATION PRECAUTIONS & SAFETY
Do not use this tool if any
components are damaged.
Contact your dealer or
manufacturer for replacement
parts.
When not in use, store this
product on a flat, clean
surface.
The machine tabletop used
in conjunction with this tool
must be flat and free from
obstructions other than the
required fence and one
cutting element. The tabletop
must be reasonably level and
below the waistline.
You must have a sturdy,
straight rip fence with a flat
front surface preferably at
least 2.5–3” in height and
square to the tabletop. The rip
fence must be long enough
to cover the entire depth
from the front to the rear of
your tabletop. The rip fence
must also be equipped with a
locking mechanism to secure
it on the tabletop so that it is
parallel to the saw blade at all
scale settings. WARNING!
DO NOT SKEW THE RIP
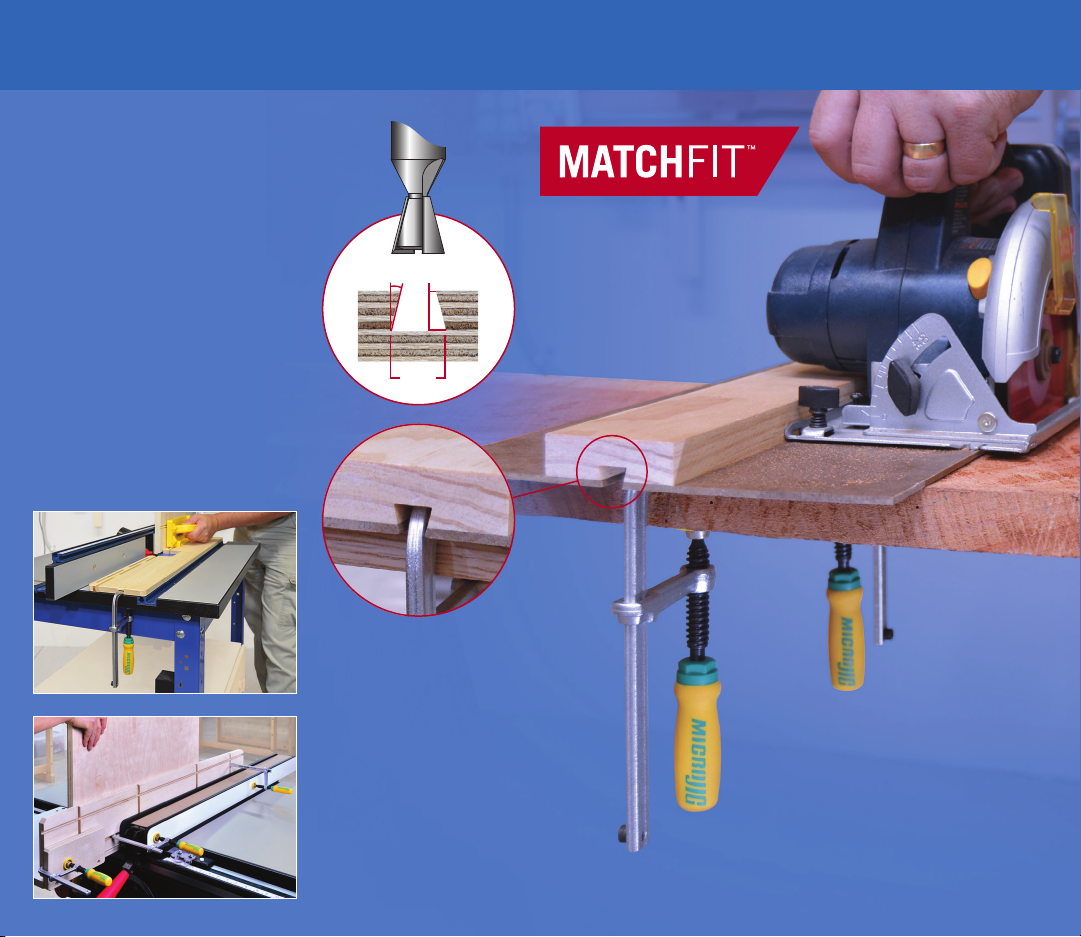
FENCE! The Dado Stop is
designed to attach parallel
to the saw blade.
The rip fence should also be
accurately calibrated to a
fixed scale to secure a precise
cutting width setting.
A sharp, clean carbide-tipped
saw blade should be used
with this tool for crosscutting,
unless otherwise specified.
Ensure that your saw blade is
set vertically at an absolute 90
degree angle.
Ensure that your miter gauge
fits properly and has no play
within the miter slot.
MAINTENANCE
TABLE SAW PREP
WARNING! Never wear loose
clothing, gloves, bracelets or
other jewelry that may get
caught in the moving parts or
cutting elements.
7
ALIGN YOUR BLADE
FOR BEST RESULTS: ALIGN YOUR BLADE
IMPORTANT: Run-out varies from table saw to table saw, saw blade
to saw blade, or a combination of both. Each calibrated MATCHFIT
Setup Gauge works with only one saw blade and table saw
combination.
To ensure precise fitting dados when changing saw blades,
prepare the blade with a reference point. This allows you
to quickly realign your blade to the original setting of your
Setup Gauge.
Use an oil-based paint marker to
draw reference dots on the arbor
flanges, saw blade, and stiffener
(if applicable).
Align all reference dots each time
this saw blade is installed on this
table saw.
1 2

8
PREPARING THE SETUP GAUGE FOR DADOS
Instructional Video: MICROJIG.com/dadostoppro
NOTE: The Setup Gauge works as a template capturing the exact
kerf of your saw blade for repeatable and consistent dado setups.
Proceed carefully, as you can only make one cut per Setup Gauge.
TRIMMING THE BLADE KERF
Using a Dovetail Clamp, attach
the Setup Gauge to the miter
gauge. It should gently touch
the edge of the MDF without
pinching or binding and sit
square on the tabletop.
Push the miter gauge forward and
backward slightly, making sure
the Setup Gauge does not drag
along the MDF.
3 4
Rip a piece of 3/4” MDF to 4”
wide. Do not move the fence
until after trimming is complete,
see
5
. NOTE: Using MDF is
preferred over solid wood
or plywood.
Place the Setup Gauge next to
the blade. Raise the saw blade to
the height of the center notch.
1 2
9
PREPARING THE SETUP GAUGE FOR DADOS
Trim the lower portion of the
Setup Gauge.
NOTE: Proceed carefully, as
you can only make one cut per
Setup Gauge.
1. Measure the width of the
upper untrimmed section of
the Setup Gauge.
2. Reset caliper to zero.
3. Measure the width of the
trimmed section.
This number is the kerf that this
saw blade and table saw are
cutting including any run-out.
Write this number along with
the table saw, and blade you
are using in the space provided
on the Setup Gauge for future
reference.
5 6
Get more out of your table saw.
Get detailed information on how to tune up your table saw
sent directly to your inbox when you become an MJ Insider.
Go to MICROJIG.com/newsletter and enter your email
address to subscribe today.

10
MAKING DADOS WITH THE DADO STOP
Instructional Video: MICROJIG.com/dadostoppro
STEP 1: SETTING THE BLADE KERF
STEP 2: SETTING THE INLAY MATERIAL WIDTH
Use the Setup Gauge as a square
across the Dado Stop aligned off
the side of Leg #2. Reference:
2.1 SET DADO (L)
Place the piece of stock to be fitted
into the dado against the Setup
Gauge, using it as a square. Adjust
Leg #3 until it touches the piece.
Reference: 2.2 SET DADO (R)
1. Attach the Dado Stop to your
rip fence.
2. Set the fence and Dado Stop
clear of the blade.
3. Use the Setup Gauge to set
Leg #2 of the Dado Stop
as shown. This will ensure
consistent results every time
you use this blade. Reference:
1.2 ALIGN BLADE (L)
3
2
Assemble the Dado Stop by
attaching the Dovetail Clamp.
Slide the clamp into the dovetail
groove on the backside of the
Dado Stop.
1
11
MAKING DADOS WITH THE DADO STOP
STEP 3: CUTTING THE DADO
Cut the first shoulder:
1. Raise the blade to desired
height.
1. Put stock against Leg #1.
Leg #1 is exactly 3” long.
Move and secure the fence to
desired distance +3“.
2. Make your cut.
Reference:
3.1 CUT DADO (R)
Cut the second shoulder:
1. Put stock against Leg #3.
2. Make your cut.
Reference:
3.2 CUT DADO (L)
4 5
Repeat cuts to remove material
between the shoulders.
Insert the inlay material.
67

12
DADO STOP AS A CROSSCUT STOP
How to use the Dado Stop as a safe and
effective crosscut stop.
A rip fence/miter gauge combination should NEVER be used for
crosscutting because the material trapped between the fence and blade
will kick back. The MATCHFIT Dado Stop can be used as a safe and
effective crosscut stop. The precise 3” length of the Dado Stop allows
you to accurately set the rip fence scale.
1. Set Leg #1 gently against the blade.
Reference: 1.1 ALIGN BLADE (R)
2. Set the scale cursor on the rip fence to exactly 3”. Now, move your
fence to desired cut width (+3”).
3. Move the stock so that it gently touches Leg #1. Make your cut.
Repeat as necessary.
13
USING THE SETUP GAUGE FOR YOUR
DOVETAIL CLAMP PROJECTS
How to use the Setup Gauge as a height gauge
when cutting dovetail grooves for your Dovetail
Clamp projects.
GET THE MOST OUT OF YOUR MATCHFIT SYSTEM:
For project plans, videos, manuals, and more information on
the MATCHFIT system, visit MICROJIG.com/matchfit
If clearance slot is desired, use the 11/32” height slot for clearance
slot (for saw blades or 1/4” router bits).
STEP 1: CUTTING THE CLEARANCE SLOT
STEP 2: ROUTING THE DOVETAIL GROOVE
Use the 3/8” height slot to set the 1/2” 14º router bit height.

1/2”
3/8”14º
Compatible with any
1/2” 14-Degree Dovetail
Router Bit
Get the most out of your
MATCHFIT system, visit
MICROJIG.com/dovetailclamp today.
MATCHFIT DOVETAIL CLAMPSMATCHFIT DOVETAIL CLAMPS
Clamping freedom
that goes beyond
the edge.
The MATCHFIT Dovetail Clamp
profile fits a 3/8” deep groove made
using a 1/2” diameter, 14º dovetail
router bit. The breakthrough dovetail
clamp arm design gives you the
freedom to create your own track
grooves, allowing you to clamp
virtually anywhere. Work smarter.
Visit
bit.ly/dvcprojectplans
to download
FREE PROJECT PLANS
2-in-1 Straight Edge Guide Plans
Router Table Pressure Jig Plans
Table Saw Tall Fence Plans
Table of contents