Micron Electronics TRANSPORT XKE User manual

2
TRANSPORT XKE
MAS001412-02

3
Why read this manual?
This book, the User's Guide, contains technical information, SETUP
instructions, and detailed configuration settings. It also contains
instructions for upgrading your system.
Why read the other manuals?
Wehavepre-loadedaMicrosoft®operatingsystemonyourcomputer.
Forhelpusing,customizing,configuring,orreinstallingthisoperating
system, see the appropriate Microsoft operating system guides.
For the latest information on your system, check the README file.
It lists the latest changes to your system, plus the latest clarifications
and corrections.
To look at README, select the README icon in the Online
Documentation program group, then press the <Enter> key on your
keyboard.
Trademarks
Pentium is a registered trademark, and MMX is a trademark of Intel
Corporation.
Microsoft, MS-DOS, Windows, and Windows NT are registered trademarks
of Microsoft Corporation.
TransPort is a registered trademark and Micron, MicronDock, FlexOpt,
Pick-a-Point, and MicronExec are trademarks of Micron Electronics, Inc.
All other brand or product names appearing in this publication are used
for identification purposes only and may be trademarks or registered
trademarks of their respective companies.
Warning:
1. Installation information in this document is for reference only.
All installation of internal optional devices or equipment including
third-party optional devices or equipment, should be performed
by an experienced and knowledgeable technician. All servicing or
upgrading of original or optional devices or equipment should
also be performed by an experienced and knowledgeable technician.
2. UNAUTHORIZED INSTALLATION, SERVICING, OR
UPGRADING MAY VOID YOUR WARRANTIES.
3. The socket-outlet shall be installed near the equipment and shall be
easily accessible.
Copyright 1997 MICRON Electronics, Inc.
All rights reserved. This document may not, in whole or in part, be copied,
photocopied, reproduced, translated, or reduced to any electronic medium
or machine readable form without prior consent, in writing, from MICRON.
With this document MICRON makes no warranties or representations,
either expressed or implied, with respect to the products described herein.
The information presented herein is being supplied on an “AS IS” basis and
is expressly subject to change without notice. The entire risk as to the use
of this information is assumed by the user.
IN NO EVENT WILL MICRON BE LIABLE FOR ANY DIRECT,
INDIRECT, INCIDENTAL, OR CONSEQUENTIAL DAMAGES
RESULTING FROM ANY CLAIM ARISING OUT OF THE
INFORMATION PRESENTED HEREIN, EVEN IF IT HAS BEEN ADVISED
OF THE POSSIBILITIES OF SUCH DAMAGES. SOME STATES DO
NOT ALLOW THE LIMITATION OF IMPLIED WARRANTIES OR
DAMAGES, SO THE ABOVE LIMITATIONS MAY NOT APPLY.

4Contents
Contents
Welcome!................................................................... 4
1. Getting Started.................................................... 5
As you unpack... .......................................................................................... 5
Do I have everything? .................................................................................. 5
To get help ..................................................................................................... 5
What’s in the box? ........................................................................................ 6
Keep the box .................................................................................................. 6
RF suppressor ............................................................................................... 6
Let your computer acclimate itself .......................................................... 7
Beware heat, cold, humidity, and glare .................................................. 7
Where to work ............................................................................................... 7
System features ............................................................................................ 8
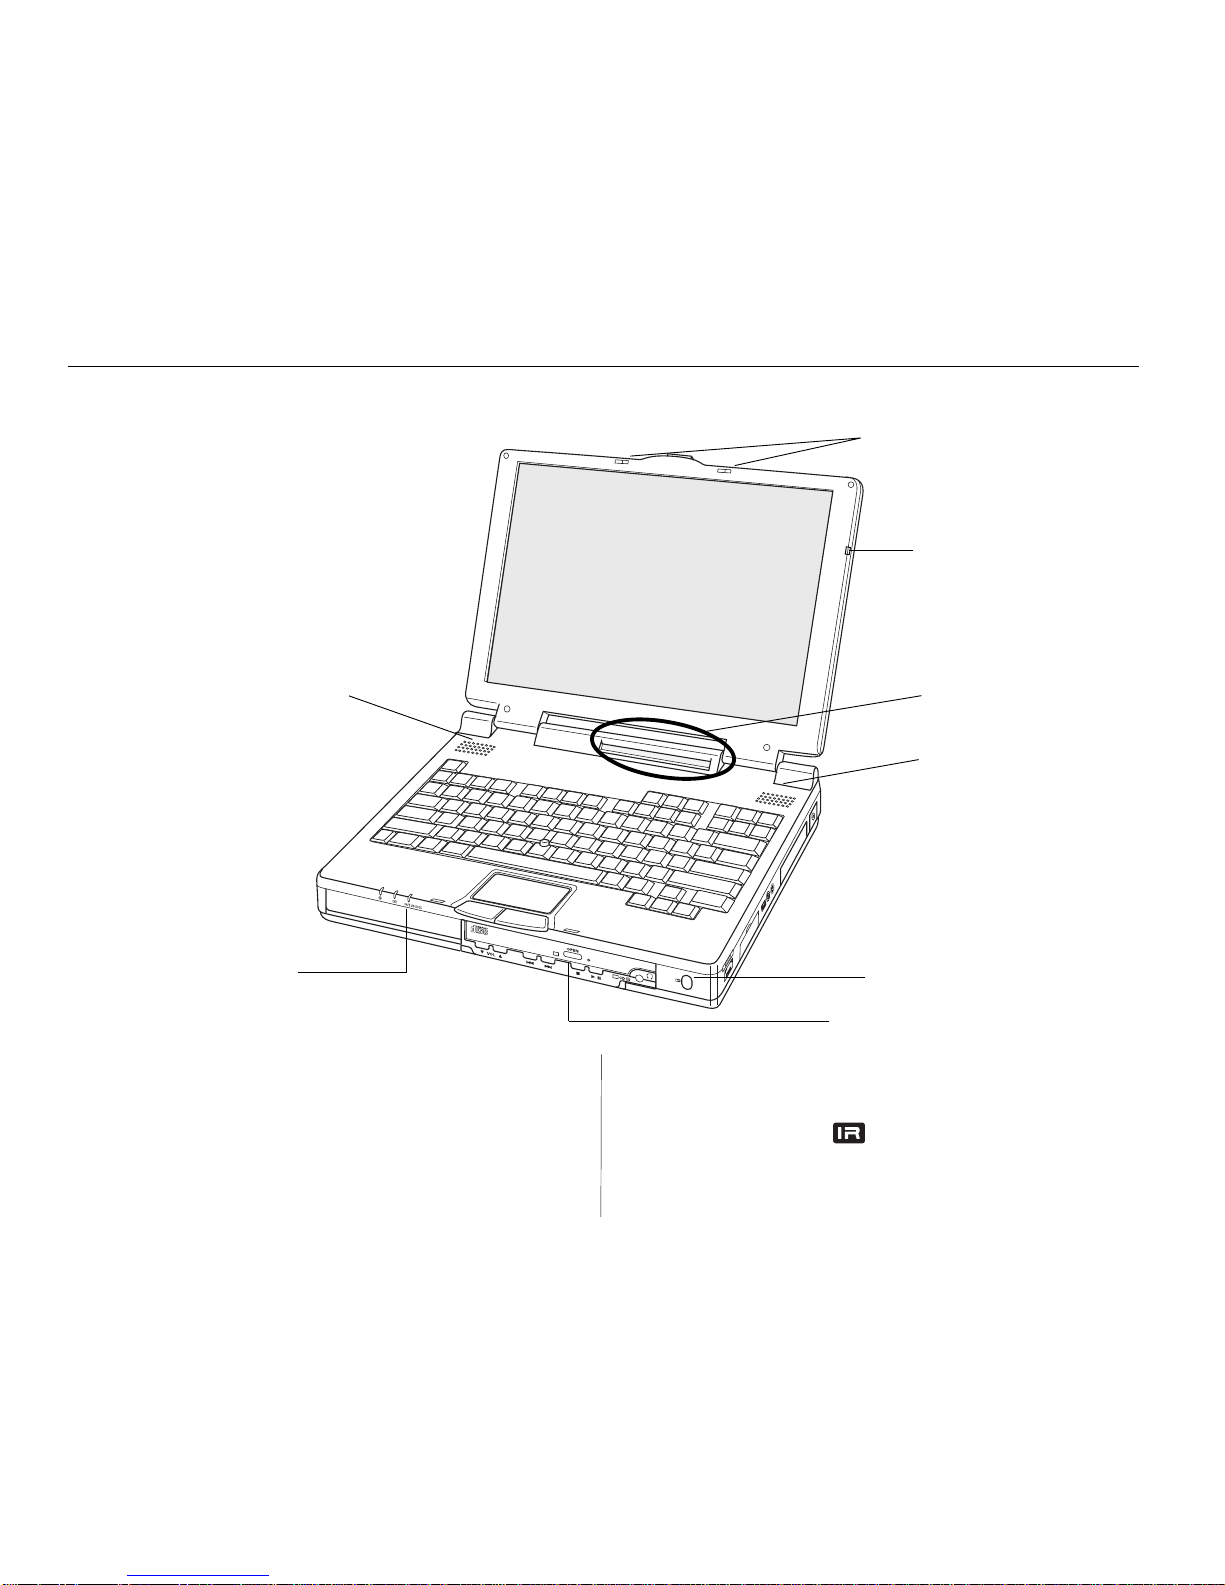
Front view ...................................................................................................... 9
Howling and Countermeasures ..............................................................10
LED indicators ............................................................................................12
Mini-LCD control panel ............................................................................13
Internal pointing devices...........................................................................14
Keyboard ......................................................................................................15
Numeric keypad .........................................................................................15
Hot keys .......................................................................................................16
Right side view ............................................................................................17
Left side view ..............................................................................................18
Rear view ......................................................................................................19
Left Expansion Bay....................................................................................21
Right Expansion Bay .................................................................................21
PC card slots (PCMCIA) ..........................................................................22
Disk drives ...................................................................................................23
Infrared ports ..............................................................................................24
Connecting to a modem or cellular phone ............................................25
CD-ROM drive ............................................................................................26
Optional MicronDockTM port replicator ................................................27
MicronDock features .................................................................................28
Connecting your TransPort XKE when it is powered off
to the MicronDock (Cold Docking) ............................................29
Connecting your TransPort XKE while it is in the Suspend Mode
to the MicronDock (Warm Docking) .........................................30
Connecting your TransPort XKE while it is running
to the MicronDock (Hot Docking) ..............................................31
Powering down your TransPort XKE and undocking ..........................32
TransPort XKE is running and undocking ..............................................33
2. Powering Your Notebook ................................. 34
Recharging function for the MicronDock and the notebook
computer system ................................................................................34
Before using a new battery pack .............................................................35
Inserting and removing a battery pack .................................................36
Running on battery power ........................................................................37
Recharging the battery pack(s) ................................................................37
Recharging two battery packs .................................................................37
Extra battery pack .....................................................................................37
Discharging two battery packs ...............................................................38
Checking a non-installed battery ............................................................38
Warm-swapping a battery pack .............................................................39
Low battery warnings ...............................................................................39
What to do if you get a low-battery warning ......................................40
Running on external (AC) power ............................................................40
3. Hardware Setup ................................................ 41
Running the SETUP program ..................................................................41
The Main menu ...........................................................................................41
Advanced menu .........................................................................................44
Security menu .............................................................................................46
Power Savings menu .................................................................................47
Boot menu....................................................................................................50
Exit menu .....................................................................................................50
4. Installing Accessories....................................... 51
Memory options..........................................................................................51
Adding RAM ...............................................................................................51
Removing the internal hard drive............................................................52
Installing a modular hard drive or floppy drive .................................53
Removing a hard drive or floppy drive module ..................................53
Installing and removing the CD-ROM drive ........................................54
NTSC and S-Video Setup.........................................................................55
5. System Software Options................................ 57
Micron Customer Resource Center CD-ROM ......................................57
Windows 95 and Windows NT 4.0 Workstation ................................57
6. Embedded Modem Guide ................................. 60
Overview ......................................................................................................60
Using your modem ....................................................................................61
Wireline connectivity ..................................................................................62
Cellular connectivity ..................................................................................63
Modem troubleshooting ............................................................................64
AT commands ............................................................................................66
Result code/Message definitions............................................................69
S-Registers ....................................................................................................70
7. System Care and Precautions ........................ 72
8. System Specifications...................................... 76
Quick Reference Sheet......................................... 79
Appendix A: Safety practices ..........................................................................80
Appendix B: Micron PowerSM Warranty.........................................................81
Appendix C: Regulatory Specifications .........................................................84
Appendix D: Ergonomic notice........................................................................86
Glossary................................................................... 87
Index ........................................................................ 88

5
Welcome!
Welcome to the TransPort XKE User’s Guide! This guide is
designedto help youget themost outofyoursystem andkeep it
runningtrouble free,year after year.
This User’s Guideisdivided into eightmain chapters, plussome
useful information in back.
Chapter 1, Getting Started will introduce you to your
system’sfeatures andaccessories, then helpyou get up
andrunning. You’ll learnhow to openand setup your
new computer, how to read the indicators, and how to
usethe keyboard.
Chapter2, Powering Your Notebook describes how to use
yourbattery, howto maintain andswap batteries, how
to connect the AC adapter, how to connect the
MicronDock port replicator and what precautions to
followfor ACoperation.
Chapter3, HardwareSETUP examines the built-in SETUP
utility that lets you customize your system’s internal
hardware. Thiswillhelp you understand yoursystem’s
internal features, set security options and control how
your machine uses power.
Chapter 4, Installing Accessories shows how you can add
morememory, removetheinternal harddrive and add
orremove the modulardrives.
Chapter5, System SoftwareOptions describes some of the
additional software that Micron has installed on your
Windows 95 or Windows NT 4.0 system.
Chapter6,Embedded Modem Guide describesthe features
ofthe modemincluded with yoursystem.
Welcome
Chapter 7, SystemCare andPrecautions describes how to
care for your Transport XKE. It also gives you general
precautions for your notebook and its peripherals.
Chapter8,SystemSpecificationslists technicaldetails about
your system and the MicronDock port replicator.
The Appendices describe safety practices, warranty
information,FCC notices,and ergonomics.
TheGlossary givesdefinitionsof common mobilecomputer
terms.
The Indexprovides a quick way to find important topics.

6
1. Getting Started
This chapter introduces you to the TransPort XKE system.
The following instructions should help you:
• Open your TransPort XKE
• Identify your TransPort’s features
• Turn your TransPort XKE on and off
• Useyour keyboard
As you unpack your system, check each item in the box for
damage. Contact your dealer or Micron Electronics Customer
Service if you notice anything broken.
As you unpack...
Examineyour new TransPortXKE carefully, matching eachitem
with the illustrations in this chapter. This Guide will help you
identify your TransPort’s components so you can use them to
yourbest advantage.
Ontheexteriorofthemachineyouwillfindvariousitems—buttons,
switches,connectors,expansion bays, PCcard slots,andexterior
indicator lights. When you open the TransPort XKE you will see
the display panel, the keyboard with its numeric keypad, and
several interior features. The rest of this chapter will describe
whatyou see whenyou examineyour TransPortXKE.
Do I have everything?
The packing slip is one of the last items sealed into your
computer box. It lists everything we shipped to you. As you
unpack the box, check the contents against the packing slip. If
anitem islistedon yourpacking slip, butisn't in thebox, it may
beinstalledin your system,or shippedinside oneof themanuals
or accessory bags. If you're sure something is missing, call
CustomerService rightaway.
To get help
The following phone numbers and addresses should help you
getassistance foryour computer.
Notebook Technical Support 800-393-8935
Micron Corporate Headquarters 800-828-0416
Customer Service 888-642-7662
Micron Sales 800-964-2766
Internet http://www.micronpc.com
CompuServe go micron
Please have your computer’s serial number ready when
you contact Micron.

7
Your box contains the packing slip, this manual, your cables
andother manuals, abatterypack, yourdrive module(s),an AC
adapter, system backup software and your operating system
manual.
This book shows you how to set up your system and keep it
running.
During the operating system registration and setup
of either Windows 95 or Windows NT 4.0 please
MAKE SURE your system is NOT DOCKED to the
optional MicronDock Port Replicator. Once you
havecompletedinitialsystemregistrationandsetup
of either Windows 95 or Windows NT 4.0, then you
can use your optional MicronDock Port Replicator
normally.
Micron has loaded and tested the operating system
on your hard drive. You can skip the installation of
the operating system and system drivers.
Ifyou ever needto reload youroperatingsystem, andorsystem
drivers,pleaserefer to yourMicrosoft operatingsystemmanual.
What’s in the box? Keep the box
It’s a good idea to keep your TransPort’s box and packing
materials. That way, if you ever have to store the system or
return it, your components will be well protected
RF suppressor
If your unit is equipped with a radio frequency (RF) noise
suppressor, it plugs into the headphone output jack (front or
rear), as shown below:
Figure1.TheRF suppressor contains an electronic filter that eliminates
excessiveRFinterferencefrom your headphone output jack.

8
Let your computer acclimate itself
Although your TransPort XKE can easily stand
temperatureextremes,itdoesn’tlikerapidchanges
in temperature, especially going from the cold
outdoorstoawarmoffice,orfromasteamy jungle
mail drop to an air-conditioned villa. Rapid changes in
temperature can cause water droplets to condense inside your
case, threatening to damage the electronic parts inside. If it is
hot or cold outside when you receive your system, let the
computergradually adjusttoroom temperaturefor 3to 4 hours
beforeyou poweritup.
Caution:
The computer may not work properly if condensation
occurs. Wait approximately 3 to 4 hours before using
the unit. This will allow the internal parts to adjust to
thesurrounding temperature.
Where to work
Your TransPort XKE generally will run well wherever you are
personally comfortable. Extremes of heat, cold, and humidity
can be challenging to your system's parts.
There are, however, some things you can tolerate that the
computerwill not likeatall; static electricity,dust,water, steam,
and oil. Whenever you decide to pull over for roadside
computing, choose a clean, comfortable work area for your
system.
Whentraveling, your systemoperateson an intelligent lithium-
ion battery pack.
Beforeyourunyoursystem forthe firsttimeonbatterypower,
removethebatteryfromitspackageand installitinthesystem,
then recharge the battery fully.
This prepares your lithium-ion battery pack for maximum
service.
Caution:
Except for PC cards and the Port Replicator, never
connect or disconnect any equipment or components
while the system power is on.
Beware of heat, cold, humidity, and glare
Pick a spot for your computer that’s not too hot, too cold, too
dark, or too bright. Glare can make it hard to read the screen.
Overheatingcandestroy computer components,so allowplenty
of room for air to circulate around the case. Do not place your
TransPort in direct sunlight.
Also, we strongly recommend using an external surge
suppressor. Your computer has its own electrical filters, fuses,
and protections, and even its own built-in surge suppressor,
but a high quality surge protector will shield your computer
fromlightning strikes, surges,shorts, and othersevereelectrical
hazards. An external surge suppressor looks like an extension
cord with several grounded outlets.

9
• Universal Serial Bus (USB) port.
• 128 Bit PCI graphics accelerator with hardware MPEG1 and
2MB EDO memory.
• NTSC video output capability lets you display images on any
standard television. For better color fidelity, use the S-video
output provided.
• True SoundBlaster --compatible 16-bit stereo audio system
with 1MB hardware wavetable and 3D Spatializer sound for
optimal sound quality and convenience. The TransPort has a
pair of amplified speakers and a built-in microphone.
• You can use two cardbus, two Type II PC cards (PCMCIA),
one Type III card, or one ZV (zoomed video), giving you
virtually unlimited expansion.
• With Pick-a-Point you get two kinds of pointing devices to
choose from. You can use the pointing stick (the blue button
on the keyboard), or the touchpad below the space bar. You
also get large, customizable mouse buttons for right- or left-
handed users. You can select either the touchpad or pointing
stick with a simple keystroke command.
• Two Infrared transceivers let you swap data with a desktop
PC or send files to a printer, all without cables. Ports are
located at the front and rear of the notebook.
• Optional BIOS passwords safeguard your system.
• The Phoenix®PowerPanel™utility lets you choose or create
your own software power management profiles all within the
operating system environment.
Note:
The above utility will overwrite your current BIOS settings.
• Just by connecting a joystick to the Game/MIDI port, you can
enjoy games with the same performance found in arcade
machines. You can also enjoy DTM (Desktop Music) simply
by connecting your own MIDI device.
• Custom-designed heat dispersion helps keep your unit running
coolly. Interior fan cooling is silent, efficient and more reliable.
System features
The TransPort XKE notebook computer contains sophisticated
featuresmade possibleonly bythe latest advancesin computer
hardware and software.
The standard configurations include up to a 266 MHz Intel
PentiumprocessorwithMMXtechnology,a12.1”or13.3” active-
matrix color display with a bright, clear image, a mini-LCD
control panel that reports feature status and an intelligent
lithium-ionbattery.
In addition, the TransPort XKE has two FlexOpt expansion bays
on the front side of the case. The right bay can hold up to a 24X-
speed CD-ROM drive, a second hard drive, or a battery pack.
The left bay can hold a battery pack or a floppy drive. If you
wantto changeamodule, youjust shut yoursystem off, change
themodule, thenturn yoursystem on again.For batteriesonly,
youmay putyoursystem intosuspend mode,change a battery,
then press any key to bring it out of suspend mode. This is
called “Warm-swapping.”
Other valuable features of the TransPort XKE:
• 166, 200, 233, or 266 MHz Intel Pentium processor, with MMX
technology.
• 32KB primary cache built into processor.
• 512KB secondary memory cache (pipeline burst SRAM) with
writeback for high-speed performance.
• High-performance Intel 430TX PCI chipset optimized for
notebook computers. This chipset exploits the full performance
of the Pentium processor. Its PCI bus improves system
integration with Plug-and-Play while boosting system
performance, achieving data transfer rates over 100MB per
second.
• High-speed EDO memory.
• 20 or 24X CD-ROM drive with AutoPlayTM.
• Internal 56 KB modem with full duplex and telephony, with
connectors for modem and cellular phone.

10
Latches slide to release the display
panel
Microphone
Mini-LCDControl Panel
Speaker
FrontInfrared(IR)Port
RightExpansion Bay(CD-ROMDrive)
LeftExpansion Bay
Speaker
Front View
Figure 1-1: Front features include the display panel,
indicator lamps, keyboard, two expansion bays, and
an infrared port.
To open the display panel:
Turn the front of the computer toward you. Slide the front latch
to the right, then lift the display panel with both hands. Tilt the
display panel to a comfortable viewing angle.
Left FlexOpt Expansion Bay
Holds either a floppy disk drive or lithium-ion battery.
Right FlexOpt Expansion Bay
Holds a CD-ROM drive, a battery, or an extra hard drive.
Front Infrared (IR) port
Transfers data between nearby computers without cables.

11
Howling
Howling is the high-pitched whining or shrieking that
is sometimes generated by the speaker when the
microphone input setting is on and the volume is at its
maximum setting. The default for the microphone
output setting is OFF, so howling will not occur.
However, sometimes a software application is shut
downwiththemicrophoneoutputsettingleftON. When
using such applications, be sure to switch the
microphoneoutput settingtoOFFafter use.
Countermeasures
Ifthe Windows95desktop isdisplayed, setthe volume
of the microphone output to minimum or off using the
softwarevolume control.
If any other screen is displayed, press ,<Fn> and <F5>
reducethe volume.

12
CD-ROM Drive
Drive Access Lamp
(Orange)
Open/CloseButton
EmergencyEject
Pinhole
CD-ROM Drive Power
LED(Green)
VolumeControl Search
(Forward/Reverse) Stop(Clear)Button
Play/Pause
Button Stereo
Headphone
Jack
When the notebook computer is off or in
the
Suspend
state
After plugging a pair of headphones or powered speakers into
the headphone jack on the CD-ROM drive, just the CD-ROM
drive turns on. The CD-ROM drive power LED (green) lights,
andthe CD-ROMdrivecan nowbe used asa CD player. Thisis
the AutoPlayTM function.
First,theDriveAccessLamp(orange)lightsforabout10seconds,and
thenturnsoff.
Next,pressthe<Play>button
ontheCD-ROMdrivetostart
playingtheCDfromthefirst
track.
Note:
To adjust the head-
phone controls, use the
various controls and
switches on the CD-ROM
drive.
Thecontrols onthe front of
the CD-ROM drive are functional whenever a pair of head
phonesor speakersare connectedthrough the headphonejack.
When the audio CD finishes playing, the notebook computer
enters Power Saver mode (if it was previously in the Suspend
state). Thenotebook computer stillconsumes asmallamount of
powerwhile it isinPower Savermode.
The CD-ROM drive is reset if the notebook computer is turned
off or on while the headphone miniplug is plugged in.
When the notebook computer is on
TheCD-ROM drive startsupnormally. The variouscontrols on
the CD-ROM drive are not functional, unless a pair of
headphonesor speakersare connectedthrough the headphone
jack.
Note:
If a pair of headphones or speakers are connected through the
headphone jack while the system is on, sound will continue to
play from the system’s speakers, as well as from the headphones .

13
Power lamp
Glows a steady green after you press and hold down the Power
button for a second. Goes out after you press the Power button
again. It flashes green slowly when the computer is in low-
power Suspendmode.
SAFE UN-DOCK
Glows a steady green after you press <Fn+F10> or the undock
button on the optional Port Replicator. The light goes out after
you undock the TransPort from the port replicator.
LEDIndicators
LED Indicators
These colored indicator lamps (below the display panel on the
right)tell you whetheryour system isonor off,andwhether the
onboard battery(ies) are being charged. You can see them with
the display panel open or closed.
Charge lamp
Charge Lamp
No light
Orange glow
Slowly flashing
orange
Fast flashing orange
Green glow
Fast flashing green
Orange/Green
Battery operation or no battery installed.
Charging in progress.
Precharge mode:This is the state the
battery is in when it has not been used for a
long time or when it it is fully discharged.
Normally, this phase lasts only a few sec-
onds, but in rare cases where the battery is
completely discharged, this phase may last
for up to two hours.
The battery has reached the end of its
operational life, and should be replaced.
Charging completed.
Charging cannot be accomplished properly.
Please contact Tech Support.
Meaning

14
Mini-LCD control panel
Located just below the display panel. Each symbol displayed
indicates the status of a system feature.
Floppy disk in-use
Data is being written to or read from the floppy disk.
Hard disk in-use
Data is being written to or read from a hard disk drive. 0
isharddisk0(thebootdrive),1isharddisk1(themodular
hard drive).
CD-ROM active
Data is being read from the CD-ROM player.
PC card present
A PC card is in slot 0 (the bottom slot) or slot 1.
Infrared Port
Choose front or rear infrared port.
Pointing Devices
Choosebetweenpointingdevices,pointstickortouchpad.
Capitalization lock
Caps Lock makes subsequent typed letters UPPER CASE.
Number lock
<Fn>+ <NumLk> activatesthe embedded numerickeypad
for convenient number entry.
Scroll lock
Press Scroll Lock to stop the screen from scrolling in DOS
mode.
Display Brightness/Stereo Speakers
Shows eleven levels of display brightness when you hold
down the <Fn> key and then press the <F7> or <F8> key.
Shows eleven volume levels of the onboard stereo
speakers when you hold down the <Fn> key and then
press the <F5> or <F6> key.
Battery Left- and Right-Side Level
Shows five levels of charge: 100%, 75%, 50%, 25%, 0%,
plus two visual Low Battery warnings.
AC power supplied
Computeris usingpower fromthe AC adapter.

15
TouchPad
Dual Mouse Buttons
Your TransPort features the Pick-a-Pointdual pointingsystem.
Thislets youuse eitherthe pointing stickor touch padto move
yourmousepointer. Eitherdevicewillwork with the two mouse
buttons at the front of the keyboard. Press <Fn + F3> to switch
between the pointing devices. The touch pad is the default
pointing device. Either device can also work simultaneously
when an external mini-DIN PS/2 mouse is attached. If a serial
mouse is attached both pointing devices and the external mini
din PS/2 mouse port are disabled.
Pointing Stick
Movesthemousepointerwhenyoutiltitinthedesireddirection.
Click on the mouse buttons to click on a screen object.
Touch Pad
The touchpad on the keyboard’s palm rest is tap-sensitive. Rest
a fingertip on the touch pad, then slide it across the pad to move
the mouse cursor. Tap on the pad to click or double-click on a
screen object. You can also use the mouse buttons instead of
tapping on the touch pad.
Internal pointing devices
Figure 1-2: You can choose your preferred pointing device with the
TransPort’s Pick-a-PointTM system.
Pointing Stick

16
Keyboard
Figure 1-3: 87-Key keyboard.
TransPortXKE has astandard notebook keyboardwith 87-keys,
an embedded numeric keypad, and twelve function keys. The
light blue pointing stick (between the <G> and the <H> keys)
provides dedicated cursor control as an alternative to the
touchpad or an external mini-DIN PS/2 mouse.
Windowskey Application key
Numeric keypad
Figure 1-4: Numeric keypad.
The numeric keypad lets you enter numbers rapidly.
To use the numeric keypad, press <Fn + NumLk> key.
Note:
Ifan externalkeyboard is attached,you cannot useembedded
numeric keypad.
Acharacterinthelowerright corner of a key identifies it as a numeral
in the embedded numeric keypad. Example: the “J” key is also the
number 1.
Embedded
Numeric
Keypad
<Fn + NumLk> key activates the
numeric keypad for easier number
entry.

17
Hot keys
Figure 1-5: Hot keys
DisplayMode
Speaker
Volume
Brightness BeepVolume
Function Key (Fn) must be held
down to adjust your display and
volumesettings.
TransPortXKE uses special function keys toadjust yourdisplay
and volume. To make your adjustments, hold down the <Fn>
key, then press the following function keys:
Fn+F2 Toggles your screen’s display mode between
internal monitor (LCD), external monitor (CRT), and
simultaneous internal-external display.
Note:
If the position of the screen image shifts or is not the proper
sizewhenthescreenimageisswitchedtoan externally connect
monitor, adjust the screen on the external monitor.
Fn+F3 Alternates pointing devices, between pointing stick
and touchpad.
Fn+F4 Switches between the front and rear infrared ports.
Fn+F5 Decreases the volume of the onboard stereo speakers.
Fn+F6 Increases the volume of the onboard stereo speakers.
Fn+F7 Decreases display brightness.
Fn+F8 Increases display brightness.
Fn+F9 Suspend mode. Enter suspend mode to save power.
Note:
Press any key to resume from suspend.
Fn+F10 Undock. Prepares your TransPort XKE for undocking
from the optional MicronDock. Wait for the “Safe
Undock” light to appear.
Fn+F12 Sets beep volume for the internal PC speaker to
Maximum,Medium,Minimum, or Off.
Note:
1. Certain system events will enable the speaker even
when it is set to disabled.
2. Some applications may conflict with certain special key
combinations. If you press a key combination without
results, exit the application and try again.

18
Right side view
Figure 1-6: Interior features (right side view).
Powerbutton
Press and hold for one to two seconds to turn computer
ON or OFF.
Note:
PressingthePower button hasno effectwhile the computer
isinSuspend mode. Also, to prevent accidentally turning
onthe computerwhen it isbeing carried,thePower button
does not function when the computer is being powered by
battery only and the display panel is closed. The power
buttondoes notfunctionwhen thecomputer is dockedwith
batteries installed and no AC adapter connected.
S-Video Out
Connects an S-video cable to a television. The S-video
terminal will provide better color fidelity than NTSC.
Video Output
Supplies an NTSC standard television signal (See NTSC
and S-Video setup in Chapter 4 for details).
Note:
1. Disconnect the external CRT display cable while
attached to the television.
2.When usingNTSC Videoout or S-Videoout, you
cannot use the notebook screen or an external
monitor.
USB port
Connects expansion USB peripherals.
Game/MIDIport
Connects your TransPort to a joystick or MIDI device.
Cellularport
Connectyourcellularphone. (See Chapter 6: “Embedded
Modem’s User’s Guide.”)
Fax/Modemport
Connects a phone jack. (See Chapter 6: “Embedded
Modem’s User’s Guide.”)
Removable EIDE Hard Drive (C:)
CellularPort
PowerButton
FAX/Modem
Game/MIDIPort
USBPort
NTSCVideo
Output
S-VideoOut
PhoenixBIOSSetup-Copyright1985-95 Phoenix Technologies Ltd.
F1 Help SelectItem -/+ Change Values F9 Setup Defaults
ESCExit SelectMenu Enter Select Sub-Menu F10PreviousValue
Main Advanced Security Power Boot Exit
Item Specific Help
SelectPowerManagement
Mode.Choosingmodes
changessystempower
managementsettings.
MaximumPowerSavings
conservesthegreatest
amountofsystempower
whileMaximum
Performanceconserves
powerbutallows
greatestsystem
performance.Toalter
thesesettings,choose
Customize.Toturnoff
powermanagement,
chooseDisable.
Powersavings: [Customized]
DozeMode: [On]
StandbyTimeout: [8Minutes]
SuspendTimeout: [10Minutes]
SaveToDisk: [Off]
HardDiskTimeout: [4Minutes]
VideoTimeout: [6Minutes]
ResumeOnModemRing: [On]
ResumeOnTime: [Off]
ResumeTime: [00:00:00]

19
Left side view
Figure 1-7: Interior features (left side view).
PCCard
EjectButtons
KensingtonTM Security
LockSlot PC Card 0Slot
PCCard 1 Slot
Kensington™security lock slot
Your TransPort XKE Kensington™security lock allows
you to attach a Kensington MicroSaver™Security
System cable to your computer. Use this cable to anchor
the computer to a desk or other large object to deter
theft.
Note:
Kensington Security System not included with
TransPortXKE.
Dual PC card slot can hold two Type I/II PC cards
(PCMCIA) or one Type III PC card.
The slots and eject buttons are recessed slightly to
protect your equipment.
Note:
ZV cards can only be used in the bottom slot (Slot 0).

20
Rear infrared port
Transfers data between computers or peripherals without
cables.
Stereo Headphone jack
Connects a stereo headphone or amplified external
speakers to the computer.
Note:
For best sound, external speakers should be amplified.
Mono Microphone jack
Connects a dynamic or condenser microphone to the
computer.
Note:
Whenthemicrophoneisnotin use, mute the volumeoutput for it
Mini-DINPS/2 mouseport
Connects a PS/2 (or compatible) mouse.
Mini-DIN PS/2 external keyboard port
Connects an IBM-AT compatible 101/102-key external
keyboard.
Serial port
Connects a 9-pin, serial-device.
EPP/ECPparallel port
Connects a parallel-printer or other parallel device.
External video connector
Connects the signal cable of a video graphics array
(VGA), super video graphics array (SVGA), or
compatible display.
Rear view
Figure 1-8: System rear view 1.
External Video
Connector
EPP/ECP
ParallelPort
SerialPort
Mini-DIN
PS/2 External
KeyboardPort
Mini-DIN
PS/2External
MousePort
MonoMicrophoneJack
StereoHeadphoneJack
RearInfrared Port

21
The included AC adapter plugs into the DC In connector. The
adapterpowers yoursystemand rechargesyour batteriesat the
sametime. Also, theAC powercord for theadapter canalso be
pluggedinto theoptional MicronDockTM port replicator,which
containsits ownAC-to-DC converter.
DC In connector
Plugs into the AC adapter, which supplies DC voltage to
system.
Systemexpansionconnector
This 240-pin expansion port is used to connect the
MicronDock port replicator.
Figure 1-9: System rear view 2.
SystemExpansion
Connector
DCInConnector
Table of contents
Other Micron Electronics Laptop manuals