Microsonic DV-T572A User manual

%
$
4 HEAD VCR
TV/VCR
MENU CLEAR DISPLAY
EJECT
CH/TRK
SLOW/SHT
SPEED CM SKIP ATR 3S
END
START
123
456
789
100 INPUT
PLAY
REW
REC/OTR
FF
STOP
P/S
0
POWER

1
SAFETY PRECAUTIONS
CAUTION : TO PREVENT ELECTRIC SHOCK, MATCH WIDE BLADE OF PLUG TO WIDE SLOT.
WARNING : TO PREVENT FIRE OR SHOCK HAZARD, DO NOT EXPOSE THIS APPLIANCE TO RAIN OR
MOISTURE.
CAUTION
RISK OF ELECTRIC SHOCKS
DO NOT OPEN
CAUTION: TO REDUCE THE RISK OF
ELECTRIC SHOCK, DO NOT REMOVE COVER
(OR BACK). NO USER-SERVICEABLE PARTS
INSIDE. REFER SERVICING TO QUALIFIED
SERVICE PERSONNEL.
The lightning flash with arrowhead symbol, within an equilateral triangle, is intended to alert the user to the
presence of uninsulated "dangerous voltage" within the product's enclosure that may be of sufficient
magnitude to constitute a risk of electric shock to persons.
The exclamation point within an equilateral triangle is intended to alert the user to the presence of
important operating and maintenance (servicing) instructions in the literature accompanying the appliance.
Note to CATV System Installer:
This reminder is provided to call the CATV system installer's attention to Article 820-40 of the NEC that
provides guidelines for proper grounding and, in particular, specifies that the cable ground shall be
connected to the grounding system of the building, as close to the point of cable entry as practical.
FCC Warning:
Any unauthorized changes or modifications to this equipment would void the user's authority to operate.
IMPORTANT SAFEGUARDS
In addition to the careful attention devoted to quality standards in the manufacture of your video product,
Safety is a major factor in the design of every instrument. However, safety is your responsibility too.
These pages list important information that will help to assure your enjoyment and proper use of a Video
Cassette Recorder. Please read them carefully before operating your video product.
!
!
USE
Power Sources–This set should be operated only
from the type of power source indicated on the
marking label. If you are not sure of the type of
electrical power supplied at your home, consult your
dealer or local power company. For those sets
designed to operate from battery power, or other
sources, refer to the operating instructions.
Water and Moisture–Do not use the set near water
for example, near a bathtub, washbowl, kitchen sink,
laundry tub, in a wet basement, or near a swimming
pool, and the like.
Accessories–Do not place the set on an unstable
cart, stand, tripod, bracket, or table. The set may fall,
causing serious injury to a child or an adult, and
serious damage to the set. Use only a cart, stand,
tripod, bracket, or table recommended by the
manufacturer.
Overloading–Do not overload wall outlets, extension
cords or convenience receptables beyond their
capacity, since this can result in fire or electric shock.
Object and Liquid Entry–Never push objects of any
kinds into the set through openings as they may touch
dangerous voltage points or short out parts that could
result in a fire or electric shock. Never spill liquid of
any kind on the set.
Portable Cart Warning–An appliance and cart
combination should be moved with care. Quick stops,
excessive force, and uneven surfaces may cause the
appliance and cart combination to overturn.
Attachments–Do not use attachments not
recommended by the manufacturer, as they may
cause hazards.
Cleaning–Unplug the set from the wall outlet before
cleaning it. Do not use liquid cleaners or aerosol
cleaners. Use a damp cloth for cleaning.
Ventilation–This slots and openings in the cabinet
are provided for necessary ventilation to ensure
reliable operation of the set and to protect it from
over-heating, these slots and openings should never
be blocked or covered.
–Never cover the slots and openings with a cloth or
other materials.
–Never block the slots and openings by placing the
set on a bed, sofa, rug or other similar surface.
AC 90~260V
UNPLUG
@
@

2
• Audio-visual material may include works of copyright which must NOT be recorded without the authority of the
owner of copyright.
• Note that voltage is supplied to the unit whenever the plug is connected to the supply socket.
• Clock display on the front panel is a indication that the main power is on.
• Keep the unit away from radiators or other sources of heat.
• Do not spill liquid of any kind onto the unit. If liquid is accidently spilled onto the unit, immediately remove the
mains plug from the supply socket, and consult a qualified service engineer.
•MOISTURE CONDENSATION: If you pour a cold liquid into a glass, water vapor in the air will condense on the
surface of the glass. This is moisture condensation. Moisture condensation on the head drum, one of the most
crucial parts of the video recorder, will cause damage to the tape. Whenever the video recorder is exposed to
extreme cold and heat at the same time, some condensation will occur. When moisture is present, turn the power
switch on, and allow at least 2 hours for the video recorder to dry out.
• Use the video recorder in a horizontal (flat) position only.
• Before operating, remove any paper wrapping which may have been affixed to the recorder during manufacture. DO
NOT COVER VENTILATION OPENINGS ON TOP AND SIDES OF THE RECORDER DURING OPERATION.
• When a cassette is inserted into the loading compartment, the power is switched on automatically as long as the
power cord is plugged into an AC outlet. DO NOT force a cassette into the compartment when the power cord is
unplugged.
• Keep the recorder and video cassette away from strong magnetic fields.
• After playing a video casssette, remove it from the recorder.
DO NOT move the recorder with a cassette in the compartment.
• Store video cassettes in their sleeve or case and position them vertically.
• If a cassette has been subjected to cold temperature, allow it to warm to room temperature before recording or
playback.
Carefully remove the VCR from the carton. Check to see that the VCR has not been damaged. The following
accessories are included.
IMPORTANT NOTES
ACCESSORIES
No other DAEWOO VCR has the same serial numbers as
yours. You will find the serial number and model
number on the rear of your VCR.
Make sure both numbers are recorded here so that you
will have them in case your VCR is stolen or you need a
complete description for identification.
Model No.
Serial Number
Purchase Date:
Purchased From:
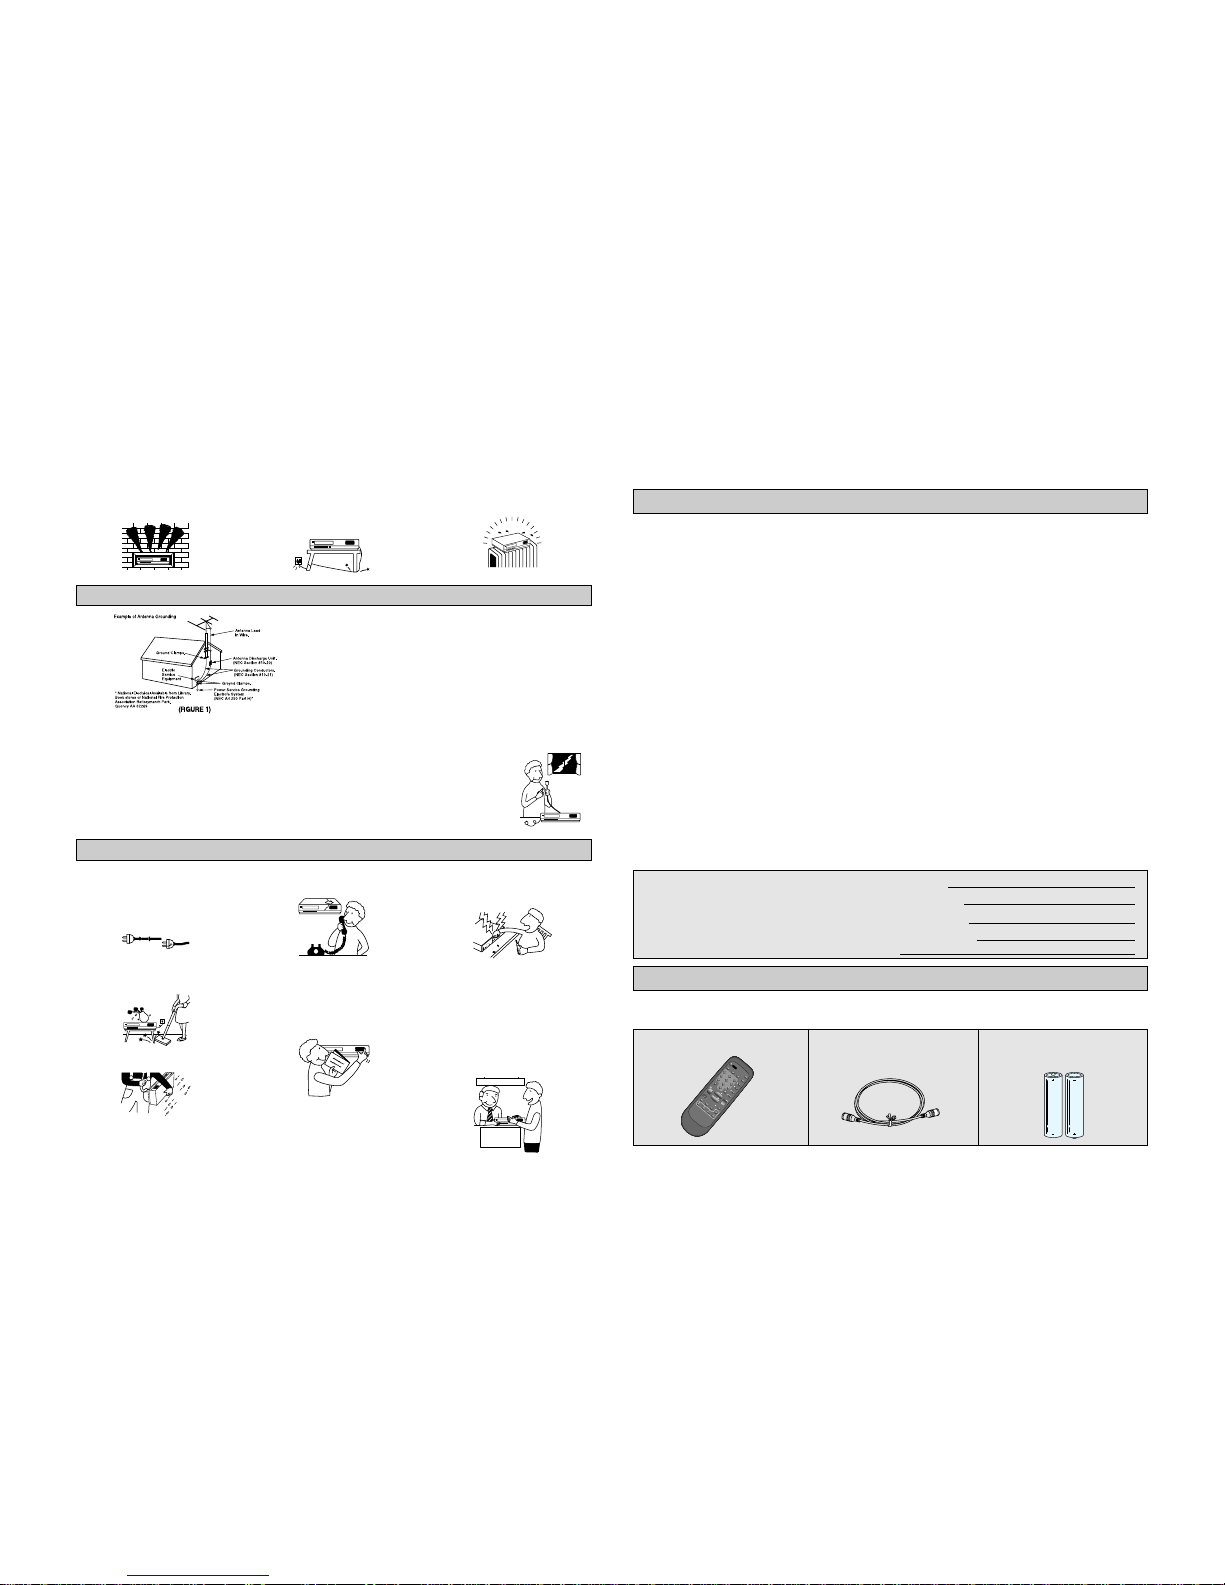
1. Wireless remote control
NOTE: Required 2 "AAA" batteries
TV/VCR
MENU CLEAR DISPLAY
EJECT
CH/TRK
SLOW/SHT
SPEED CM SKIP ATR 3S
END
START
123
456
789
100 INPUT
PLAY
REW
REC/OTR
FF
STOP
P/S
0
POWER
DV-T572A
–Never place the set in a confined space such as a
bookcase, or built-in cabinet, unless proper ventilation
is provided.
Power-Cord Protection–Route the power cord so
that it is not likely to be walked on or pinched by
items placed upon or against them, paying particular
attention to the plugs, receptacles, and the point
where the cord exits from the appliance.
–Do not place the set near over a radiator or heat
register, or where it is exposed to direct sunlight.
SERVICE
Damage Requiring Service–Unplug the set from
the wall outlet and refer servicing to qualified service
personnel under the following conditions:
–When the power cord or plug is damaged or frayed.
–If liquid has been spilled or objects have fallen into
the set.
–If the set has been exposed to rain or water.
–If the set has been dropped or the cabinet has been
damaged.
–If the set does not operate normally by following the
operating instructions. Adjust only those controls that
are specified in the operating instructions. Improper
adjustment of other controls may result in damage
and will often require extensive work by a qualified
technician to restore the set to its normal operation.
–When the set exhibits a distinct change in
performance–this indicates a need for service.
Servicing–Do not attempt to service the set yourself
as opening or removing covers may expose you to
dangerous voltage or other hazards.
Refer all servicing to qualified service personnel.
Replacement parts–When replacement parts are
required, be sure the service technician has used
replacement parts specified by the manufacturer that
have the same charac-teristics as the original parts.
Unauthorized substitutions may result in fire, electric
shock, or other hazards.
Safety Check–Upon completion of any service or
repairs to the set, ask the service technician to
perform routine safety checks (as specified by the
manufacturer) to determine that the set is in safe
operating condition.
OUTSIDE ANTENNA, EQUIPMENT, AND POWER EXPOSURE
1. ENSURE SAFE ANTENNA AND CABLE CONNECTIONS
If an outside antenna or cable system is connected to the set, be sure the antenna
or cable system is grounded so as to provide some protection against built up
static charges and voltage surges. Section 810 of the National Electrical Code.
ANSI/NEPA No. 70-1984, provides information with respect to proper grounding
of the mast and supporting structure, grounding of the lead-in wire to an antenna
discharge unit, size of grounding conductors, location of antenna discharge unit,
connection to grounding electrodes and requirements for the grounding electrode:
See figure 1 for items a-d below.
a. Use No. 10 AWG (5.3mm2) aluminum. No. 8 AWG (8.4mm2) No. 17-AWG
(10mm2) copper-clad steel or bronze wire, or larger, as ground wire.
b. Secure antenna lead-in and ground wires to house with stand-off insulators
spaced from 4 feet (1.22m) to 6 feet (1.83m) apart.
c. Mount antenna discharge unit as close as possible to where lead-in enters
house.
d. Use jumper wire not smaller than No. 6 AWG (13.3mm2) copper, or the
equivalent, when a separate antenna grounding electrode is used. See NEC
Section 810-21 (I).
2. ELIMINATE ANTENNA PROXIMITY TO HIGH VOLTAGE POWER SOURCES OR
CHANCE OF ACCIDENTAL CONTACT BY INSTALLER
An outside antenna system should be located where it will never be reached by
power lines, electric light or power circuits and where it will never contact these
power sources if it falls. Installer should use extreme care to avoid possible fatal
contact by touching power lines, circuits or other power sources when installing
outside antenna.
Lightning–For added protection for this set during a
lightning storm, or when it is left unattended and
unused for long periods of time, unplug it from the
wall outlet and disconnect the antenna or cable
system. This will prevent damage to the set due to
lightning and power-line surges.
FRAYED OR CUT
AC LINE
CRACKED PLUG
SERVICE DEPT
ALL SETS RECEIVE
OUR OK
SAFETY CHECK.
2. Coaxial cable for connecting
the VCR to your TV's VHF terminal. 3. BATTERY
"Attential because of the transportation,
battery could be discharged."

3
One Touche Timer Recording (OTR)............................................................................................21
Super Simple System (3S) for Timer Recording........................................................................22
Preferences .....................................................................................................................................23
Functions .........................................................................................................................................24
Selecting the on-screen display language................................................................................25
Auto Repeat .....................................................................................................................................25
Duplicating a video tape...............................................................................................................26
Speaking the language : A glossary of terms............................................................................27
Trouble Shooting Guide.................................................................................................................27
Specifications.................................................................................................................................28
To get the best performance from your new VCR, it is important that you carefully read and follow
the operating instructions in this manual in the sequence in which they are presented.
Should you experience a problem, please follow the "Trouble Shooting Guide" on page 27.
Safety Precautions...........................................................................................................................1
Important Safeguards.......................................................................................................................2
Table of Contents..............................................................................................................................3
Connections.......................................................................................................................................5
VCR to CABLE System Connection................................................................................................5
Identification ....................................................................................................................................7
Video Cassette.................................................................................................................................10
Basic Playback...............................................................................................................................11
Special Operations.........................................................................................................................12
Digital Shuttle Function.................................................................................................................13
MENU Operation.............................................................................................................................14
Setting the clock by using Menu.................................................................................................15
Setting a TV Channels....................................................................................................................16
Recording TV Programs.................................................................................................................17
Normal Timer Recording...............................................................................................................18
TABLE OF CONTENTS

4
After you have connected the antenna to the VCR, you must connect the VCR to the TV.
Below are 4 common methods of connecting your VCR to a TV. Find the type of TV you are using and follow the
connection diagram.
VCR TO TV CONNECTION
The VCR must be connected "between" the antenna and the TV. First, remove the antenna from the TV and connect it
to the VCR. Then connect the VCR to the TV. Below are 3 common methods of connecting an antenna system to a
VCR. Find the type of antenna system you are using and follow the connection diagram. After you have connected the
antenna to the VCR, connect the VCR to the TV.
This VCR has a single 75 ohm antenna input for connection to an antenna (VHF/UHF) or cable (CATV) system. If you
have separate VHF and UHF antennas (number 3 below), use a mixer to connect the antennas to the VCR.
NOTE: • A clear picture will not be obtained by the VCR unless the antenna signal is good.
Connect the antenna to the VCR properly.
• For the best quality recording, an indoor antenna or a telescopic antenna is not recommended. The use of
an outdoor type antenna is required.
• If you are not sure about the connection, please refer to qualified service personnel.
CONNECTIONS
ANTENNA TO VCR CONNECTION
COMBINATION VHF/UHF ANTENNA
WITH 75 OHM COAXIAL CABLE VCR
ANT IN
75 OHM COAXIAL CABLE
COMBINATION VHF/UHF ANTENNA
WITH 300 OHM TWIN LEAD (FLAT) WIRE VCR
300 OHM TWIN LEAD (FLAT) WIRE
MATCHING TRANSFORMER
300 OHM INPUT 75 OHM OUTPUT
(NOT PROVIDED)
SEPARATE VHF AND
UHF ANTENNAS
UHF
VHF
VCR
300 OHM TWIN LEAD (FLAT) WIRE
75 OHM COAXIAL CABLE
ANT IN
MIXER 75/300 OHM
INPUTS 75 OHM OUT
(NOT PROVIDED)
VHF/UHF IN
TV with signle 75 ohm
VHF/UHF antenna input
TV 75 OHM COAXIAL CABLE (PROVIDED)
VCR
RF OUT
VHF
UHF
TV with 300 ohm UHF
and 75 ohm VHF
antenna inputs
SPLITTER
75 OHM INPUT
75/300 OHM OUTPUTS
(NOT PROVIDED)
75 OHM COAXIAL CABLE (PROVIDED)
RF OUT
VCR
TV
UHF
VHF
TV with 300 ohm UHF
and 300 ohm VHF
antenna inputs
SPLITTER
75 OHM INPUT
75/300 OHM OUTPUTS
(NOT PROVIDED)
TV
VCR
RF OUT
75 OHM COAXIAL CABLE (PROVIDED)
VHF/UHF IN
IN
TV
OUT IN OUT
VIDEO AUDIO
VIDEO
OUT
AUDIO
OUT
RCA JACK (NOT PROVIDED)
VIDEO
IN AUDIO
IN
VCR
!
!
$
#
@
#
@

ALLOWS:
* Recording of unscrambled channels.
* Using the programmable timer.
* Recording an unscrambled channel while watching any channel selected at the converter/descrambler box.
(Set the VCR to the TV mode by pressing the TV/VCR key)
PREVENTS:
* Recording scrambled channels.
NOTE:
If you are playing a tape or using the tuner built into the VCR, the converter must be set to the video channel output of
the VCR (either 3 or 4).
• CABLE INSTALLATION
Your VCR is capable of receiving 68 broadcast channels or up to 125 unscrambled cable channels.
Local cable systems may vary, so check your cable company's compatibility requirements.
5
Many cable companies offer services permitting reception of extra channels including pay or subscription
channels. This VCR has an extended tuning range and can be tuned to most cable channels without using a cable
company supplied converter box, except for those channels which are intentionally scrambled.
If you subscribe to a special channel which is scrambled, you must have a descrambler box for proper reception. This
VCR cannot receive scrambled programs since it does not contain a descrambler.
In order to receive scrambled programs your existing descrambler must be used.
Descrambler boxes are available from cable companies. Consult your local cable company for more information
concerning connection to their descrambler equipment.
There are many ways to connect the VCR to a cable system. Below are six common methods of connection. For basic
cable service, no premium (scrambled) channels.
ALLOWS:
* Recording of nonscrambled channels.
* Use of the programmable timer.
* Recording of one channel while watching another.
(Set the VCR to the TV mode by pressing the TV/VCR key)
ALLOWS:
* Recording of channels through the converter/descrambler box (scrambled and unscrambled).
* Using the programmable timer to record only the channel selected at the converter/descrambler box.
PREVENTS:
* Recording one channel while watching another.
* Using the VCR tuner to select channels.
NOTE:
To record from converter/descrambler, VCR tuner must be tuned to the converter output channel, usually channel 3 or
4.
VHF/UHF IN
VCR
TV
RF OUT
INCOMING CABLE
OUT IN
VHF/UHF IN
VCR
TV
RF OUT
INCOMING
CABLE
CONVERTER/
DESCRAMBLER
OUT IN
VHF/UHF IN
VCR
TV
RF OUT
INCOMING
CABLE
CONVERTER/
DESCRAMBLER
WHENEVER A CONVERTER/DESCRAMBLER BOX IS PLACED BEFORE THE VCR YOU MUST TUNE THE VCR TO
THE OUTPUT OF THE CONVERTER/DESCRAMBLER BOX.
Channels
• VHF (Channels 2-13)
ON AIR • UHF (Channels 14-69)
• Channel 1 (A-8)
• Channels 14~36 (A~W)
CATV • Channel 37 (W+1) upto 94 (W+58)
• Channels 95-99 (A-5~A-1)
• Channels 100~125 (W+59~W+84)
VCR TO CABLE SYSTEM CONNECTION
!
#
@

6
ALLOWS:
* Recording of all channels through the converter/descrambler box.
* Recording a scrambled or unscrambled channel while watching another (scrambled or unscrambled) channel.
(Set the A/B switch to B position)
* Using the programmable timer to record only the channel selected at the converter/descrambler box.
PREVENTS:
* Using the VCR tuner to select channels.
NOTE:
To record from converter/descrambler, VCR tuner must be tuned to the converter/descrambler output channel, usually
channel 3 or 4.
ALLOWS:
* Recording of all channels through the converter/descrambler box.
* Recording of one channel while watching another. (Set the A/B switch to A position)
* Using the programmble timer to record only the channel selected at the converter/descrambler box.
PREVENTS:
* Watching scrambled channels while recording another channel.
* Using the VCR tuner to select channels.
NOTE:
To record from converter/descrambler, VCR tuner must be tuned to the converter/descrambler output channels,
usually channel 3 or 4.
ALLOWS:
* Recording of unscrambled channels.
* Recording of one channel while watching another.
* Watching premium channels through the converter/descrambler box while recording nonscrambled channels. (Set
the A/B switch to B position)
* Using the programmable timer.
PREVENTS:
* Recording scrambled channels.
IN OUT
VHF/UHF IN
VCR
TV
RF OUT
INCOMING
CABLE
CONVERTER/
DESCRAMBLER
SPLITTER
A/B SWITCH
A
B
ANT IN
IN OUT
VHF/UHF IN
VCR
TV
RF OUT
INCOMING
CABLE
CONVERTER/
DESCRAMBLER
SPLITTER
A/B SWITCH
A
B
ANT IN
IN OUT
VHF/UHF IN
IN OUT
VCR
TV
RF OUT
INCOMING
CABLE
CONVERTER/
DESCRAMBLER
SPLITTER
A/B SWITCH
A
B
ANT IN
WHENEVER A CONVERTER/DESCRAMBLER BOX IS PLACED BEFORE THE VCR YOU MUST TUNE THE VCR TO
THE OUTPUT OF THE CONVERTER/DESCRAMBLER BOX.
$
%
^

1POWER KEY
2CASSETTE COMPARTMENT
3PLAYBACK KEY
4VIDEO INPUT JACK
5AUDIO INPUT JACK
6STOP/EJECT KEY
7DISPLAY PANEL
8CH UP, DOWN/TRACKING KEY
9REWIND/REVIEW KEY
10FAST FORWARD/CUE KEY
11RECORD/OTR KEY
7
1AC POWER CORD
2AUDIO OUT JACK
3AUDIO IN JACK
4ANTENNA INPUT
5RESET KEY
6VIDEO OUT JACK
7VIDEO IN JACK
8CHANNEL SELECTION SWITCH
9RF OUTPUT
REAR OF VCR
IDENTIFICATION
FRONT OF VCR
65
234
789
1
DISPLAY PANEL
1TAPE IN INDICATOR
2CLOCK/COUNTER/FUNCTION MODE 3VCR MODE INDICATOR
4TIMER RECORDING INDICATOR

8
1
2
3
4
5
6
7
8
9
10
11
12
13
14
15
16
17
18
19
20
21
22
23
REMOTE CONTROLFRONT PANEL DISPLAY
TV/VCRMENU CLEAR DISPLAY
EJECT
CH/TRK
SLOW/SHT
SPEED CM SKIP ATR 3S
END
START
123
456
789
100 INPUT
PLAY
REW
REC/OTR
FF
STOP
P/S
0
POWER
On/OFF Turned on/off
PLAY Playback
FF Fast Forward
SCH Forward Search
REW Rewind
REC Timer recording
R0:00, R1:00OTR(One Touch Recording)
SLOW Slow Motion
REC Record
PAUS Pause / Still
STOP Stop
REPT Auto Repeat
SAFE Child Lock
Power-turn on/off key
Menu key
Clear key
Direct Access Channel 0-9 keys
100 key
Rewind/Review key
Stop key
Record/OTR key
Speed key
CM Skip key
3S (- START +) keys
Eject key
TV/VCR key
Display key
Channel Up & Down/Tracking Adjustment keys
Slow/Shuttle keys
Input key
Play back key
Fast Forward/Cue key
Pause/Still key
3S (Super Simple System) keys
Auto Tracking key
3S (- END +) keys

9
HOW TO INSTALL BATTERIES
1. Any object between the remote control and VCR will block the path of the beam when it is
being used.
Dark walls, direct sunshine or very bright (incandescent) light will reduce the remote sensitivity.
2. Hold the remote control within an angle range of about 30° from either side of the remote
sensor as shown below.
3. When the remote control is vertical to the remote sensor, it will work within about 23 feet (7m)
from the VCR.
4. Point the front of the remote control directly at the front of the VCR.
* Function keys do not work when pressing several keys at the same time.
HOW TO USE THE REMOTE CONTROL
TV/VCRMENU CLEAR DISPLAY
EJECT
CH/TRK
SLOW/SHT
SPEED CM SKIP ATR 3S
END
START
123
456
789
100 INPUT
PLAY
REW
REC/OTR
FF
STOP
P/S
0
POWER
¡
Remove the cover on
the reverse side of the
remote control.
™
Install two batteries
("AAA" size) into the
remote control.
UM-4
(AAA)
DC 1,5Vx2
+
–
+
–
£
Replace the battery
cover.

Use type with the $mark in this unit.
Recording/Playback Time of Video Tape
Video cassettes are equipped with a safety tab to prevent accidental erasure. When the tab is
removed, recording can not be performed. If you wish to record on a cassette whose tab has
already been removed, use adhesive tape to block the hole.
10
TYPE OF VIDEO CASSETTE
ERASE OF PROTECTION
Push the cassette into the cassette compartment
gently with label up.
* Upon inserting the cassette, the power is turned on
even if the power is off as long as the AC power cord
is plugged in.
The TAPE IN indicator }will light up.
Press the STOP/EJECT key on the VCR.
The TAPE IN indicator }will turn off.
Pull the cassette out gently.
* When you press the STOP/EJECT key even if the
power is off, the cassette will be ejected.
•Inserting a cassette with its safety tab in place turns
the recorder on automatically.
•Due to the new auto-play function, when a cassette
with its safety tab removed is inserted, the VCR turns
on and begins to play back auto-matically.
VIDEO CASSETTE
LOADING
UNLOADING
NOTES:
•An inverted cassette cannot be inserted.
•Be sure to insert the cassette firmly into the slot, otherwise, it will be automatically ejected.
•The automatic loading mechanism will operate only when the cassette is inserted correctly.
•When the unit is not plugged into a power outlet, do not insert cassette.
CAUTION
•Do not attempt to pull out the cassette once automatic loading has started.
•Do not insert fingers or any foreign object beyond the door flaps of the cassette loading slot
as this could lead to injury or damage to the mechanism.
•Do not allow children to insert any foreign objects into VCR.
LOADING POWERON
LOADING POWER ON PLAY • To prevent accidental erasure
•After recording, break off the safety tab
with a screwdriver if you don't want to
record over the tape.
• To record again
•Cover the hole with cellophane tape.
NTSC SP Mode EP Mode
(Standard Play) (Extended Play)
T-60 1hour 3hours
T-90 1 hour 30min. 4hours30 min.
T-120 2hours 6hours
T-160 2hours 40 min. 8hours
PAL SP Mode LP Mode
(Standard Play) (Long Play)
E-60 1hour 2hours
E-120 2hours 4hours
E-180 3hours 6hours
E-240 4hours 8hours
E-300 5hours 10hours

11
Set the CH 3/CH 4 switch on the rear of the
VCR to either CH 3 or 4, and then tune your TV
to the same.
Upon inserting a prerecorded cassette, the
power will turn on automatically even if the
power is off.
Press the PLAY key, then picture will appear.
The tape is rewound automatically to the
beginning after playing to the end of recorded
part.
Press the STOP key.
The tape will stop but remain fully loaded and
ready to play.
BASIC PLAYBACK
PREPARATION
LOADING
PLAY
STOP
TV/VCRMENU CLEAR DISPLAY
EJECT
CH/TRK
SLOW/SHT
SPEED CM SKIP ATR 3S
END
START
123
456
789
100 INPUT
PLAY
REW
REC/OTR
FF
STOP
P/S
0
POWER
Press the FF key in the STOP mode.
The tape advances at high speed without
picture and sound.
Press the REW key in the STOP mode.
The tape is rewound at the high speed without
picture and sound.
Press the EJECT key.
The tape will come out of the cassette
compartment.
Press the CLEAR key to reset the time
counter to 00:00 any where on a tape so that
you can easily locate a tape segment.
Only in case of displaying the status mode
indication on the screen, the CLEAR key will
be operated.
The DISPLAY button shows the status of the
VCR (STOP, PLAY, RECORD, etc), channel
number, time counter, date, time and tape
speed on the TV screen. The date and time
must be set before they can be displayed.
FAST FORWARD
REWIND
EJECT
CLEAR
DISPLAY
TV/VCRMENU CLEAR DISPLAY
EJECT
CH/TRK
SLOW/SHT
SPEED CM SKIP ATR 3S
END
START
123
456
789
100 INPUT
PLAY
REW
REC/OTR
FF
STOP
P/S
0
POWER
CLEAR
KEY DISPLAY
KEY

12
When a tape is played, the Digital Auto Tracking System automatically adjusts the tracking to
obtain the best possible picture.
If noise bars appear during playback, adjust the tracking manually.
• Press the CH/TRK key to obtain the best possible picture.
• Press the
ATR
key to adjust the tracking of tape automatically during playback or still (pause-
play).
• To disable to usage of the VCR or to protect your timer recordings, you can lock the VCR so that
the buttons on the VCR or remote won’t work.
- To lock : Press and hold POWER on the remote for approximately six seconds.
- To release : Press and hold POWER on the remote for approximately six seconds.
• The “SAFE” letter appears on the display panel when the CHILD LOCK has been set.
• This is useful for skipping commercials or program segments.
- Press CM SKIP once during playback to advance the tape approximately 30 seconds.
- Each press of the CM SKIP adds an additional 30 seconds up to 5 minutes.
• The “SCH” letter appears on the display panel during CM SKIP mode.
• Press the INPUT key to select between the VCR tuner or the unit connected to the
AUDIO/VIDEO IN jack (Auxiliary).
Press the FF key once or twice in the
PLAYBACK mode.
Then, the tape advances rapidly with the
picture and the “SCH” letter appears on the
display panel.
Press the REW key once or twice in the
PLAYBACK mode.
Then, the tape is rewound rapidly with picture
and the “SCH-” letter appears on the display
panel.
Press the P/S key during playback. If this key
is pressed again, you can view one frame with
each press of the button.
•V-HOLD: Press the CH/TRK key to
eliminate picture shakiness in the STILL
mode.
•Press the P/S key during playback. And then
by pressing the SLOW/SHT key, you
can watch the desired frame in detail.
•Press the PLAY key to resume PLAYBACK
mode.
•Noise bars may appear on the picture in the
SLOW mode. To reduce the noise bars, press
the CH/TRK keys on the remote
control.
SPECIAL OPERATIONS
TO VISUALLY SEARCH FORWARD (CUE)
TO VISUALLY SEARCH BACKWARD (REVIEW)
DIGITAL TRACKING CONTROLS
AUTO TRACKING
CHILD LOCK
CM SKIP
INPUT
TO WATCH STILL PICTURE
TO WATCH SLOW PICTURE
TV/VCRMENU CLEAR DISPLAY
EJECT
CH/TRK
SLOW/SHT
SPEED CM SKIP ATR 3S
END
START
123
456
789
100 INPUT
PLAY
REW
REC/OTR
FF
STOP
P/S
0
POWER
PLEASE NOTE:
1. No sound will be heard in the SEARCH or STILL mode.
2. Squeezed picture could be seen while switching from the SEARCH mode to the
PLAYBACK mode.
This is NOT a sign of malfunction.
• Press the PLAY key to resume PLAYBACK mode.

DIGITAL SHUTTLE FUNCTION allows you to control speeds variously during playback.
This function can be controlled only with the remote control.
DIGITAL SHUTTLE FUNCTION
13
TV/VCRMENU CLEAR DISPLAY
EJECT
CH/TRK
SLOW/SHT
SPEED CM SKIP ATR 3S
END
START
123
456
789
100 INPUT
PLAY
REW
REC/OTR
FF
STOP
P/S
0
POWER
•
Speed is increased by pressing the SLOW/SHT and SLOW/SHT keys once every time.
• When the SLOW/SHT key is pressed once every time, the speed will change as follows:
• When the
SLOW/SHT
key is pressed once every time, the speed will change as follows:
NORMALPLAYBACK SEARCHFORWARD I (SLOW)
SEARCHFORWARDIII (FAST)SEARCHFORWARDII (MID)
NORMALPLAYBACK REVERSESEARCH I (SLOW)
REVERSESEARCHII (MID) REVERSE SEARCHIII (FAST)

Select a language
1 Español
2 Português
3 > English
Press to continue
MENU
SELECT LANGUAGE
14
¢
Selecting "4" from the MENU produces the PREFERENCES
Screen as shown.
The detail of preferences is given on page 23.
∞
Selecting "5" from the MENU produces the FUNCTIONS
Screen as shown.
The detail of functions is given on page 24-25.
§
Selecting "6" from the MENU produces the SELECT
LANGUAGE Screen as shown.
The detail of language select is given on page 25.
1 Auto Channel Search
2 Add/Remove Channels
3 Signal Type:
Press to exit
MENU
CABLE
CHANNEL SET
1 OSD display ON
2 Auto Power off YES
3 Dimmer ON
4 System Select AUTO
Press to exit
MENU
PREFERENCES
Turn on the TV and VCR.
Set the VCR to VCR mode by pressing the TV/VCR key on the
remote control if the VCR indicator is not on the display panel.
Set the TV to CH3 or 4.
Press the MENU key then the MENU screen will appear.
Pressing this key once more makes the MENU screen disappear.
¡
Using the Direct Access key to select "1" from the MENU to
produce the On Screen Display as shown.
The detail of setting your clock is given on page 15.
™
Selecting "2" from the MENU produces the TIMER
RECORDINGS Screen as shown.
The detail of programming is given on page 18~21.
£
Selecting "3" from the MENU produces the CHANNEL
SET Screen as shown.
The detail of channel set is given on page 16.
MENU OPERATION
1 CLOCK SET
2 TIMER RECORDINGS
3 CHANNEL SET
4 PREFERENCES
5 FUNCTIONS
6 SELECT LANGUAGE
Press to exit
MENU
MENU
3or 4
1 Make a New Program
2 Review/Cancel Programs
Press to exit
MENU
TIMER RECORDINGS
Time --:--
(hh:mm)
Date --/--/--
Press to cancel
MENU
CLOCK SET
1 Index Search
2 Go-To Search
3 Tape Select
4 Wake-up Call
Press to exit
MENU
FUNCTIONS

15
¢
Set the Date using the Direct Access keys. Press "1"&"5"
for "15".
∞
Set the Month using the Direct Access keys. Press "0"&"5"
for "05" (May).
§
Select the Year using the Direct Access keys. Press "0"&
"0" for "2000".
The VCR will automatically select the correct day according
to the year that is selected.
¶
Press the MENU key to save the selectings you have made.
Time 10:30
Date - - / - - / - -
(dd/mm/yy)
Press CLEAR to correct
Press MENU to cancel
CLOCK SET
SETTING THE CLOCK BY USING MENU
This clock is based on a 24-hour digital display. The
clock not only serves as a digital display of your
current local time, but in essential to the successful
operation of the VCR's Programmable Recording
used for unattended recording.
Therefore it is of the utmost importance that the
clock should be set accurately.
When the VCR and TV are turned on for the first
time, --:-- will appear on the display panel.
•Set the VCR to VCR mode by pressing the TV/VCR
key on the remote control if the VCR indication not
appear on the display panel.
•SettheTVtoCH3or4.
EXAMPLE: Setting the clock to the imaginary
current date and time: 10:30 May 15, 2000.
¡
First press the MENU key then press the
No. key 1to enter into the CLOCK SET mode.
™
Next set the hour by using the Direct Access
keys. Press "1"&"0" for "10".
£
Set the minutes using the Direct Access keys.
Press "3"&"0" for 30.
TV/VCRMENU CLEAR DISPLAY
EJECT
CH/TRK
SLOW/SHT
SPEED CM SKIP ATR 3S
END
START
123
456
789
100 INPUT
PLAY
REW
REC/OTR
FF
STOP
P/S
0
POWER
Time --:--
(hh:mm)
Date --/--/--
Press to cancel
MENU
CLOCK SET
Time 10:--
(hh:mm)
Date --/--/--
Press CLEAR to correct
Press MENU to cancel
CLOCK SET
Time 10:30
Date 1 5 / - - / - -
(dd/mm/yy)
Press CLEAR to correct
Press MENU to cancel
CLOCK SET
Time 10:30
Date 15/05/- -
(dd/mm/yy)
Press CLEAR to correct
Press MENU to cancel
CLOCK SET
Time 10:30
Date 1 5 / 0 5 / 0 0 (MON)
Press CLEAR to correct
Press MENU to set
CLOCK SET

¢After finishing the channel search process, the first channel appears automatically.
∞Press the CH/TRK key to check the memorized channels. (The memorized channels
are selected in order).
NOTE:
• Auto memory of channel by the AUTO CHANNEL SEARCH function is possible only
during broadcast.
Now Scanning Channel
Press to cancel
any key
02
™ADD
•Select a channel number to add by pressing the Direct Access keys.
(Example : Press “0”& “5” for “05”.)
•When you press the DISPLAY key, the selected channel will be
added.
•Press the MENU key three times to exit from the menus.
£REMOVE
•Select a channel number to remove by pressing the Direct Access
keys. (Example : Press “0”& “5” for “05”.)
•When you press the CLEAR key, the selected channel will be
removed.
•Press the MENU key three times to exit from the menus.
16
•Press the number key 3in the MENU mode to select
the CHANNEL SET mode.
•CABLE or ANTENNA indication will be changed by pressing the
number key 3in the CHANNEL SET mode.
SIGNAL TYPE SELECTION
1 Auto Channel Search
2 Add/Remove Channels
3 Signal Type:
Press to exit
MENU
CABLE
CHANNEL SET
• Turn on the TV and VCR and set the TV to 3CH or 4CH.
•Set the VCR to VCR mode by pressing the TV/VCR key on the remote
control if the VCR indication is not on the display panel.
•Press the MENU key then the MENU screen will appear.
•Press the No. key 3.
•CHANNEL SET screen will appear.
¡Press the number key 1in the CHANNEL SET screen to select AUTO
CHANNEL SEARCH mode.
™The scanning channel number appears on the TV screen.
£Wait until the channel numbers stop changing. This takes about one
or two minutes. The TV will then tune to the lowest channel found.
Pressing CH/TRK key will select only the active channels.
SETTING A TV CHANNELS
PREPARATION
AUTO CHANNEL SEARCH
1 Auto Channel Search
2 Add/Remove Channels
3 Signal Type: CABLE
Press to exit
MENU
CHANNEL SET
AUTO CHANNEL SEARCH
To memorize additional channel not set by the AUTO SEARCH
function and to remove the unnecessary channels.
¡Channel Selection
• Press the Number key 2in the CHANNEL SET screen to select
ADD/REMOVE CHANNELS mode.
ADD/REMOVE CHANNELS MANUALLY
Channel 05
is presently REMOVED
Press DISPLAY to add
Press MENU to exit
ADD/REMOVE CHANNELS
Channel 05
is presently ADDED
Press CLEAR to remove
Press MENU to exit
ADD/REMOVE CHANNELS

17
Follow the procedure all the way through the recording TV programs.
To have the correct hook-up, see pages 4-6.
Then set the VCR to the TV mode by pressing the TV/VCR key.
(The “REC” letter will be displayed on the Display Panel.)
Then select the TV channel you want to watch by using TV channel selector on the TV receiver.
Press the STOP key to STOP the recording.
PREPARATION
First, turn on the TV and set it to your VCR channel.
¡Loading
Load a cassette into VCR, making sure that the safety tab is intact.
The power will turn on automatically and the Tape In indicator }will light on the Display
Panel.
™Cable Mode
Select the CHANNEL SET mode from the MENU screen and select the CABLE mode by pressing
the number key 3.
£Channel Selection
Press the CHANNEL DIRECT ACCESS keys or the CH/TRK key to select the
channel you want to watch and record.
¢Speed Selection
Also select the speed at which you want to record – SP or LP – by using the SPEED key.
∞Recording
Press the REC/OTR key and the recording will start.
The “REC” letter appears on the Display Panel.
TO WATCH ONE CHANNEL AND RECORD ANOTHER
TO STOP RECORDING
TO RECORD A CABLE PROGRAM
PREPARATION
First, turn on the TV and set it to your VCR channel.
¡Loading
Load a cassette into VCR, making sure that the safety tab is intact.
The power will turn on automatically and the Tape In indicator }will light on the Display
Panel.
™VCR Mode
The VCR indicator automatically appears on the Display Panel when the VCR is turned on.
If it does not, press the TV/VCR key to display it.
£Channel Selection
Press the Channel Direct Access keys or the CH/TRK key to select the channel
you want to watch and record.
¢Speed Selection
Also select the speed at which you want to record – SP or LP – by using the SPEED key.
∞Recording
Press the REC/OTR key and the recording will start.
The “REC” letter appears on the Display Panel.
Press the P/S key to pause the recording if you want to avoid unwanted material. The “PAUS”
letter appears on the Display Panel.
Press the REC key to continue recording.
RECORDING TV PROGRAMS
TO WATCH & RECORD THE SAME CHANNEL
TO PAUSE
Note:
That the Pause function will be released after 5 minutes to prevent damage to the tape or
the VCR and the STOP mode will be entered automatically.
NOTE:
Since the VCR has its own TV tuner, it is not necessary to turn on the TV in order to make a
recording.
Turning on the TV merely allows confirmation of proper channel settings on your VCR.

The Programmable Timer Recording function allows you to record up to 8 different programs as
long as one year in advance. Once you have set the time for timer programming, VCR will record
automatically at the time you have preset.
There are four program modes:
One time : Record a program on any day you choose within one month (One Time Recording of
a single program)
Weekday : Record a program from Monday to Friday at the same time as you have preset
(MON-FRI).
Daily : Record a program from Monday to Saturday at the same time as you have preset
(MON-SAT).
Weekly : Record a program at the same time once a week.
Before setting your VCR to record a programme in advance make sure that the following
have been checked:
•The VCR is set to the VCR mode. Press the TV/VCR button and ensure that the VCR indicator
appears on the Display Panel.
•The clock is set to the correct current time.
•The safety tab is not missing from the cassette.
•The tape is long enough to record the desired programme.
EXAMPLE
For the purpose of this example we are assuming that the current time is 10:00 on 15 May 2000
and that we wish to record 20, May from 10:30 to 11:30 and the programme we wish to record is
on TV Channel 6.
NOTE:
If the Programming mode is selected when current time has not been set on the Clock, "Clock
must be set first" will appear on screen.
Preset contents can be corrected by using CLEAR key on the remote control.
The cursor box will move to previous step.
NORMAL TIMER RECORDING
18
¡MENU MODE
Press the MENU key on the remote control. The Menu screen
appears.
™TIMER RECORDING MODE
Press the Number key 2to enter the Timer Recording mode.
£ONE TIME PROGRAMMING MODE
To select the one time programming mode press the Number
key 1, 2, 3 or 4.
¢CHANNEL SETTING
Press the Direct Access keys to select the desired Channel
(06).
OPERATION 1 (SINGLE PROGRAMMING)
1 Make a New Program
2 Review/Cancel Programs
Press to exit
MENU
How often do you want
to record program?
1 One Time
2 Weekday (MON-FRI)
3 Daily (MON-SAT)
4 Weekly (Once a week)
Press to exit
MENU
(ONE TIME)
Channel - -
StartTime --:--
End Time - - : - -
StartDate --/--/--
Tape Speed SP
Press to exit
MENU
PROGRAM 1
TIMER RECORDING
1 CLOCK SET
2 TIMER RECORDINGS
3 CHANNEL SET
4 PREFERENCES
5 FUNCTIONS
6 SELECT LANGUAGE
Press to exit
MENU
MENU
(ONE TIME)
Channel 0 6 Antenna
StartTime --:--
End Time - - : - -
StartDate --/--/--
Tape Speed SP
Press CLEAR to correct
Press MENU to exit
PROGRAM 1

19
•MONTH SETTING
Press the Direct Access keys to set the Month (0,5 for May).
ªYEAR SETTING
Press the Direct Access keys to set the Year (0, 0 for 2000).
¡º SPEED SELECTION
Press the Direct Access key 1or 2to select the recording
speed SP or LP.
¡¡ ADDITIONAL PROGRAMMING
Press the MENU key and the following screen will appear.
For additional programming, repeat steps 2-10.
¡™ TIMER STAND-BY MODE
Press the POWER key and the Power will turn off and the
Timer REC indicator will light on the Display Panel.
∞ON TIME SETTING
Press the Direct Access keys on the remote control to set the
Hour (10).
Press the Direct Access keys to set the Minute (30).
§OFF TIME SETTING
Press the Direct Access keys to set the Hour (11).
Press the Direct Access keys to set the Minute (30).
Current Date and Year will be selected automatically.
*In this mode, if you press the MENU key, the program which is
selected current date and year will be saved as shown. You
can select the tape speed by pressing the SPEED key.
¶DATE SETTING
Press the Direct Access keys to set the Date (20).
Program 1 has been saved.
For program recordings, insert a
cassette and
turn the VCR off before the
program start.
Press to continue
MENU
(ONE TIME)
Channel 0 6 Antenna
StartTime 10:--
EndTime --:--
StartDate --/--/--
Tape Speed SP
Press CLEAR to correct
Press MENU to exit
PROGRAM 1
(ONE TIME)
Channel 0 6 Antenna
StartTime 10:30
EndTime --:--
StartDate --/--/--
Tape Speed SP
Press CLEAR to correct
Press MENU to exit
PROGRAM 1
(ONE TIME)
Channel 0 6 Antenna
StartTime 10:30
EndTime 11:--
StartDate --/--/--
Tape Speed SP
Press CLEAR to correct
Press MENU to exit
PROGRAM 1
(ONE TIME)
Channel 0 6 Antenna
StartTime 10:30
EndTime 11:30
Start Date 1 5 / 0 5 / 0 0 MON
Tape Speed SP
Press CLEAR to correct
Press MENU to save
PROGRAM 1
(ONE TIME)
Channel 0 6 Antenna
StartTime 10:30
EndTime 11:--
Start Date 2 0 / - - / - -
Tape Speed SP
Press CLEAR to correct
Press MENU to exit
PROGRAM 1
(ONE TIME)
Channel 0 6 Antenna
StartTime 10:30
EndTime 11:--
Start Date 2 0 / 0 5 / 0 0
Tape Speed SP
Press CLEAR to correct
Press MENU to exit
PROGRAM 1
(ONE TIME)
Channel 0 6 Antenna
StartTime 10:30
EndTime 11:--
Start Date 2 0 / 0 5 / 0 0 SAT
Tape Speed SP
1-SP 2-LP
Press CLEAR to correct
Press MENU to exit
PROGRAM 1
(ONE TIME)
Channel 0 6 Antenna
StartTime 10:30
EndTime 11:30
Start Date 2 0 / 0 5 / 0 0 SAT
Tape Speed SP
Press CLEAR to correct
Press MENU to save
PROGRAM 1
Table of contents