Milennia MIL-MR50 User manual

MIL-MR50
INSTRUCTION MANUAL
SD/USB/MP3/WMA PLAYER
AM/FM STEREO

DEAR CUSTOMERS:
Selecting fine audio equipment such as the unit you have just purchased is only the start of
your musical enjoyment. Now it is time to consider how you can maximize the fun and
excitement your equipment offers.
To establish a safe level:
Start your volume control at the lowest setting, and then slowly increase the sound until
you can hear it comfortably and clearly, and without distortion.
Once you have established a comfortable sound level, set the dial and leave it there.
Taking a moment to do this now will help to prevent hearing damage or loss in the future.
ABOUT THIS MANUAL
This product features a number of sophisticated functions ensuring superior reception and
operation. All are designed for the easiest possible use, but many are not self-explanatory.
This operation manual is intended to help you benefit fully from their potential and to
maximize your listening enjoyment.
We recommend that you familiarize yourself with the functions and their operation by
reading through the manual before you begin using this product. In this operation manual,
the Basic Operation for each sound source is outlined at the beginning of its explanation,
covering simple operation for that source, such as merely playing music.
FEATURES:
USB/SD/MP3/WMA MULTIMEDIA PLAYER
ELECTRONIC VOLUME CONTROL
INTRODUCTION/REPEAT/RANDOM PLAY CONTROLS
MONO/STEREO CONTROL
LOUDNESS CONTROL
MUTE CONTROL
EQ PRE-SETTING:POP,ROCK ,and CLASSIC
CLOCK(12/24 MODE)
LED INDICATORS
POWER OUTPUT:4X40W
Page 1

LOCATION AND FUNCTION OF CONTROLS
1. POWER
2. MUTE button
3. >>| TUNE/TRACK UP button
4. |<< TUNE/TRACK DOWN button
5. USB /MMC and SD sockets
6. AUX INPUT
7. Radio PRESET 6/Track+10
8. Radio PRESET 5/Track-10
9. Radio PRESET 4/Random mode
10. Radio PRESET 3/Repeat mode
11. Radio PRESET 2/INTRO mode
12. Radio PRESET1/PAUSE/PLAY button
13. Automatic Storage/Preset Scan
14. Radio BAND button
15. MODE button
16. CLOCK
17. STEREO/MONO button / EUR/US
FREQUENCY selection
18.VOLUME spindle knob
19. SELECT button
20. RESET button
Page 2

General Operation:
1. POWER ON/OFF
Press this button to turn the unit on. Press and hold to turn the unit off.
2. MUTE BUTTON
Press this button to mute the volume in any mode. Press it again to cancel mute. While in
the muted state, the words “MUTE ON” will display.
3 & 4.TUNE, TRACK UP / DOWN BUTTONS
Media mode:
Press the >>| button briefly to play next track. Press the |<< button briefly to play the
previous track. Press and hold the >>| or |<< button to fast-forward / fast-reverse the
current track.
5.USB PORT / SD SLOT
Provided is a USB port to accommodate most simple MP3 players including flash drives.
Also provided is a SD slot. Both are capable of playing WMA and MP3 formatted music.
Caution: Do not force USB devices or SD cards. If resistance is encountered, flip the USB
device/connector/SD card over and try again. Note, not all USB devices will fit into this slot.
Maximum USB device dimensions are 13/16’ wide X 1/2’ tall or 20mm wide X 13mm tall.
6. AUX INPUT
A front auxiliary input jack is provided to accommodate other listening devices through the
earphone jack should your favorite device not have USB capabilities or not be USB
compatible with the MR50.
7. TRACK+10
In USB or SD mode, use this button to advance 10 tracks at a time.
8. TRACK-10
In USB or SD mode, use this button to go back 10 tracks at a time.
9.RANDOM BUTTON
In USB/SD mode, press the RDM button to hear all tracks played in random order. Press
the button again to cancel random mode.
10.REPEAT BUTTON
1.) REPEAT ONE: In USB or SD mode, press the RPT button to play the current
track repeatedly. “REPEAT ONE” will display briefly upon entering this mode.
2.) REPEAT ABM: Press the RPT button again to repeat all tracks from the current
album. “REPEAT ABM” will display briefly upon entering this mode.
3.) To cancel repeat mode, press the RPT button again until “REPEAT OFF”
displays.
11.INTRO BUTTON
In USB/SD mode, press the INT button to sample the first 10 seconds of each track. Press
the button again for normal play.
12.PAUSE BUTTON
In USB/SD mode, press the >II button to pause play. Press again to resume play.
Page 3

13. APS BUTTON (Auto-storage /Preset scan)
1) In radio mode, press and hold for more than 3 seconds; the radio searches the
first 6 stations of sufficient signal strength and stores them in the corresponding
preset number. The auto-storage operation is implemented separately in each
selected band.
2) Press the APS button briefly and the radio searches for each preset station in
the current band. When you have reached the desired station, press the APS
button again to stop scanning.
14. BAND BUTTON
While in radio mode, press the BND button briefly to select the radio broadcasting bands:
->FM 1-> FM 2 -> FM 3 -> AM 1->AM 2
15. MODE BUTTON
Press the MODE button to change from TUNER (radio), SD, USB, or AUX mode.
16. CLK button: see CLOCK DISPLAY AND TIME ADJUSTMENT under the system
settings section
17a. MONO/STEREO BUTTON
In FM mode, press the ST briefly to select stereo or mono sound mode.
17b. US/EUROPEAN FREQUENCY SELECTION
In radio mode, press and hold the ST button until the unit shuts down. Upon turning the
unit back on, the radio will automatically be in the alternate frequency.
18.VOLUME CONTROL
The volume level can be adjusted at any time by rotating the VOL knob.
19. SELECT BUTTON:
Activated by pressing the volume knob. See System settings for usage.
20. RESET BUTTON
Press this button with a small object (like a paper clip) when the operation keys do not
work or the display becomes confused. This operation will erase the clock setting and
some stored contents but should correct the problem.
System settings:
SELECT button (19)
When the button is briefly pressed, the following features are available for adjustment:
-> VOLUME ->BASS ->TREBLE -> BALANCE -> FADER ->
Briefly press the SELECT button to navigate to the next feature.
After selecting the desired feature, rotate the volume knob to adjust.
When the button is pressed and held for 2 seconds, the following features are available:
BEEP(OFF/ON)-USERSET(FLAT/CLASSIC/ROCK/POP)
--VOLLAST(VOLOEFA)-LOUD(OFF/ON)-CLK(OFF/ON)-CLK(24/12)
Briefly press the SELECT button to navigate to the next feature.
After selecting the desired feature, rotate the volume knob to adjust.
The settings are immediately accepted and unit will return to normal playing mode if no
further selection or adjustment is made within three seconds.
Page 4

CLK button (16) - CLOCK DISPLAY AND TIME ADJUSTMENT
1) To view the current time, press the CLK button briefly.
2) To set the time, press and hold the CLK button unit the time begins to flash on
the display. While still flashing, use the volume knob to adjust the time. A counter-
clockwise rotation adjusts the hour and clockwise rotation adjusts the minutes. To
accept the new time, allow setting mode to expire in two seconds or simply press
the CLK button once again.
3) To choose from 12-hour or 24-hour mode, press and hold the SELECT button
for two seconds until the words “BEEP OFF” appear on the display. Briefly press
the knob again repeatedly until “CLK 12” or “CLK 24” shows on the display. Rotate
the volume knob to make the selection and wait for the display to return to normal.
4) To display the clock while unit is off, press and hold the SELECT button for two
seconds until the words “BEEP OFF” appear on the display. Briefly press the
button again repeatedly until the words “CLK ON” appear on the display. Use the
volume knob to toggle between on/off and wait for the display to return to normal.
Repeat to turn the feature off.
BASS, TRBLE, BALANCE or FADE controls: briefly press the SELECT button repeatedly
until the desire feature shows on the display. Rotate the volume knob to adjust.
BEEP on/off: press and hold the SELECT button for 2 seconds until the words “BEEP ON”
or BEEP OFF” shows on the display. Use the volume knob to toggle between on/off.
EQ - choose from POP, ROCK, CLASSIC, or FLAT: press and hold the SELECT button for
2 seconds until the words “BEEP ON” or BEEP OFF” is seen on the display. Press again
briefly until the word “USERSET” displays. Use the volume knob to adjust.
VOLUME LAST / VOLUME DEFAULT
1.) To choose from VOLUME LAST or VOLUME DEFAULT, press and hold the
SELECT button for 2 seconds until the words “BEEP ON” or “BEEP OFF” shows
on the display. Press again briefly and repeatedly until the word “VOLUME LAST”
or “VOLUME DEFA” displays. Use the volume knob to make the choice.
2.) If VOLUME DEFAULT is preferred, press and hold the SELECT button again
for 2 seconds until the words “BEEP ON” or “BEEP OFF” shows on the display.
Press again briefly and repeatedly until the word “AVOL” is displayed and use the
volume knob to once again adjust. The unit will default to this setting each time it is
turned on.
3.) If VOLUME LAST is chosen, no further action is needed. Upon powering up,
the unit will return to the volume level last listened to before being turned off.
LOUDNESS on/off: press and hold the SELECT button for 2 seconds until the words
“BEEP ON” or BEEP OFF” shows on the display. Press again briefly and repeatedly until
the word “LOUD ON” or “LOUD OFF” displays. Use the volume knob to make the choice.
Page 5
PRECAUTIONS AND MAINTENANCE
1. If the interior is extremely hot, as after being in the sun, do not use the unit until cooled
off.
2. The unit is designed for negative terminal of the battery which is connected to the
vehicle. Please confirm it before installation.
3. Do not allow the speaker wires to be shorted together when the unit is switched on.
Otherwise it may overload or burn out the power amplifier.
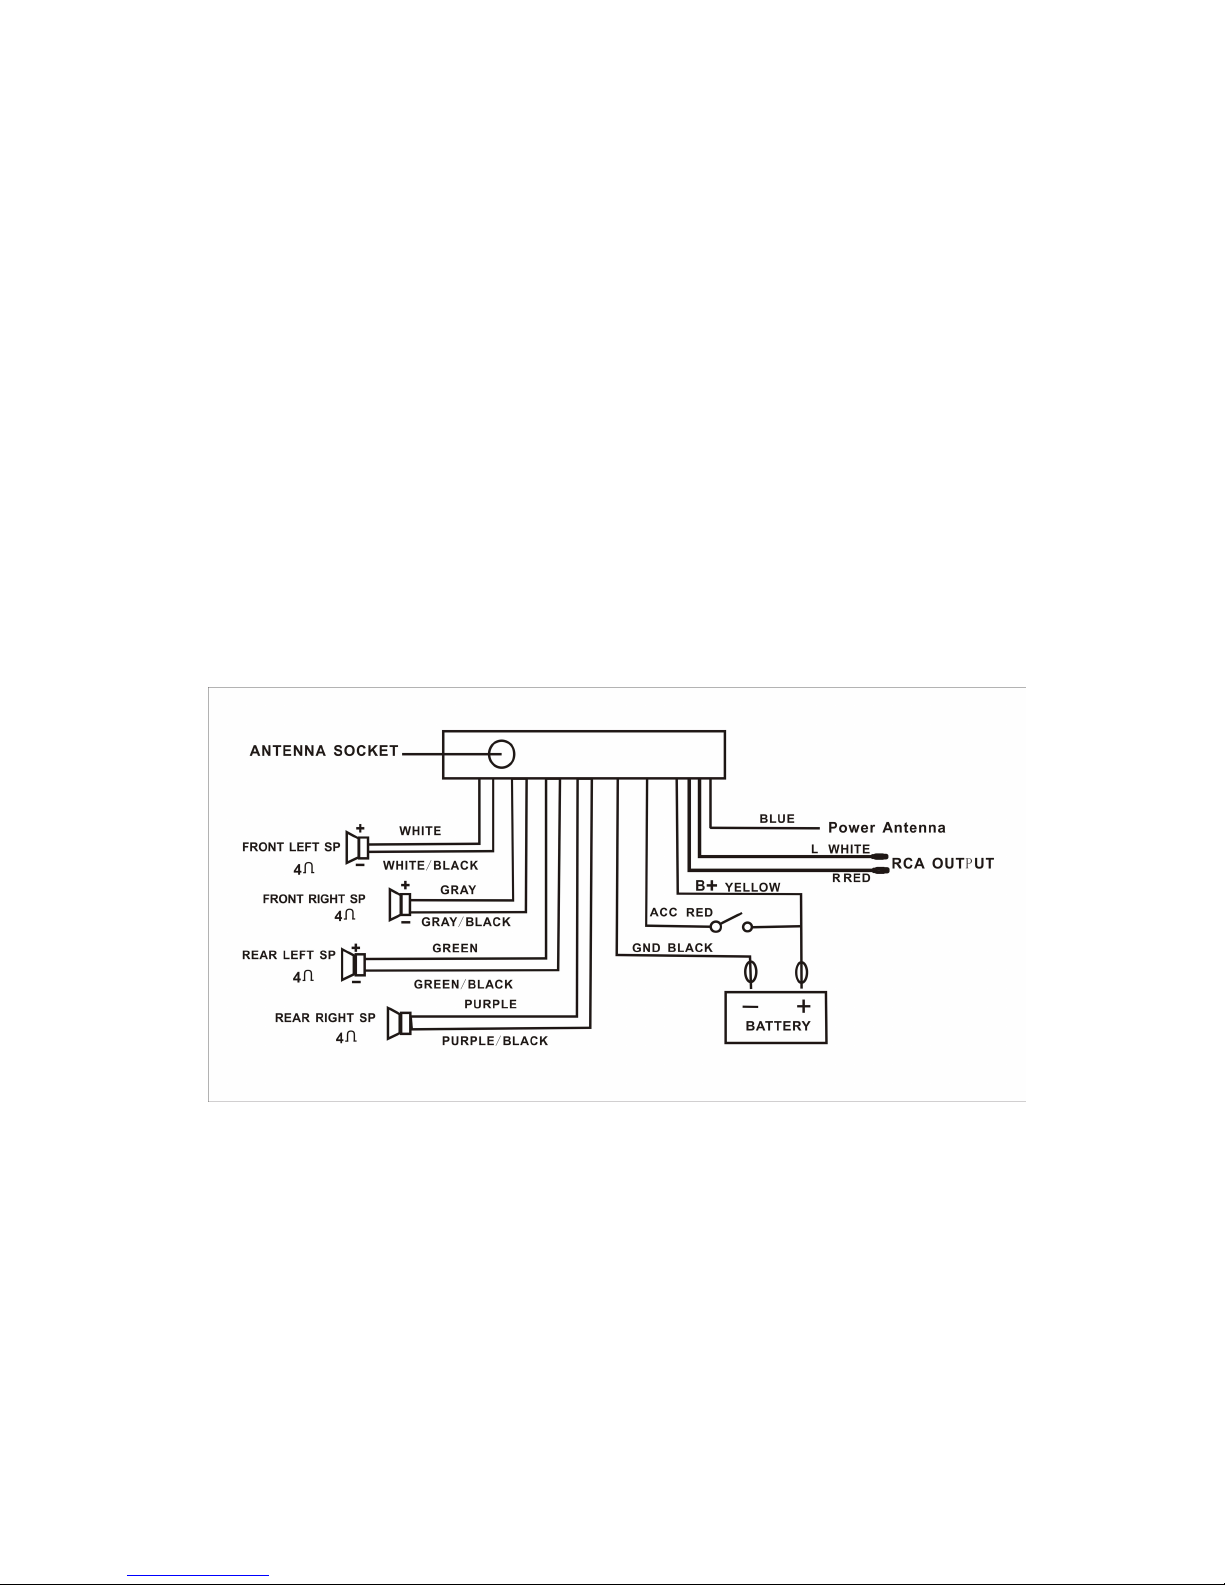
WIRE CONNECTIONS
Please connect as shown below. Do not allow the speaker wire positive and ground to
touch each other.
Page 6

SPECIFICATION
GENERAL
Supply Voltage DC 12 V. Negative Ground
Current Consumption Max.10A
Power Output 40W X 4
Number of channels 2 STEREO channels.
Unit Dimensions 178[W] X 157[D] X 50[H] mm.
FM SECTION
Frequency range 87.5MHz -108MHz / 87.5MHZ-107.9MHZ
Effective sensitivity 10uV.
I.F Frequency 10.7MHz.
AM SECTION
Frequency range 522KHz - 1620KHz/ 530KHZ-1710HZ
I.F Frequency 450KHz
RCA LINE OUT (OPTION)
Output 2000mV MAX.
MP3/WMA PLAYER
System audio system.
Frequency characteristics 20Hz-100Hz<8dB 10KHz-20KHz<8dB.
Page 7
Table of contents
Other Milennia Car Receiver manuals


