manuals.online logo
Brands
  1. Home
  2. •
  3. Brands
  4. •
  5. Milwaukee
  6. •
  7. Impact Driver
  8. •
  9. Milwaukee M18 FMTIW2P12 User manual

Milwaukee M18 FMTIW2P12 User manual

This manual suits for next models

3

Other Milwaukee Impact Driver manuals

Milwaukee M18 FUEL 2953-20 User manual

Milwaukee

Milwaukee M18 FUEL 2953-20 User manual

Milwaukee M18 ONEID2 User manual

Milwaukee

Milwaukee M18 ONEID2 User manual

Milwaukee M18 2650-20 User manual

Milwaukee

Milwaukee M18 2650-20 User manual

Milwaukee M18 BLID2 User manual

Milwaukee

Milwaukee M18 BLID2 User manual

Milwaukee M18 FUEL 2766-20 User manual

Milwaukee

Milwaukee M18 FUEL 2766-20 User manual

Milwaukee M18 2850-20 User manual

Milwaukee

Milwaukee M18 2850-20 User manual

Milwaukee M18 FIWP12 User manual

Milwaukee

Milwaukee M18 FIWP12 User manual

Milwaukee M18 FUEL 2762-20 User manual

Milwaukee

Milwaukee M18 FUEL 2762-20 User manual

Milwaukee M18 FUEL 2769-20 User manual

Milwaukee

Milwaukee M18 FUEL 2769-20 User manual

Milwaukee M12 FUEL 2452-20 User manual

Milwaukee

Milwaukee M12 FUEL 2452-20 User manual

Milwaukee 58-01-0520 User manual

Milwaukee

Milwaukee 58-01-0520 User manual

Milwaukee M18 FUEL SURGE 2760-20 User manual

Milwaukee

Milwaukee M18 FUEL SURGE 2760-20 User manual

Milwaukee 9078-20 User manual

Milwaukee

Milwaukee 9078-20 User manual

Milwaukee 9058-1 Guide

Milwaukee

Milwaukee 9058-1 Guide

Milwaukee M18 FUEL ONE-KEY ONEID3 User manual

Milwaukee

Milwaukee M18 FUEL ONE-KEY ONEID3 User manual

Milwaukee HD 18 HIW User manual

Milwaukee

Milwaukee HD 18 HIW User manual

Milwaukee 9078-20 User manual

Milwaukee

Milwaukee 9078-20 User manual

Milwaukee 9057-1 Guide

Milwaukee

Milwaukee 9057-1 Guide

Milwaukee M18 FUEL 2769-22 User manual

Milwaukee

Milwaukee M18 FUEL 2769-22 User manual

Milwaukee 2762-20 User manual

Milwaukee

Milwaukee 2762-20 User manual

Milwaukee M18 FUEL ONE-KEY ONEID2 User manual

Milwaukee

Milwaukee M18 FUEL ONE-KEY ONEID2 User manual

Milwaukee M12 BID User manual

Milwaukee

Milwaukee M12 BID User manual

Milwaukee M18 BIW12 User manual

Milwaukee

Milwaukee M18 BIW12 User manual

Milwaukee M18 FUEL 2769-20 User manual

Milwaukee

Milwaukee M18 FUEL 2769-20 User manual

Popular Impact Driver manuals by other brands

Ryobi RDP102L manual

Ryobi

Ryobi RDP102L manual

Ingersoll-Rand 2171 Product information

Ingersoll-Rand

Ingersoll-Rand 2171 Product information

stayer IW500D operating instructions

stayer

stayer IW500D operating instructions

Makita DTD152 instruction manual

Makita

Makita DTD152 instruction manual

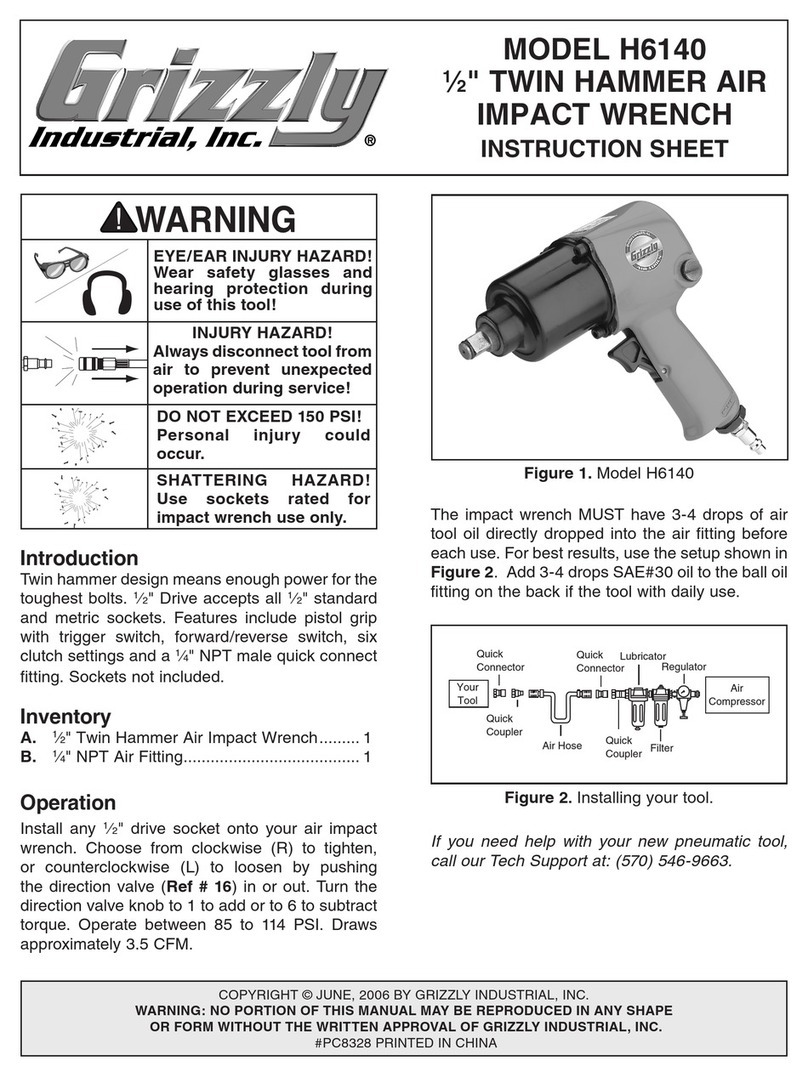
Grizzly H6140 instruction sheet

Grizzly

Grizzly H6140 instruction sheet

Makita BTW450 user manual

Makita

Makita BTW450 user manual

Ozito LID-3000 instruction manual

Ozito

Ozito LID-3000 instruction manual

Ryobi R18IW3 Original instructions

Ryobi

Ryobi R18IW3 Original instructions

Sthor 57091 manual

Sthor

Sthor 57091 manual

Greenlee HW3 Service manual

Greenlee

Greenlee HW3 Service manual

Makita DTD145 instruction manual

Makita

Makita DTD145 instruction manual

Makita BTP131RFE instruction manual

Makita

Makita BTP131RFE instruction manual

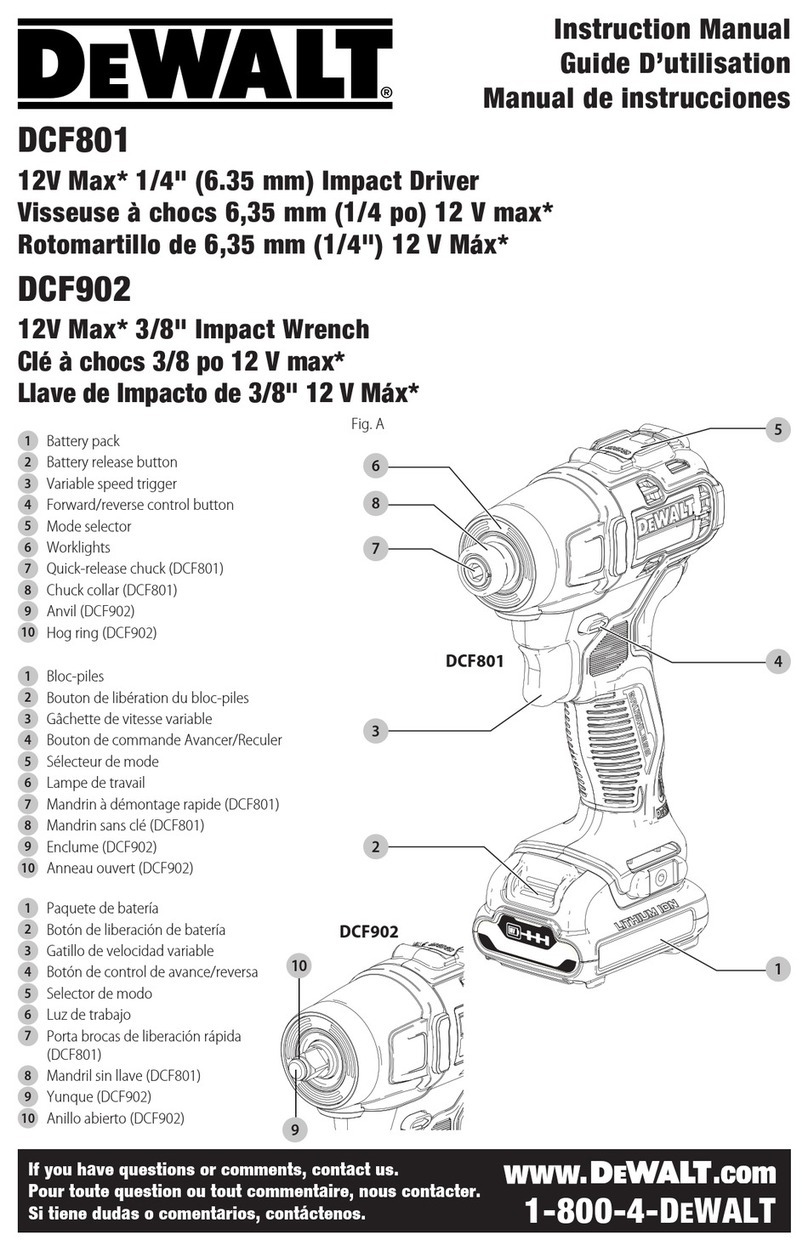
DeWalt XR Li-ion DCF902 instruction manual

DeWalt

DeWalt XR Li-ion DCF902 instruction manual

Stanley FATMAX SBI810 Original instructions

Stanley

Stanley FATMAX SBI810 Original instructions

Sealey CP650LIHV manual

Sealey

Sealey CP650LIHV manual

Sunex Tools SX505A-8 operating instructions

Sunex Tools

Sunex Tools SX505A-8 operating instructions

Facom NJ.1400F 826558 Original instructions

Facom

Facom NJ.1400F 826558 Original instructions

MAG TOOLS MCF894 instruction manual

MAG TOOLS

MAG TOOLS MCF894 instruction manual

manuals.online logo
manuals.online logoBrands
  • About & Mission
  • Contact us
  • Privacy Policy
  • Terms and Conditions

Copyright 2025 Manuals.Online. All Rights Reserved.

Original instructions
Originalbetriebsanleitung
Notice originale
Istruzioni originali
Manual original
Oorspronkelijke
gebruiksaanwijzing
Original brugsanvisning
Original bruksanvisning
Bruksanvisning i original
Alkuperäiset ohjeet
  
Orijinal iletme talimatı
Pvodním návodem k
používání
Pôvodný návod na použitie
Instrukcjoryginaln
Eredeti használati utasítás
Izvirna navodila
Originalne pogonske upute
Instrukcijm oriinlvalod
Originali instrukcija
Algupärane kasutusjuhend
 
 
  

Instruciuni de folosire
originale
  

  
ї
 
M18 FMTIW2P12
M18 FMTIW2F12
2 3
ENGLISH 1 2 3 Picture section
with operating description and functional description Text section with Technical Data, important Safety and Working Hints
and description of Symbols
DEUTSCH 1 2 3 Bildteil
mit Anwendungs- und Funktionsbeschreibungen Textteil mit Technischen Daten, wichtigen Sicherheits- und Arbeitshinweisen
und Erklärung der Symbole.
FRANÇAIS 1 2 3 Partie imagée
avec description des applications et des fonctions Partie textuelle avec les données techniques, les consignes importantes de sécurité et de travail ainsi que
l’explication des pictogrammes.
ITALIANO 1 2 3 Sezione illustrata
con descrizione dell'applicazione e delle funzioni Sezione testo con dati tecnici, importanti informazioni sulla sicurezza e sull‘utilizzo,
spiegazione dei simboli.
ESPAÑOL 1 2 3 Sección de ilustraciones
con descripción de aplicación y descripción funcional Sección de texto con datos técnicos, indicaciones importantes de seguridad y trabajo y explicación de los
símbolos.
PORTUGUES
1 2 3 Parte com imagens
explicativas contendo descrição operacional e funcional Parte com texto explicativo contendo Especificações técnicas, Avisos de segurança e de operação e a Descrição
dos símbolos.
NEDERLANDS
1 2 3 Beeldgedeelte
met toepassings- en functiebeschrijvingen Tekstgedeelte met technische gegevens, belangrijke veiligheids- en arbeidsinstructies en verklaring van de
symbolen.
DANSK 1 2 3 Billeddel
med anvendelses- og funktionsbeskrivelser Tekstdel med tekniske data, vigtige sikkerheds- og arbejdsanvisninger
og symbolforklaring.
NORSK 1 2 3 Bildedel
med bruks- og funksjonsbeskrivelse Tekstdel med tekniske data, viktige sikkerhets- og arbeidsinstruksjoner
og forklaring av symbolene.
SVENSKA 1 2 3 Bilddel
med användnings- och funktionsbeskrivning Textdel med tekniska informationer, viktiga säkerhets- och användningsinstruktioner
samt symbolförklaringar.
SUOMI 1 2 3 Kuvasivut
käyttö- ja toimintakuvaukset Tekstisivut: tekniset tiedot, tärkeät turvallisuus- ja työskentelyohjeet
sekä merkkien selitykset.
ΕΛΛΗΝΙΚΑ 1 2 3  
         ,   
     .
TÜRKÇE 1 2 3 Resim bölümü
Uygulama ve fonksiyon açıklamalarıile birlikte Teknik bilgileri, önemli güvenlik ve çalıma açıklamalarınıve de sembollerin açıklamalarını
içeren metin bölümü.
ČESKY 1 2 3 Obrazová ást
s popisem aplikací a funkcí Textová ást s technickými daty, dležitými bezpenostními a pracovními pokyny
a s vysvtlivkami symbol
SLOVENSKY
1 2 3 Obrazová ass popisom aplikácií a funkcií Textová ass technickými dátami, dôležitými bezpenostnými a pracovnými pokynmi
a s vysvetlivkami symbolov
POLSKI 1 2 3 Cz rysunkowa z opisami zastosowania i dziaania Cz opisowa z danymi technicznymi, wanymi wskazówkami dotyczcymi bezpieczestwa i pracy oraz
objanieniami symboli.
MAGYAR 1 2 3 Képes részalkalmazási- és mködési leírásokkal Szöveges rész mszaki adatokkal, fontos biztonsági- és munkavégzési útmutatásokkal, valamint a szimbólumok
magyarázata.
SLOVENSKO
1 2 3 Del slikez opisom uporabe in funkcij Del besedila s tehninimi podatki, pomembnimi varnostnimi opozorili in delovnimi navodili
in pojasnili simbolov.
HRVATSKI 1 2 3 Dio sa slikamasa opisima primjene i funkcija Dio štiva sa tehnikim podacima, važnim sigurnosnim i radnim uputama
i objašnjenjem simbola.
LATVISKI 1 2 3 Attla daa ar lietošanas un funkciju aprakstiem Teksta daa ar tehniskajiem parametriem, svargiem drošbas un darbbas nordjumiem,
simbolu atšifrjumiem.
LIETUVIŠKAI
1 2 3 Paveiksllio dalissu vartojimo instrukcija ir funkcijaprašymais Teksto dalis su techniniais duomenimis, svarbiomis saugumo ir darbo instrukcijomis
bei simbolipaaiškinimais.
EESTI 1 2 3 Pildiosa kasutusjuhendi ja funktsioonide kirjeldusega Tekstiosa tehniliste näitajate, oluliste ohutus- ja tööjuhenditega
ning sümbolite kirjeldustega.
РУССКИЙ 1 2 3       ,   ,     
,    .
БЪЛГАРСКИ
1 2 3           ,     
  .
ROMÂNIA 1 2 3 Secvena de imagine cu descrierea utilizrii i a funcionrii Poriune de text cu date tehnice, indicaii importante privind sigurana i modul de lucru
i descrierea simbolurilor.
МАКЕДОНСКИ 1 2 3            ,    
  .
УКРАЇНСЬКА 1 2 3          ,      
 .
ﻲﺑرﻋ 1 2 3                  
4
4
4
4
4
4
4
4
4
4
4
4
4
4
4
4
4
4
4
4
4
4
4
4
4
4
4
4
16
19
22
25
28
31
34
37
40
43
46
49
52
55
58
61
64
67
70
73
76
79
82
85
88
91
94
99
4 5
6
10
14
11
13
12
8
9
START
STOP
M18 FMTIW2P12
M18 FMTIW2F12
6 7
Remove the battery pack
before starting any work on the
machine.
Vor allen Arbeiten an der
Maschine den Wechselakku
herausnehmen
Avant tous travaux sur la machine retirer
l’accu interchangeable.
Prima di iniziare togliere la batteria dalla
macchina.
Retire la batería antes de comenzar
cualquier trabajo en la máquina.
Antes de efectuar qualquer intervenção na
máquina retirar o bloco acumulador.
Voor alle werkzaamheden aan de machine
de akku verwijderen.
Ved arbejde inden i maskinen, bør batteriet
tages ud.
Ta ut vekselbatteriet før du arbeider på
maskinen
Drag ur batteripaket innan arbete utföres på
maskinen.
Tarkista pistotulppa ja verkkojohto
mahdollisilta vauriolta. Viat saa korjata vain
alan erikoismies.
Ðñéí áðü êÜèå åñãáóßá óôç ìç÷áíÞ
áöáéñåßôå ôçí áíôáëëáêôéêÞ ìðáôáñßá.
Aletin kendinde bir çalıma yapmadan önce
kartuaküyü çıkarın.
Ped zahájením veškerých prací na vrtacím
šroubováku vyjmout výmnný akumulátor.
Pred každou prácou na stroji výmenný
akumulátor vytiahnu.
Przed przystpieniem do jakichkolwiek prac
na elektronarzdziu naley wyj wkadk
akumulatorow.
Karbantartás, javítás, tisztítás, stb. eltt az
akkumulátort ki kell venni a készülékbl.
Pred deli na stroju izvlecite izmenljivi
akumulator.
Prije svih radova na stroju izvaditi bateriju za
zamjenu.
Pirms mašnai veikt jebkda veida apkopes
darbus, ir jizem rakumultors.
Prieš atlikdami bet kokius darbus renginyje,
išimkite keiiamakumuliatori.
Enne kõiki töid masina kallal võtke vahetatav
aku välja.
Bûíüòå àêêóìóëÿòîð èç ìàøèíû ïåðåä
ïðîâåäåíèåì ñ íåé êàêèõ-ëèáî
ìàíèïóëÿöèé.
     
   .
Scoatei acumulatorul înainte de a începe
orice intervenie pe main.
    
    .
 -   
   .
.          
1
1
2
2
click
78-100 %
55-77 %
33-54 %
10-32 %
< 10 %
8 9
1
2
click
M18 FMTIW2P12 M18 FMTIW2F12
10 11
START
STOP
12 13
LOCK
Handle (insulated gripping surface)
Handgri󰀨(isolierte Gri󰀨fläche)
Poignée (surface de prise isolée)
Impugnatura (superficie di presa
isolata)
Empuñadura (superficie de agarre
con aislamiento)
Manípulo (superfície de pega isolada)
Handgreep (geïsoleerd)
Håndtag (isolerede gribeflader)
Håndtak (isolert gripeflate)
Handtag (isolerad greppyta)
Kahva (eristetty tarttumapinta)
 ( 
)
El kulpu (izolasyonlu tutma yüzeyi)
Rukoje(izolovaná uchopovací
plocha)
Rukovä(izolovaná úchopná plocha)
Uchwyt (z izolowanpowierzchni)
Fogantyú (szigetelt fogófelület)
Roaj (izolirana prijemalna površina)
Rukohvat (izolirana površina za
držanje)
Rokturis (izolta satveršanas virsma)
Rankena (izoliuotas rankenos
paviršius)
Käepide (isoleeritud pideme piirkond)
 (
 )
 ( 
 )
Mâner (suprafa de prindere izolat)
 ( )
 (  )
(  ) 
0-1250 0-1950 0-2575 0-1325
0-1250 0-1950 0-2575 0-1325
0-900 0-2100 0-3100 -
0-900 0-2100 0-3100 -
M18 FMTIW2P12 min-1
M18 FMTIW2F12 min-1
M18 FMTIW2P12
M18 FMTIW2F12
14 15
1
2
16 17
M18 FMTIW2P12 M18 FMTIW2F12
..................... 4777 19 01... .............4777 08 01...
...000001-999999 ...000001-999999
....................0-1250 min-1..................0-1250 min-1
......................0-900 min-1....................0-900 min-1
......................0-475 Nm......................0-475 Nm
....................0-1950 min-1..................0-1950 min-1
....................0-2100 min-1..................0-2100 min-1
......................0-610 Nm......................0-610 Nm
....................0-2575 min-1..................0-2575 min-1
....................0-3100 min-1..................0-3100 min-1
......................0-745 Nm......................0-745 Nm
....................0-1325 min-1..................0-1325 min-1
..............................- ...................................-
...........................47 Nm...........................47 Nm
.........................745 Nm.........................745 Nm
........................M22 .............................M22
............... 1/2" (12,7 mm) ............. 1/2" (12,7 mm)
...........................18 V ..............................18 V
................2,0 ... 3,1 kg..................2,0 ... 3,1 kg
............................................-18...+50 °C
................................... M18B..., M18HB...
..................................M12-18..., M1418C6
........................95,4 dB (A) ...................95,4 dB (A)
......................106,4 dB (A) .................106,4 dB (A)
........................17,3 m/s2.......................17,4 m/s2
..........................1,5 m/s2.........................1,5 m/s2
ENGLISH
Chips and splinters must not be removed while the
machine is running.
When working in walls ceiling, or floor, take care to avoid
electric cables and gas or waterpipes.
Clamp your workpiece with a clamping device. Unclamped
workpieces can cause severe injury and damage.
Remove the battery pack before starting any work on the
machine.
Do not dispose of used battery packs in the household
refuse or by burning them. Milwaukee Distributors o󰀨er to
retrieve old batteries to protect our environment.
Do not store the battery pack together with metal objects
(short circuit risk).
Use only System M18 chargers for charging System M18
battery packs. Do not use battery packs from other
systems.
Never break open battery packs and chargers and store
only in dry rooms. Keep dry at all times.
Battery acid may leak from damaged batteries under
extreme load or extreme temperatures. In case of contact
with battery acid wash it o󰀨immediately with soap and
water. In case of eye contact rinse thoroughly for at least
10 minutes and immediately seek medical attention.
Warning! To reduce the risk of fire, personal injury, and
product damage due to a short circuit, never immerse your
tool, battery pack or charger in fluid or allow a fluid to flow
inside them. Corrosive or conductive fluids, such as
seawater, certain industrial chemicals, and bleach or
bleach containing products, etc., can cause a short circuit.
SPECIFIED CONDITIONS OF USE
The cordless impact wrench can be used to tighten and
loosen nuts and bolts wherever no mains connection is
available.
Do not use this product in any other way as stated for
normal use.
RPM SETTING
The function is designed to give the user greater control
in application and reduce damage to the fastener or work
surface by automatically shutting the tool o󰀨after the tool
senses the mechanism impacting for approximately one
second.
EC-DECLARATION OF CONFORMITY
We declare under our sole responsibility that the product
described under “Technical Data” fulfills all the relevant
regulations and the directives 2011/65/EU (RoHS),
2014/30/EU, 2006/42/EC, and the following harmonized
standards have been used:
EN 62841-1:2015
EN 62841-2-2:2014
EN 55014-1:2017+A11:2020
EN 55014-2:2015
EN IEC 63000:2018
Winnenden, 2020-05-25
Alexander Krug
Managing Director
Authorized to compile the technical file.
Techtronic Industries GmbH
Max-Eyth-Straße 10
71364 Winnenden
Germany
OPERATION
Note: It is recommended after fastening to always
check the torque with a torque wrench.
The fastening torque is a󰀨ected by a wide variety of factors
including the following.
• State of battery charge – When the battery is discharged
voltage will drop and the fastening torque will be reduced.
• Operation at speeds – Operating the tool at low speeds
will cause a reduction in fastening torques.
• Fastening position – Holding the tool or the driving
fastener in various angles will a󰀨ect the torque.
• Drive accessory/socket – Failure to use the correct size
accessory or socket, or a non-impact rated accessory
may cause a reduction in the fastening torque.
• Use of accessories and extensions – Depending on the
accessory or extension fitment can reduce the fastening
force of the impact wrench.
• Bolt/Nut – Fastening torques may di󰀨er according to the
diameter of the nut or bolt, the class of nut/bolt and the
length of nut/bolt.
• Condition of the fastener – Contaminated, corroded, dry
or lubricated fasteners may vary the fastening torques.
• Condition and base material – The base material of the
fastener and any component in between the surfaces
may e󰀨ect the fastening torque (dry or lubricated base,
soft or hard base, disc, seal or washer between fastener
and base material).
IMPACTING TECHNIQUES
The longer a bolt, screw, or nut is impacted, the tighter it
will become.
To help prevent damaging the fasteners or workpieces,
avoid excessive impacting.
Be particularly careful when impacting smaller fasteners
because they require less impacting to reach optimum
torque.
Practice with various fasteners, noting the length of time
required to reach the desired torque.
Check the tightness with a hand-torque wrench.
If the fasteners are too tight, reduce the impacting time.
If they are not tight enough, increase the impacting time.
Oil, dirt, rust or other matter on the threads or under the
head of the fastener a󰀨ects the degree of tightness.
The torque required to loosen a fastener averages 75% to
80% of the tightening torque, depending on the condition of
the contacting surfaces.
On light gasket jobs, run each fastener down to a relatively
light torque and use a hand torque wrench for final
tightening.
BATTERIES
Battery packs which have not been used for some time
should be recharged before use.
Temperatures in excess of 50°C (122°F) reduce the
performance of the battery pack. Avoid extended exposure
to heat or sunshine (risk of overheating).
The contacts of chargers and battery packs must be kept
clean.
For an optimum life-time, after use, the battery packs have
to be fully charged.
To obtain the longest possible battery life remove the
battery pack from the charger once it is fully charged.
For battery pack storage longer than 30 days:
Store the battery pack where the temperature is below
27°C and away from moisture
Store the battery packs in a 30% - 50% charged condition
Every six months of storage, charge the pack as normal.
ENGLISH
TECHNICAL DATA CORDLESS IMPACT SCREWDRIVER
Production code.....................................................................
No-load speed................................................
Impact range ..................................................
Torque ............................................................
No-load speed................................................
Impact range ..................................................
Torque ............................................................
No-load speed................................................
Impact range ..................................................
Torque ............................................................
No-load speed................................................
Impact range ..................................................
Torque ............................................................
Torque max............................................................................
Max. diameter bolt / nut.........................................................
Tool reception ........................................................................
Battery voltage.......................................................................
Weight according EPTA-Procedure 01/2014 (2.0 ... 12.0 Ah)
Recommended ambient operating temperature....................
Recommended battery types.................................................
Recommended charger.........................................................
Noise/vibration information
Measured values determined according to EN 62841.
Typically, the A-weighted noise levels of the tool are:
Sound pressure level (Uncertainty K=3dB(A)) ......................
Sound power level (Uncertainty K=3dB(A))...........................
Wear ear protectors!
Total vibration values (vector sum in the three axes)
determined according to EN 62841.
Vibration emission value ah
Impact tightening of fasteners of the maximum capacity of the tool
Uncertainty K=....................................................................
WARNING Read all safety warnings, instructions,
illustrations and specifications provided with this
power tool. Failure to follow all instructions listed below
may result in electric shock, fire and/or serious injury.
Save all warnings and instructions for future reference.
IMPACT SCREWDRIVER SAFETY WARNINGS
Hold the power tool by insulated gripping surfaces,
when performing an operation where the fastener may
contact hidden wiring. Fasteners contacting a „live“ wire
may make exposed metal parts of the power tool „live“ and
could give the operator an electric shock.
Wear ear protectors. Exposure to noise can cause
hearing loss.
ADDITIONAL SAFETY AND WORKING INSTRUCTIONS
Use protective equipment. Always wear safety glasses
when working with the machine. The use of protective
clothing is recommended, such as dust mask, protective
gloves, sturdy non-slip footwear, helmet and ear defenders.
The dust produced when using this tool may be harmful to
health. Do not inhale the dust. Wear a suitable dust
protection mask.
Do not machine any materials that present a danger to
health (e.g. asbestos).
Switch the device o󰀨immediately if the insertion tool stalls!
Do not switch the device on again while the insertion tool is
stalled, as doing so could trigger a sudden recoil with a
high reactive force. Determine why the insertion tool stalled
and rectify this, paying heed to the safety instructions.
The possible causes may be:
• it is tilted in the workpiece to be machined
• it has pierced through the material to be machined
• the power tool is overloaded
Do not reach into the machine while it is running.
The insertion tool may become hot during use.
WARNING! Danger of burns
• when changing tools
• when setting the device down
WARNING
The vibration and noise emission level given in this information sheet has been measured in accordance with a standardized
test given in EN 62841 and may be used to compare one tool with another. It may be used for a preliminary assessment of
exposure.
The declared vibration and noise emission level represents the main applications of the tool. However if the tool is used for
di󰀨erent applications, with di󰀨erent accessories or poorly maintained, the vibration and noise emission may di󰀨er. This may
significantly increase the exposure level over the total working period.
An estimation of the level of exposure to vibration and noise should also take into account the times when the tool is
switched o󰀨or when it is running but not actually doing the job. This may significantly reduce the exposure level over the
total working period.
Identify additional safety measures to protect the operator from the e󰀨ects of vibration and/or noise such as: maintain the
tool and the accessories, keep the hands warm, organization of work patterns.
18 19
M18 FMTIW2P12 M18 FMTIW2F12
..................... 4777 19 01... .............4777 08 01...
...000001-999999 ...000001-999999
....................0-1250 min-1..................0-1250 min-1
......................0-900 min-1....................0-900 min-1
......................0-475 Nm......................0-475 Nm
....................0-1950 min-1..................0-1950 min-1
....................0-2100 min-1..................0-2100 min-1
......................0-610 Nm......................0-610 Nm
....................0-2575 min-1..................0-2575 min-1
....................0-3100 min-1..................0-3100 min-1
......................0-745 Nm......................0-745 Nm
....................0-1325 min-1..................0-1325 min-1
..............................- ...................................-
...........................47 Nm...........................47 Nm
.........................745 Nm.........................745 Nm
........................M22 .............................M22
............... 1/2" (12,7 mm) ............. 1/2" (12,7 mm)
...........................18 V ..............................18 V
................2,0 ... 3,1 kg..................2,0 ... 3,1 kg
............................................-18...+50 °C
................................... M18B..., M18HB...
..................................M12-18..., M1418C6
........................95,4 dB (A) ...................95,4 dB (A)
......................106,4 dB (A) .................106,4 dB (A)
........................17,3 m/s2.......................17,4 m/s2
..........................1,5 m/s2.........................1,5 m/s2
TECHNISCHE DATEN AKKU-SCHLAGSCHRAUBER
Produktionsnummer ..............................................................
Leerlaufdrehzahl.............................................
Schlagzahl......................................................
Drehmoment...................................................
Leerlaufdrehzahl.............................................
Schlagzahl......................................................
Drehmoment...................................................
Leerlaufdrehzahl.............................................
Schlagzahl......................................................
Drehmoment ..................................................
Leerlaufdrehzahl.............................................
Schlagzahl......................................................
Drehmoment ..................................................
Drehmoment max..................................................................
Maximale Schraubengröße / Mutterngröße...........................
Werkzeugaufnahme ..............................................................
Spannung Wechselakku........................................................
Gewicht nach EPTA-Prozedur 01/2014 (2,0 ... 12,0 Ah) .......
Empfohlene Umgebungstemperatur beim Arbeiten...............
Empfohlene Akkutypen..........................................................
Empfohlene Ladegeräte ........................................................
Geräusch/Vibrationsinformation
Messwerte ermittelt entsprechend EN 62841.
Der A-bewertete Geräuschpegel des Gerätes beträgt
typischerweise:
Schalldruckpegel (Unsicherheit K=3dB(A))...........................
Schallleistungspegel (Unsicherheit K=3dB(A))......................
Gehörschutz tragen!
Schwingungsgesamtwerte (Vektorsumme dreier
Richtungen) ermittelt entsprechend EN 62841.
Schwingungsemissionswert ah
Anziehen von Schrauben und Muttern maximaler Größe ..
Unsicherheit K = .................................................................
WARNUNG! Lesen Sie alle Sicherheitshinweise,
Anweisungen, Darstellungen und Spezifikationen für
dieses Elektrowerkzeug. Versäumnisse bei der
Einhaltung der nachstehenden Anweisungen können
elektrischen Schlag, Brand und/oder schwere Verletzungen
verursachen.
SICHERHEITSHINWEISE FÜR
SCHLAGSCHRAUBER
Halten Sie das Gerät an den isolierten Griffflächen,
wenn Sie Arbeiten ausführen, bei denen die Schraube
verborgene Stromleitungen treffen kann. Der Kontakt
der Schraube mit einer spannungsführenden Leitung kann
metallene Geräteteile unter Spannung setzen und zu
einem elektrischen Schlag führen.
Tragen Sie Gehörschutz. Die Einwirkung von Lärm kann
Gehörverlust bewirken.
DEUTSCH
WEITERE SICHERHEITS- UND ARBEITSHINWEISE
Schutzausrüstung verwenden. Beim Arbeiten mit der
Maschine stets Schutzbrille tragen. Schutzkleidung wie
Staubschutzmaske, Schutzhandschuhe, festes und
rutschsicheres Schuhwerk, Helm und Gehörschutz werden
empfohlen.
Beim Arbeiten entstehender Staub ist oft
gesundheitsschädlich und sollte nicht in den Körper
gelangen. Geeignete Staubschutzmaske tragen.
Es dürfen keine Materialien bearbeitet werden, von denen
eine Gesundheitsgefährdung ausgeht (z.B. Asbest).
Beim Blockieren des Einsatzwerkzeuges bitte das Gerät
sofort ausschalten! Schalten Sie das Gerät nicht wieder
ein, solange das Einsatzwerkzeug blockiert ist; hierbei
könnte ein Rückschlag mit hohem Reaktionsmoment
entstehen. Ermitteln und beheben Sie die Ursache für die
Blockierung des Einsatzwerkzeuges unter
Berücksichtigung der Sicherheitshinweise.
Mögliche Ursachen dafür können sein:
WARNUNG
Die angegebenen Schwingungsgesamtwerte und Geräuschemissionswerte wurden nach einem genormten Messverfahren
gemäß EN 62841 gemessen und können für den Vergleich von Elektrowerkzeugen miteinander verwendet werden. Es kann
für eine vorläufige Einschätzung der Belastung verwendet werden.
Der angegebene Schwingungs- und Geräuschemissionspegel repräsentiert die hauptsächlichen Anwendungen des
Elektrowerkzeugs. Wenn allerdings das Elektrowerkzeug für andere Anwendungen, mit abweichenden Einsatzwerkzeugen
oder ungenügender Wartung eingesetzt wird, können sich die Schwingungs- und Geräuschemissionen unterscheiden. Dies
kann deren Wirkung über den gesamten Arbeitszeitraum deutlich erhöhen.
Bei der Abschätzung der Belastung durch Schwingungen und Lärm sollten auch die Zeiten berücksichtigt werden, in denen
das Elektrowerkzeug ausgeschaltet ist oder zwar läuft, aber keine tatsächliche Arbeit verrichtet wird. Dies kann deren
Wirkung über den gesamten Arbeitszeitraum deutlich reduzieren.
Legen Sie zusätzliche Sicherheitsmaßnahmen zum Schutz des Bedieners vor den Auswirkungen von Schwingungen- und /
oder Lärm fest, wie z. B.: Wartung des Werkzeugs und des Zubehörs, Warmhalten der Hände, Organisation der
Arbeitsabläufe.
ENGLISH
BATTERY PACK PROTECTION
In extremely high torque, binding, stalling and short circuit
situations that cause high current draw, the tool will vibrate
for about 2 seconds and then the tool will turn OFF.
To reset, release the trigger.
Under extreme circumstances, the internal temperatur of
the battery could become to high. If this happens, the
battery will shut down.
Place the battery on the charger to charge and reset it.
TRANSPORTING LITHIUM BATTERIES
Lithium-ion batteries are subject to the Dangerous Goods
Legislation requirements.
Transportation of those batteries has to be done in
accordance with local, national and international provisions
and regulations.
• The user can transport the batteries by road without
further requirements.
• Commercial transport of Lithium-Ion batteries by third
parties is subject to Dangerous Goods regulations.
Transport preparation and transport are exclusively to be
carried out by appropriately trained persons and the
process has to be accompanied by corresponding
experts.
When transporting batteries:
• Ensure that battery contact terminals are protected and
insulated to prevent short circuit.
• Ensure that battery pack is secured against movement
within packaging.
• Do not transport batteries that are cracked or leak.
Check with forwarding company for further advice
MAINTENANCE
Use only Milwaukee accessories and spare parts. Should
components need to be replaced which have not been
described, please contact one of our Milwaukee service
agents (see our list of guarantee/service addresses).
If needed, an exploded view of the tool can be ordered.
Please state the machine type printed as well as the
six-digit No. on the label and order the drawing at your
local service agents or directly at: Techtronic Industries
GmbH, Max-Eyth-Straße 10, 71364 Winnenden, Germany.
SYMBOLS
CAUTION! WARNING! DANGER!
Remove the battery pack before starting any
work on the machine.
Please read the instructions carefully before
starting the machine.
Do not dispose electric tools, batteries/
rechargeable batteries together with household
waste material.
Electric tools and batteries that have reached the
end of their life must be collected separately and
returned to an environmentally compatible
recycling facility.
Check with your local authority or retailer for
recycling advice and collection point.
n0No-load speed
IPM Impact range
VVolts
Direct current
European Conformity Mark
Ukraine Conformity Mark
EurAsian Conformity Mark