manuals.online logo
Brands
  1. Home
  2. •
  3. Brands
  4. •
  5. Milwaukee
  6. •
  7. Impact Driver
  8. •
  9. Milwaukee M18 FUEL SURGE 2760-20 User manual

Milwaukee M18 FUEL SURGE 2760-20 User manual

GENERAL POWER TOOL
SAFETY WARNINGS
WARNING
Read all safety warnings, instruc-
tions, illustrations and specica-
tions provided with this power tool. Failure to
follow all instructions listed below may result in
electric shock, re and/or serious injury. Save all
warnings and instructions for future reference.
The term "power tool" in the warnings refers to your
mains-operated(corded)powertoolorbattery-oper-
ated (cordless) power tool.
WORK AREA SAFETY
•Keep work area clean and well lit. Cluttered or dark
areas invite accidents.
•Do not operate power tools in explosive atmo-
spheres, such as in the presence of ammable
liquids, gases or dust. Power tools create sparks
which may ignite the dust or fumes.
•Keep children and bystanders away while operat-
ing a power tool. Distractionscancauseyoutolose
control.
ELECTRICAL SAFETY
•Power tool plugs must match the outlet. Never
modify the plug in any way. Do not use any
adapter plugs with earthed (grounded) power
tools. Unmodied plugs and matching outlets will
reduce risk of electric shock.
•Avoid body contact with earthed or grounded
surfaces, such as pipes, radiators, ranges and
refrigerators. There is an increased risk of electric
shock if your body is earthed or grounded.
•Do not expose power tools to rain or wet condi-
tions. Water entering a power tool will increase the
risk of electric shock.
•Do not abuse the cord. Never use the cord for
carrying, pulling or unplugging the power tool.
Keep cord away from heat, oil, sharp edges or
movingparts.Damagedor entangledcordsincrease
the risk of electric shock.
•When operating a power tool outdoors, use an
extension cord suitable for outdoor use. Use of
a cord suitable for outdoor use reduces the risk of
electric shock.
•If operating a power tool in a damp location is
unavoidable, use a ground fault circuit interrupter
(GFCI) protected supply. Use of an GFCI reduces
the risk of electric shock.
PERSONAL SAFETY
•Stay alert, watch what you are doing and use
common sense when operating a power tool. Do
not use a power tool while you are tired or under
the inuence of drugs, alcohol or medication. A
moment of inattention while operating power tools
may result in serious personal injury.
•Use personal protective equipment. Always wear
eye protection. Protectiveequipmentsuchasadust
mask, non-skid safety shoes, hard hat or hearing
protectionusedforappropriateconditionswillreduce
personal injuries.
•Prevent unintentional starting. Ensure the switch
is in the off-position before connecting to power
source and/or battery pack, picking up or carrying
the tool. Carrying power tools with your nger on the
switchorenergizingpower tools that have the switch
on invites accidents.
•Remove any adjusting key or wrench before
turning the power tool on. A wrench or a key left
attachedto arotatingpart of thepower tool mayresult
in personal injury.
•Do not overreach. Keep proper footing and bal-
ance at all times. This enables better control of the
power tool in unexpected situations.
•Dress properly. Do not wear loose clothing or
jewelry. Keep your hair and clothing away from
moving parts. Loose clothes, jewelry or long hair
can be caught in moving parts.
•If devices are provided for the connection of dust
extraction and collection facilities, ensure these
are connected and properly used. Use of dust
collection can reduce dust-related hazards.
•Do not let familiarity gained from frequent use
of tools allow you to become complacent and
ignore tool safety principles. Acareless action
can cause severe injury within a fraction of a second.
POWER TOOL USE AND CARE
•Do not force the power tool. Use the correct
power tool for your application. Thecorrectpower
tool will do the job better and safer at the rate for
which it was designed.
•Do not use the power tool if the switch does not
turn it on and off. Any power tool that cannot be
controlled with the switch is dangerous and must be
repaired.
•Disconnect the plug from the power source and/
or remove the battery pack, if detachable, from
the power tool before making any adjustments,
changing accessories, or storing power tools.
Such preventive safety measures reduce the risk of
starting the power tool accidentally.
•Store idle power tools out of the reach of children
and do not allow persons unfamiliar with the
power tool or these instructions to operate the
power tool. Powertoolsaredangerousinthehands
of untrained users.
•Maintain power tools and accessories. Check for
misalignment or binding of moving parts, break-
age of parts and any other condition that may
affect the power tool’s operation. If damaged,
have the power tool repaired before use. Many
accidents are caused by poorly maintained power
tools.
•Keep cutting tools sharp and clean. Properly
maintainedcutting tools with sharp cutting edges are
less likely to bind and are easier to control.
•Use the power tool, accessories and tool bits etc.
in accordance with these instructions, taking into
account the working conditions and the work to
be performed. Use of the power tool for operations
differentfromthose intended could resultina hazard-
ous situation.
•Keep handles and grasping surfaces dry, clean
and free from oil and grease. Slippery handles
and grasping surfaces do not allow for safe handling
and control of the tool in unexpected situations.
BATTERY TOOL USE AND CARE
• Recharge only with the charger specied by the
manufacturer. Acharger that issuitable for onetype
of battery pack may create a risk of re when used
with another battery pack.
•Use power tools only with specically designated
battery packs. Use of any other battery packs may
create a risk of injury and re.
•When battery pack is not in use, keep it away
from other metal objects, like paper clips, coins,
keys, nails, screws or other small metal objects,
Cat. No. 2760-20
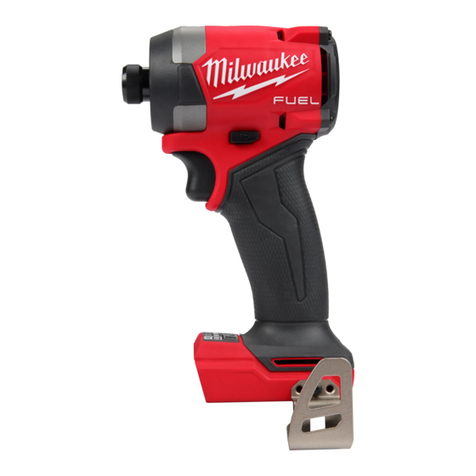
M18™ FUEL™ SURGE™ 1/4" HEX HYDRAULIC DRIVER
OPERATOR'S MANUAL
WARNING To reduce the risk of injury, user must read and understand operator's manual.
that can make a connection from one terminal to
another. Shorting the batteryterminalstogether may
cause burns or a re.
•Under abusive conditions, liquid may be ejected
from the battery; avoid contact. If contact ac-
cidentally occurs, ush with water. If liquid con-
tacts eyes, additionally seek medical help. Liquid
ejected from the battery may cause irritation or burns.
•Do not use a battery pack or tool that is dam-
aged or modied. Damaged or modied batteries
may exhibit unpredictable behavior resulting in re,
explosion or risk of injury.
•Do not expose a battery pack or tool to re or
excessive temperature. Exposure to re or tem-
perature above 265°F (130°C) may cause explosion.
•Follow all charging instructions and do not
charge the battery pack or tool outside the
temperature range specied in the instructions.
Charging improperly or at temperatures outside the
specied range may damage the battery and increase
the risk of re.
SERVICE
• Have your power tool serviced by a qualied
repair person using only identical replacement
parts. This will ensure that the safety of the power
tool is maintained.
• Never service damaged battery packs. Service
of battery packs should only be performed by the
manufacturer or authorized service providers.
SPECIFIC SAFETY RULES
FOR IMPACT DRIVER
AND IMPACT WRENCH
• Hold the power tool by insulated gripping sur-
faces, when performing an operation where the
fastener may contact hidden wiring. Fasteners
contacting a “live” wire may make exposed metal
parts of the power tool “live” and could give the
operator an electric shock.
•Wear ear protectors when impact drilling. Expo-
sure to noise can cause hearing loss.
• Use only sockets and other accessories speci-
cally designed for use on impact wrenches and
drivers. Othersockets and accessoriesmight shatter
or break causing injury.
•Maintain labels and nameplates. These carry im-
portant information. If unreadable or missing, contact
a MILWAUKEE service facility for a free replacement.
•
WARNING
Somedust createdby power sanding,
sawing, grinding, drilling, and other
construction activities contains chemicals known to
cause cancer, birth defects or other reproductive
harm. Some examples of these chemicals are:
•lead from lead-based paint
•crystalline silica from bricks and cement and other
masonry products, and
• arsenic and chromium from chemically-treated lumber.
Your risk from these exposuresvaries,dependingon
how often you do this type of work. To reduce your
exposure to these chemicals: work in a well ventilated
area,and work withapproved safety equipment, such
as those dust masks that are specially designed to
lter out microscopic particles.
SYMBOLOGY
Volts
Direct Current
No Load Revolutions per Minute (RPM)
Impacts per Minute Under Load (IPM)
CUS
UL Listing for
Canada and U.S.
SPECIFICATIONS
Volts .............................................................. 18 DC
Battery Type .................................................M18™
Charger Type ................................................M18™
Cat. No...................................................... 2760-20
RPM .......................................................... 0 - 3 000
IPM ........................................................... 0 - 4 000
FUNCTIONAL DESCRIPTION
1. 1/4" Hex drive chuck
2. LED
3. Control switch
4. Trigger
5. Handle
6. Speed control
7. Belt clip
8. Auxiliary bit holder
8
1
2
4
3
7
56
ASSEMBLY
WARNING
Recharge only with the charger
specied for the battery. For spe-
cic charging instructions, read the operator’s
manual supplied with your charger and battery.
Removing/Inserting the Battery
To remove the battery, push in the release buttons
and pull the battery pack away from the tool.
WARNING
Always remove battery pack before
changing or removing accesso-
ries. Only use accessories specically recom-
mended for this tool. Others may be hazardous.
To insert the battery, slide the pack into the body
of the tool. Make sure it latches securely into place.
WARNING
Use only sockets and other acces-
sories specifically designed for
use on impact wrenches and drivers. Other
sockets and accessories might shatter or break
causing injury.
3. To stop thetool, release thetriggerand the electric
brake stops the tool instantly.
Impacting Techniques
The longer a bolt, screw, or nut is impacted, the
tighter it will become. To help prevent damaging the
fasteners or workpieces, avoid excessive impact-
ing. Be particularly careful when impacting smaller
fasteners because they require less impacting to
reach optimum torque.
Practice with various fasteners, noting the length of
time required to reach the desired torque. Check the
tightness with a hand-torque wrench. If the fasteners
are too tight, reduce the impacting time. If they are
not tight enough, increase the impacting time.
Oil, dirt, rust or other matter on the threads or under
the head of the fastener affects the degree of tight-
ness.
The torque required to loosen a fastener averages
75% to 80% of the tightening torque, depending on
the condition of the contacting surfaces.
On light gasket jobs, run each fastener down to a
relatively light torque and use a hand torque wrench
for nal tightening.
Temperature Protection
The tool features internal protections that prevent
damage during extreme cold and overheating.
•
If performance is abnormal in low temperature, pull
thetrigger withno load forabout 10 secondsto warm
up the tool.
•
In extreme cold temperatures, the tool may shut
down. Allow the tool to warm up before use.
•
If performance is abnormal after heavy use, let
the tool cool down for about 30 minutes. Normal
performance will return.
MAINTENANCE
WARNING
To reduce the risk of injury, always
unplug the chargerand remove the
battery pack from the charger or tool before
performing any maintenance. Never disassemble
the tool, battery pack or charger. Contact a
MILWAUKEE service facility for ALL repairs.
Maintaining Tool
Keep your tool, battery pack and charger in good
repair by adopting a regular maintenance program.
Inspect your tool for issues such as undue noise,
misalignmentor binding ofmovingparts, breakage of
parts, or any other condition that may affect the tool
operation. Return the tool, battery pack, and charger
to a MILWAUKEE service facility for repair. After six
months to one year, depending on use, return the
tool, battery pack and charger to a MILWAUKEE
service facility for inspection.
If the tool does not start or operate at full power with
a fully charged battery pack, clean the contacts on
the battery pack. If the tool still does not work prop-
erly, return the tool, charger and battery pack, to a
MILWAUKEE service facility for repairs.
WARNING
To reduce the risk of personal in-
jury and damage, never immerse
your tool, battery pack or charger in liquid or
allow a liquid to ow inside them.
Attaching and Removing Accessories
The tool is intended for use with drill and
driver bits.
1. To attach an accessory, press the shank
into the hex drive chuck.
2. To remove the accessory, pull out the
ring and remove the accessory. Re-
lease the ring.
OPERATION
WARNING
Always remove battery pack before
changing or removing accesso-
ries. Only use accessories specically recom-
mended for this tool. Others may be hazardous.
To reduce the risk of injury, wear safety goggles
or glasses with side shields.
Using the Control Switch
The control switch may be set to three positions:
forward, reverse and lock. Due to a lockout mecha-
nism, the control switch can only be adjusted when
the ON/OFF switch is not pressed. Always allow the
motor to come to a complete stop before using the
control switch.
1. For forward (clockwise) rota- CENTER TO LOCK
Forward Reverse
tion, push the control switch
in the direction shown. Check
the direction of rotation
before use.
2. For reverse (counterclock-
wise) rotation, push the control switch in the
direction shown. Check the direction of rotation
before use.
3. To lock the trigger, push the control switch to the
center position. The trigger will not work when the
control switch is in the locked position.
Alwaysremove the batterypack before performing
maintenance or changing accessories. Always
lock the trigger or remove the battery pack before
storing the tool and any time the tool is not in use.
Selecting Speed
Allow the tool to come to a complete stop before
changing speeds. Press the selector button to
cycle between the settings.
Setting Max RPM
123
2760-20 900 2 100 3 000 Designed for driving
self-tapping screws
in sheet metal †
†The function is designed to reduce screw
stripping, screw breakage, and damage to the
work surface when driving self-tapping screws.
This function is optimized for the most common
materials, including #8-#10 self-tapping screws
between ½”-1” in length and 20-28 gauge sheet
metal.
Starting, Stopping and Controlling Speed
The tool may be operated at any speed from 0 to
full speed.
1. To start the tool, pull the trigger.
NOTE: An LED is turned on when the trigger is pulled.
2. To vary the driving speed, increase or decrease
pressure on the trigger. The further the trigger is
pulled, the greater the speed, up to the maximum
speed set by the speed control. Rely only on high-grade power tools on our virtual shelves.
Other manuals for M18 FUEL SURGE 2760-20

2

This manual suits for next models

1

Other Milwaukee Impact Driver manuals

Milwaukee 58-01-0520 User manual

Milwaukee

Milwaukee 58-01-0520 User manual

Milwaukee M18CHIWP12 User manual

Milwaukee

Milwaukee M18CHIWP12 User manual

Milwaukee M18 FUEL ONE-KEY ONEID2 User manual

Milwaukee

Milwaukee M18 FUEL ONE-KEY ONEID2 User manual

Milwaukee HD18 HIWF User manual

Milwaukee

Milwaukee HD18 HIWF User manual

Milwaukee M12 FQID User manual

Milwaukee

Milwaukee M12 FQID User manual

Milwaukee V28 0799-20 User manual

Milwaukee

Milwaukee V28 0799-20 User manual

Milwaukee 2564-20 User manual

Milwaukee

Milwaukee 2564-20 User manual

Milwaukee HEAVY DUTY M12 BRAID User manual

Milwaukee

Milwaukee HEAVY DUTY M12 BRAID User manual

Milwaukee M18 FMTIW2P12 User manual

Milwaukee

Milwaukee M18 FMTIW2P12 User manual

Milwaukee M12 FUEL M12FRAIWF38 User manual

Milwaukee

Milwaukee M12 FUEL M12FRAIWF38 User manual

Milwaukee M12 FID-0 User manual

Milwaukee

Milwaukee M12 FID-0 User manual

Milwaukee M12 FID User manual

Milwaukee

Milwaukee M12 FID User manual

Milwaukee M12 FUEL CID User manual

Milwaukee

Milwaukee M12 FUEL CID User manual

Milwaukee M18 FUEL 2953-20 User manual

Milwaukee

Milwaukee M18 FUEL 2953-20 User manual

Milwaukee 9010 Guide

Milwaukee

Milwaukee 9010 Guide

Milwaukee M18 FQID User manual

Milwaukee

Milwaukee M18 FQID User manual

Milwaukee Fuel M18CHIWF12 User manual

Milwaukee

Milwaukee Fuel M18CHIWF12 User manual

Milwaukee 9060 Guide

Milwaukee

Milwaukee 9060 Guide

Milwaukee HEAVY DUTY M18 FQID-0 User manual

Milwaukee

Milwaukee HEAVY DUTY M18 FQID-0 User manual

Milwaukee M12 FUEL FIW38 User manual

Milwaukee

Milwaukee M12 FUEL FIW38 User manual

Milwaukee M18 FUEL 2853-20 User manual

Milwaukee

Milwaukee M18 FUEL 2853-20 User manual

Milwaukee 9078-20 User manual

Milwaukee

Milwaukee 9078-20 User manual

Milwaukee 2656-20 User manual

Milwaukee

Milwaukee 2656-20 User manual

Milwaukee M18 ONEIWP12 User manual

Milwaukee

Milwaukee M18 ONEIWP12 User manual

Popular Impact Driver manuals by other brands

Silverline 797138 manual

Silverline

Silverline 797138 manual

Makita TD090D instruction manual

Makita

Makita TD090D instruction manual

Bosch GBH 5-40 D Professional Original instructions

Bosch

Bosch GBH 5-40 D Professional Original instructions

Harbor Freight Tools 95666 Assembly and operating instructions

Harbor Freight Tools

Harbor Freight Tools 95666 Assembly and operating instructions

Stanley FatMax KFMCF647 Original instructions

Stanley FatMax

Stanley FatMax KFMCF647 Original instructions

Makita BTD150 instruction manual

Makita

Makita BTD150 instruction manual

Clarke CAT102 Operation & maintenance instructions

Clarke

Clarke CAT102 Operation & maintenance instructions

Makita DTD157ZJ instruction manual

Makita

Makita DTD157ZJ instruction manual

Northern Tool 100700 owner's manual

Northern Tool

Northern Tool 100700 owner's manual

Rocks OK-03.4316 manual

Rocks

Rocks OK-03.4316 manual

Ingersoll-Rand 255A instructions

Ingersoll-Rand

Ingersoll-Rand 255A instructions

Kobalt KIW 124B-03 manual

Kobalt

Kobalt KIW 124B-03 manual

Raider RDI-IBW01 user manual

Raider

Raider RDI-IBW01 user manual

Powermate 024-0077SP instruction manual

Powermate

Powermate 024-0077SP instruction manual

Makita 6914D instruction manual

Makita

Makita 6914D instruction manual

Festool TID 18 instructions

Festool

Festool TID 18 instructions

Makita TW202DZ instruction manual

Makita

Makita TW202DZ instruction manual

Makita DTD155 instruction manual

Makita

Makita DTD155 instruction manual

manuals.online logo
manuals.online logoBrands
  • About & Mission
  • Contact us
  • Privacy Policy
  • Terms and Conditions

Copyright 2025 Manuals.Online. All Rights Reserved.