minCam 360compact User manual

User Manual
minCam360compact®


User Manual minCam360compact
®
3
®minCam GmbH, Bundesstraße 9, 87538 Fischen, Germany info@mincam.de
Version: March 2020, according to the technical state of the art at the time of publication, subject to alterations
Contents
1
Product description 5
1.1
General description ................................................................................... 5
1.1.1
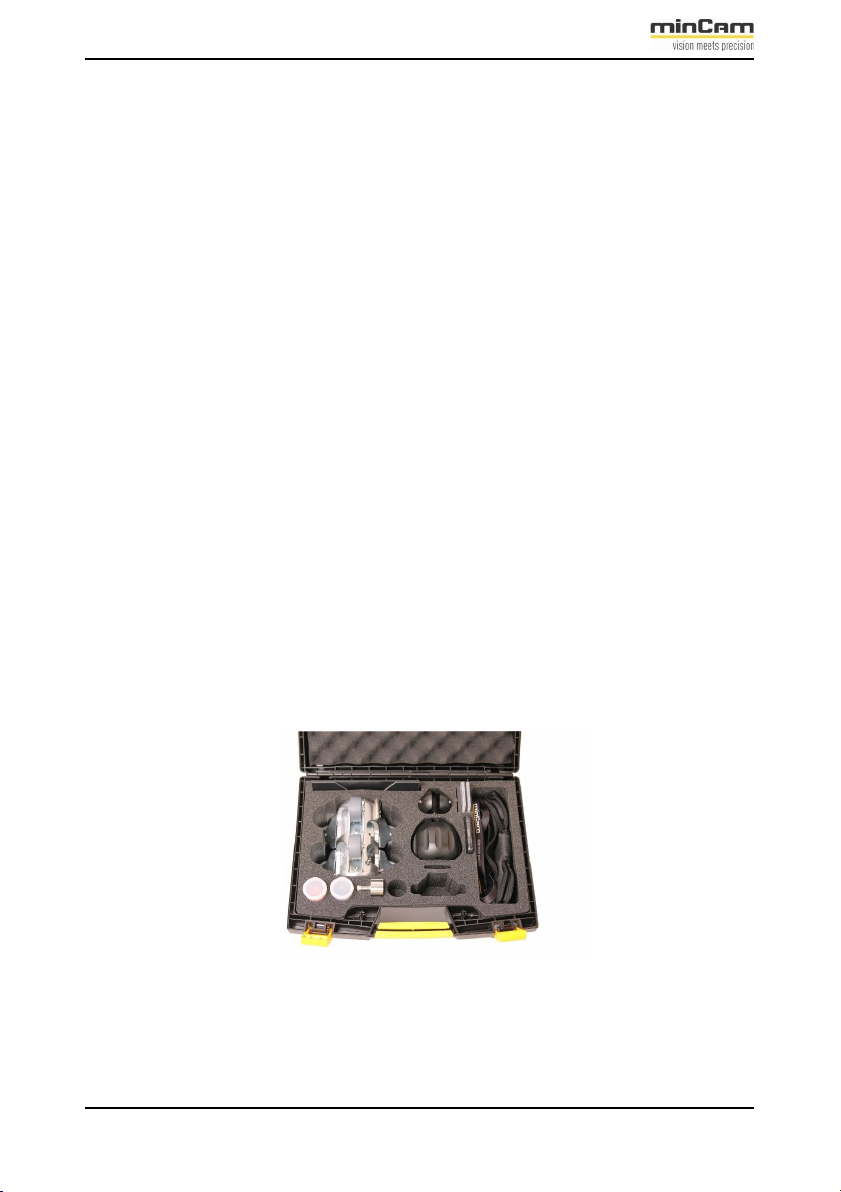
Scope of delivery.......................................................................... 5
1.1.2
Product features ............................................................................ 6
1.1.3
Manufacturer ................................................................................ 6
1.1.4
Copyright protection..................................................................... 6
1.1.5
Warranty ....................................................................................... 6
1.1.6
Limitation of liability.................................................................... 6
1.2
Safety ........................................................................................................ 7
1.2.1
General safety............................................................................... 7
1.2.2
Intended use.................................................................................. 8
1.2.3
Commissioning with monitor case ............................................... 8
1.2.4
Commissioning WiFi.................................................................. 10
1.2.5
Pressurization.............................................................................. 10
2
Functional description 13
2.1
Components............................................................................................. 13
2.1.1
Remote control ........................................................................... 13
2.1.2
Reel............................................................................................. 14
2.1.3
Power supply .............................................................................. 16
2.1.4
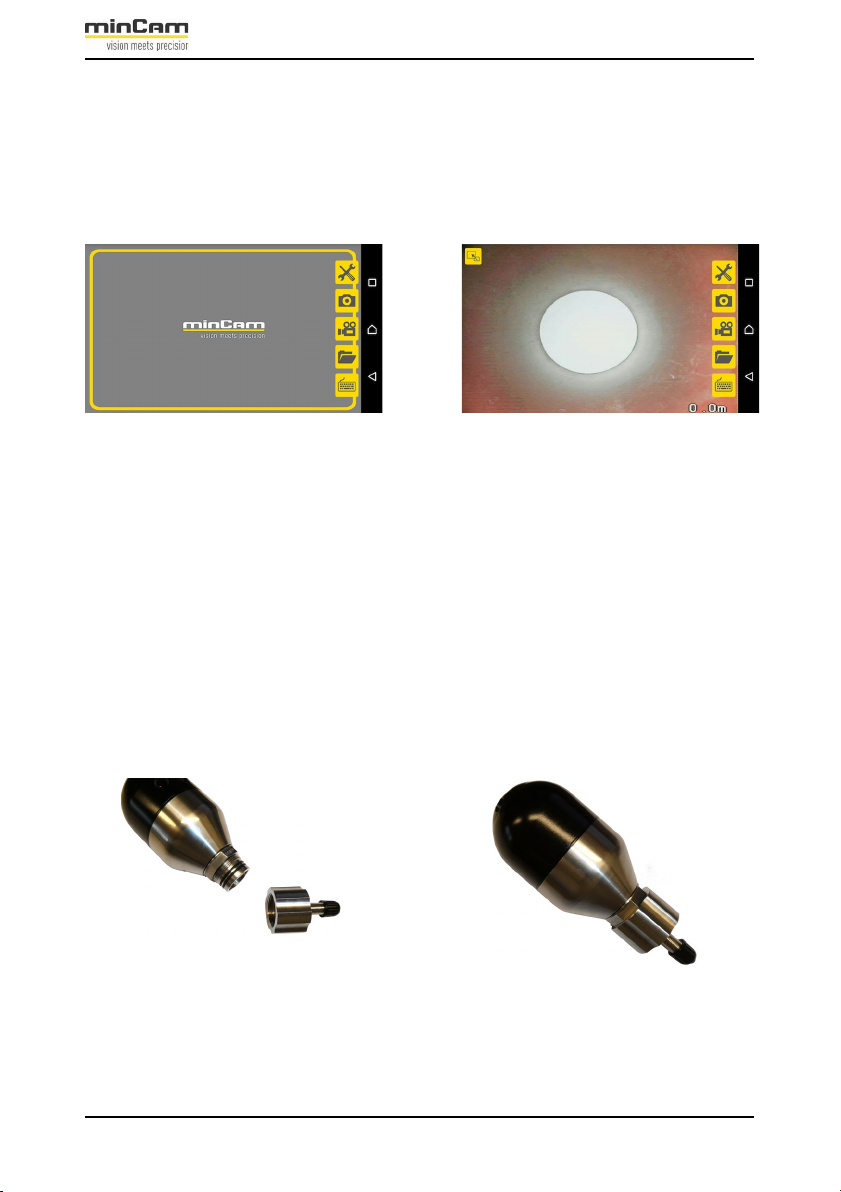
Camera head ............................................................................... 16
2.1.5
Camera head mode ..................................................................... 16
2.1.6
Focus........................................................................................... 16
2.1.7
Light ........................................................................................... 16
2.1.8
Locating ...................................................................................... 17
2.2
Recording ................................................................................................ 18
2.2.1
LED display SD Slot .................................................................. 18
2.2.2
Remote control ........................................................................... 18
2.2.3
Storage unit................................................................................. 19
2.2.4
Video .......................................................................................... 20
2.2.5
Picture......................................................................................... 23
2.2.6
Playing back saved data.............................................................. 24

User Manual minCam360compact
®
4
®minCam GmbH, Bundesstraße 9, 87538 Fischen, Germany info@mincam.de
Version: March 2020, according to the technical state of the art at the time of publication, subject to alterations
2.3
Accessories.............................................................................................. 25
2.3.0.1 Roller skids................................................................. 25
2.3.1
Optional accessories ................................................................... 28
2.3.1.1
Roller skid, large ........................................................ 28
2.3.1.2
Roller skid, illuminated .............................................. 28
2.3.1.3
Roll-In-Device............................................................ 29
2.3.1.4 PUSH3000.................................................................. 33
3
Maintenance 37
3.1
Transport, cleaning, maintenance............................................................ 37
3.1.1
Transport..................................................................................... 37
3.1.2
Cleaning...................................................................................... 37
3.1.3
Maintenance................................................................................ 37
3.2
Disposal................................................................................................... 38
4
Technical data 39
4.1
Cameras................................................................................................... 39
4.1.1
Pan and tilt camera head ............................................................. 39
4.2
Reel ......................................................................................................... 39
4.2.1
Monitor....................................................................................... 40
4.2.2
Data storage ................................................................................ 40

User Manual minCam360compact
®
5
®minCam GmbH, Bundesstraße 9, 87538 Fischen, Germany info@mincam.de
Version: March 2020, according to the technical state of the art at the time of publication, subject to alterations
1 Product description
1.1
General description
This user manual is intended to help you become familiar with the functions of the
unit. This user manual is intended to help you become familiar with the functions of
the unit.
1.1.1
Scope of delivery
The minCam360compact®pan and tilt camera system contains:
•
Reel with 40m/6.7mm push rod
•
SK50 pan and tilt camera head
•
Two batteries (Makita)
•
Monitor case with video recording and remote control
•
Accessories case: available as an option (2.3.1)
Figure 1.1: Accessories case minCam360compact®

User Manual minCam360compact
®
6
®minCam GmbH, Bundesstraße 9, 87538 Fischen, Germany info@mincam.de
Version: March 2020, according to the technical state of the art at the time of publication, subject to alterations
1.1.2
Product features
The pan and tilt camera system minCam360compact®is an optical inspection system for
the inspection of pipes, sewers, containers and cavities. For the documentation of the
inspection videos and pictures are either stored on an SD card, or processed and saved on
a computer/notebook using an acquisition and evaluation software (e.g. minREC or
WinCan, etc.).
1.1.3
Manufacturer
minCam GmbH
Bundesstraße 9
87538 Fischen
Germany
1.1.4
Copyright protection
The user manual and all pictures, illustrations and information contained therein are
the intellectual property of minCam GmbH. Any use beyond the scope of the system
use is not permitted without written permission of minCam GmbH.
1.1.5
Warranty
The warranty provisions can be found in the General Terms and Conditions. You
can find them on www.minCam.de.
1.1.6
Limitation of liability
All information and notes in this user manual are based on currently valid
regulations and standards as well as the current state of the art. The operator is
obliged to ensure safe operation. This can be ensured by:
•
Providing and following the operating instructions
•
Regular training

User Manual minCam360compact
®
7
®minCam GmbH, Bundesstraße 9, 87538 Fischen, Germany info@mincam.de
Version: March 2020, according to the technical state of the art at the time of publication, subject to alterations
•
Careful handling of the system and hazard-aware operation of the system.
The manufacturer accepts no liability for any damage caused by:
•
Non-compliance with the user manual
•
Not intended use
•
Untrained personnel
•
Unauthorised conversions or technical modifications
•
Use of unauthorised spare parts.
Avoid excessive strain on the camera head and large temperature differences. The
push rod can break if it is subjected to excessive stress or if the minimum bending
radius is not reached. The push rod is subject to normal wear and tear, which,
depending on its handling, sooner or later leads to replacement of the push rod. If the
push rod is broken, do not switch the camera on again and contact Service (see 3.1.3).
1.2
Safety
1.2.1
General safety
Please use the unit only for the functions described in the instructions. Any other use
is considered to be non-intended use and may result in damage to the product or the
environment of the product.
Conversion or modification of the product impairs product safety.
The system must be visually inspected for damage and abnormalities before
each commissioning.
Checking the internal pressure of the camera and pressurizing if necessary (see
1.2.5)
The camera is battery-operated. For this purpose, it is essential to observe the
corresponding protective measures. Remove the battery from the system
during transport and when not in use.
•
•
•
•

User Manual minCam360compact
®
8
®minCam GmbH, Bundesstraße 9, 87538 Fischen, Germany info@mincam.de
Version: March 2020, according to the technical state of the art at the time of publication, subject to alterations
If the battery has a significantly shorter operating time than after purchase,
it can be assumed that it has reached the end of its life.
•
ATTENTION, Risk of injury: Never open the system without authorisation,
never carry out repairs yourself.
•
Handle the system with care. It can be damaged by shocks, blows or falling
from an already low height. Keep all parts of the operation unit away from
moisture and extreme heat. Protect the storage unit from dirt and rain.
To ensure smooth storage, format the SD card from time to time. Keep the
memory card away from magnetic exciters.
•
Do not use contaminated cameras for fresh water operations.
In case of damage caused by improper operation, the warranty claim becomes void.
No liability is assumed for consequential damages. Technical changes and errors
excepted.
1.2.2
Intended use
This camera system is designed for optical inspections of pipes and cavities, not for
medical inspections. Please use the camera system only for the predetermined range
of applications.
1.2.3
Commissioning with monitor case
If the minCam360compact®is used with the TFT5R, proceed as follows during
commissioning:
1.
Move the monitor case (display and control unit) into position. Align the case
by releasing the lever on the ball joint. When the monitor is in the ideal working
position, close the lever again.
•

User Manual minCam360compact
®
9
®minCam GmbH, Bundesstraße 9, 87538 Fischen, Germany info@mincam.de
Version: March 2020, according to the technical state of the art at the time of publication, subject to alterations
Figure 1.2: Adjusting the monitor case
To open the case, unfold the sun visor. The unit is ready to use.
Figure 1.3: Opening the monitor case
2.
Pressurize the camera (cf. 1.2.5)
3.
Adjust the brake (cf. 2.3)
4.
Switch on the minCam360compact®(Status cf. 2.2.1)
5.
Position the camera at the beginning of the pipe.
6.
Set the meter counter to 0.
7.
Enter text (if required) (cf. ??)
8.
Start video recording (cf. 2.2.4)
9.
Start the inspection

User Manual minCam360compact
®
10
®minCam GmbH, Bundesstraße 9, 87538 Fischen, Germany info@mincam.de
Version: March 2020, according to the technical state of the art at the time of publication, subject to alterations
1.2.4
Commissioning WiFi
If the minCam360compact®is operated via WiFi, the respective app (available for
Android and iOS) has to be installed on a smartphone or tablet.
Figure 1.4: minCam®App.
To connect the mobile device to the system, enter the SSID and the password
12345678 that is on the system. Once the connection is established, the app can be
started on the mobile device. The minCam360compact®can now be controlled via
the intuitive app.
1.2.5
Pressurizing
Before starting the inspection, check the internal pressure of the camera and
pressurize the camera with nitrogen if necessary.
For this purpose, screw the pressurizing adapter in the accessories case onto the
camera.
Figure 1.5: Pressurizing adapter for the camera

User Manual minCam360compact
®
13
®minCam GmbH, Bundesstraße 9, 87538 Fischen, Germany info@mincam.de
Version: March 2020, according to the technical state of the art at the time of publication, subject to alterations
The recommended overpressure in the camera head is 800mbar.
Use a pressure reducer for the pressurization of the camera and do not exceed a
maximum overpressure of 1.5 bar.

User Manual minCam360compact®
14
®minCam GmbH, Bundesstraße 9, 87538 Fischen, Germany info@mincam.de
Version: March 2020, according to the technical state of the art at the time of publication, subject to alterations.
2 Functional description
2.1
Components
2.1.1
Remote control
Figure 2.1: Remote control for minCam360compact®
The remote control can remain in the Peli-case for operation, be held in the hand or
placed on the pushing aid. If the remote control is inside the charging tray, the battery
of the remote control is charged automatically. To switch on the remote control push
for 1 second. When the remote control is switched on, the blue LED flashes until
the Bluetooth connection is established (LED constantly blue).
To switch off the remote control, press and hold for 4 seconds.

User Manual minCam360compact
®
15
®minCam GmbH, Bundesstraße 9, 87538 Fischen, Germany info@mincam.de
Version: March 2020, according to the technical state of the art at the time of publication, subject to alterations
Figure 2.2: Functions of the remote control minCam360compact®
2.1.2
Reel
Figure 2.3: Reel control buttons
To unwind the push rod from the reel, release the brake. Move the brake lever
anti-clockwise.
Pull the brake lever to position it as needed.

User Manual minCam360compact®
16
®minCam GmbH, Bundesstraße 9, 87538 Fischen, Germany info@mincam.de
Version: March 2020, according to the technical state of the art at the time of publication, subject to alterations.
Figure 2.4: Brake lever minCam360compact®
The camera is guided out of the reel above the guide roller.
Figure 2.5: Guide roller minCam360compact®
If you turn the brake lever clockwise, the reel basket is fixed again.
For best performance, it is recommended that the brake is adjusted in such a way
that the reel is permanently slightly decelerated.

User Manual minCam360compact
®
17
®minCam GmbH, Bundesstraße 9, 87538 Fischen, Germany info@mincam.de
Version: March 2020, according to the technical state of the art at the time of publication, subject to alterations
2.1.3
Power supply
The minCam360compact® camera system is operated with two Makita batteries.
The batteries can be charged with the included Makita quick charger. The charge
level can be read from the individual batteries. The batteries can be exchanged and
replaced during operation.
2.1.4
Camera head
To control the camera head, move the joystick in the same way as the desired viewing
direction: forward/backward, camera module moves up/down, left/right. The camera
head rotates according to the axis of rotation.
2.1.5
Camera head mode
Besides controlling the camera head using a joystick or position keys, three different
camera head modes can be set at the touch of a button.
0-position/upright picture
left-right
360◦Rotation
2.1.6
Focus
The minCam360compact® has an automechanical focus, which switches between near and
far at about 84°. This makes any focus settings superfluous.
In order to obtain the best possible picture quality, it is recommended that for
inspections of Ø > DN200, the camera should be panned to a maximum of 80°.
2.1.7
Light
The light intensity can be adjusted with the keys on the remote control.
Depending on the viewing direction of the camera head, the individual LEDs are
controlled automatically.
An exception is the Container Inspection mode in which all LEDs light up
simultaneously.
The camera head is temperature controlled. At an operating temperature of 64°C
the light is reduced to avoid overheating.

User Manual minCam360compact®
18
®minCam GmbH, Bundesstraße 9, 87538 Fischen, Germany info@mincam.de
Version: March 2020, according to the technical state of the art at the time of publication, subject to alterations.
2.1.8
Locating
After pressing the locating button (> 1 sec) the camera head is switched off and the
message “Detection” is displayed.
If the button is pressed again (< 1 sec) you can switch between the frequencies.
LED flashes 512Hz
LED lights up 33kHz
Table 2.1: Selection of locating frequency
Both the camera head and the push cable can be located. To do this, the locating
receiver must be switched into the corresponding mode. The camera head itself can
be located via pinpoint location, the push rod via pipe location.
Figure 2.6: Both the camera itself and the push rod can be located.
The intensity of the signal depends on the actual distance between the camera and
the tracking receiver and the nature of the material in between.

User Manual minCam360compact
®
19
®minCam GmbH, Bundesstraße 9, 87538 Fischen, Germany info@mincam.de
Version: March 2020, according to the technical state of the art at the time of publication, subject to alterations
2.2
Recording
The integrated display and recording unit is located in a housing which is attached to
the reel via the ball joint. The device is used to store videos and damage pictures,
even during video recording, on an SD card. Videos are stored as MPEG-4 files with
the file extension *.avi, damage pictures with *.BMP.
2.2.1
LED display SD Slot
The LED on the SD slot indicates the status of the system.
During the startup process the LED lights up constantly. When it starts flashing,
the system and SD card are ready for recording.
If the LED does not light up, the system is not ready for operation. No or no
compatible SD card is inserted.
2.2.2
Fernbedienung
Figure 2.7: Remote control TFT5(R)

User Manual minCam360compact®
20
®minCam GmbH, Bundesstraße 9, 87538 Fischen, Germany info@mincam.de
Version: March 2020, according to the technical state of the art at the time of publication, subject to alterations.
POWER
No function
PLAY
Recalling stored data
MENU Opening the menu
LEFT Selection to the left
UP
Selection upwards
RIGHT
Selection to the right
DOWN
Selection downwards
OK
Confirmation / Save picture
ESC
Back in menu / Pause video recording
REC
Start /Stop recording
Bz
Switch beep on / off
LED Switching live picture / display via storage unit
LOCK No function
2.2.3
Storage unit
The live picture can be displayed on the monitor directly or via the storage unit.
Switching between these two options is performed by pressing the LED button on
the remote control.
Figure 2.8: Live picture displayed directly on the monitor (left) and via the
storage unit (right)
The recording and saving of videos and damage pictures is possible in both
modes.
Various settings can be adjusted in the storage unit.

User Manual minCam360compact
®
21
®minCam GmbH, Bundesstraße 9, 87538 Fischen, Germany info@mincam.de
Version: March 2020, according to the technical state of the art at the time of publication, subject to alterations
Figure 2.9: Menu: Settings
Select the menu: “Settings“ with the “MENU“ button
Microphone
On / Off
Storage
Formatting, recording
System
Date, time
Settings, format, position, colour
Language
Status display
On / Record Status / Off
Factory settings
Software status
Version / Update
Table 2.2: Setting options for the storage unit
ATTENTION: Always select “MENU“ before removing the memory card.
2.2.4
Video
To record and save a video, proceed as follows:
1.
Start the video recording by pressing the ”REC” button. As soon as the recording is
started, a red square appears in the upper left corner of the picture (when displayed
via the storage unit):

User Manual minCam360compact®
22
®minCam GmbH, Bundesstraße 9, 87538 Fischen, Germany info@mincam.de
Version: March 2020, according to the technical state of the art at the time of publication, subject to alterations.
Figure 2.10: red square in the top left corner = recording in progress
Table of contents
Popular Digital Camera manuals by other brands

X4-Life
X4-Life SDK8320 instruction manual

Sealife
Sealife ReefMaster DC600 instruction manual

Nikon
Nikon Coolpix L32 quick start guide

Kodak
Kodak V1003 - EASYSHARE Digital Camera Specfications

Samsung
Samsung ST5000 Quick start manual

Olympus
Olympus Stylus 1200 Black - Stylus 1200 12MP Digital... Manuel Avancé