manuals.online logo
Brands
  1. Home
  2. •
  3. Brands
  4. •
  5. MINOURA
  6. •
  7. Rack & Stand
  8. •
  9. MINOURA BIKE PIT User manual

MINOURA BIKE PIT User manual

BIKE-PIT instructions manual /バイクピット 取扱説明書
Important Notes /注意していただきたいこと
• For normal 2-wheel bicycle only. Not
compatible with heavy electric or DH bikes
and long tandem bikes.
• Do not use BikePit for any other purposes
than instructed.
• BikePit is supported with the spring power
to the ceiling. Setup to the area where the
durable enough reinformcement ceiling
beam is located, and choose solid oor.
Failure to do so will cause serious damage
and injury while using.
!
!
!
Setup BikePit vertically between the ceiling and oor.
If the pillar has been slanted, it cannot support the bike
weight securely, and if something hit the pillar, it may fall
down and will cause serious accident.
バイクピットは天井と床との間で垂直にセットして使用
してください。傾いたまま設置されると十分な安定を確
保できなくなり,不意の地震や何かの衝撃で外れて転倒
する恐れがあります。
When you setup BikePit, make sure the Red Indicator is
completely hidden in the Upper Rubber Cup.
If you see the indicator even after setting up, it means you
didn't extend the pillar long enough and BikePit cannot
support the bike weight properly.
バイクピットの支柱長さを設定する際は,設置時に上側
ゴムカップの直下にある赤い警告表示が見えなくなるま
で,十分に支柱を伸ばしてください。
Make sure the Red
Indicator is invisible
赤い警告表示が見えて
いたらダメ
BikePit cannot be setup on any angled ceiling.
Choose the ceiling area where the reinforcement
beam is located. Just ceiling panel is not durable
enough and the pillar spring may break your ceiling.
Reinforcement Beam /梁
Ceiling Panel
(must be horizontal)
天井板
(必ず水平のこと)
- 1 -
(ver.2.2 2009/10)
Pillar Height Adjustability
支柱高さ調整範囲:
1.7 - 3.1 meter Upper Rubber Cup
上側ゴムカップ
Upper Pillar (40mm diameter)
上支柱(直径 40 ミリ)
Upper Hook (for front wheel)
上側フック(前輪用)
Pillar Joint /中間ジョイント
Lower Pillar (45mm diameter)
下支柱(直径 45 ミリ)
Lower Hook (for rear wheel)
下側フック(後輪用)
Lower Rubber Cup
下側ゴムカップ
Spring /バネ
[ Parts Name ]
<各部の名称>
Red Indicator /赤色警告表示
Required Tools /必要な工具
1 x M5 Hex Wrench / M5 六角レンチ
●バイクピットは通常の2輪自転車専用です。
 電動アシスト車や DH バイクのような重い自転車や, 
 タンデム車のような長い自転車には使用できません。
●支柱を水平に設置してそこに自転車をぶら下げるなど,
 この説明書で指示されていない用途には使用しないで
 ください。
●バイクピットは天井に対してバネで押し付ける力で設
 置されます。天井には梁が通り十分な強度を持つ場所
 にのみ設置してください。また床もしっかりと安定し
 ている必要があります。
 強度不足の場所に設置すると,倒れたりして怪我や損
 害の原因となります。
バイクピットは必ず十分
な強度を持つ梁の通った
場所に設置してください。
梁がない板だけの場所だ
と,バネの力で天井を突
き破ってしまう恐れがあ
ります。
1At rst, tighten the lower bolt on Pillar Joint rmly, then loosen the upper bolt to
extend the pillar.
Place the pillar on the oor and extend Upper Pillar to the ceiling.
Stop extending when Upper Rubber Cup touches the ceiling, and tighten the bolt
temporally (see Fig.A). (You don't need to tighten this bolt rmly at this moment.)
まず最初に中間ジョイントの下側のボルトをしっかりと締め込んでおきます。
続いて上側のボルトを緩め,支柱を伸ばしていきます。
下支柱を床に付けた状態で上支柱を天井に向かって伸ばしていき,上側ゴム
カップが天井に触れたところで,いったん中間ジョイントのボルトを仮締め
します(ここではまだ本締めする必要はありません)。(図A)
Tighten the bolt
temporally
上側ボルトは
仮締めのまま
2Remove the pillar from the ceiling. Be careful you don't change the pillar length at
this moment.
Extend the pillar 20mm more, then tighten the upper bolt on Pillar Joint rmly.
(see Fig. B)
いったん支柱を天井と床との間から取り外します。このとき支柱の長さが
変わってしまわないように注意してください。
この長さからさらにあと 20 ミリだけ支柱を伸ばし,その位置で中間ジョイ
ントのボルトをしっかりと締め込みます。(図B)
!
If the upper bolt on Pillar Joint has been loosened, Upper
Pillar may slide down due to the bike weight on Upper
Hook. Make sure this bolt is securely tightened.
中間ジョイントのボルトが緩んでいると,自転車をフッ
クに載せた荷重で上支柱がずり落ちてきてしまいますか
ら,しっかりと締め付けておいてください。
1) Loosen the upper bolt
 上側のボルトを緩める
3) Tighten the upper bolt
 上側のボルトを締める
2) Extend 20mm more
 20 ミリ伸ばす
How To Setup Pillar /支柱のセットのしかた
Setting Up Hooks /フックの組み付け方
1
(Fig. A)
(Fig. B)
If you see Red Indicator when nishing installing the pillar, it means the pillar
length is too short and BikePit cannot support the bike weight. It may cause
serious accident by falling down. Remove the pillar and adjust the pillar
length properly.
赤い警告表示が見えているこということは,支柱が十分に伸ばし切れていな
いことを意味します。そのままでは十分に荷重を支えることができず,転倒
してしまう恐れがあります。支柱の長さ調整をやり直してください。
!
- 2 -
Upper Hook
(for front wheel)
with 40mm band
上側フック
(前輪用)
Lower Hook
(for rear wheel)
with 45mm band
下側フック
(後輪用)
Install Upper Hook to Upper Pillar and Lower Hook to Lower Pillar with the supplied
Stainless Band Clip (see Fig. C & D)
Be sure there are two different sizes on the band clip. Use smaller (40mm) band for
Upper Pillar and the larger (45mm) band for Lower Pillar. There is no compatibility
between them.
上支柱に上側フックを,下支柱に下側フックを,それぞれステンレス
バンドで取り付けます。(図C・D)
ステンレスバンドには2つのサイズがあり,小さい方(40 ミリ用)を上支柱に,
大きい方(45 ミリ用)を下支柱に使用します。これらに互換性はありません。
!
It could be possible to hang down the bike upside down,
but you will be easily jammed by the wide handlebar
when passing by. So we don't recommend this style.
(Fig. C)
(Fig. D)
3To setup the pillar, attach Upper Rubber Cup to the ceiling and push the pillar toward the ceiling
to compress the spring.
Stand the pillar by moving Lower Pillar, then place on the oor when the pillar becomes vertical.
Make sure that Red Indicator is completely hidden in Upper Rubber Cup.
まず上側ゴムカップを天井に当て,そのまま天井に向かって突き上げるようにしてバネ
を縮めます。この状態のまま支柱を立てていき,垂直になったところで静かに床に下ろ
します。このとき赤い警告表示が完全に上側ゴムカップの中に隠れていることを確認し
てください。
自転車の上下をひっくり返して前輪を下にした
状態での使用はおすすめできません。
- 3 -
2
(Fig. E)
3
Stainless Band (40mm or 45mm)
ステンレスバンド(40 ミリまたは 45 ミリ)
Plastic Bracket /樹脂ブラケット
M6x30 Bolt
M6x30 ボルト
Flat Washer
平ワッシャ
90º
!
There are two sizes on the stainless
band clip; 40mm and 45mm.
Use 40mm for narrower Upper Pillar
and 45mm for fatter Lower Pillar.
Each one has its own size indication
on the surface as "40" or "45".
ステンレスバンドには 40mm と
45mm の2サイズがあります。
上支柱には 40mm を,下支柱には
45mm を使用します。互換性はあ
りません。それぞれに「40」や「45」
といったサイズの刻印があります。
(Fig. F)
(Fig. G)
!
!
Follow the steps below to install the stainless band clip;
1) Disassemble the band clip.
2) Open the band and wind around the pillar.
3) Overlap the band ends as the welded nut is located inner side (see
Fig. F). Make sure both ends are perfectly overlapped.
If the nut side has been bent in wrong angle, you won't be able to
screw the bolt. Adjust the angle properly.
4) Put Plastic Bracket on the band.
5) Insert M6x30 bolt with washer to the hole on the hook, then gently
screw to the hole on Plastic Bracket.
6) After adjusting the height and angle of each hook, tighten the bolt
rmly.
ステンレスバンドの取り付けかたは,以下の通りに行ないます。
1)いったんステンレスバンドを分解します。
2)バンドを開き,支柱に巻き付けます。
3)ナットが溶接されている側の端が内側になるようにして,
バンドの両端を重ね合わせます。(図F)
両方のバンド端がぴったりと重ね合わされていることを確
認してください。もし曲がっていたらバンドを曲げ直して
修正してください。
4)樹脂ブラケットをバンドにかぶせます。
5)M6x30 ボルトに平ワッシャを通し,フックの孔に通してか
ら,樹脂ブラケット中央の孔に静かにねじ込みます。
6)フックの高さや角度を調節したら,ボルトをしっかりとね
じ込みます。
Both band ends must be overlapped correctly, otherwise,
you cannot screw the bolt to the nut.
Make sure the nut is set in right angle (90 deg-rees) to the
bolt line. (see Fig. G)
バンド端は両方ともきちんと重なり合わなければなりま
せん。もしナット側が曲がっていると,ボルトがねじ込
めなくなります。ボルトに対してナットが直角になって
いることを確認してください。(図G)
Do not push the bolt hard when screwing in.
It will bend the thin band and you won't be able to tighten
the bolt.
ボルトをねじ込むとき,力を入れて押し込まないでくだ
さい。ナット側のバンド端が曲がってしまい,ボルトが
ねじ込めなくなってしまいます。
(Fig. H)
To mount the bike, hook the front wheel to Upper Hook to hang down the
bike. (see Fig. H)
Just hanging down won't keep the bike vertical due to the bike's
unsymmetrical weight balance. To hold the bike vertical, hook the rear wheel
by Lower Hook from behind. Adjust the contact position to adjust the bike
angle.
自転車を搭載するには,まず前輪を上側フックに掛け,自転車をぶら
下げます。(図H)
そのままだと自転車の重量バランスのために後輪が後方に傾いてしま
うため,下側フックで後輪を後ろから抱えるようにして支え,自転車
を垂直に保つようにします。フックのタイヤに当てる位置で自転車の
垂直度を調節します。
!
To avoid any damage to the tire valve, you should escape the
valve area for hooking.
前輪をフックに掛けるとき,フックでバルブを曲げたりしない
ように注意してください。
できるだけバルブから離れた位置で掛けると回避できます。
Contact /お問い合わせ先
If you have any questions or need help, you should contact the dealer where you purchased or the Minoura distributor in your country rst.
The distributor can be found on our web site. Only when you cannot get enough service, you can contact us.
もし何かご不明な点や不具合があった場合には,まずこの商品をお買い求めになったショップに最初にご連絡ください。
Made in Japan /日本製
- 4 -
MINOURA North America MINOURA Japan Headquarters
(Only for U.S. residents) (for every world-wide customers)
1996 East Ave. Hayward, CA 94541 U.S.A. 1197-1 Godo, Anpachi, Gifu 503-2305 Japan
Phone 1-510-538-8599 Fax +81-584-27-7505
Fax 1-510-538-5899 Mail [email protected]
Mail [email protected] Web www.minoura.jp
株式会社 深谷産業 株式会社 箕浦
〒 460-0015 名古屋市中区大井町 1-38  〒 503-2305 岐阜県安八郡神戸町神戸 1197-1
Phone (052) 321-6571 Phone (0584) 27-3131
Fax (052) 332-3166 Fax (0584) 27-7505
Web www.fukaya-sangyo.co.jp Mail [email protected]
For your safety, we recommend you to attach your BikePit to a secure
location with the supplied plastic tie and self-tapping screw.
予期しない地震や不慮の事態による転倒を防止するため,バイク
ピットは付属のケーブルを使ってしっかりした天井や壁などに固
定すべきです。
Self-Tapping Screw (M3.5x16 or 25)
Use proper size one
タッピングビスM3.5x16 または 25
いずれかを使用
How To Use The Supplied Zip-Tie /転倒防止ストラップについて

Other MINOURA Rack & Stand manuals

MINOURA TRUE-PRO User manual

MINOURA

MINOURA TRUE-PRO User manual

MINOURA P-500AL-6S User manual

MINOURA

MINOURA P-500AL-6S User manual

MINOURA RS-4000 User manual

MINOURA

MINOURA RS-4000 User manual

MINOURA P-700X User manual

MINOURA

MINOURA P-700X User manual

MINOURA FCG-310 - MANUAL 2 User manual

MINOURA

MINOURA FCG-310 - MANUAL 2 User manual

MINOURA RS-1100 User manual

MINOURA

MINOURA RS-1100 User manual

MINOURA BikeTower 20D User manual

MINOURA

MINOURA BikeTower 20D User manual

MINOURA P-500AL-2 User manual

MINOURA

MINOURA P-500AL-2 User manual

MINOURA WORKMAN PRO User manual

MINOURA

MINOURA WORKMAN PRO User manual

MINOURA T-817 User manual

MINOURA

MINOURA T-817 User manual

MINOURA LEVEL-170 User manual

MINOURA

MINOURA LEVEL-170 User manual

MINOURA W-300 User manual

MINOURA

MINOURA W-300 User manual

MINOURA DS-4000 User manual

MINOURA

MINOURA DS-4000 User manual

MINOURA RS-X User manual

MINOURA

MINOURA RS-X User manual

MINOURA BIKE TOWER 5 User manual

MINOURA

MINOURA BIKE TOWER 5 User manual

MINOURA VERGO EXCEL-S User manual

MINOURA

MINOURA VERGO EXCEL-S User manual

MINOURA VERGO EXCEL-L User manual

MINOURA

MINOURA VERGO EXCEL-L User manual

MINOURA DW-2 User manual

MINOURA

MINOURA DW-2 User manual

MINOURA P-700X User manual

MINOURA

MINOURA P-700X User manual

MINOURA DS-110 DS-100H User manual

MINOURA

MINOURA DS-110 DS-100H User manual

MINOURA RS-1200 User manual

MINOURA

MINOURA RS-1200 User manual

MINOURA PAIR STAND User manual

MINOURA

MINOURA PAIR STAND User manual

MINOURA P-600AL User manual

MINOURA

MINOURA P-600AL User manual

MINOURA LEVEL-170H User manual

MINOURA

MINOURA LEVEL-170H User manual

Popular Rack & Stand manuals by other brands

Vintage King Rack Side Feet 500 Installation

Vintage King

Vintage King Rack Side Feet 500 Installation

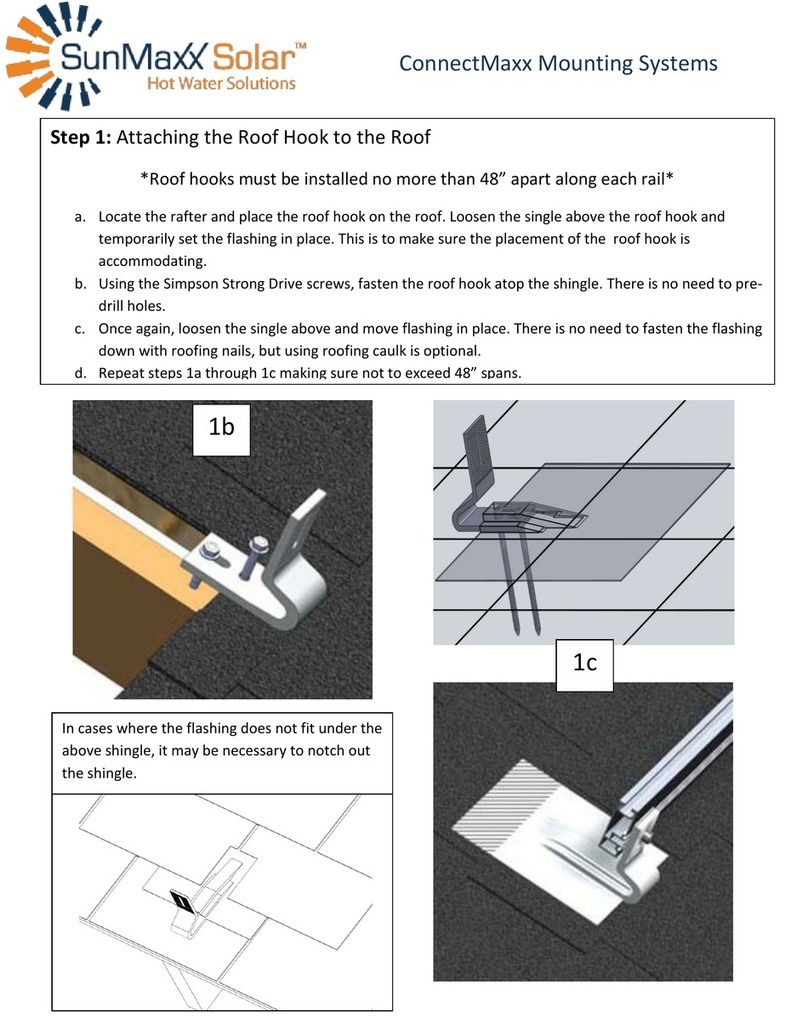
SunMaxx Solar ConnectMaxx installation guide

SunMaxx Solar

SunMaxx Solar ConnectMaxx installation guide

AmazonBasics WISHR-003 Welcome guide

AmazonBasics

AmazonBasics WISHR-003 Welcome guide

HUANUO HNSS12 instruction manual

HUANUO

HUANUO HNSS12 instruction manual

Axiom DEX quick start guide

Axiom

Axiom DEX quick start guide

SKY-WATCHER SynScan EQ6 Pro instruction manual

SKY-WATCHER

SKY-WATCHER SynScan EQ6 Pro instruction manual

Sunforce Unirac 33800 manual 

Sunforce

Sunforce Unirac 33800 manual 

Realfiction Dreamox XL3 Basic Stand Assembly guide

Realfiction

Realfiction Dreamox XL3 Basic Stand Assembly guide

CommScope BSAMNT-SBS-2-3 instruction sheet

CommScope

CommScope BSAMNT-SBS-2-3 instruction sheet

Blichmann Command Stand Assembly operation maintenance

Blichmann

Blichmann Command Stand Assembly operation maintenance

Saris Freedom SuperClamp Spare Tire Assembly instructions

Saris

Saris Freedom SuperClamp Spare Tire Assembly instructions

Vantage Point Products AX2LSB01 Assembly instructions

Vantage Point Products

Vantage Point Products AX2LSB01 Assembly instructions

BAHR Modultechnik LSZ 60 installation instructions

BAHR Modultechnik

BAHR Modultechnik LSZ 60 installation instructions

Samsung SBP-300NB user manual

Samsung

Samsung SBP-300NB user manual

RedNeck Deer Assembly instructions

RedNeck

RedNeck Deer Assembly instructions

AKRO-MILS AkroBin AC3618KD4AS Assembly instructions

AKRO-MILS

AKRO-MILS AkroBin AC3618KD4AS Assembly instructions

ERARD EXO XXL TW3 manual

ERARD

ERARD EXO XXL TW3 manual

Halo LT4 installation instructions

Halo

Halo LT4 installation instructions

manuals.online logo
manuals.online logoBrands
  • About & Mission
  • Contact us
  • Privacy Policy
  • Terms and Conditions

Copyright 2025 Manuals.Online. All Rights Reserved.