TPH-1 の使い方/ HowToUseTPH-1
注意していただきたいこと/ ImportantNotes
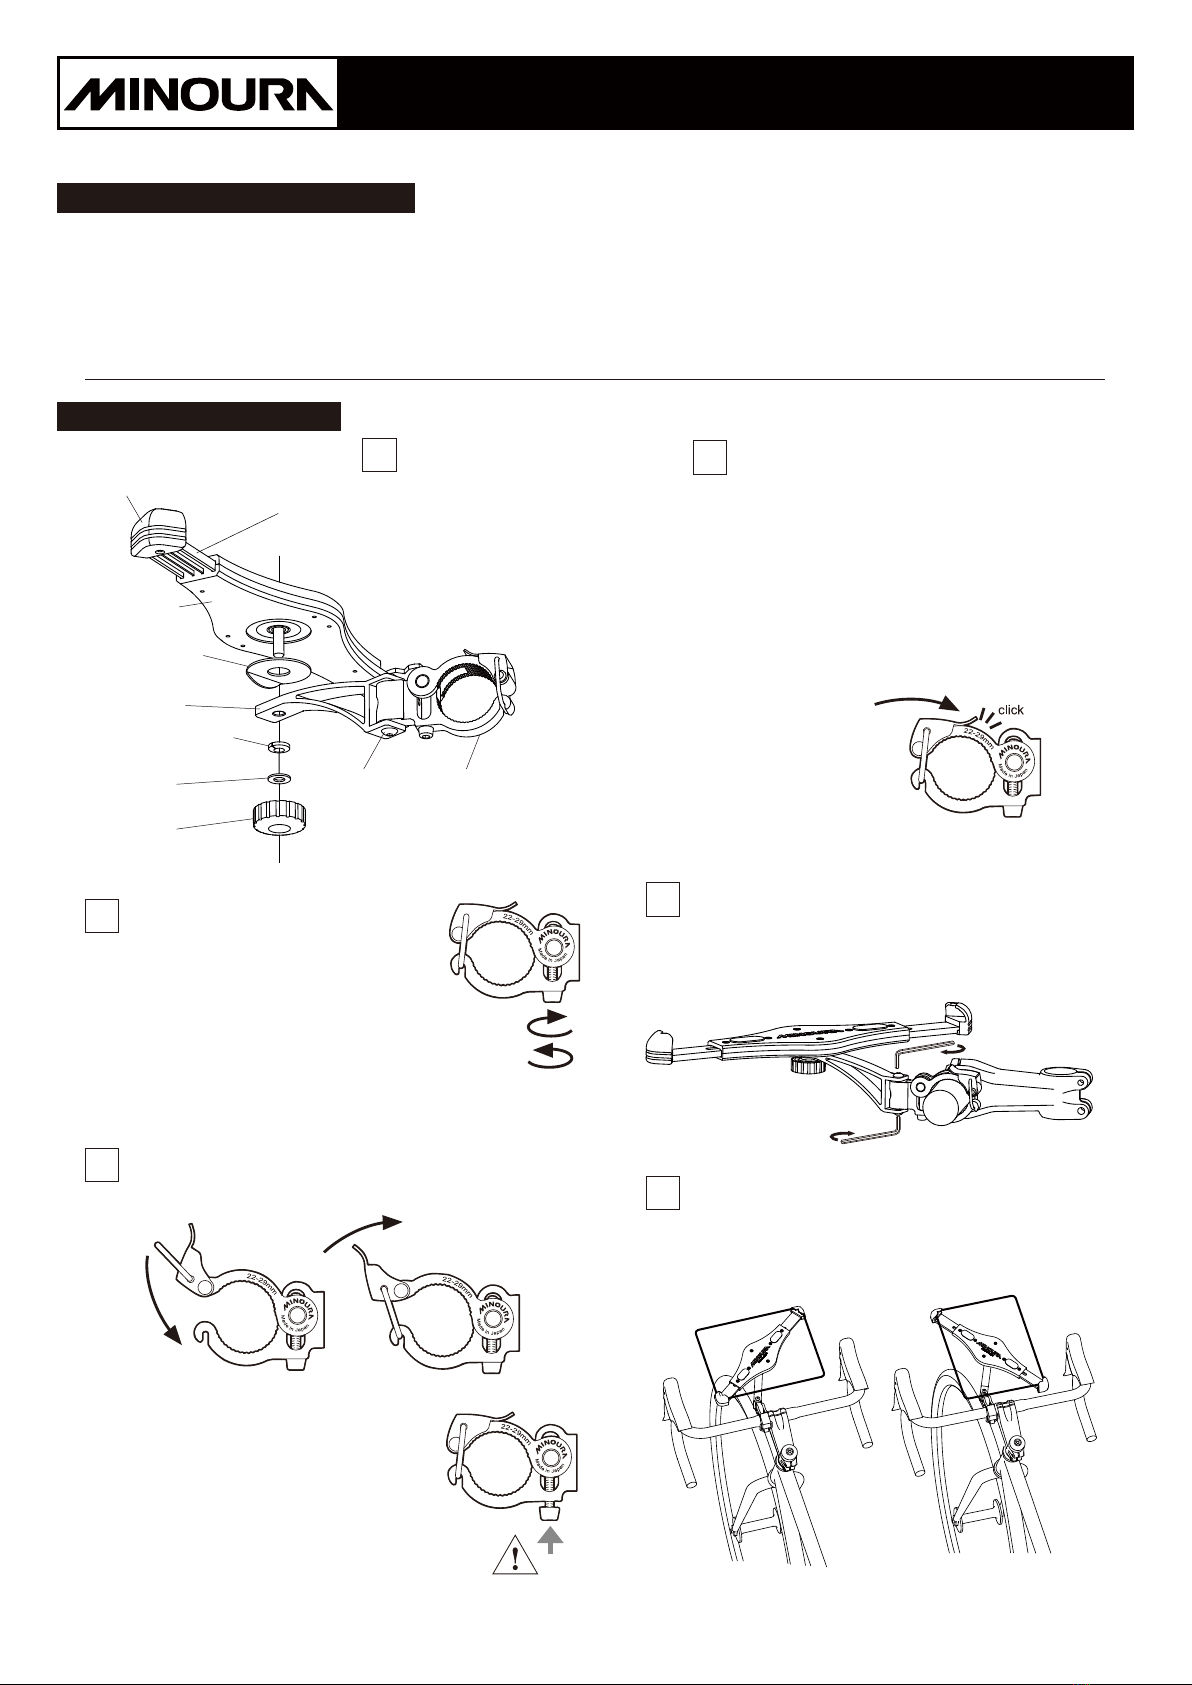
最小/ Minimum:28mm
最大/ Maximum:35mm
2あらかじめクランプ側面の調整ボルトを回して
クランプの開き幅をハンドルバーのおよその
径に合わせておきます。
傷防止の東名ショートをハンドルバーに巻き、
その上からクランプをかぶせます。
Turnthesidescrewtoroughly
adjusttheclampopeningsize
tofityourhandlebar.
Windthesuppliedvinylsheeton
theclampingpositiontoavoidthe
scratching.
3リングを反対側のフックに掛け、レバーを倒してクランプを
締め付けます。
Hooktheringthenpulldownthelevertoshuttheclamp.
このとき調整ボルトがいっぱいにクランプに
引きこまれていることを確認してください。
浮いていると正しく締められません。
Makesurethesidescrewhasbeenfully
retractedintotheclampbody.
Failuretodosowillcausetheunexpected
droppingoffproblem.
4レバーをいっぱいに倒したとき「パチン」と
音がするくらいの力でリングを引き込んで
いれば、正常にクランプできています。
音がしない、あるいは弱い場合は緩んでいる
証拠なので、いったんレバーを起こして締め
付けを解除し、側面ボルトをもう少し締めて
から、もう一度レバーを倒してみてください。
Ifyouhearclickingsoundwhencompletely
closingthelever,itʼ sthesignofcorrect
installation.
Ifyoudonʼ thearanysoundoriftheclamp
isloose,releasetheleverandtightenthe
sidescrewalittlemore.
Iftheleveristoo
tight,clampmay
havedamageand
youmaybeinjured.
Slightlyloosenthe
sidescrew.
6レールを引っ張ってタブレットを対角線状に挟み込みます。
ホルダは回転できるので、タブレットは横置き・縦置き
どちらでも可能です。
ThetabletPCisswivel.Youcansetitatyourfavoriteangle.
Afteradjustment,firmlytightenthebacksideknobnut.
ホルダ本体
Holder
段付きワッシャ
BentWasher
アームArm
スプリングワッシャ
SpringWasher
平ワッシャ
FlatWasher
ノブナット
KnobNut
グリップラバー
GripRubber
クランプ
Clamp
ピボットボルト
PivotBolt
レール
Rail
●屋内使用のみです。装着したまま路上を走行しないでください。
●対角線寸法が 280mm 〜 320mm のタブレット用です。付属の短い方のレールに付け替
えることで、215mmまでのサイズに対応できます。
●厚さは 10mmまでの対応です。ジャケットを装着している場合、取り外す必要が出る場合
があります。
●装着中のタブレットを引っ掛けて落とさないように注意してください。
●タブレットへの防水機能はありません。汗などに注意のこと。
●Indooruseonly.Donotrideoutsidewhileusing.
●ForthetabletPCwith280‒320mmdiagonaldimention.Replacetherailarmto
thesuppliedshorteroneforusingsmallertabletPCupto215mm.
●Maximumcapablethicknessis10mm.MakesureyourtabletPCisthinnerthan
10mmespeciallywhenwearingajacketorcovers.
●BecarefulnottohitthetabletPCwhileholding.Itmaycomeoffanddrop.
●Nowater-prooffunction.
5クランプから伸びるアームは必要に応じて角度を変えることが
できます。角度を決めたら上下のボルトを3mm六角レンチで
締め付けて固定します。
TheArmisangleadjustable.Setatyourfavoriteanglethen
tightenthescrewstofixtheposition.
1台紙から取り外し、左図のように組み
立てます。
段付きワッシャにはアームの先端が
当たるようにします。
Removefromthepackagecard,
thenreassembleasshowninthe
abovepicture.
MakesurethetipoftheArmfits
thebentpartoftheBentWasher.
タブレットグリップ TPH-1 取扱説明書
TPH-1 Tablet Grip ‒ instructions manual


