Minox DTC 1000 User manual

1
MINOX DTC 1000
Instructions

2
MINOX DTC 1000
•English page 43

43
Content
Scope of Delivery 45
Accessories (optional) 45
Introduction 46
Get to Know Your MINOX DTC 1000 47
Controls 49
Preparing Your Camera 49
-ExplanationoftheControls 49
-InsertingtheBatteries 50
-CheckingtheBatteryStatus 50
-InsertingtheMemoryCard 50
-InsertingtheSIMCard 51
-LanguageSettings 51
-MountingtheCamera 52
Setup and Operational Modes 52
-SetupMode 52
-OperationalMode 52
Menu Functions and Settings 53
-ManualRelease 53
-CameraMode 53
-VideoMode 53
-DayandNightModes 54
-PhotoandVideoPlayback 54
-DeletePhotosorVideos 54
-VideoPlayback 54
-A. Camera Setting 55
-CameraMode 55
-PhotoFormat 55
-PhotoResolution 55
-PhotoBurst 55
-VideoResolution 55
-VideoLength 56
-VideoSound 56
-QuietTime 56
-Illumination 56
-TimeStamp 57
-SetDate/Time 57
-AccessControl 58
-PowerType 58
-Format 59
-Temperature 59
-DutyTime 59
-Timelapse 60
-Defaultset 61

44
-B. GSM Setup 61
-Settings Using the
Download Tool Software 61
-SendMode 62
-SendVia 62
-SendTo 65
-OperatorParameter 65
-Recipients 66
-RemoteControl 66
-CameraName 68
-GPS 68
-Path 68
-TestingtheMobilePhoneNetwork 68
-Settings Using the Camera 69
-SendMode 69
-SendVia 71
-SendTo 71
-NetworkSetup 71
-DownloadTool 73
-RemoteControl 73
-C. GPS Input 74
-D. Language 74
-E. Camera Information 74
-FilesCount 74
-Storage 75
-FirmwareVersion 75
-CameraName 75
Connecting the Camera
to a Computer 75
-ConnectingWithaUSBCable 76
-TransferringPhotosandVideosViaSDCard 76
MPEG-4 Visual Patent Portfolio License 76
Technical Data 77
Warranty Terms 78

45
Scope of Delivery
- MINOXDTC1000TrailCamera
- Mountingstrap
- USBcable
- 12x1.5VAAbatteries
- 2GBSDcard
- Instructions
Important notice
PleaseuseonlytheSDcardincludedinthescope
ofdelivery.However,ifyouuseadifferentcard,
pleaseformatthecardasdescribedonpage59.
Filesonthecardfromotherdevicescanaffectthe
functionalityofthecamera.
Accessories (optional)
- Poweradapter(EUversion),orderno.65016
- Cableforattachmenttoanexternalbattery,
orderno.65017
- Bracket,orderno.65019
FurtherinformationaboutaccessoriesfortheDTC
1000canbefoundontheMINOXwebsite:
www.minox.com

46
Introduction
CongratulationsonthepurchaseofyourMINOXDTC
1000trailcamera.
LikeallotherMINOXproducts,thisMINOXDTC1000
trailcameraboastsofthetraditionalvaluesfostered
byMINOX.Itcombinesfunctionalityandbestoptical
qualityinthesmallestpossiblespace.Simpleandfast
operationmakestheMINOXDTC1000idealfordigi-
talphotosandvideosintheintendedfieldsofuse.
Theseinstructionsaretohelpyoumakethemostof
thefullrangeoffunctionsofferedbyyourMINOX
DTC1000trailcamera.

47
Get to Know Your MINOX DTC 1000
Pleasetakeafewmomentstoreadtheseinstructions
carefully.
WewishyoumuchenjoymentwithyourMINOX
product!
Someproducthighlightsinclude:
- Sendsimagestoyourcellphoneorper
e-mailinstantly
- Quadbandtechnology
- Builtinmicrophoneforaudioonvideomode
- Dailyreport(totalpicture/videonumberget
capturedduringthepast24hours,thebattery
levelandremainingstoragespace)
- IR-flashwithblackfilter
- Adjustablemotionsensor
- HighrangeIR-flashofmorethan50feet(15m)
- 8megapixelresolution
- Convenient2.0"colormonitor
- Simpleandintuitiveoperation,
6-buttoncontrolpanel
- Shortshutterreleasedelayofjust1second
- Pictureseriesandshortvideos
- Multilingualmenunavigation
- SD/SDHCcardupto32GB(2GBcardincluded)
- Smallanddiscreet
- Lowpowerconsumption
- Passwordprotected
- Padlocklockable

48
17
18
17
8
19
11
12
13 14 15 16
2 3
45
6
7
1
9
10

49
Controls
1. IRLEDswithablackfilterfornightrecordings
2. Twilightsensor
3. BlueactivationLED
4. Cameralens
5. Lockablelatch
6. Motionsensor
7. Rubberplugforexternalpowersupply
8. 2”LCDcolordisplay
9. Memorycardslot
10.SIMcardslot
11. Controlbuttons,OKbutton
12. Mainswitchwiththreepositions:
Off/SetupMode/OperationalMode
13. Portforexternalpowersupply(6V/9VDC)
14.USBcableport
15.Menubutton
16.Batterycompartmentfor12x1.5VoltAAbatteries
17. Mountingbrackets
18.¼”tripodthread
19. Antenna
Preparing Your Camera
Explanation of the Controls
Proceedasfollowstopreparethecameraforuse:
1.PlaceyourDTC1000onaflatsurface.
2.
Pushthelatch(5)upontherightofthecamerabody.
3.Foldthelatch(5)overtotheright.
4.Openthefrontofthecameratotheleft.
Ontheleftoftheopenedcamerabodyyouwillsee
thecontrols(11,12,15)andontherightthebattery
compartment(16).Ontheleftouteredgeofthecam-
erabodyyoucanfindthememorycardandSIMcard
slots(9/10).Atthetopoftheinnersurfaceisthe2”
LCDdisplay(8).Belowthedisplayyouwillseethe
fourdirectionalbuttonstomakeselectionsinthemenu
(11).InthecenterofthesebuttonsyouwillfindtheOK
button(11)usedtoconfirmtheselectedmenusettings;
theoval-shapedENTERbuttontotheupperright(15)is
toswitchbacktothemainmenuwhileinSetupMode.
Onthebottomleftisthemainswitch(12)withthree
positionsforthefollowingsettings:
1.OFF=mainswitchtotheleft
2.SET=SetupMode;mainswitchinthemiddle
3.ON=OperationalMode;mainswitchtotheright

50
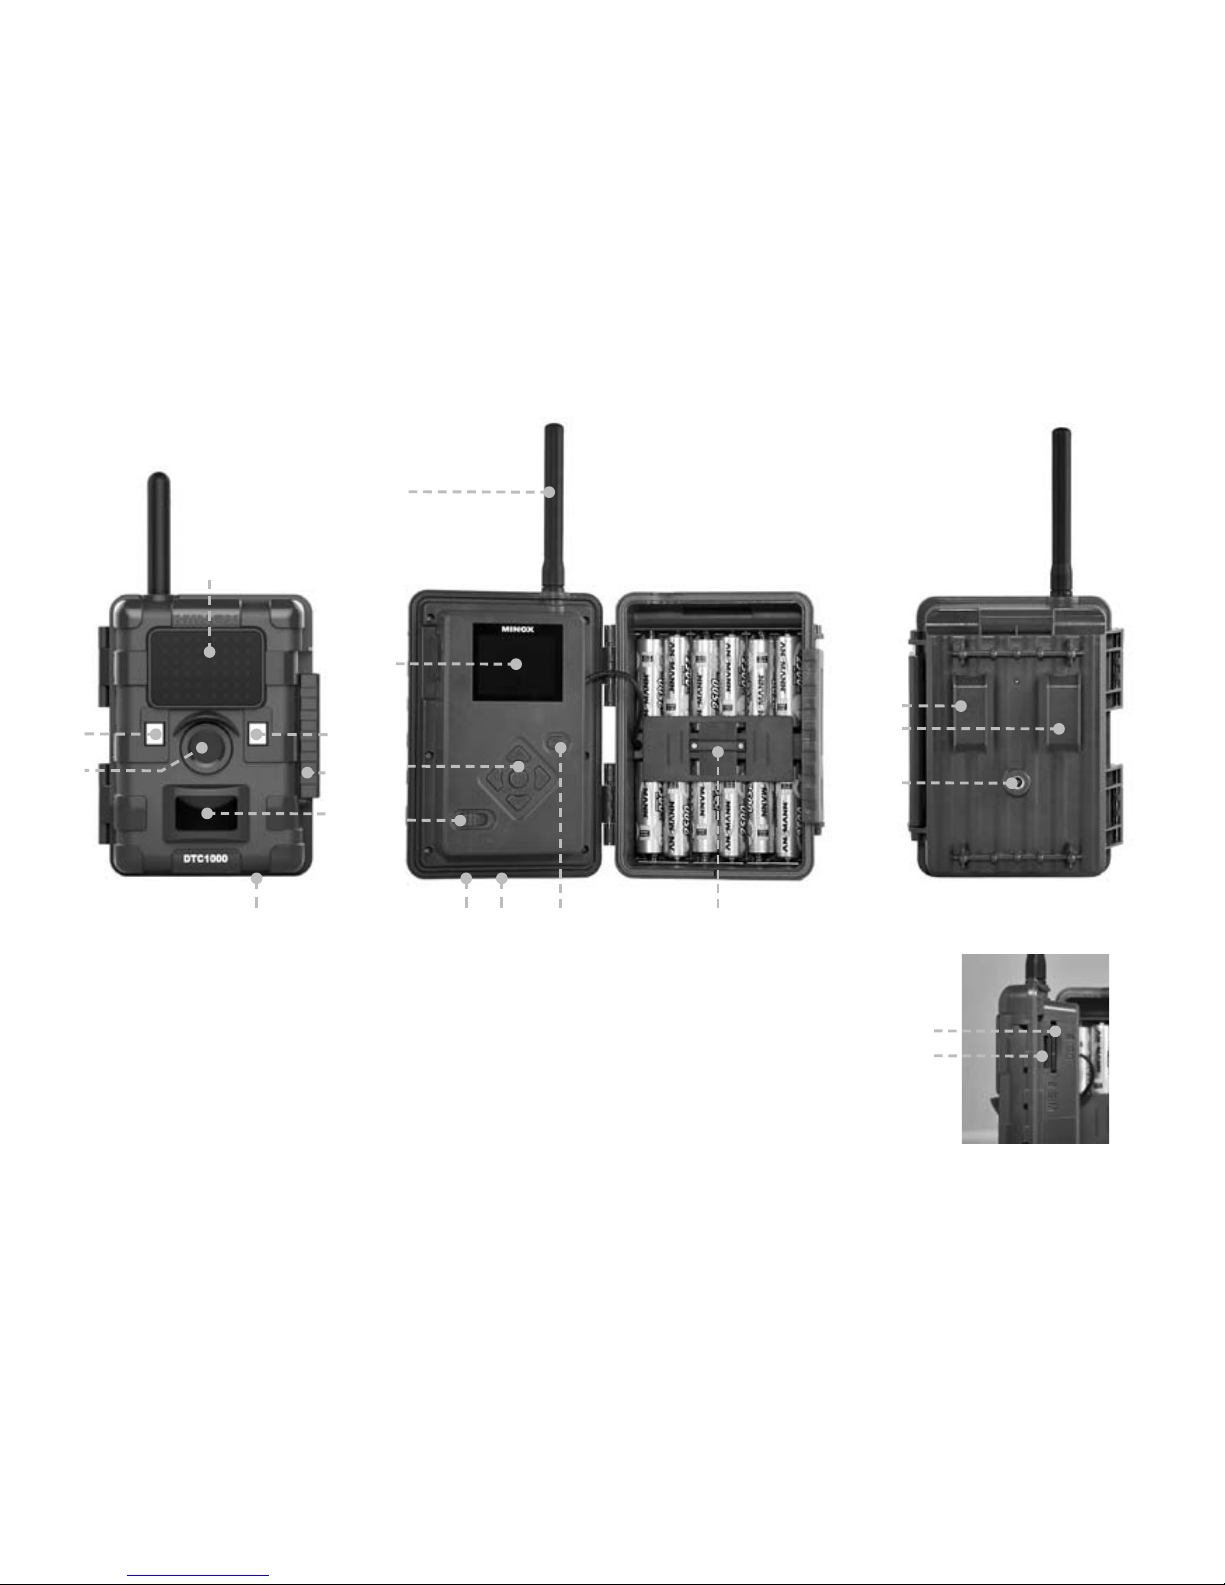
Onthebottomofthecamerathereareadditional
portsfor:
- externalpowersupply(13)
- USBcable(14)forattachingthecameratoacom-
puter(readmoreunder“Attachingthecamerato
acomputer”)
Toclosethecamerabody,proceedasfollows:
1. PlaceyourDTC1000onaflatsurfaceinfrontofyou.
2.Foldthecamerabodytotheright.
3.Foldupthelatch(5)ontheright.
4.Slidethelatch(5)downuntilfirmlyinplace.
Inserting the Batteries
YourDTC1000cameraisdesignedforAAalkaline,
lithium-ion(Li-Ion)ornickelmetalhydride(NiMH)
batteries.Toinsertthebatteries,openyourcamera
andinserttwelve1.5VoltAAbatteriesintothebat-
terycompartment(16),makingsurethatthe(+/-)
polesareintherightdirection.
Note: Alternatively,anexternalpowersupplyof
6Vor9Vcanbeused.Ifthecameraisconnected
toanexternalpowersupply,thebatterieswillbe
bypassed–itisthusnotpossibletorechargebat-
terieswhiletheyareinthecamera.Pleasedonot
usea12Vpowersupplyasthiswilldamagethe
cameraandnullifythewarranty.
Checking the Battery Status
SwitchtheDTC1000intoSETmode(mainswitch
(12)tothemiddle).Youcanfindthebatterystatus
symbolinthebottomleftoftheLCDdisplay(8).
Note:Forbestresults,werecommendusinghigh
qualitybatteries.Thebatterylifecanbeprolonged
byproducingshortervideosegments,shortphoto
burstsorlonger“quiettimes”–see“QuietTime”
under“CameraSettings”.
Inserting the Memory Card
YourDTC1000camerasupports(SD/SDHC)memory
cardswithacapacityofupto32GB.Insertthemem-
orycardintothememorycardslot(9)withthebrass
coloredcontactstowardtheinsideofthecamera.
MakesurethatthecameraisoffandthattheSD
cardisnotlocked.
Note: FormatyourSDcardusingyourPCbefore
everyuse–wesuggestnottoformatthecardwith

51
theDTC1000(seealso“Format”under“Camera
Setting”).Thisproceduredeletesolderdatafrom
theSDcardandpreparesyourcardforanerror-free
operationinyourcamera.Itisrecommendedto
recordsomeimagesdirectlyafterinsertingtheSD
cardtoverifythecamera’sfunctionality.
Pleasemakesurethatthecameraisturnedoffbe-
foreinsertingorremovingtheSDcard.Switchyour
DTC1000toSET(12)tocontinuewithyourcamera
settings.
Inserting the SIM Card
TosendphotoswithyourDTC1000,youwillneed
anactivatedSIMcardfromamobilephoneprovider
ofchoice.Youcanuseaprepaidcardoraphone
plancard.MakesurethatthecardusedfortheDTC
1000isactivatedtosendMMSmessages.Itisalso
importantthatthiscardisnotlockedwithaPIN.
Note:MINOXassumesnoresponsibilityforany
coststhatmayariseinconnectionwiththeuseof
mobiletelephonenetworks.
InserttheSIMcardintothecorrectslot(10)withthe
chiptowardsthefrontofthecamera.Aschematic
imprintofthepropercardpositionisindicatednext
tothecardslot.
Note:Pleasemakethesurethecameraisturned
offbeforeinsertingorremovingthecard.
Language Settings
TheDTC1000TrailCameraissettoEnglishbyfactory
default.Tochangethemenunavigationtoadifferent
language,pleasefollowthesesteps:
1.Pushthemainswitch(12)toSET.
2.YouarenowinManualReleasemode.
3.PushMENU(15)once.Youarenowinthemain
menuofthecamera.
3.PushtheUParrowbutton(11)twice.
4.Youarenowinthe“Language”menu.
5.PushOK(11)once.
6.UsingtheUP/DOWNarrowbuttons(11),selectthe
desiredlanguage.
7.PushOK(11)once.
8.Themainmenuisnowinthelanguageyouhave
chosen.

52
Mounting the Camera
1.Mountingstrap
Onthebackofthecameraaretwomountingbrack-
ets(17)forfixingthecameratoatreeorpostwitha
strapormountingharness.Passthemountingstrap
(includedinthescopeofdelivery)throughthetwo
brackets,aroundatreeorpostandfastentightly
withthebuckle.
2.Tripod
Onthebackofthecameraisa¼”tripodthread(18)
formountingthecameraonatripod.
Setup and Operational Modes
Yourcamerahastwomainmodes:
Setup Mode
SwitchyourDTC1000toSET(12).Youarenowin
ManualReleasemode.PushMENU(15)onceto
enterthemainmenuofthecamera.Inthismode
youcanprogramthecameraandsetthedate,time,
temperature,etc.,tobedisplayedinthephotosor
videofootage.
Operational Mode
SwitchyourDTC1000toON(12).Inthismode,your
DTC1000camerawillbefullyoperationalinaccord-
ancewiththesettingsthathavebeenmadeduring
theSetupMode.
Note:TheblueactivationLED(3)willblinkafew
secondsbeforethecameraisinfulloperational
mode.

53
Menu Functions and Settings
ThemainmenuofyourDTC1000has5menuitems
tochoosefrom:
A.CameraSetting
B.GSMSetup
C.GPSInput
D.Language
E.CameraInformation
PushMENU(15)toenterthemainmenuofthecam-
era.In“CameraSetting”(A)youcansetthecamera
parameterstosuityourparticularneeds.In“GSM
Setup”(B)youcanmakethesettingsrequiredto
connectthecameratothemobilephonenetwork.
In“GPSInput”(C)youcansettheGPScoordinates
tobeintegratedintothemeta-dataofthephotos.
In“Language”(D)youcanchoosethelanguageto
beusedtooperatethecamera.“CameraInforma-
tion”(E)providesyouwithanoverviewofrelevant
informationaboutyourDTC1000suchasavailable
storagespace,firmwareversionorcameraname.
Manual Release
ThisoptionenablesyoutouseyourDTC1000asa
normaldigitalcamera.Aswithanycommondigi-
talcamera,youcanviewscenesonthedisplayand
capturethemasphotosorvideos.TheDTC1000is
inManualReleasemodebydefaultafterswitch-
ingthecameratoSET(see“SetupandOperational
Modes”).Youcanswitchbetweenthecameraand
videomodeusingtheLEFT/RIGHTarrowbuttons
(11).PushMENU(15)toenterthemainmenu.Push
MENUagaintogobacktotheManualReleasemode.
Camera Mode
ThefollowingisvisibleintheLCDdisplay(8):At
thetopleftisthecamerasymbolwiththecurrent
resolutionsettingandthetoprightthefilecapacity
[0000/0000].Atthebottomleftisthecurrentpower
sourceandbatterylevel.IfaSDcardhasbeenin-
serted,youwillseetheSDcardsymbolatthebottom
rightofthedisplay.PushOK(11)totakeapicture.
Video Mode
Toswitchtovideomode,pushtheLEFTarrowbutton
(11).ThefollowingisvisibleintheLCDdisplay(8):
Atthetopleftisthevideocamerasymbolandat
theupperrighttherecordedtime[00:00:00].Atthe

54
bottomleftisthecurrentpowersourceandbattery
level.IfaSDcardhasbeeninserted,youwillseethe
SDcardsymbolatthebottomrightofthedisplay.
PushOK(11)tobeginrecordingavideo.PushOK
againtostoprecording.
Day and Night Modes
WhileinManualReleasemode,youcanactivatethe
dayornightmodebyusingtheUParrowbutton(11).
YourDTC1000issettodaymodebydefault–photos
andvideoswillbeincolor.Toentertheinfra-red
nightmode,pushtheUParrowbutton(11).Thedis-
play(8)willchangefromthedaytimeviewincolor
totheinfra-rednighttimeviewinblackandwhite.
Photo and Video Playback
WhileinManualReleasemode,pushtheDOWNar-
rowbutton(11)orgoto“Playback”foundin“Camera
Mode”under“CameraSetting”.Youcannowview
thephotosorvideosintheLCDdisplay(8).There-
cordedformatcanbeseenintheupperrightofthe
displayintheformofeitheraJPGorfilmstripsymbol.
Abovethesymbol,youcanseethefilenumberand
numberoffiles.Thelengthofthevideocanbeseen
atthetopleft.BypushingtheLEFT/RIGHTarrowbut-
tons(11)youcanbrowsethefiles.IftheGSMsettings
havebeencorrectlymade,youcansendaselected
photodirectlytoapredefinednumberoremailad-
dressbypushingOK(11).Itisnotpossiblehowever,
tosendvideosviayourSIMcard.PushMENU(15)to
enterthemainmenuortheDOWNarrowbutton(11)
togobacktoManualReleasemode.
Delete Photos or Videos
Whileinthemanualreleasemode,pushtheDOWNar-
rowbutton(11)orselect“Playback”foundin“Camera
Mode”under“CameraSetting”.Searchforthephotoor
videothatyouwouldliketodeleteusingtheLEFT/RIGHT
arrowbuttons(11).PushtheUParrowbutton(11)to
enterthesubmenu.UsetheUP/DOWNarrowbuttons
(11)tochoosebetween“DeleteOne”or“DeleteAll”.
VerifyyourchoicewithOK(11)andselecteither“No”
or“Yes”.VerifyyourchoiceagainwithOK(11).Push
MENU(15)togobacktotheManualReleasemode.
Video Playback
UsetheLEFT/RIGHTarrowbuttons(11)tobrowseyour
filesuntilyoufindthevideothatyouwouldliketoview
andthenpushOK(11).IfyoupushOKagain,astillshot
ofthevideowillbeseen.PushOKagaintocontinue
playback.PusheitherMENU(15)ortheDOWNarrow
button(11)togobacktoManualReleasemode.

55
A. Camera Setting
Camera Mode
YoucansetyourDTC1000toeithertakephotosor
recordvideos.PushMENU(15)toenterthemain
menuandselect“CameraMode”.PushtheLEFTar-
rowbutton(11)toenterthepreviousmenuorpush
OK(11)andthenusetheUP/DOWNarrowbuttons
(11)tomakeyourselection.Afterverifyingyourse-
lectionwithOK(11),youwillautomaticallyenterthe
manualreleasemode.Select“Playback”ifyouwish
toviewyourfiles.Fromhere,youcanpressMENU
(15)togobacktoManualReleasemode.
Photo Format
Gotothemainmenuandselect“CameraSetting”
andthenpushOK(11).Select“PhotoFormat”and
verifywithOK(11).UsingtheUP/DOWNarrowbut-
tons(11),selectadesiredformat–“Normal”(4:3)or
“WideVision”(16:9)–andverifywithOK(11).You
willautomaticallyenterthe“CameraSetting”menu.
YoucanmakefurthersettingsorpushtheLEFTarrow
button(11)toenterthepreviousmenu.
Photo Resolution
Gotothemainmenuandselect“CameraSetting”
andthenpushOK(11).Select“PhotoResolution”
andverifywithOK(11).Selectthedesiredresolu-
tion–3MP,5MPor8MP–usingtheUP/DOWN
arrowbuttons(11)andverifywithOK(11).Youwill
automaticallyenterthe“CameraSetting”menu.You
canmakefurthersettingsorpushtheLEFTarrow
button(11)toenterthepreviousmenu.
Photo Burst
Hereyoucansetthecameratotakeeitherone,two
orthreephotosinsequencewitheverytriggerre-
lease.Gotothemainmenuandselect“CameraSet-
ting”andthenpushOK(11).Select“PhotoBurst”
andverifywithOK(11).PushtheUP/DOWNarrow
buttons(11)tomakeyourselectionofone,twoor
threephotosandthenverifywithOK(11).Youwill
automaticallyenterthe“CameraSetting”menu.You
canmakefurthersettingsorpushtheLEFTarrow
button(11)toenterthepreviousmenu.
Video Resolution
Gotothemainmenuandselect“CameraSetting”
andthenpushOK(11).Select“VideoResolution”
andverifywithOK(11).Selectthedesiredresolution

56
–HD(1280x720)orVGA(640x480)–usingtheUP/
DOWNarrowbuttons(11)andverifywithOK(11).
Youwillautomaticallyenterthe“CameraSetting”
menu.Youcanmakefurthersettingsorpushthe
LEFTarrowbutton(11)toenterthepreviousmenu.
Video Length
Gotothemainmenuandselect“CameraSetting”
andthenpushOK(11).Select“VideoLength”and
verifywithOK(11).PushtheUP/DOWNarrowbut-
tons(11)toselectyourdesiredvideolength(5-60
sec.)andthenverifywithOK(11).Youwillauto-
maticallyenterthe“CameraSetting”menu.Youcan
makefurthersettingsorpushtheLEFTarrowbutton
(11)toenterthepreviousmenu.
Video Sound
Herethevideosoundcanbeactivatedordeactivated
wheninvideomode.Gotothemainmenuandse-
lect“CameraSetting”andthenpushOK(11).Select
“VideoSound”andverifywithOK(11).PushtheUP/
DOWNarrowbuttons(11)toselect“ON”or“OFF”
andthenverifywithOK(11).Youwillautomatically
enterthe“CameraSetting”menu.Youcanmake
furthersettingsorpushtheLEFTarrowbutton(11)
toenterthepreviousmenu.
Quiet Time
Hereyoucansettheintervalsbetweenshutterre-
leaseswheretheDTC1000shouldnotrecordimages
ie.howlongthemotionsensorshouldbedeactivated
duringadesiredinterval.Theintervalscanbeset
between5to59secondsand1to60minutes.Goto
themainmenuandselect“CameraSetting”andthen
pushOK(11).Select“QuietTime”andverifywithOK
(11).PushtheUP/DOWNarrowbuttons(11)tomake
yourselectionandthenverifywithOK(11).Youwill
automaticallyenterthe“CameraSetting”menu.You
canmakefurthersettingsorpushtheLEFTarrow
button(11)toenterthepreviousmenu.
Note:Thisfunctionisalwaysactivated.Theshort-
estpossibleintervalbetweenphotos,photobursts
orvideorecordingsis5seconds.Pleasemakesure
thatadesiredintervalissetbeforeusingthecamera.
Illumination
ThisfunctionhasnoinfluenceontheDTC1000.
Pleasemakesurethat“Internal”isalwaysactivated.

57
Time Stamp
Hereyoucanactivateordeactivatethetimestamp
foryourphotosorvideos.Gotothemainmenuand
select“CameraSetting”andthenpushOK(11).Us-
ingtheUP/DOWNarrowbuttons(11),select“Time
Stamp”andthenverifywithOK(11).Makeyour
selectionusingtheUP/DOWNarrowbuttons(11)
andpushOK(11).Youwillautomaticallyenterthe
“CameraSetting”menu.Youcanmakefurtherset-
tingsorpushtheLEFTarrowbutton(11)toenterthe
previousmenu.
Set Date/Time
Hereyoucansetthedateandtimethatwillappear
inthetimestamp.Gotothemainmenuandselect
“CameraSetting”andthenpushOK(11).Usingthe
UP/DOWNarrowbuttons(11),select“SetDate/
Time”andthenverifywithOK(11).Inthesub-menu,
youcanmakethefollowingthreesettings:
DateFormat
ChooseyourdesireddateformatandthenpushOK
(11).Youwillautomaticallyenterthe“CameraSet-
ting”menu.Youcanmakefurthersettingsorpush
theLEFTarrowbutton(11)toentertheprevious
menu.
TimeFormat
Chooseyourdesiredtimeformatof12or24hours
andthenpushOK(11).Youwillautomaticallyenter
the“CameraSetting”menu.Youcanmakefurther
settingsorpushtheLEFTarrowbutton(11)toenter
thepreviousmenu.
SetDate/Time
Inthetoprow,youcansetDay/Month/Yearandin
thebottomrowthehour/minutes(andAM/PMif
settingforthe12hourmode).
PushtheUP/DOWNarrowbuttons(11)tochoose
thedesiredunitandtheRIGHTandLEFTarrowbut-
tons(11)tochangepositionsfromDaytoMonthetc.
Whenyouhavefinishedmakingyoursettings,push
OK(11)tosaveyoursetting.Youwillautomatically
enterthe“SetDate/Time”menu.Youcanmake
furthersettingsorpushtheLEFTarrowbutton(11)
toenterthepreviousmenu.
Note:Itissuggestedtoentertheexacttimeand
dateasthiswillautomaticallyadjustthemoon
phasecalendar,whichisdisplayedinthetimes-
tampofyourphotoorvideo.

58
Access Control
Hereyoucanseta4-digitPINtopreventunauthor-
izedaccesstothefilesonyourcamera.Withouta
correctPIN,itisnotpossibletoenterthemainmenu
afterturningthecameraon.
Gotothemainmenuandselect“CameraSetting”
andthenpushOK(11).UsingtheUP/DOWNarrow
buttons(11),select“AccessControl”andthenverify
withOK(11).Inthesub-menu,youcansetthefol-
lowingpreferences:
SetPassword
PushtheUP/DOWNarrowbuttons(11)tochoose
thedesirednumber(0-9)andtheRIGHTandLEFT
arrowbuttons(11)tochangepositions.Whenyou
arefinished,verifyyoursettingbypushingOK(11).
Youwillautomaticallyenterthe“Password”menu.
YoucanmakefurthersettingsorpushtheLEFTarrow
button(11)toenterthepreviousmenu.
DisablePassword
Gotothemainmenuandselect“CameraSetting”
andthenpushOK(11).UsingtheUP/DOWNarrow
buttons(11),select“AccessControl”andthenverify
withOK(11).Inthesub-menu,choose“DisablePass-
word”andpushOK(11).Youwillautomaticallyenter
the“CameraSetting”menu.Youcanmakefurther
settingsorpushtheLEFTarrowbutton(11)toenter
thepreviousmenu.
Power Type
YourDTC1000TrailCameraisahigh-techprecision
device.Itishighlysuggestedtousehigh-quality
alkaline,Lithium-IonorNiMHbatteries.Tosetthe
correcttypeofbatteriesyouwillbeusing,gotothe
mainmenuandselect“CameraSetting”andthen
pushOK(11).UsingtheUP/DOWNarrowbuttons
(11),select“PowerType”andthenverifywithOK
(11).Choosethepowersourceorbatterytypeyou
willbeusingwiththeUP/DOWNarrowbuttons(11)
andverifywithOK(11).
Note:IfyouwilluseLi-Ionbatteries,pleaseselect
“LithiumorAlkaline”.Alternativetobatteries,an
externalpowersupplyof6Vor9Vcanbeused.
Ifthecameraisconnectedtoanexternalpower
supply,thebatterieswillbebypassed–itisnot
possibletorechargethebatterieswhileinthecam-
era.Pleasedonotusea12Vpowersupplyasthis
willdamagethecameraandnullifythewarranty.

59
AfterverifyingyourselectionwithOK(11),youwill
automaticallyenterthe“CameraSetting”menu.You
canmakefurthersettingsorpushtheLEFTarrow
button(11)toenterthepreviousmenu.
Format
Pleasemakesurethatthecameraisturnedoffbefore
insertingorremovingtheSDcard.Formattingyour
memorycarddeletesolderdatafromtheSDcardand
preparesitforanerror-freeoperationinyourcamera.
Aftersavingyourfilesonanexternalharddrive,itis
recommendedtoformatyourSDcardbeforeevery
use.Ifthecardhasbeenusedinadifferentcamera,
donotuseitintheDTC1000withoutfirstformatting
itwithyourPC.Ifhowever,theSDcardincludedin
thescopeofdeliveryisusedexclusivelyinyourDTC
1000,thenitcanalsobeformattedinthecamera.
Gotothemainmenuandselect“CameraSetting”and
thenpushOK(11).UsingtheUP/DOWNarrowbuttons
(11),select“Format”andthenverifywithOK(11).
Choose“Yes”ifyouwishtoformatyourcardandthen
pushOK(11).Thiswilldeleteallfilesonthecardand
formatitforthenextuse.Select“No”andthenOK(11)
ifyoudecidenottoformatyourcardorpushtheLEFT
arrowbutton(11)toenterthepreviousmenu.
Note:Itisrecommendedtorecordsomeimages
directlyafterinsertingtheSDcardtoverifythe
camera’sfunctionality.
Temperature
Hereyoucansetthetemperaturetobedisplayed
inyourphotosorvideosindegreesofFahrenheitor
Celsius.Gotothemainmenuandselect“Camera
Setting”andthenpushOK(11).UsingtheUP/DOWN
arrowbuttons(11),select“Temperature”andthen
verifywithOK(11).Makeyourselectionof“Fahren-
heit”or“Celsius”andverifywithOK(11).Youwill
automaticallyenterthe“CameraSetting”menu.You
canmakefurthersettingsorpushtheLEFTarrow
button(11)toenterthepreviousmenu.
Duty Time
HereyoucanprogramyourDTC1000toturnitself
onandoffduringapreselectedperiodoftime.Dur-
ingthecamera’sdutytime,imageswillberecorded
onlywhenthemotionsensorhasbeenactivated.
Thisisespeciallyusefulifyouknowacertainarea
isfrequentedbywildlifeduringspecificperiodsof
time–thecameraisactiveonlyduringthesettime,
whichconsiderablyconservesbatterypower.

60
Gotothemainmenuandselect“CameraSetting”and
thenpushOK(11).UsingtheUP/DOWNarrowbuttons
(11),select“DutyTime”andthenverifywithOK(11).
Select“Disable”or“Enable”andverifywithOK(11).
Ifyouhavechosen“Enable”,youcandeterminewhen
thecamerashouldturnitselfonandoff.Select“Start
Time”andpushOK(11).UsingtheUP/DOWNarrow
buttons(11),youcansetthetimeinhours/minutes–
pleasenote,thedutytimecanonlybesetinthe24
hourformat–andwiththeLEFT/RIGHTarrowbuttons,
youcanswitchtotheunityouwishtoset.Whenyou
arefinishedmakingyoursetting,pushOK(11).You
willautomaticallyenterthe“DutyTime”menu.Here
youcansetthe“EndTime”.Repeattheprocedureex-
plainedaboveforsettingthe“StartTime”.Whenyou
arefinishedmakingyoursettings,pushOK(11).You
willautomaticallyenterthe“DutyTime”menu.You
canmakefurthersettingsorpushtheLEFTarrowbut-
ton(11)toenterthepreviousmenu.Todeactivatethe
dutytime,gotothemainmenuandselect“Camera
Setting”andthenpushOK(11).UsingtheUP/DOWN
arrowbuttons(11),select“DutyTime”andthenverify
withOK(11).Select“Disable”andverifywithOK(11).
Youwillautomaticallyenterthe“DutyTime”menu.
YoucanmakefurthersettingsorpushtheLEFTarrow
button(11)toenterthepreviousmenu.
Time lapse
Thisisnottobeconfusedwiththedutytimeand
isfortheexpresspurposeofdefiningatimeframe
betweenwhichphotosorvideosshouldbemade,
regardlessifthemotionsensorhasbeentriggeredor
not.Duringthistimeframe,adelayintervalforeach
recordingcanbedetermined–forexample,between
10:00PMand05:00AM,thecamerashouldrecord
imagesevery10minutes.
Note:Ifthemotionsensorhasneverthelessbeen
activatedbyamovinganimalorpersonduringthis
delayinterval,animagewillberecordedaswell.
Gotothemainmenuandselect“CameraSetting”and
thenpushOK(11).UsingtheUP/DOWNarrowbuttons
(11),select“TimeLapse”andthenverifywithOK(11).
Select“Disable”or“Enable”andverifywithOK(11).
Ifyouhavechosen“Enable”,youcandefinethetime
frameinwhichthecamerashouldrecordimagesat
thepreselectedintervals.Select“StartTime”andpush
OK(11).UsingtheUP/DOWNarrowbuttons,youcan
setthetimeinhours/minutes–pleasenote,theduty
timecanonlybesetinthe24hourformat–andwith
theLEFT/RIGHTarrowbuttons,youcanswitchtothe
unityouwishtoset.Whenyouarefinishedmaking
Other manuals for DTC 1000
1
Table of contents
Other Minox Camcorder manuals
Popular Camcorder manuals by other brands

JVC
JVC GZ-MG555US Schematic diagrams

Aluratek
Aluratek Cinecam AHDVC01F quick start guide

Ikegami
Ikegami HDK-790EXIII Brochure & specs

Sony
Sony Handycam DCR-SX44 Specifications

Sony
Sony HXR-MC1 Brochure Important safety instructions

Sony
Sony DCR-TRV340 - Digital8 Camcorder w/ 2.5" LCD USB... Specifications