MIOX RIO ZUNI User manual

RIO Zuni™ Oxidant Tank Kit
Installation, Operation, and Maintenance Manual
MIOX RIO Zuni™ Oxidant Tank Manual P/N: 102-00115-C Page 1

CONTENTS
INTRODUCTION AND OVERVIEW .................................................................................................................. 3
Description ................................................................................................................................................ 3
System Illustrations and Component Descriptions................................................................................... 4
INSTALLATION AND STARTUP ....................................................................................................................... 6
What you need.......................................................................................................................................... 6
Tools for Install...................................................................................................................................... 6
Installation Location Requirements ...................................................................................................... 6
Connections .............................................................................................................................................. 6
Plumbing Connections .......................................................................................................................... 6
Hydrogen Vents .................................................................................................................................... 6
Level Switch Assembly .......................................................................................................................... 7
Installing the Oxidant Tank ....................................................................................................................... 7
OPERATION AND MAINTENANCE ................................................................................................................. 9
MIOX RIO Zuni™ Oxidant Tank Manual P/N: 102-00115-C Page 2

INTRODUCTION AND OVERVIEW
This manual is intended to provide basic installation and operation guidelines for the oxidant solution
tank for the RIO Zuni™ on-site generator (OSG). If supplying your own oxidant storage tank, refer to the
Hydrogen Vent/Oxidant Tank Assemble Installation Instructions. If you encounter problems or have
questions not covered in this manual, please contact MIOX Service at 1-888-646-9457.
Description
The RIO Zuni OSG is designed to operate in conjunction with an oxidant storage tank. An oxidant tank
with a drop tube assembly separates the mixture of mixed oxidant solution and hydrogen gas which is
generated by the OSG, vents the hydrogen gas to a safe location, and stores the oxidant for use. The
oxidant tank also holds the level switches which control the operational mode of the RIO Zuni OSG.
The RIO Zuni Oxidant Tank Kit is a product option that can be ordered with the RIO Zuni OSG. If an
oxidant tank was ordered from MIOX, the oxidant inlet, tank vent, overflow and oxidant outlet valve will
come pre-installed.
Figure 1: Fully Assembled Oxidant Tank
MIOX RIO Zuni™ Oxidant Tank Manual P/N: 102-00115-C Page 3

System Illustrations and Component Descriptions
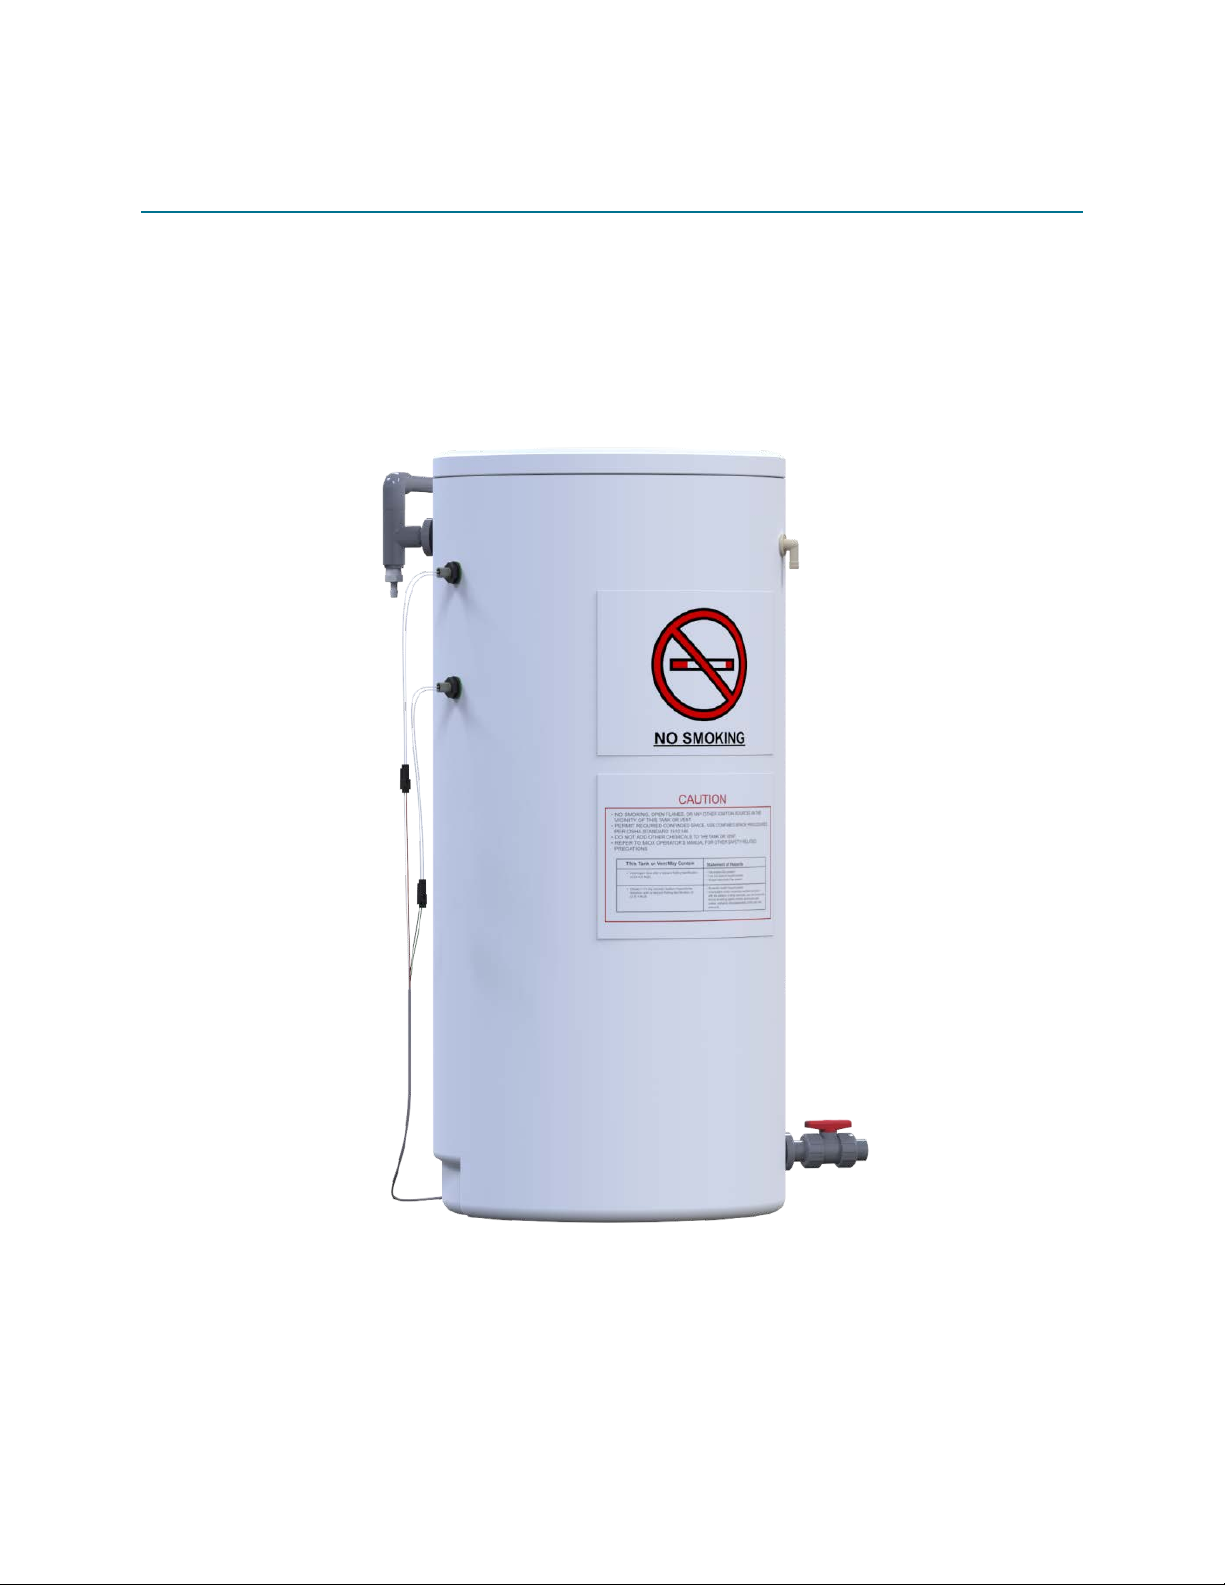
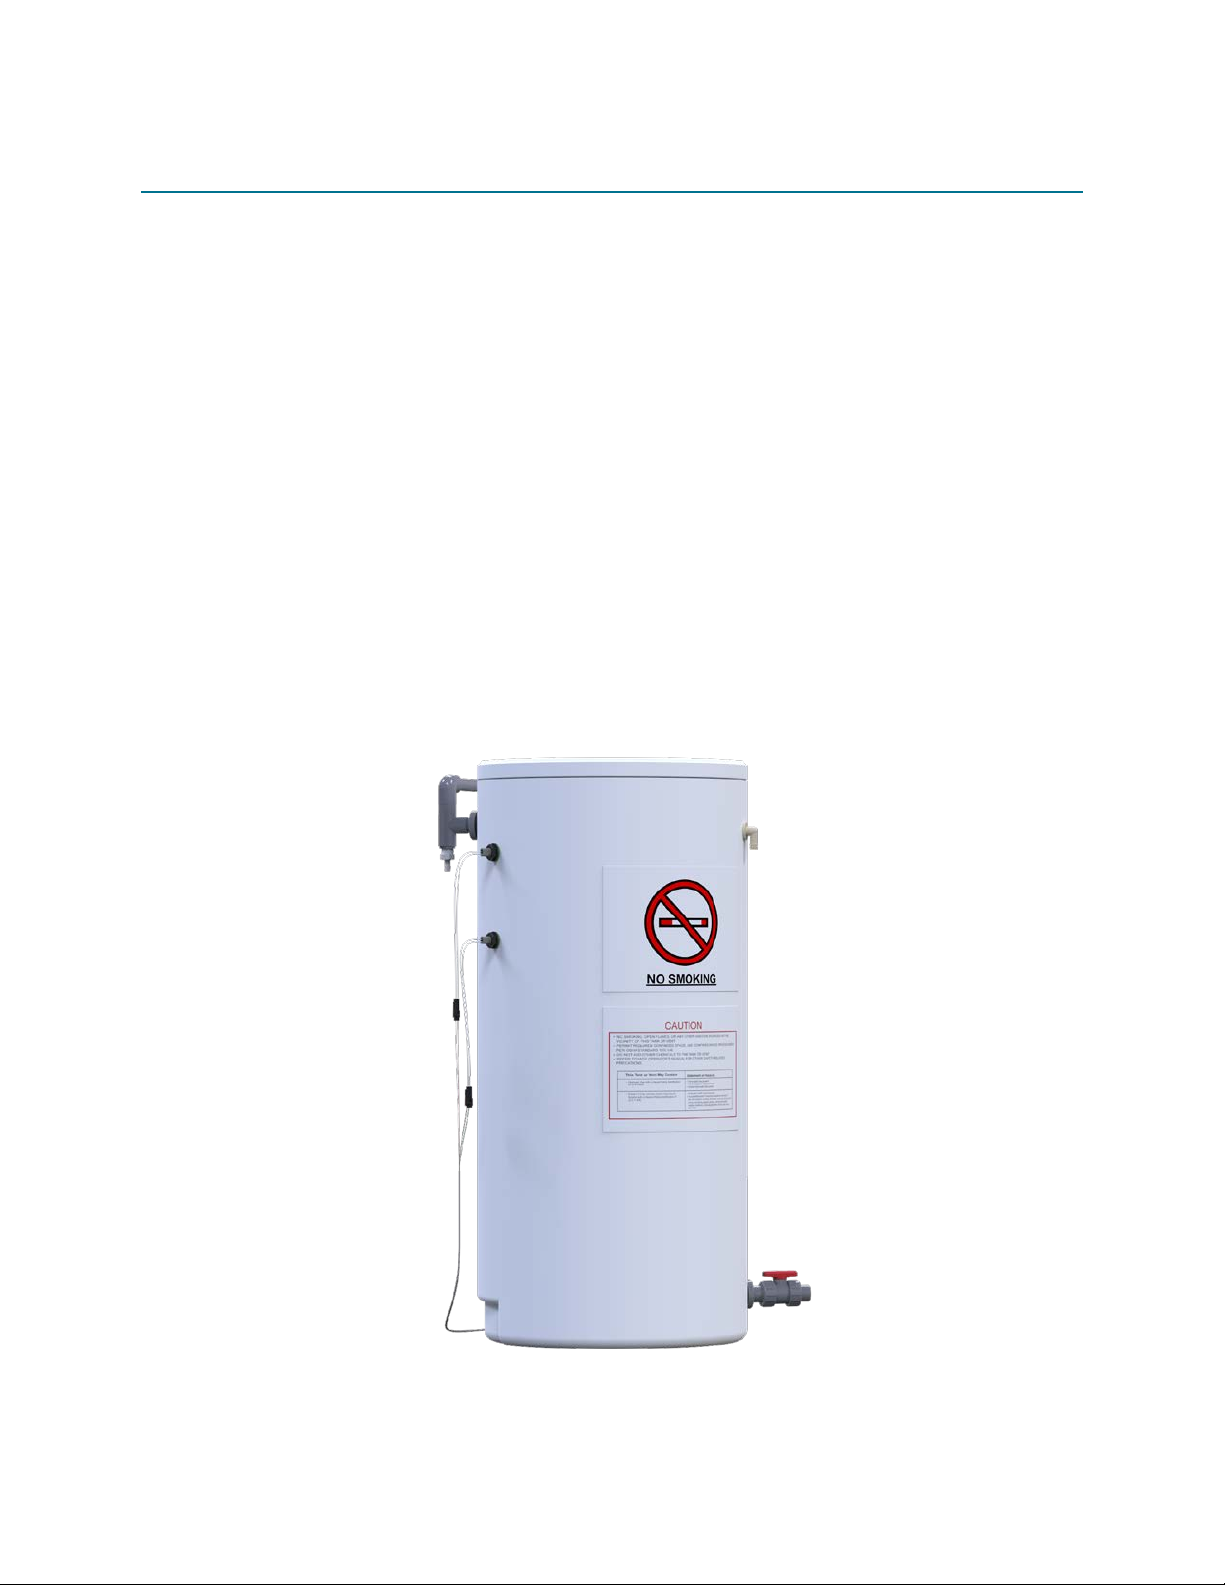
Oxidant Tank with Lid
The oxidant tank is where the oxidant solution generated from the OSG is stored for later distribution.
The tank should be constructed of a sodium hypochlorite-resistant material and should not exceed a
wall thickness of 1/8” (3.5mm) to insure proper installation of level switches. The tank should be sized to
store your maximum 48 hour usage.
Oxidant Inlet
The oxidant inlet has two purposes. First, it acts as the inlet to the oxidant storage tank to transfer the
Mixed Oxidant Solution generated from the OSG. Second, it acts as the primary vent for the hydrogen
gas generated during the electrolytic process.
Oxidant Outlet
The oxidant outlet is where solution is distributed to the application.
Failure to properly seal the oxidant outlet from the OSG to the oxidant inlet of the oxidant
tank may result in hydrogen gas leaking into the environment around the OSG.
Overflow Port
The overflow port acts as a safety measure in the event that the level switching fails, preventing Mixed
Oxidant Solution from flowing back into the OSG.
Drop Tube Assembly
The drop tube assembly separates hydrogen gas from the mixed oxidant solution.
Tank Hydrogen Vent
The tank hydrogen vent acts as a secondary vent for hydrogen gas generated during the electrolytic
process.
Failure to provide appropriate hydrogen venting may result in explosions in the oxidant
tank. Follow all instructions in the MIOX Hydrogen Safety White Paper to prevent any
hydrogen safety issues.
Safety Labels
Safety labels are provided to warn anyone nearby of the possible dangers and necessary precautions.
Level Switch Cable Assembly
The level switch cable assembly measures when the oxidant level is low or has reached maximum
capacity. This measurement is communicated to the OSG, telling it when to run and when to turn off.
Note: This sensor is orientation-sensitive and must be installed with the arrow facing upward or it will
not function properly. Refer to page 7 of this manual for additional information.
Safety Advisory
Safety Advisory
MIOX RIO Zuni™ Oxidant Tank Manual P/N: 102-00115-C Page 4

Figure 2: Image of generic oxidant tank showing all necessary components installed in the tank
Tank Hydrogen Vent
Drop Tube Assembly
Tank Overflow Port
Oxidant Outlet
Oxidant Inlet
Level Switch
Cable Assembly
MIOX RIO Zuni™ Oxidant Tank Manual P/N: 102-00115-C Page 5

INSTALLATION AND STARTUP
What you need
To install an oxidant tank for the RIO Zuni OSG you need:
1) Hydrogen Safety White Paper
2) Oxidant Tank Assembly (MIOX recommends using a tank made of polyethylene or other sodium
hypochlorite resistant material)
3) Level Switch Cable Assembly (Included in the OSG standard parts kit)
4) Hydrogen Vent Kit Assembly parts
5) Oxidant Tank Manual
6) Piping for running the hydrogen vent outside the building containing the OSG (see Hydrogen
Safety White Paper for details)
7) Plumbers tape
Tools for Install
The tools needed to install the Oxidant Storage Tank and Level Switch Cable Assembly are pliers and an
adjustable wrench.. Other tools will be needed to properly install the hydrogen vent kit into the specific
installation location.
Details for installing a hydrogen vent into a specific location are in the Hydrogen Safety White Paper.
Installation Location Requirements
MIOX recommends placing the oxidant tank near an external wall for ease of hydrogen venting and no
further than 10 ft (3m) away from the OSG. (see Hydrogen Safety White Paper for details)
Connections
There are three types of connections on an oxidant tank: plumbing, vents, and level switch connections.
Plumbing Connections
The specific plumbing connections into an oxidant tank depend on each specific installation.
MIOX recommends only using hypochlorite-resistant materials for all plumbing components. All
threaded components should be sealed with plumbers tape around the threads.
Hydrogen Vent
Every oxidant tank requires a hydrogen vent system to prevent storing potentially explosive hydrogen
gas in the tank and inside the building. Hydrogen venting requirements and installation specifics are
detailed in the Hydrogen Safety White Paper.
MIOX RIO Zuni™ Oxidant Tank Manual P/N: 102-00115-C Page 6

Level Switch Assembly
The two level switches of the level switch assembly mount through the oxidant tank wall and in the
orientation shown in Figure 3.
When installing the level switches in to the oxidant tank, the switch nearer the top of the tank should be
labeled ‘High’ and the switch nearer the bottom of the tank should be labeled ‘Low’. The switches must
be oriented such that the switch closes as the oxidant level rises or it will not function properly. If the
correct orientation is unclear, refer to the arrow located on the sensor which points in the upward
direction.
NOTE: Incorrect level switch connection will prevent the OSG from operating properly.
Figure 3: Diagram showing installation of level switch into tank wall
Installing the Oxidant Tank
1) Position the Oxidant Tank
Place the Oxidant Tank in a location no more than 10 ft (3m) away from the OSG and near an
external wall for venting.
2) Install Drop Tube
If an oxidant tank was purchased from MIOX, connect the loose portion of the drop tube
assembly that is located inside the tank to the opposite union half and tighten in place so that
the drop tube is facing vertically towards the bottom of the tank.
3) Connect Oxidant Outlet of OSG
Connect the oxidant outlet from the RIO Zuni OSG to the oxidant inlet of the oxidant tank using
the 3/8” I.D. vinyl tubing supplied with the OSG’s standard parts kit. Secure the connections with
the 5/8” hose clamps, also provided in the Standard Parts Kit.
4) Install Level Switches
Install the level switches in the side of the tank.
i. Follow diagram in Figure 3. The nut should be tightened no more than 2 ft-lbs (2.6 Nm).
ii. The gasket will deform and sandwich the tank wall.
MIOX RIO Zuni™ Oxidant Tank Manual P/N: 102-00115-C Page 7

iii. Ensure level switches are oriented properly as shown in Figure 3.
Confirm that the level switch at the top of the tank is labeled ‘High’ and the connector near the
bottom of the tank is labeled ‘Low’.
5) Connect Level Switches
Connect the Level Switch Cable assembly to the RIO Zuni OSG by matching the connectors.
6) Install Hydrogen Venting
Install the hydrogen vent strainer as described in the Hydrogen Safety White Paper.
MIOX RIO Zuni™ Oxidant Tank Manual P/N: 102-00115-C Page 8

OPERATION AND MAINTENANCE
Once installed, the RIO Zuni Oxidant Tank should require no regular maintenance apart from periodic
inspection for leaks or changes in the hydrogen venting.
MIOX RIO Zuni™ Oxidant Tank Manual P/N: 102-00115-C Page 9
Other manuals for RIO ZUNI
1
Table of contents
Other MIOX Portable Generator manuals
Popular Portable Generator manuals by other brands

Keysight Technologies
Keysight Technologies M8190A Getting started guide

Generac Power Systems
Generac Power Systems GP Series owner's manual

Stanley
Stanley SG 5600 Basic Original instructions

Westinghouse
Westinghouse iGen2500c user manual

ETQ
ETQ NI2000i owner's manual

Mitsubishi
Mitsubishi MGE6700Z owner's manual