MISTEL Barocco MD600 User manual


Please make sure the package completely contains the following:
The Instrument Instruction Manual
Congratulations on your purchase of this Electronic keyboard!
The keyboard is an user friendly keyboard with fabulous sound quality and advance feature such as
style record and self-learning. No matter you are adult or children, you will enjoy playing the keyboard
as it provides amazing styles for accompaniment, expressive tones, and real time record. Other features
such as numbered musical notation display chord dictionary, variety of songs will help you better master
the playing skill.
You are recommended to study this manual carefully before using the unit.
2
Music Rest
12V Adaptor

3
Your keyboard will give you years of playing
pleasure if you follow the simple rules given
below:
Do not expose the unit to the following
conditions to avoid deformation,
discoloration, or more serious damage
Direct sunlight
High temperature (near a heat source,
or in a car during the day time)
Excessive humidity
Excessive dust
Strong vibration
Location Cleaning
Slightly dampen a cloth helps to remove
stubborn grime and dirt
Never use cleaners such as alcohol or
thinner
Avoid placing vinyl object on top of the
unit (vinyl might discolor and stick to
the surface)
Clean the unit with a soft dry cloth
Power Supply
Make sure to use the suitable AC adaptor,
and also make sure the AC outlet voltage
at your country matches the input voltage
specified on the AC adaptor s label
Turn the power switch OFF when the
instrument is not in use
An AC adaptor should be unplugged from
the AC outlet if the instrument will not be
used for an extended period of time
Unplug the AC adaptor during electric
storms
Avoid plugging the AC adaptor into the
same AC outlets as appliances with high
power consumption, such as electric
heaters or ovens. Also avoid using multi-
plug adaptors since this could reduce
sound quality, causes operation errors
and damages
'
's
Handling and Transporting
Never apply excessive force to the
controls, connectors or other parts of
the instrument
Always unplug cables by gripping the
plug firmly, but not pulling the cables
Disconnect all cables before moving
the instrument
Physical shocks caused by dropping,
bumping, or placing heavy objects on
the instrument could result in scratches
or even severe damages
Electrical Interference
This instrument contains digital circuitry
and may cause interference if it is placed
too close to radio or television receivers.
If this occurs, move the instrument further
away from the receivers
Turn Off Power When Making Connections
To avoid damaging the instrument and
other devices to which it is connected,
turn off the power switches of all related
devices prior to connecting or disconnecting
cables
The normal function of the product may be disturbed by Strong Electro Magnetic If so,
simply reset the product to resume normal operation by following the instruction manual. In case the function
could not resume, please use the product in other location.
Interference.
Caution!

Main Features
4
KEYBOARD
61-key touch response keyboard
LCD DISPLAY
The keyboard indicates the note
you playing on the staff
VOICE
559 voices in total, 36 voices can
be selected conveniently from the panel
STYLE
203 styles in total, including 3 user
styles, 24 styles can be selected
conveniently from the panel
SONG
100 songs in total. Each song has
its learning mode
DEMO
2 demos in total
CHORD MODE
Single finger chords, multi finger chords,
A.B.C. On/Off
CHORD DICTIONARY
A function for you to learn the chords,
including Dict 1 mode (dictionary mode)
and Dict 2 mode (test mode)
By pressing and holding [YES/+] and [NO/-]
together and turning the power on simultane-
ously; default setting will be loaded into the
keyboard, then the memory and the record
song will be lost
RECORD
3 recording song. Each recording song
has 6 track--1 ACCOMP track and 5
melody tracks.
STYLE RECORD
3 recording style
MEMORY FEATURE
48 memories, 8 banks with 6 memories
each
MIXER MENU
PEDAL
Foot Switch (Sustain Pedal Soft Pedal
Memory Change Pedal Start/stop Pedal)
Volume Pedal
INTERFACE
MIDI THRU, IN, OUT
USB
Headphones
Rhythm s、Rhythm m、Bass、Chord1、
Chord2、Chord3、Phrase1、Phrase2、
Voice R1, Voice R2, Voice L
、 、
、

Contents
5
General Guide..................................
Front Panel..........................................................
Rear Panel.....................................................
LCD Display......................................................
Mixer Menu.......................................................
Memory..................................................
Bank.....................................................................
Store and Load.........................................................
Memory Date...........................................................
One Touch Setting.............................................
Record..................................................
Playback Recording.........................................
Stop Recording.....................................................
Start Recording.........................................................
Real-time Recording................................................
Delete Recording..................................................
Style Record...........................................
Quantify a Style...................................................
Copy a Style............................................................
Edit a Style...........................................................
Record a Style.................................................
Delete a Style....................................................
Lesson 1....................................................................
Lesson 3.................................................................
Lesson 2..................................................................
Song....................................................
Lesson Mode.......................................................
Chord Dictionary...............................
Pedal........................................................
MIDI Function......................................
USB Connection.....................................................
What is MIDI............................................................
MIDI Application..............................................
MIDI Connection.....................................................
Specifications...........................................
Trouble Shooting.........................................
Appendix 6-MIDI Implementation Chart...........
Appendix 3-Song List.......................................
Appendix 1-Voice List...........................................
Appendix 5-Chord List.......................................
Appendix..............................................
Appendix 4-Demo List....................................
Appendix 2-Style List...............................
Preparation....................................
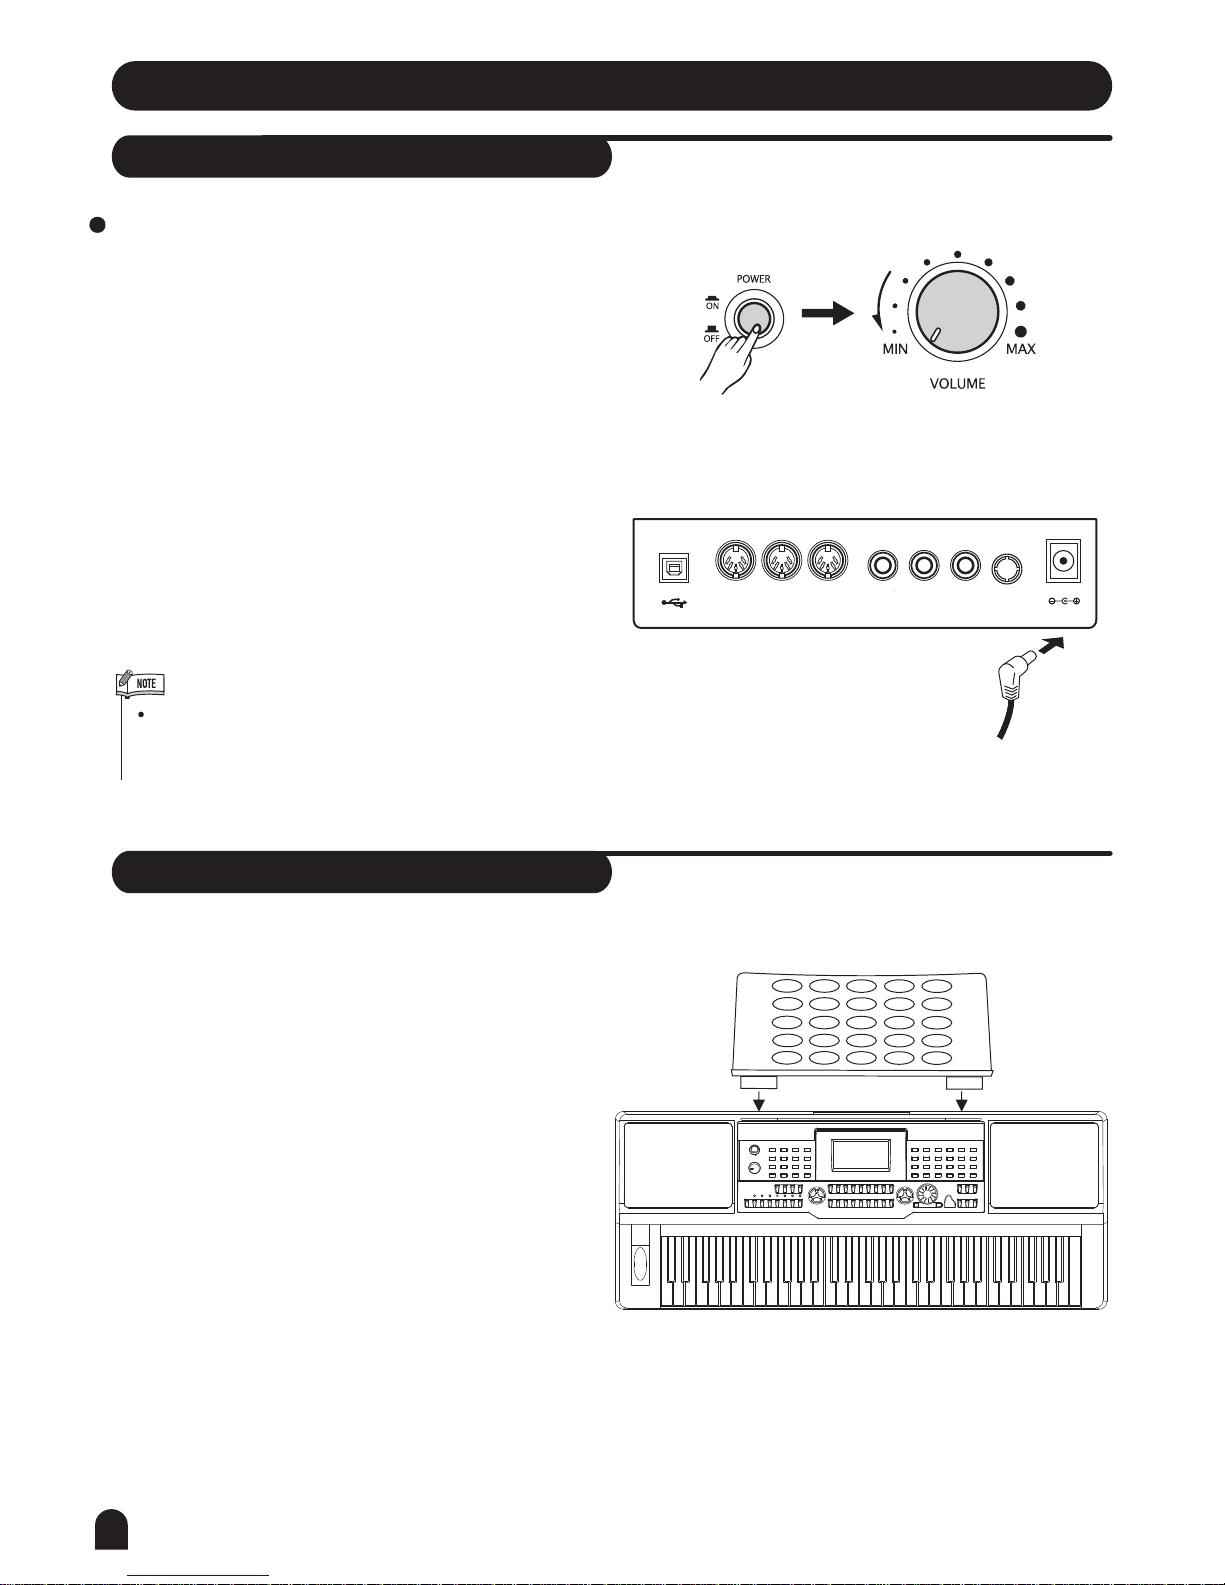
Power Supply..................................................
Setting Music Stand..........................................
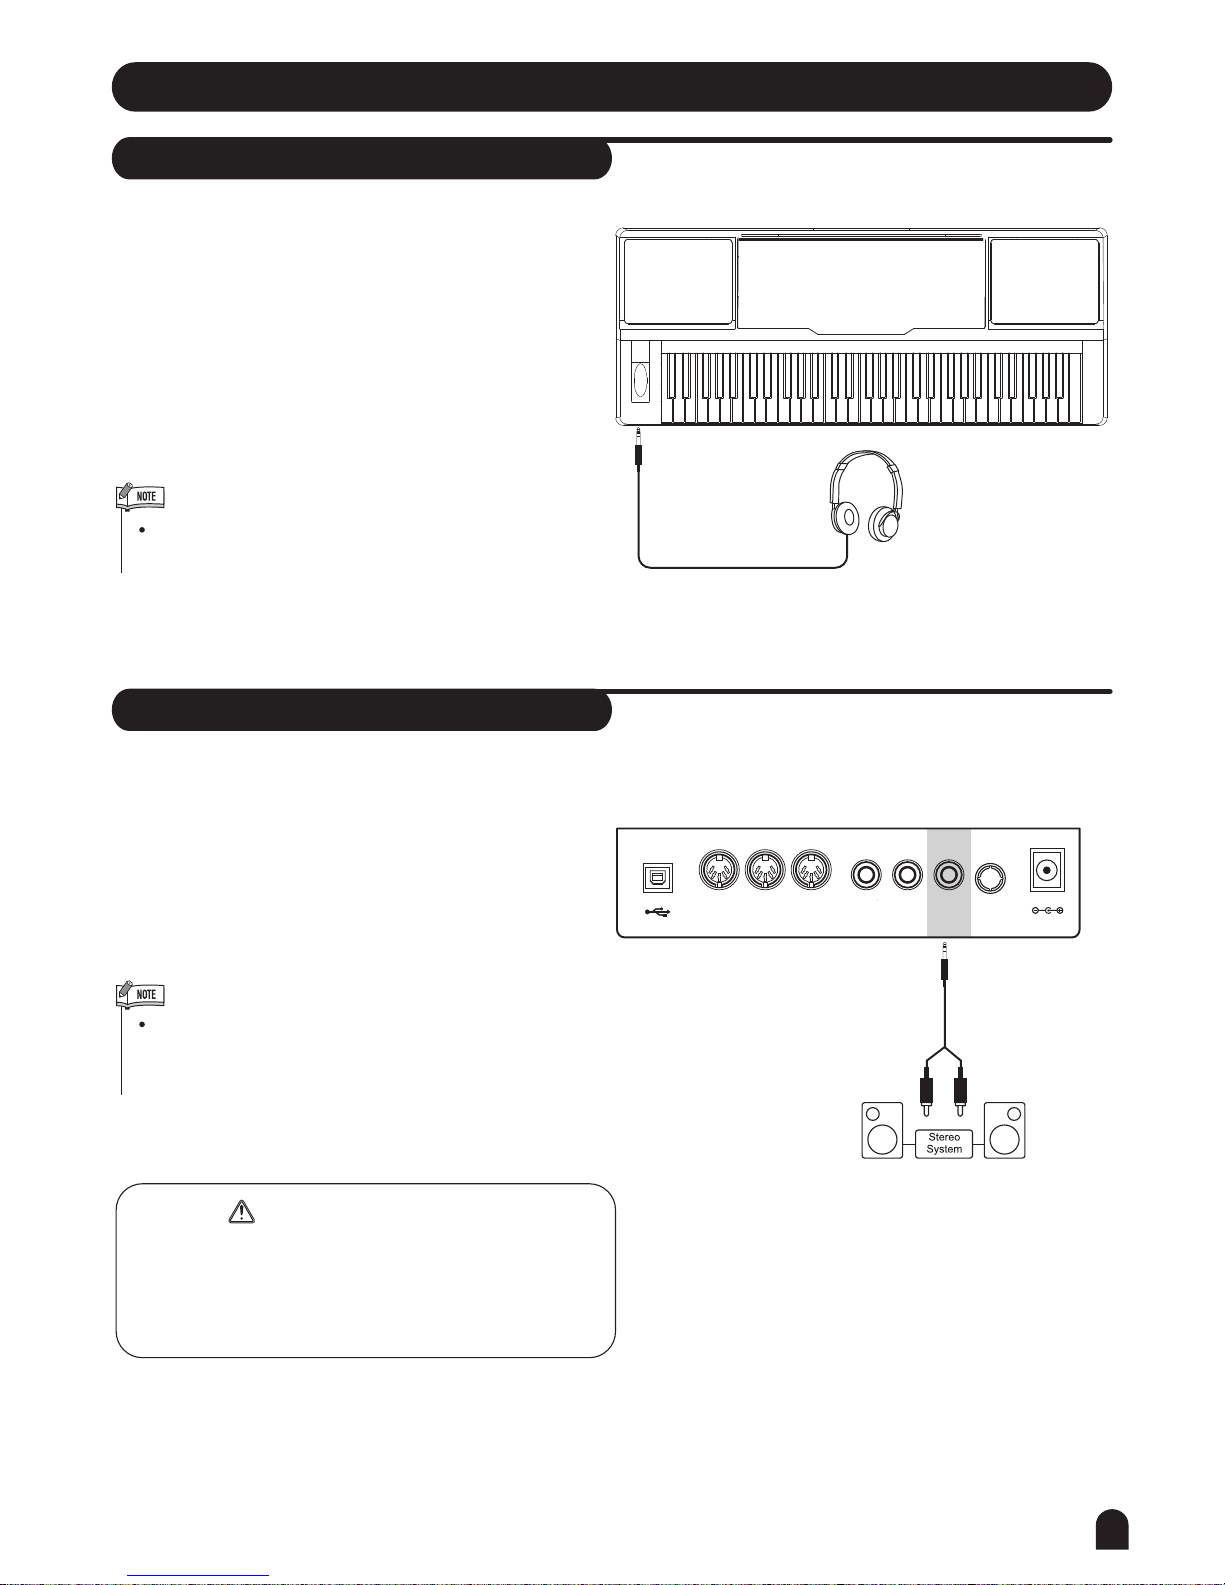
Headphone Jack..............................................
AUX.OUT Jack...............................................
Sustain Jack................................................
Volume Jack.....................................................
USB Jack.........................................................
Connections...................................
DEMO..........................................................
Basic Operation............................
Power Switch & Volume....................................
Modulation......................................................
DSP Effect..................................................
Voices and Effects.........................
Select a Voice...................................................
Dual Voice................................................
Lower Voice/Split Point.....................................
Sustain Voice....................................................
Pitch Bend........................................................
Touch.........................................................
Transpose....................................................
Octave..............................................................
Piano...............................................................
Fill A/B...............................................................
Accomp Volume..............................................
Fade IN/OUT.....................................................
Tempo...............................................................
Style Control.....................................
Select a Style........................................................
The Accompaniment Section..................................
Start a Style.........................................
Stop a Style.......................................................
Recognizing Chords........................................
Metronome.......................................................
Reverb Level...................................................
Split Point........................................................
Pedal Assign.....................................................
Beat.................................................................
Function Menu...............................
Tune.................................................................
Chorus Level........................................................
MIDI Setting..................................................
6
6
7
7
8
8
8
9
9
9
10
10
10
11
11
11
12
12
13
14
14
12-13
15
15
15
16
16-17
17
18
18
19
19-20
22
21
23
23
26
24-25
26
27
27
28
28
28
29
29
29
30
31
31
31
31
32
33
36
45
34
33
34-35
35
34
36-39
41-42
42-43
44
40
46
46
47
47
48-50
51
52
52
52
53
53
54
54
55
55-59
62-64
60-61
64
65
66

6
General Guide
3
4
5
6
7
7
8
9
9
10
10
11
11
12
12
13
14
2
1
2
1POWER ON/OFF
MASTER VOLUME
MIXER
FUNCTION NEXT
FUNCTION BACK
ACCOMPANIMENT VOLUME
TEMPO
TEMPO
AUTO BASS CHORD
START/STOP
START/STOP
SYNC STOP
INTRO/END
REPEAT A/B
FILL A
REW
FILL B
FF
FADE
ACCOMPANIMENT VOLUME
SYNC START
PAUSE
15
16
17
LESSON
LEFT HAND
RIGHT HAND
CHORD DICTIONARY(Hold for two seconds)
19
18 STYLE RECORD
RECORD
21
22
20 PLAY/STOP
ACCOMP
MELODY1
MELODY2
MELODY3
MELODY4
MELODY5
23
24
BANK
M1-M6STORE
25
27
26
28
29
31
32
33
34
30
35
36
38
39
40
41
42
43
44
37
ONE TOUCH SETTING
STYLE
VOICE
TOUCH
SUSTAIN
DSP
TRANSPOSE
TRANSPOSE
OCTAVE
OCTAVE
SONG
DUAL
SPLIT
DEMO
PIANO
DATA DIAL
STYLE DIRECT SELECT BUTTON
VOICE DIRECT SELECT BUTTON
LCD DISPLAY
/NO
/YES
METRONOME
ONE TOUCH SETTING(M1-M4)
Front Panel
1
2
34
7
65
8 9 10 11 12 13 514
516 517
515
19 20 21
252423
27 28
26
39 40 36 37
29
34
35
38
30 31 32 33
44
41
22
43
42
In the Style mode
In the Song mode

General Guide
7
Rear Panel
3567 8
121
4
VOLUME
AUX.OUT
DC 12V
6
7
8
5SUSTAIN
2
3
4
MIDI THRU
MIDI IN
MIDI OUT
1USB JACK
MIDI THRU MIDI IN MIDI OUT SUSTAIN VOLUME AUX.OUT DC 12V USB
46
45
PHONES
MODULATION
45
PITCH BEND
46
PHONES
47
LCD Display
1 1
3
3 9
7
5
511
6
1
1 7
2
2 8
8
10
9
1
4
410
6
6
1
11
1
12
MELODY 2
MELODY 3
ACCOMP
MELODY 1
VOICE/STYLE/DEMO/SONG
DUAL
TOUCH
SUSTAIN
DSP
SPLIT
MELODY 4
MELODY 5
18
1
17
19
21
20
14
13
16
1
15
22
24
23
MEASURE
BEAT
BASS CLEF
FILL A/B
RECORD/STYLE RECORD
TREBLE CLEF
61 KEY KEYBOARD
TEMPO
LEFT/RIGHT HAND LESSON MODE
STORE M1-M6/ONE TOUCH SETTING
NOTE INDICATION
CHORD
13 14 15
16
17
18
19
20
21
22
24
DUAL
SPLIT
TOUCH
SUSTAIN
DSP
ACCOMP
MELODY 1
MELODY 2
MELODY 3
MELODY 4
MELODY 5
23
47
12

8
Using the AC Adaptor
1. First, please ensure the keyboard is turned off, then turn
the volume switch to reach the minimum volume level.
2. Connect the adaptor into the AC wall outlet and the cord
into the unit.
Please set up the music rest as the instruction below:
Power Supply
Preparation
Setting Music Rest
When the keyboard is not in use or in the time of
thunderstorm, please disconnect the power for
safety purpose.
MIDI THRU MIDI IN MIDI OUT SUSTAIN VOLUME AUX.OUT DC 12V USB

Headphones Jack
AUX.OUT Jack
Connections
1. If you prefer to play with headphones for high quality
personal monitoring, plug a set of stereo headphone
into the PHONES jack.
2. Plug a set of headphones into the [PHONES] jack and
the speakers will be shut automatically.
The AUX.OUT jack delivers the output signal of the
keyboard to an external amplifier.
Use an audio cord to plug into the [AUX.OUT] jack
located on the rear panel; then plug the other end of
the cord into LINE IN or AUX.IN of the amplifier.
Never use headphones in high volume, as it may
hurt your ears.
MIDI THRU MIDI IN MIDI OUT SUSTAIN VOLUME AUX.OUT DC 12V USB
9
To avoid damaging the speakers, please ensure
that the volume has set to the minimum level before
connecting the power and other devices.
PHONES
To avoid damages, turn off the power switches of
this keyboard and all related devices if you want to
plug in or unplug between this instrument with all
related devices.
WARNING

MIDI THRU MIDI IN MIDI OUT SUSTAIN VOLUME AUX.OUT DC 12V USB
Sustain Jack
Volume Jack
USB Jack
Connection
10
1. An optional footswitch can be plugged into the
[SUSTAIN] jack for sustain control.
2. The footswitch functions like the damper pedal on a
piano-press for sustain, release for normal sound.
1. Connect PC or other USB host devices that support
USB audio.
2. For devices with USB cable, after the driver is installed
and initialization is finished, you can choose USB audio
device in the device menu of the software to transfer
midi data.
An optional volume control can be plugged into the
[VOLUME] jack for adjusting the volume of sound.

DEMO
Power Switch & Volume
Adjust
volume
Basic Operation
11
1. First, please ensure the correct connection based on
previous instruction.
2. Turn the volume switch to reach the minimum volume
level, then turn the [POWER] switch on. The LCD
display lights up.
3. Use the [VOLUME] control switch to adjust the volume
to your desired level.
There are total of 2 demos.
1. Press [DEMO] button to
play demo songs.
2. Select a demo song with
[+/YES] / [-/NO] or dial.
3. Press [DEMO] or [START/
STOP] button to exit from
the demo mode.
In the demo mode, all function keys except DEMO,
START/STOP, TEMPO, +/YES, -/NO, VOLUME,
POWER ON/OFF will be voided.
+/YES-/NO
SONG
VOICESTYLE

Select a Voice
559 voices in total (See appendix: page 55).
Voices and Effects
12
Dual Voice
Direct Select Button
Use the Direct Select Button to select a voice (36 voices),
2 direct voices for each button(upper & nether key)
While changing a voice, pay attention to the rules:
If you press the same button, the voice will be
changed between the upper and nether key.
When the upper/nether voice is on, and then you
press another direct button, the corresponding
upper/nether voice will be selected.
Press [VOICE] button to enter voice mode . The default
VOICE R1 is No:001 Stereo Grand Piano ;
LCD displays and the voice number.
" "
" "
"VOICE R1"
1.
Press or use the Direct Select
Button to select the voice you want.
[+/YES] / [-/NO] or dial
2.
After selecting a voice, you can now play the keyboard.
3.
This function is capable of enhancing the delicacy of your music by playing two voices of musical
instruments simultaneously; new combinations of voices and music could be created then.
When the dual function is off, the voice indicated is VOICE R1. When the dual function is on,
the voice indicated is VOICE R2.
+/YES-/NO
SONG
VOICESTYLE

Voices and Effects
13
1.
2.
3.
During the VOICE R1 status, press [DUAL] button to
enter the dual voice function. VOICE R2 and DUAL
signal would be lightened simultaneously. The number
of the dual voice will be displayed on the LCD. Now,
two different sounds at the same time when pressing
one key.
" " " " DUAL
SPLIT
TOUCH
SUSTAIN
DSP
Press [+/YES] / [-/NO] button, or turn the DIAL to select
your desired voice. The default DUAL VOICE number is
No:265 The Strings .
Press [DUAL] button again to turn off the DUAL VOICE.
Voice R2 will be disabled, the note you play sounds a
single voice of Voice R1.
" "
In DUAL VOICE status, only section above split point
on keyboard has dual voice.
SUSTAINDUAL TOUCHSPLIT DSP
Two voices will sound
at the same time.
Eg. Piano
Eg. Cello
Lower Voice/Split Point
1.
2.
3.
DUAL
SPLIT
TOUCH
SUSTAIN
DSP
You can split the keyboard to melody and chord area
by this function.
Press [SPLIT] button to turn on the LOWER VOICE,
LCD lights the LOWER VOICE flag and displays
"VOICE L" and its name. When you play in real time,
you can activate Split Mode simply by pressing this
button.
Press [+/YES] / [-/NO] button, or turn the DIAL to select
the voice you want. The default LOWER VOICE number
is No:265 The Strings .
Press [SPLIT] button again to turn off the LOWER VOICE.
LCD darkens its flag.
" "
SUSTAINDUAL TOUCHSPLIT DSP
Melody
area
Chord
area
Default split
point F#

Touch
Voices and Effects
14
This function allows you to activate the dynamic
level while playing the keyboard.
The LCD displays the touch value ranging from off to
level 3.
Press [+/YES] / [-/NO] button, or turn the DIAL to
change the touch response level.
Default level of touch response is 2.
To experience the effect, play any note on the keyboard
after you turn it on.
If the "touch function" is disabled, there will be no touch
response.
1.
2.
3.
DUAL
DUAL
SPLIT
SPLIT
TOUCH
TOUCH
SUSTAIN
SUSTAIN
DSP
DSP
SUSTAINDUAL TOUCHSPLIT DSP
Sustain Voice
When you step on the 'sustain pedal', its sustain
effect is stronger than the effect by pressing the
[SUSTAIN] button.
This function helps you to get a voice with a
sustained effect, while playing the keyboard.
Press [SUSTAIN] button to activate the sustain effect.
The "SUSTAIN" flag lightens on the display.
1.
Press [SUSTAIN] button again to eliminate the sustain
effect. The "SUSTAIN" flag will disappear.
2.
DUAL
SPLIT
TOUCH
SUSTAIN
DSP
SUSTAINDUAL TOUCHSPLIT DSP

15
Voices and Effects
DSP Effect
This function allows you to perform the overall
sound in a realistic style.
The DSP effect is set to ON when keyboard power on.
The default setting of DSP effect is ON.
Press [DSP] button to turn off the DSP effect.
1.
2.
DUAL
SPLIT
TOUCH
SUSTAIN
DSP
SUSTAINDUAL TOUCHSPLIT DSP
Pitch Bend
The pitch bend wheel can be used to bend the note
upwards or downwards, ranging between +/- 2 semitones.
When the wheel is released, the note will return back
to the normal status.
Higher (+2)
semitones
Lower (-2)
semitones
PHONES
Modulation
Press and hold [MODULATION] button. You can hear
the modulation effect while playing the keyboard.
Release the button to exit the modulation effect.
PHONES

Transpose
1.
2.
You can change the key of the entire keyboard with
the TRANSPOSE function by adjusting the pitch in
semitone steps.
Press [TRANSPOSE +] or [TRANSPOSE -] button to
enter the Transpose setting mode.
The LCD will display the current transpose value. The
default transpose value is 00.
Use [TRANSPOSE +] / [TRANSPOSE -] to adjust the
value from -12 to +12 semitones.
Press [TRANSPOSE +] and [TRANSPOSE -]
simultaneously to set the default value: 00.
If you don't press any button for 5 seconds after
entering the Transpose setting mode, it will quit
this menu automatically.
Voices and Effects
Press [OCTAVE +] or [OCTAVE - ] button to set the
octave mode. The LCD will display the current octave
value.
Octave
1.
Use [OCTAVE +] or [OCTAVE - ] to change the octave
value. This function can change the key -1 to 1 octave
up or down.
2.
16

数码效果 Voices and Effects
什么是 数码效 果?
数码 效果 是一 种模 仿声 音在 真实 环境 中的 音场 定位 的技 术。 由于 每个 声音 都必 须在 一定 的空 间内 产生 ,
所以当您在家里、在影剧院或者在旷野拉同一把小提琴时您所听到的声音是不同的,这种不同是改变
环境 所造 成的 。
17
16
If you don't press any button for 5 seconds after
entering the Octave setting mode, it will quit this
menu automatically.
Press [OCTAVE +]and [OCTAVE -] simultaneously to set
the octave value back to its default. The default octave
value is 00.
3.
Piano
Press [PIANO] button to return to the piano mode.
The LCD displays PIANO, and the voice is changed
to piano immediately. In this mode, A.B.C. is OFF.
Press [PIANO] button again to exit the PIANO mode.
You can select the style number with the [+/YES] / [-/No]
key, or turn the dial at the PIANO mode. Press the
[START/STOP] button to activate the style(only drum).
The MIXER and FUNCTION menu can be functioned.
1.
2.
3.
4.

Style Control
18
The keyboard has a total of 203 styles, from 001 to
203, including 3 user styles. The default style is 001.
(See appendix: page 60)
1. Press [STYLE] button to set the keyboard to the "style
mode". The "STYLE flag" and the style number will
show up on the display.
Select a Style
2.
3.
Press [+/YES] / [-/NO] button or use the Direct Select
Button to select the voice you want.
Use the Direct Select Button to select your desired style
( 24 styles), 2 direct styles for each button (upper & nether).
Direct Select Button
While changing a style, pay attention to the rules:
If the same button has been pressed twice, the style
will be swapped from one to another.
When the upper/nether style is on, and you then press
another direct button, the corresponding upper/nether
style will be selected.
+/YES-/NO
SONG
VOICESTYLE
DZB0'B0DQXDOBB*BSDUWBDZB0'B0DQXDOBB*BSDUWB

Accompaniment consists of Intro, main, variation, fill (a-a,
a-b, b-a, b-b), ending. Using different sections based on
the structure of styles enables you to enhance musical
performance.
INTRO
Press the [INTRO/END] button to insert an intro section
before you start to play . The rhythm will begin with a 2-4
measure introduction which will be followed by a menu
section.
MAIN and VARIATION
There are two sections: main and variation. Each section
consists of 2 to 4 measures.
FILL
While the accompaniment is playing, you can fill in the
rhythm/accompaniment by pressing the [FILL A] button
or the [FILL B] button. This will automatically insert a fill
section.
ENDING
When you press the [INTRO/END] button, it brings rhythm
accompaniment and your performance to on end with a 2-4
measure conclusion.
Style Control
Start a Style
Start immediately:
A.B.C. Mode:
Use [START/STOP] button to start the style.
The default setting of A.B.C is off. Press [A.B.C.] button
to turn on the auto bass chord.
The area to the left of split point is known as the chord
area. When playing the chord, both the bass and the
chord voice sound.
1.
2.
19
4.
3.
2.
1.
The Accompaniment Section
DZB0'B0DQXDOBB*BSDUWBDZB0'B0DQXDOBB*BSDUWB

Style Control
20
Sync start:
Press [SYNC START] button to enter the sync start
waiting mode. The 4 beats on LCD flash together.
If the A.B.C. mode is on , play any key in left area of
keyboard, the style start playing with bass and chord.
If the A.B.C. Mode is off, play any key on keyboard; the
style plays only the drum voice.
Press [START/STOP] again to stop the style.
Intro start:
Press [INTRO/END] button when the style is not playing,
'A' flashes on LCD, indicates the intro section is ready to
play. Length of intro varies in different style.
Flashing
Flashing
Press [START/STOP] button, then the style starts with
an intro section , followed by the main section.
3.
4.
DZB0'B0DQXDOBB*BSDUWBDZB0'B0DQXDOBB*BSDUWB
Other manuals for Barocco MD600
1
Table of contents