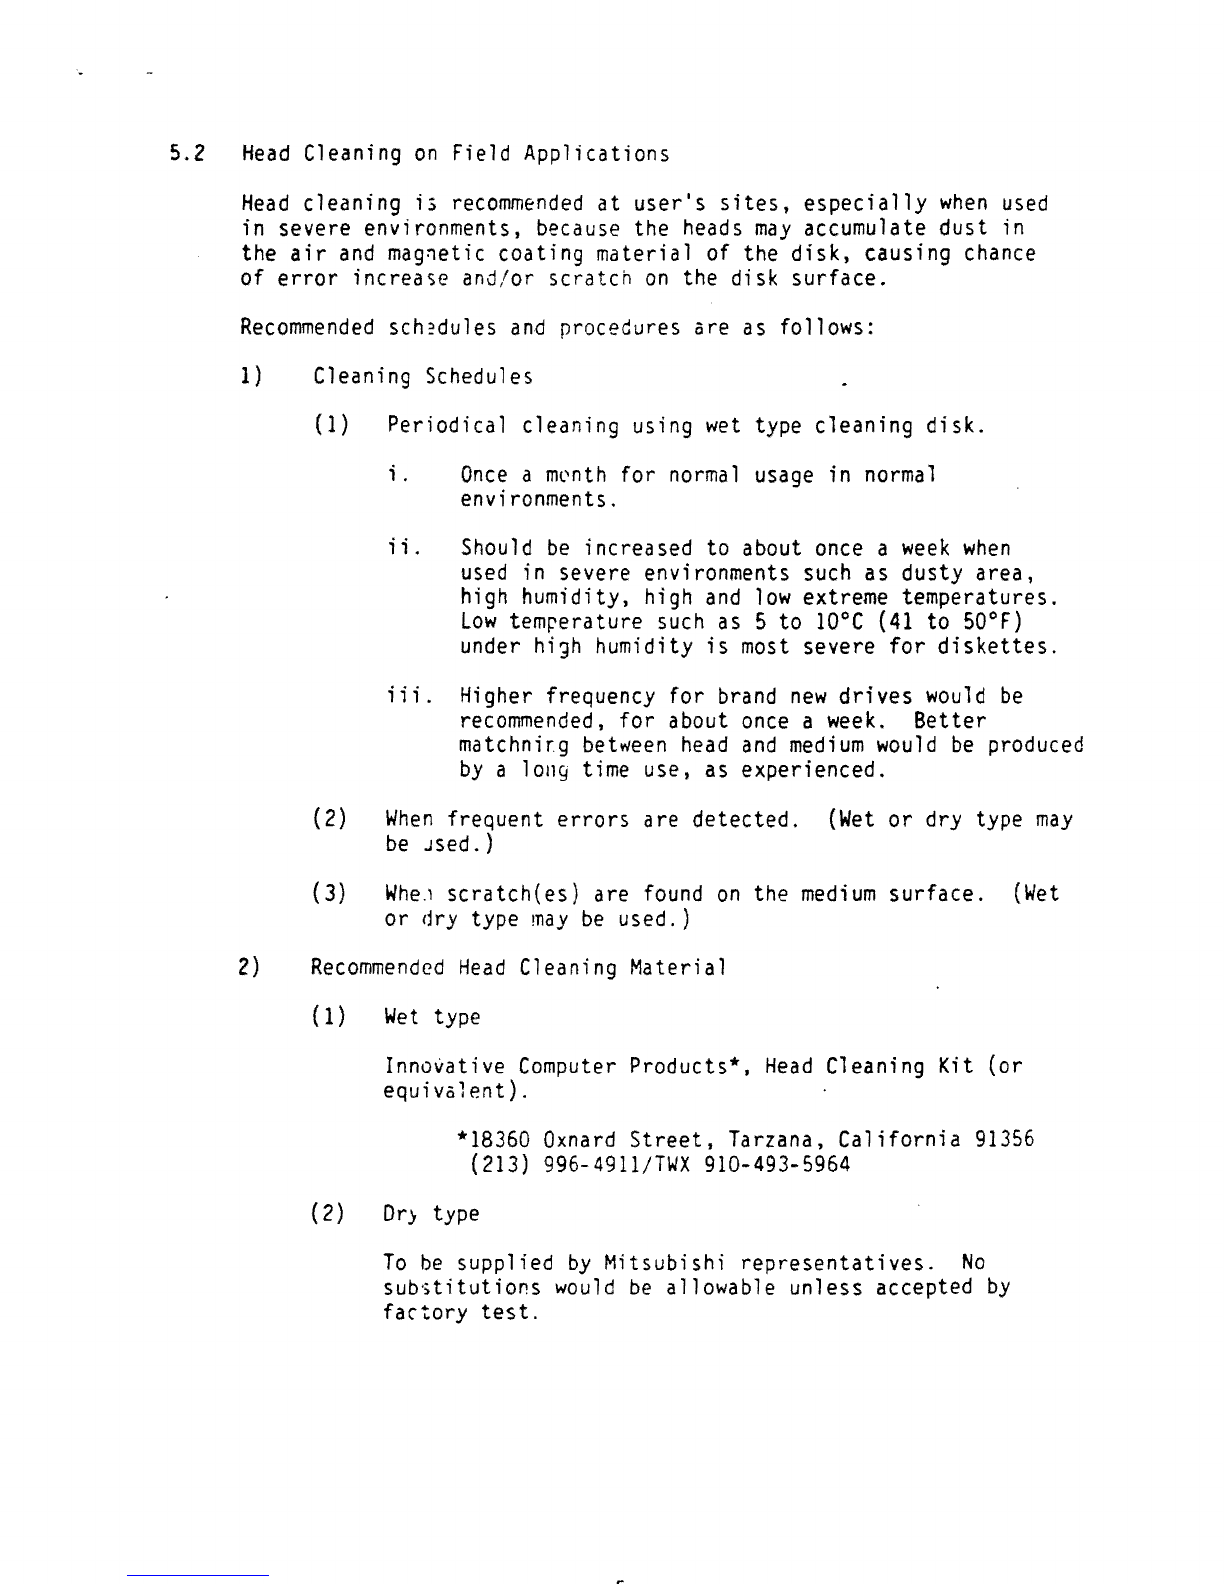
Mitsubishi M4853 User manual

....
-,
TJ2-4861A
5.25
INCH
FLEXIBLE
DISK
DRIVE
MODEL
M4853
MAINTENANCE
MANUAL
MITSUBISHI
ELECTRIC
CO.,
LTD.

4.
OPERATING
IHFOR.."'
..
'\TlON
4.1
Environment
There
is
no
problem in operating under
normal
office
conditions
but
when
operating
out of following
conditions,
Drive
may
not
work
properly
or
Diskette
may
get
damaged.
1 Temperature/Humidity
Range
Durino
Operatio~
Quring Nbn-ooeration
Temperature
Range
+5°C
-
+43°C
Humi
d
ity
Range
20~
-
80~
RH
(DEW
LESS)
5: -95:
RH
(DEW
LESS)
(Maximum
wet
bulb
temp
29.4°C)
• During Transportation
Tempe,ra
ture
Range
-40
Cl
C -
+62
C1
C
for
maximum
ped
od
of
72
hours
Humidity
Range
1%
-
95%
RH
with
no
peri
odof
72
hours condensation
for
m~ximum
Z Dust
Be
extra
careful
of
dust
entering
unit
because
it
may
damage
to
head
or
diskette
media. cause
4.2
Diskette
Handling
(Be
extra
careful
of
the
following)
1
Keep
diskette
media
away
from
any
applian~e
which
may
generate
magnetic
field.
(i.e.
radio,
tv,
motor/dynamo
and
other
electrical
appliances.)
2
Do
not
bring
any
ferro
magnetic
materials
near
the
diskette
..
3
Do
not bend media under
any
condition.
4 Return
the
diskette
storing
it.
to
storage
envelope
when
transporting
and
S
Do
not touch
alcohol.
or
attempt
to
clean the disk media
surface
with
6
Do
not expose
diskette
to
head,
d~st
or
sunliyht.
7
Do
not
write
anywhere
a
soft
felt
tip
pen. except
on
the medial
label
and
only use

FICLIRE
2
-3-

5.
REGUlAR
MAINTENANCE
"Unit
life
can
be
affected
by
damaged
parts
as
a
result
of
dusty
environment
or
excessive
operation".
So
maintenance
by
such
methods as visual
inspection,
cleaning/change
of
damaged
parts
and
regular
functional checks will
keep
the
unit
in
good
condition
and
enable the discovery of
any
problem
at
an
early
stage.
Time
span between maintenance
is
calculated
at
an
actual operation
rate
of 8 hours a
day
so
in case of a
greater
rate,
differences
modification
is
needed.
When
operating
at
a
normal
environment
condition,
perform mairtenance
onc~
a
year.
5.1 Caution
1 During maintenance,
be
careful
of
dust
entering
unit,
and
damaging head.
2
Make
sure
power
sl/itch
;s
off
first
when
starting
maintenance.
3
When
put
off/on
P-inted
Circ~it
Board
(P.C.B.) Assy,
make
sure
power
switch
is
"off"
to
protect
semiconductors
and
ICs.
4
Do
not touch
Ois~
media
surface or
head
directly
and
do
not
bring
any
ferro
n~gnetic
materials
near
it.
5
When
using
this
unit
for
Read
data only
(when
using
CE
disk),
be
careful
of
write
mode
~ishandling
to
protect
data.
6
Do
not touch steEl
belt
and
do
not
adjust
related
mechanism.
7
Avoid
static
shock
or
excessive force to
head
carriage
assembly
because
it
has
bE-en
ca
refull
y
adjusted.
Do
no
readjust
any
screws except wh(re
specified
in
this
manual.
-4-

5.2
Head
Cleaning
on
Field Applications
Head
cleaning
is
recommended
at
user's
sites,
especially
when
used
in severe environments, because the heads
may
accumulate
dust
in
the
air
and
mag~etic
coating material of the
disk,
causing chance
of
error
increase and/or
scratch
on
the disk
surface.
Recommended
sch:?dules
and
procedures are as follows:
1)
Cleaning Schedules
(1) Periodical cleaning using
wet
type cleaning
disk.
i.
Once
a mrnth for
normal
usage in
normal
environments.
ii.
Should
be
increased to about once a
week
when
used in severe environments such as dusty
area,
high humidity, high
and
low
extreme temperatures.
Low
temperature such as 5
to
10°C
(41
to 50°F)
under
hi~h
humidity
is
most
severe
for
diskettes.
iii.
Higher frequency
for
brand
new
drives
would
be
recommended.
for
about once a
week.
Better
matchnirg between
head
and
medium
would
be
produced
by
a
10119
time use, as experienced.
(2)
When
frequent
errors
are
detected.
(Wet
or
dry type
may
be
Jsed.)
(3)
Whe.l
scratch(es)
are found
on
the
medium
surface.
(Wet
or
dry type
may
be
used.)
2)
Recommended
Head
Cleaning Material
(1)
Wet
type
Innovative
Computer
Products*,
Head
Cleaning Kit (or
equivalent).
*18360
Oxnard
Street,
Tarzana.
California
91356
(213)
996-4911/TWX
910-493-5964
(2)
Dr}
type
To
be
supplied
by
Mitsubishi
representatives.
No
substitutions
would
be
allowable unless accepted
by
fartory
test.

5.3
Check
and
Adjustments
5.3.1 Diskette
rotational
cycle adjustments
1)
Equipment
CE
Tester
(Disk
Exerciser)
Scratch Diskette
Universal Counter
VR
Adjustment Driver
(Pot
Trimmer)
2)
Adjustment procedure
2)-1 Connect
CE
Tester to Drive then turn-on.
power
switch.
2)-2
Load
diskette
then turn-on motor with drive
select.
2)-3
Make
sure
HLMG
ON.
(Head
Loaded)
2)-4
Seek
to
TKOO.
2)-5
Connect
universal counter
to+INDEX
(interface
signal)
and
measure
rotational
cycle
rate.
2)-6 Adjust counter reading
until
it
comes
within
specifications
using
SPM
VR
(see Figure
4).
2)-7 After
this
adjustment,
Lock
VR
with white
paint.
3)
Test
specification
3)-1
Check:
±1.6%
(196.8 -203.2ms)
3)-2 Adjust:
±1.0%
(198.0 -202.0ms)

'.
"
r , "
.#-
,
-,'
-. "
.......
'.
..
'.
.
-
..
'"-
~
..
198.0
...
202.0
"
I'
r
...
+INOEX
FfGURE
4
-7-

5.3.2
TKOO
sensor position adjustment
1)
Equi
pment
CE
Tester
(Disk
Exerciser)
Scratch Diskette
No.
1 plus screw
driver
Oscilloscope
2)
Adjustment procedure
2)-1 Connect
CE
Tester
to
Drive then turn-on
power
switch
and
load
diskette.
2)-2 Turn-on motor
and
select
drive.
2)-3
Repeat seek between
TKOO
and
02
(see Figure
5).
2)-4 Observe
waveform
(TKOO)
at
TPBl
using
oscilloscope.
tr;gger
CHl--step
(DC,
+)
TPD15
signal
CH2--TKOO
(DC
) TPEl
2)-5
Loosen
screw
and
adjust
time
until
it
comes
to
within
3-4ms
by
moving
TKOO
in
the
direction
of
the arrow (see
figure).
3)
Note:
3)-1 Set step
rate
at
3ms
using
CE
tester.
3)-2
Make
sure
there
are
2 pulses
on
step
signals.
5.3.3
TROO
Sensor
Check
(Alternate
Procedure--recommended)
Connect
disk
exerciser
to
drive
Turn
on
motor
and
Select
drive
Insert
Diskette
Recalibrate
(Seek)
to
TROO
Connect
oscilloscope
probe
channel
I/DC
to
TPBl
Trigger
Mode
Auto
Source
CHI
2
volts/Div
±
lmsec./Div
TPBl
should
be
high
at
TKOO
Step
out
to
TK02
TPBl
should
be low .
-8-

-'.
.
Trigger
(CH1)
2-1-.0
TK
TK
(k-1-2
t
11
11
~
1
I.·
(3ms)
·I~_--...I---
.,
3-4ms
FIGURE
5

5.3.3
INDEX
sensor position adjustment
1)
Equipment
CE
Tester
CE
diskette
(DYMEK
502-10
STANDARD
DISKETTE)
No.
1 plus screw
driver
Oscilloscope
2)
Check
procedure
2)-1 Connect
CE
Tester to Drive
(set
power
off).
2)-2 Turn-on
power
switch
and
motor
on.
2)-3
Select
drive
and
load
CE
diskette
(close
clamp
door
slowly) .
2)-4
Read
timing of each
waveform
at
TPB9
+ TPBIOunder
read
model'TK02,
using oscilloscope. (See
figure.)
Trigger:
EXT
-
+INDEX
(DC,
+) (TPD14)
Signal:
CHI
-
TPB9
(AC)
lOOrn\t/Div
CH2
-
TPBIO
(AC,INV)
Add
SO-"(s/Div
2)-5
Specification
Check:
200±200
~s
at
TK02
Sici~
n
200
±
30
0
-"'(
sat
TK
02
Siee
1
Adjust:
200±100
~s
at
TK02
Side
0
LUO±200
~s
at
TK02
Side
1
*Check
=
make
sure
reading
falls
within
this
spec.
Adjust
=
if
reading
is
out
of
~check~
spec.,
adjust
to
within
spec.
indicated
here.
Tric;c;er
r
fINOEX
(TPD14)
(SOus)
Signal
(TPB9+10)
\~urs'!;
waveforal.)
•
•
To2
FIGURE
6
PCA.
set
screw

5.~.4
Head
alignment adjustment
1)
Equi
pment
CE
Tester
CE
Diskette
(DYMEK
502-10
STANDARD
DISKETTE)
No.
1 screw
driver
Oscilloscope
Hex
wrench
(1.5mm
dia.)
2)
Adjustment procedure
2)-1
Connect
CE
Tester to Drive
(set
power
off).
2)-2 Turn-on
power
switch
and
motor on.
2)-3 Select drive
and
load
CE
diskette
(close
clamp
door
s1
owl
y).
2)-4
Seek
TKOO
to
TK32
then read amplitude of each
waveform
(positioning
waveform)
at
TPA1+
TPA2
under read
mode
(see Figure
7).
Trigger:
EXT
-
+INDEX
(DC.
+)
(TPD14)
Signal:
CHI
-TPB9
(AC
)
Add
100rn\l!Div
CH2
-TPBl.O
(AC.INV)
20
ms/Div
Specification:
whenA>B
B/A
>
60%
A<B
A/B >
60%
2)-6
Seek
both
directions
TKOO-tTK32i'm~TK79""'K32.
loosen both
set
screws, then
adjust
STM
until
Signal
comes
within spec. Tighten screw.
3)
Note: Adjust
~nder
following conditions
Temperature:
23°C
±2°C
exposed over 2 hours
Humidity:
50%
±5%
-11-

FIGURE
7
-12-

5.3.5
Head
Azimuth
I)
Equi
pment
CE
Tester
CE
Diskette
Oscilloscope
2)
Check
procedure
2)-1 Connect
CE
Tester to Drive then turn-on
power
switch.
2)-2
Turn
on
motor.
2}-3
Select
drive
and
load
CE
diskette.
2)-4
Seek
to
TK68.
2)-5
Read
azimuth
waveform
using
oscilloscope.
Trigger:
EXT
-
+INDEX
(DC
+)
(TPD14)
Signal:
CHI
-TPB9 .
(AC)
Add
lOOm~/D~v
CH2
-TPBIC
(AC,INV)
±
Ims/DJ.v
2}-6 Acceptable
when
adjusted
waveform
within following
range
FIGURE
8
TPD14
____
~r--l~
____________________________
_
(INDEX)
0'
Azimuth
"Error
TPB9/TPBIO
----------~I_AJ~.
~1,B
I~!.C'!~.!
D:~.
------
(USE
DIFFERENTIAL
AMP)
--J
__
AZIMUTH
~±18'
115>AX
115
~
~
X
100
~
X
100
~
115
(-18I ) (+
18
I )
Note:
A=B:
-12min
Specification=
±18min
C=D:
+12min
,
.,

•
NOTE
The
head's azimuth
is
not
adjustable.
It
is
suggested
that
the drive
be
sent to
an
authorized
repair
center
or a
new
head
assembly
be
installed.
In
the
latter
case,
all
previous adjustments should
be
made
again.
-14-

,,'
•
/'
.
,
;
-j
-Il"~
Pl·
'.___
.
.....
-
--··'1"
:
-:::
~IIO
~'j(;
-
~
"IX.
ri
'~----'-----""4~"
i
C"I(I
t.O'
;:)'01
fll(,
....
;>--..:-
- -
.:
0
. .
-:
1(.'''''
! !
-1
~;--------------~~~O
•
_____
t_u
+
1"1J
'
••
00(
....
D •
:..!J
"!o"
i
"t.""-
-ST[I'.I'I-
I;
"I
-
("T\
-"3
...,
'>
"'0
--;
Iv
-
n
"'l/l..
0 c
..
,
n
."
.,.,
,
tv -,.
:s
-"010.0111,"1-46
~
1If"'~
t-t¥
U,;
~
"
t)O
•
,.
US(
....
"
f.-j
V't
•
'''~1J
....;::
Lv
\.,.
,
.-,
..,
......
-llfAOT
'S-S
,1'.1-
'S·~
'S',
••••
!
crr--"
...
.JI
MOt'OII
ON
+"
r""
'"
10010'1
ON
GMO
...
·AA
......c:wt'I'QII
ON
P.
-.UI
,OIl
U!>£
1.£0 "
:
•••.••
;
"'.!l9
..
!>~
....
"",
."
U'So(
~O
..
Other manuals for M4853
1
Other Mitsubishi Floppy Disk Drive manuals