MIUFLY S2 PRO User manual

MIUFLY S2 PRO Body Camera
User Guide
Supporting Website:
www.miuflybodycamera.com

1
About this Guide
The content in this document is for information purpose and is subject to
change without prior notice. We have made every effort to ensure that
this User Guide is accurate and complete.
However, no liability is assumed for any errors or omissions that may
have occurred.
The manufacturer reserves the right to change the technical specification
and accessories without prior notice.
Caution
Do not expose battery being placed in high temperature environment. If
battery leaks or bulges, stop to use.
Risk of explosion if battery is placed by an incorrect type.
Dispose of used batteries according to the instructions.
Never replace the battery on your own. Doing so may cause the damage
or explosion. Please have the dealer do it for you.
Do not put the LCD displayer or lens under the sunshine.
Note
A specific emission frequency may influence the image quality.
Please try a few times of video-taking test before you formally use this
product in order to be familiar with this product.
Always full charge the battery before use.
Never dismantle, crush, or pierce the product, or allow the product to
short-circuit. Please persuade for professional assistance if the product
doesn’t work properly.
Before you start using this product, it is assumed that
you agree to the above statement.

2
TABLE OF CONTENTS
1. Introduction
Product Overview
Box contents
2. Product Diagram
3. Main Menu Optional Detail
4. Operation
5. Troubleshooting

3
1. Introduction
Product Overview
MIUFLY S2 PRO Body Camera is ruggedly designed to provides law
enforcement, security and emergency personnel with super Full HD 1512p
video recording capabilities, and one-button recording and activation. When
worn on the front of clothing, an ultra-wide 140° field-of-view lens captures
what happens in the field as accurate information for further analysis.
Featuring a 32GB (64GB) internal memory, pre-record buffering, importance
tagging, and integrated Infrared LEDS for night vision, MIUFLY S2 PRO is
equipped to perform in any conditions.
With full featured and adaptable operation, MIUFLY S2 PRO can record video
and audio simultaneously, or audio only for suspect interrogations and
victim/witness statements. MIUFLY S2 PRO is fully configurable and offers
multiple recording qualities, super full HD 1512p video down to 864x480
resolution, giving users the options to adjust the recording quality according to
their storage capabilities.
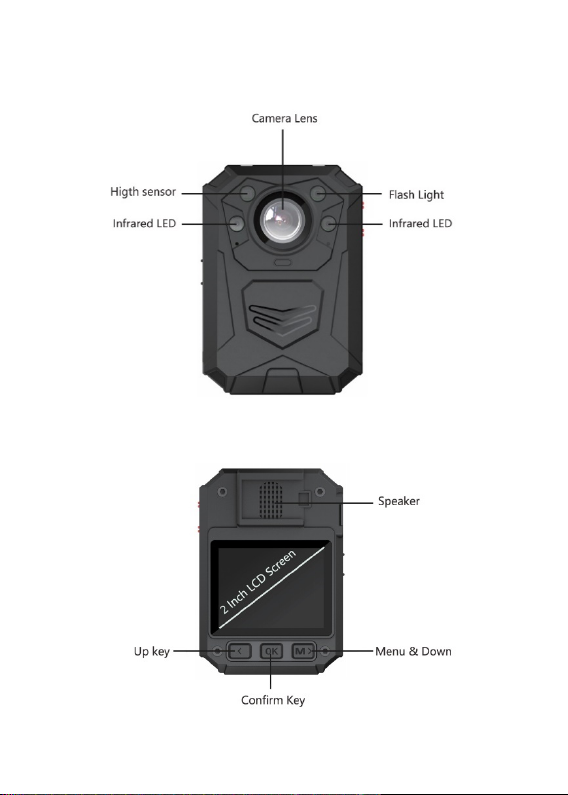
MIUFLY S2 PRO can also take up to 20 high-resolution snapshots, which,
together with video, can be viewed on backlit, 2 inch LCD color screen. Security
protocols of the device are secure to prevent accidental deletion of evidence
or modification of system settings. Video footage is also digitally watermarked
with the user ID, time and date, ensuring the authenticity of collected video of
the event. The internal GPS receiver provides automatic location tagging of
video- and still-captures, offering irrefutable substantiation of where and when
the audio and video were recorded.
The MIUFLY S2 PRO has voice control function, and users can awaken voice
control through the wake-up word "muifly". They can control video/audio
recording, and photography functions of the law enforcement instrument by
controlling keywords.
Box contents
l MIUFLY Body Camera
l Charging Dock
l USB Cable
l Wall charger
l 360 Degree Rotatable
Clip
l User Manual
l Epaulette Clip
● Crocodile Clip

4
2. Product Diagram

5

6
Item
Description
Camera Lens
High-Definition Camera
Light Sensor
Detect changes in light and auto turn on IR for low-
light recording
Infrared LED
Records clear image in low light situation. Enable
Clear face view with up to 10 meters
Flash Light
Hold Photo button to turn on/off white light
Speaker
Built-in speaker
Up key&
Change
Resolution
a). Press to scroll up in menu mode
b). In play mode, hold to zoom out the playing image
c). In play mode, press to rewind video
d). Hold to change resolution between 1080P and
720P
Confirm Key
a). Press to make a selection in menu mode
b). In play mode, press to pause/resume video or
audio playback.
c). In standby mode, press to review files.
Menu &
Down key
a). Press to enter into menu mode
b). Press to scroll down in menu mode
c). In play mode, hold to zoom in the playing image
d). In play mode, press to fast forward video
FN key
a). Press to tag importance to audio/video file when
camera is on recording
b). Press to switch between video, photo and audio
when playback files
c). Hold to turn IR light on/off;
One Press
Audio
Recording
a). Press to start/stop audio recording
b). Hold to power up camera and start audio
recording immediately when camera is powered off.
c). Hold to turn on/off white flash light

7
One Press
Photo Shot
a). Press to take pictures in standby mode
b). Press to take a single snapshot image while in
video recording
c). Hold to turn on/off white light
One Press
Video
Recording
a). Press to start/stop recording
b). Hold to power up camera and start video
recording immediately when camera is powered off.
USB Port
Connects to USB cable for charging or connection to
PC
PS: optionally connects to external camera
Reset Port
Inside the USB port, press to reset the device
Power
ON/OFF
Button
a). Hold for 3 seconds to turn on/off camera.
b). Press to enter or exit screen saver when camera is
on
Status
Indicator
LED
Green: camera is powered up and in standby mode,
not recording
Flashing Red: camera is recording video
Flashing Yellow: camera is recording audio only
Charging
Indicator
LED
RED: Charging Status
Flat GREEN when device is fully charged
Charging
Base Port
Connect to charging dock to charge the camera

8
LCD Interface:
Recording Indicator
Red blinking record status icon indicates camera is
recording,
Recorded Time
Recorded time of current clip
Battery Level
Current battery charge level
Device and Officer ID
Assigned camera and Officer IDs
Remaining Recording
Time
Estimated recording hours remaining
Available Memory
Internal SD Card capacity: Free space/Total capacity

9
3. Main Menu Optional Detail
To enter the setting menu:
1. Press Menu ( ) button and then enter a password.
2. Enter the password by using the following commands:
l Press Scroll Up ( ) button to change the character to the
previous letter or number.
l Press Menu ( ) button to change the character to the next
letter or number.
l Press OK ( ) button to move to the next character
PS: The default password is 000000.
3. After selecting the last character, press OK ( ) button to enter
the setting menu.
To navigate the settings menu:
Ø Press Menu ( ) button to select next setting or option.
Ø Press Scroll Up ( ) button to select the previous setting or
option.
Ø Press OK ( ) button to move to confirm your selection or enter
the sub-menu.
Ø Press Power ( ) button to save setting and return to the
previous menu.
Following is a list of the available settings and options. The bold items
are the default options.

10
Setting
Description
Options
Resolution
The image resolution for video
2688×1512 30P
2560×1440 30P
2304×1296 30P
1920×1080 30P
1280×720 30P
864×480 30P
Coding
Format
The coding format of video files
H.264, H.265
Quality
The quality of the image for video and
photo files.
S. Fine, Fine, Normal
Pre-record
When on, a certain time (depends on
the video resolution) will be
combined into the recorded video
before record button is pressed to
start recording.
When off, video start until the Record
button is pressed to start recording.
Off, On
Post Record
The amount of the time the camera
waits to stop recording video after
you press the Record button.
Off, 5 secs, 1 min, 10
mins, 20 mins, 35 mins
Dewarp
When on, video distortion correction
will be corrected, with more power
consumption.
Off, On
CarDV Mode
When on, camera will power up
automatically and start video
recording when it is charged. Camera
will power off as it normally does
when it is disconnected from the
power source.
Off, On
Loop
Recording
When on, camera will overwrite the
oldest video file with the most
current video file once its memory is
full. This setting can be selected only
when car DVR mode is on.
Off, On
Split Time
While recording video, the camera
will automatically split its recording
into files of this length.
1 min, 3Mins, 5 Mins,
10 Mins, 15 Mins, 20
Mins, 30 Mins, 45Mins

11
Megapixels
The image resolution for photos
5M (3008×1692 16:9)
12M (4608×2592 16:9)
20M (5984×3366 16:9)
25M (6656×3744 16:9)
30M (7296×4104 16:9)
40M (8448×4752 16:9)
Burst
The number of images captured when
you take a photo.
Off, 2, 3, 5, 6, 8, 10, 15,
20
Record Cam
When choose Ext., it will only record
the external mini cam. When choose
both, it will record both the main cam
and mini cam.
Single., Dual
Self Timer
The amount of time the camera waits
to take a photo after you press
Snapshot button.
off, 5 sec, 10 sec,20
sec, 30 sec, 1 minute
Slideshow
When on, viewing photo file will start
a slideshow where each photo will be
shown for around 5 seconds.
Off, on
Infrared
When set to manual, you will need to
hold Snapshot button to turn IR LEDs
on/off. When set to Auto, these lights
will activate automatically based on
the light sensor's reading.
Manual, Auto
Motion
Detect
When on, camera will start recording
when front movement is detected by
the lens.
Off, On
Recording
Warning
When on, you will hear a voice
confirmation when you start
recording. When off, voice
confirmation is disabled.
Off, On
Video mute
When on, recorded video files will
not record sound.
Off, On
GPS
When GPS is on, position of video will
be recorded and can be reviewed by
GPS player.
Off, On
Time Zone
Adopt local time in real time zone
-12 to +12, default +0
Language
The language of the text in camera
interface
English, 简体中文,
Pусский, Polski, 한국,
French, 日本語,
Portuguese, Español,
Türk, українськаий

12
Screen Saver
The amount of the time the camera
can be idle before deactivating the
display to conserve power.
Off, 30 sec, 1 min, 3
Mins, 5 Mins
LCD
Brightness
Screen lighting to view
High, Medium,Low
Auto Power
off
The amount of the time the camera
can be idle before powering off.
Off, 30 sec, 1 min, 3
Mins, 5 Mins
Power saving
When on, will enter power saving
mode
On, Off
LED Light
When on, indicator LED will tell the
status of the camera; When off,
camera is entering covert mode
On, Off
White Led
White Led light to offer light source
On, Off
Key Tone
When on, camera will play a tone
each time you press a button. When
off, tone is disabled.
On, Off
Motor
When on, there will be no vibration
prompts during startup, shutdown,
video recording, and recording.
On, Off
Volume
The volume of camera speaker. This
affects the loudness of video
playback, audio playback, the key
tone, record warning, and any other
sounds played by camera. This
doesn't affect the volume of the
recorded video or audio files
themselves.
0-12
Time Setup
Adjust time to real location
yyyy/mm/dd __:__
ID setting
User is able to set Device SN and
Person SN
Alphanumeric
characters
Password
If password is on, user needs to enter
password to get access to setting and
connection to PC
On, Off
Change User
Password
Password can be set or changed
Alphanumeric
characters
Default
setting
Use this to return camera to its
original settings. This does not erase
the memory.
O (Yes), X (No)
FW Name
Firmware version

13
4. Operation
4.1 Power on/off
hold Power button for 3 seconds to start up and enter standby mode;
at any mode with holding Power button for 3 seconds, camera will
shut down.
PS: at standby / video recording / audio recording mode, short press
power button , screen saver can be on/off.
4.2 Audio recording
In standby mode, press audio Recording Button for audio recording.
Camera will beep, and vibrate once and LED indicator on the top turns
yellow and flashes. Press again audio Recording Button to stop audio
recording (camera vibrates twice) and save the file.
In audio recording mode, short press FN button to remark the file as an
important file, the yellow star icon will appear at the right side on screen.
4.3 Photo shooting
At standby mode, press photo button to take photos.
4.4 Video recording
In standby mode, press video Recording Button to start video
recording. Camera will beep, and vibrate once and LED indicator on the
top turns red and flashes. Press again video Recording Button to stop
video recording (camera vibrates twice) and save the file.
In video recording mode, short press FN button to remark the file as an
important file, the yellow star icon will appear at the right side on screen.
4.5 One-button video recording
At power-off mode, hold video Recording Button for three seconds
for powering on the camera and start video recording immediately.

14
4.6 PIV (picture in video)
In video recording mode, press photo button to capture photo.
4.7 Zoom
In standby or video recording mode, hold Scroll Up button and scroll
down button to zoom in and out the image.
4.8 IR night vision
Under dark circumstances, infrared LED will help to record clear image
or video.
In standby mode, PRESS Menu buttonto navigate. Find option
【Infrared】, PRESS OK button to enter sub-menu: Manual & Auto,
press OK button to select.
1) Auto infrared mode:
In low light situations (1 Lux), 2 IR LEDS will be turned on automatically,
camera switches on infrared filter lens, video image turn black and
white. Otherwise, when circumstance brightness grew up, IR LED turns
off, and image becomes colorful again.
2)Manual infrared mode:
When night vision is needed, hold FN button to switch to Infrared mode,
IR LEDS will be turned on, black and white image. hold FN button again
to turn off IR LEDS, image becomes colorful.
4.9 White LED
In standby or video recording mode, hold photo button to turn
on/off white LED.

15
4.10 Playback
In standby mode, press OK button to enter playback mode. There
are Video, Photo, and Audio options, FN button to select, and press OK
button to confirm the selection, hold on OK button can delete file.
1) In video file playback mode, PRESS OK button to pause/resume
playback; PRESS scroll-Up button to rewind, PRESS Scroll-down
button to fast forward, then PRESS OK button to play normally.
You can fast forward or rewind 2x, 4x, 8x, 16x, 32x, 64x.
2) In photo file playback mode, hold and button to zoom in and
out the image. Adjustable is X1.0~X10.0. In the zoom in and out image,
short press and button to move the image to right or left side.
4.11 Reset
In any case the camera is frozen, use a pin to reset and restart the camera.
Reset button is inside USB port.
4.12 Device ID/ User ID
In standby mode, PRESS Menu button to enter settings. Find [ID
setting], PRESS OK button to select, then the Device & Person SN
interface will show up, 5 characters for device ID and 6 characters for
person ID.
PRESS scroll-Up button or Scroll-down button to choose a
character, then PRESS OK button to select.
4.13 Time Setting
In standby mode, PRESS Menu button to enter settings. Find Time
bar, for example, 2008/02/02 07:40. PRESS OK button and enter the
password, then users can change the date and time.

16
Press scroll-Up button or Scroll-down button to choose a
character, then PRESS OK button to select.
4.14 Video/Picture/Audio files can be deleted by holding on OK
button or on your PC/laptop.
After being connected to PC, password interface shows up, please enter
the password(default password is 000000)Press the (OK) button 6 times,
the camera will be recognized by the computer as Extra drive. User can
go to camera folder and delete those files not needed.
4.15 Charging
When camera batter is low, the battery icon will flash in the display, and
you will hear a alert tone. When this happens, charge the camera.
While camera is charging, indicator lights RED and flat GREEN after
camera is fully charged. It will take approximately 4 hours to fully charge
the camera.
Charging methods:
1). Use a USB cable to connect camera’s USB port to USB port on your
computer (powered on) or USB power adapter (connect to a power
outlet)
2). Attach camera to the docking bay. Use a USB cable to connect the
docking bay to USB port on your computer (powered on) or USB power
adapter (connect to a power outlet)
NOTES: Use the original wall charger (connect to a power outlet)
4.16 GPS tag
When GPS turns on, camera will record specific location information
along with body camera footage, and the tags are stored in the video
metadata, pinpointing the location when the footage is reviewed.

17
There will be GPS coordinate (longitude and latitude) showing up in the
upper right corner of LCD screen when GPS signal is received.
You can download the GPS player here :
http://www.miuflybodycamera.com
(
On the FAQ&Support
page
)
4.17 VOICE CONTROL YOUR CAMERA
In standby mode, you can directly start video recording, audio recording,
and photo taking functions through voice control. Say "Miufly" and the
camera will vibrate to indicate that the voice control function has been
activated. Then say the command to start recording. The voice control
commands are as follows.
Say “Miufly , take video” to start video recording.
Say “Miufly , take audio” to start audio recording.

18
Say "Miufly , take picture” to take photo.
voice control distance : the control distance can up to 13 ft in a quiet
indoor environment. In a noisy outdoor environment, the voice control
distance is about 6 ft.
Note :
1. The success rate of voice control will be affected when the ambient
noise is higher than 70 decibels. It is recommended to use the button
control in a noisy environment.
2. In rainy and snowy weather, the microphone hole of the camera may
be blocked by rain and snow, so that the camera cannot hear voice
commands. It is recommended to use buttons to control.
3. In order to prevent others from interrupting the recording through
voice control, we have not enabled the function of voice control to stop
recording. If you need the function of voice control to stop recording,
please contact us.

19
5. Troubleshooting
5.1 Cannot enter Menu of Body Camera
A. Stop Recording prior to entering Body Camera’s menu by pressing
Record button.
B. Body Camera supports a six-character alphanumerical password format.
Prior to entering menu of Body Camera, ensure that correct password is
entered.
5.2 IR are not turning on
A. IR turn on automatically only if they’re set to Auto in the Infrared menu.
Otherwise the Infrared will remain disabled.
5.3 Indicator LEDS are not lit
A. If the camera is powered up and Status LEDS are not lit go to Body
Camera’s menu and select LED Light menu option. Ensure that it is set to
ON.
5.4 Body Camera only records for short periods of time
A. In event of Body Camera recording for brief moments then shutting off,
please ensure that menu option Auto Power OFF is set to OFF.
5.5 How do I delete videos on the body camera?
A. The recorded videos, pictures and sound recording can be deleted by
holding on the OK button or on the computer via USB cable.
Note: Do not modify the file name directly on the camera memory, it
will cause the file to be lost or the system to crash.
If you have any questions, please contact us
Email: wendy@miuflybodycamera.com
Table of contents