MODE S120WWR User manual

SHOWER CABIN
Refer To sheet 12 For Relevant Product Codes

BEFORE YOU START, HERE IS SOME IMPORTANT INFORMATION
1) General Information
2) Additional Notes
Please inspect this product upon delivery. Any missing parts or manufacturing
defects must be reported immediately to the supplier. Damage or defects reported
later will not be accepted. TAKE CARE WHEN HANDLING GLASS PARTS-AVOID
HEAVY CONTACT BETWEEN THE GLASS EDGES AND ANY HARD SURFACE.
Glass breakage claims will not be accepted after the product has been unpacked.
Please note: Alumimium is a soft metal, and undergoes a series of extrusion,
shower cabin. Some light surface marks are normal, and is a result of the
manufacturing processes. Quality control has ensured that this item is of a good
Please read these instructions carefully before starting installation.
Note: This product is heavy and will require two people to install.
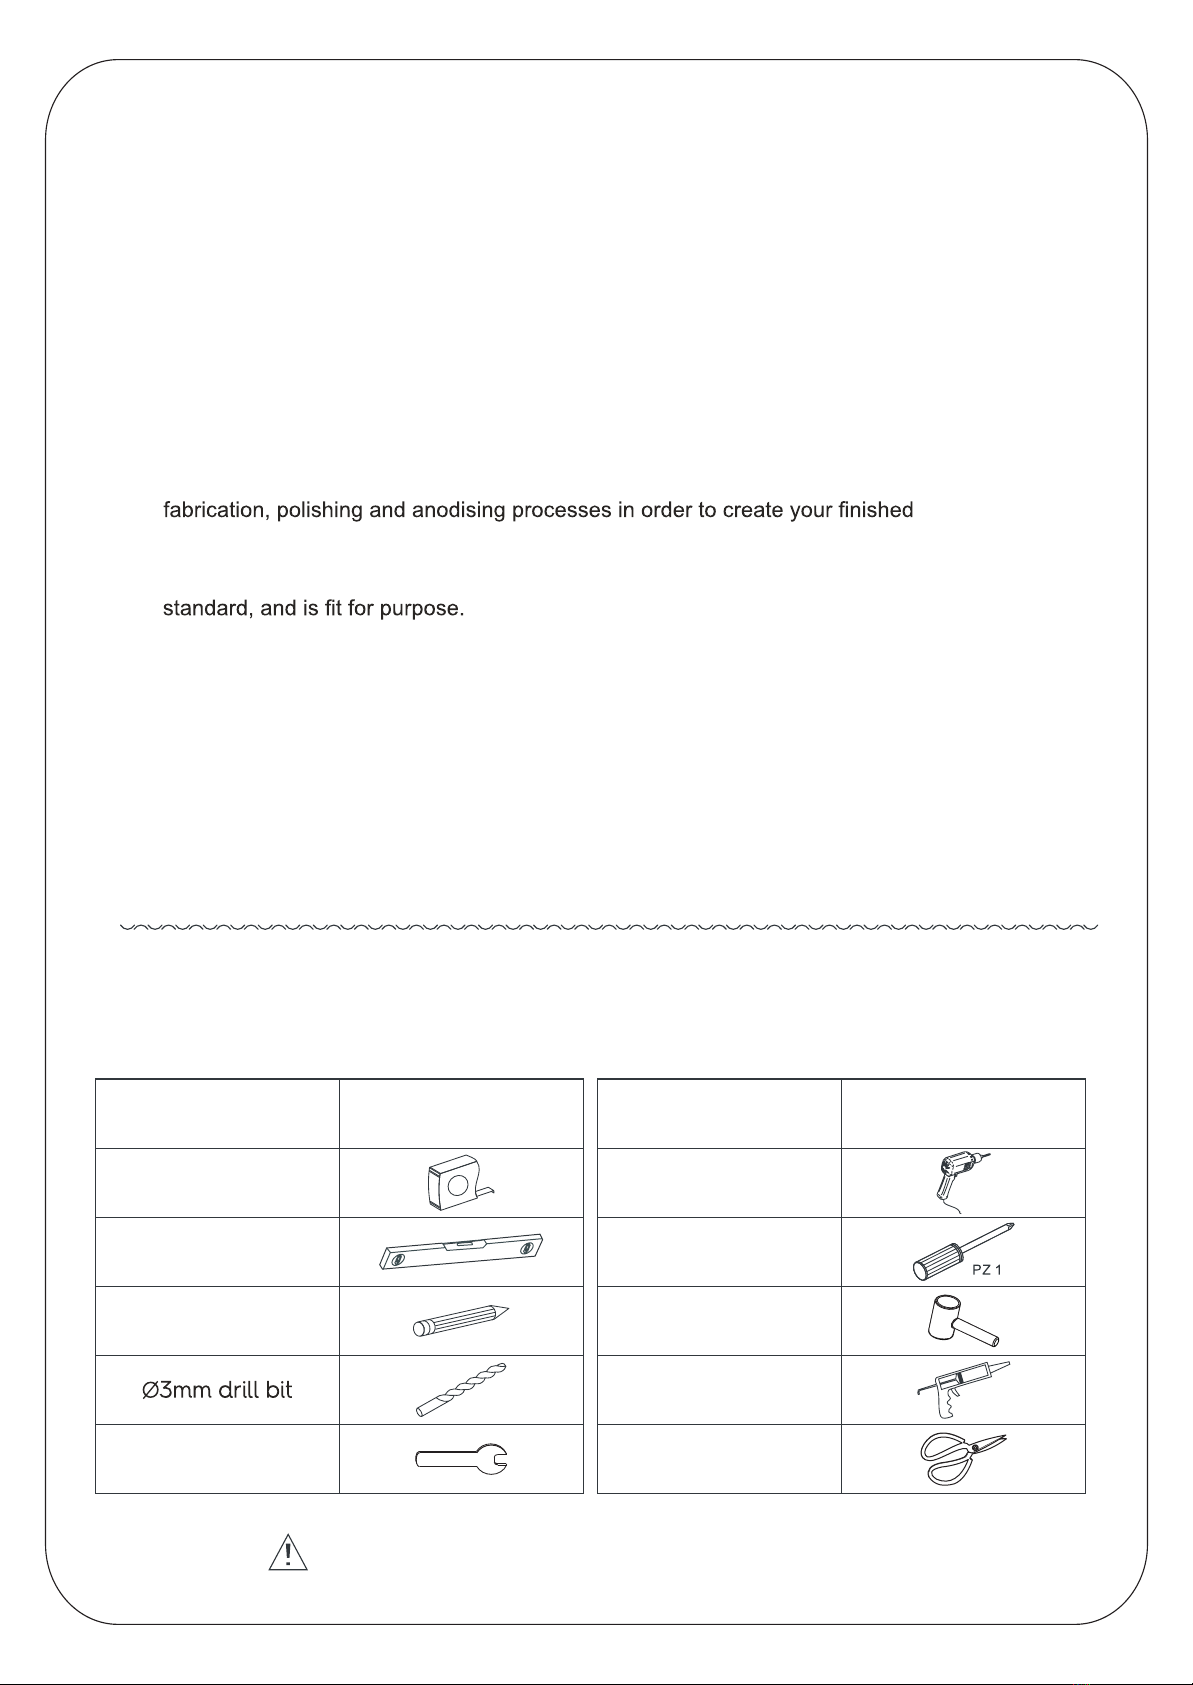
TOOLS REQUIRED
This product is heavy and will require two people to install.
Pencil
Spirit level
Tape measure
DESCRIPTION DESCRIPTION
PART IMAGE PART IMAGE
Drill
Cross head
Screwdriver
Rubber mallet
Silicone Sealant
This product requires a minimum of 2 bar water pressure to operate effectively. Do not
exceed a maximum of 4 bar pressure as this will cause damage to the unit and will
invalidate the product warranty.
1
Spanner Forfex

ASSEMBLY VIEW AND PARTS LIST
2
(1) 1xShower roof
A
A
A
A
A
A
C
B
C
B
E
C
PACK I.D
D
E
E
E
E
E
E
C
E
E
E
E
E
PACK I.D
E
E
E
E
E
E
E
PACK I.D
(2) 1xBack panel, left side
(3) 1xBack panel, right side
(4) 1xTray
(5) 1xFixed glass
(6) 1xSliding glass
(7) 2xSelf adhesive rubber seal
(8) 2xRail
(9) 2xDearation rubber seal
(10) 1xWall profile
(12) 2xRubber seal on the fixed
glass/sliding glass
(23) 2xBottom rollers and washers
(24) 10xM4x16 (2 spare)
(25) 8xM4x9 (2 spare)
(26) 2xM4x22
(29) 3xST4x12 (1 spare)
(11) 1xRubber seal between the
fixed glass
(14) 1xTop shower
(15) 1xHand shower
(16) 1xHolder
(17) 1xFlexible hose
(18) 1xInside hose connector
(19) 1xGlass shelf
(20) 2xGlass clamp and screw cap
(21) 2xRubber seal
(22) 2xTop rollers and washers
(30) 3xTube clips (1 spare)
(31) 2xElbow joint
(32) 2xWhite rubber seal
(33) 2xhexagon nut (1 spare)
(34) 1xSmall black rubber seal
(35) 1xBig black rubber seal
A(13) 1xWood floor (optional)
E
E
(27) 22xST4x16 (2 spare)
(28) 5xST4x55 (1 spare)
E
E
A
B
B
(36) 5xST4x35 (1 spare)
(37) 10xST4x10 (2 spare)
(38) 1xFixed glass
(39) 1xVertical profile
(40) 1xCorner profile
13
18
17
16
26
15
2
24
1
4
7
27
19
3
25
14
30
32
33
34
35
31
28
20
21
9
10
11
5
12
6
8
22
4
29
23
36
38
39
37
40
28
36

ASSEMBLY INSTRUCTIONS
If you require help, we advise you contact a competent plumber
Installation Steps
Step 1
Step 2
Adjust the tray feet to level the
tray in the desired location, then
pull the tray out to fit the shower
cabin.
(Shower waste not supplied.)
3
SHOWER TRAY FEET ADJUSTMENT
HANDSHOWER, SHELF AND BACK PANEL BOTTOM SEAL ASSEMBLY
16
15
17
7
discard
31
32
33
34
18
17
30
19
2
3
2xM4x22
26

Step 3
Step 4
6xM4x9
4
CONNECTING THE BACK PANELS
ASSEMBLING THE CABIN DOOR FRAME
Lift onto the tray. One person to hold
in place.
25
4xST4x55
10
8
28
4xST4x35
39
8
36

Step 5
Step 6
ASSEMBLING THE CABIN DOOR FRAME
OFFER THE FRAME TO THE BACK PANELS
5
40
38

Step 7
Step 8
12xST4x16
27
WHEN POSITIONED CORRECTLY, SCREW THE FRAME TO THE BACK PANELS
3MM
8xST4x16
DRILL, SILICONE AND SCREW THE BACK PANELS TO THE TRAY
(AT THE REAR OF THE CABIN)
NOTE!: Silicone the
drilled holes before
screwing panel to
the tray
27
6
3MM
8xST4x10
37

Step 9
Step 10
5
11
ATTACH TOP AND BOTTOM SEALS TO THE FIXED GLASS PANELS
SLIDE FIXED PANELS INTO THE FRAME. WEDGE IN PLACE USING RUBBER SEALS
21
5
21
5
7

Step 11
Step 12
22
ATTACHING THE TOP AND BOTTOM ROLLERS
TOP
BOTTOM
23
6
6
20
ATTACHING THE GLASS CLAMPS
1xST4x12
20
1xST4x12
29
29
8

Step 13
Step 14
To adjust the doors so that they are parallel, turn the screw underneath each top roller
either clockwise or anti-clockwise. This lifts, or lowers each corner.
TAKE CARE NOT TO OVER-TIGHTEN THE
ROLLER SCREWS. THIS WILL CAUSE THE
ROLLERS TO MALFUNCTION
ADJUSTING THE DOORS
A
B
ATTACHING THE SLIDING DOORS
Push down
button to
clip bottom
roller into
profile
A
B
B
A
9

Step 15
Step 16
9
12
FITTING THE SIDE/BACK VERTICAL SEALS
13
FITTING THE SHOWER ROOF
31
14
1
35
32
8xM4x16
24
30
10

Step 17
CONNECTING THE PIPEWORK AND WATER SUPPLY
NOTE!: Ensure correct
hot and cold water feed
connections to the cabin
shower valve.
NOTE!: After completing assembly, check ALL nuts and washers are tight and
secure. Turn on water supply and FULLY test the product. Carefully check for
leaks before moving the cabin into its final position.
11

CARE AND MAINTENANCE
COMMITMENT TO QUALITY
It is our intention that the quality and functions of this product
are of the highest standard. If you require help we advise you
firstly contact a competent plumber. However we understand that
this may not always be the case, so should you experience
any problems please contact out customer services quoting
the following:
Product name: Rectangular Shower cabin
Product code: S120WWR/S120BLR
Customer help line number:0344 804 48 48
1) AFTER CARE INSTRUCTIONS
2) MAINTENANCE
Regularly clean your shower product with warm soapy water
Clean the plastic parts with a cloth and mild detergent. Never
use any abrasive creams, dissolvents, acetone or detergents
and disinfectants that contain chlorine. The supplier accepts
no liability for any type of use of care other than those contained
in these instructions. The supplier reserves the right to introduce
technical changes without notice.
to prevent lime scale build up. Do not use abrasive cleaning
fluids or materials, or strong chemical cleaners as this will
damage the product surface.
12

INSTALLERS NOTES
13

14
The packaging you have received with your product is 100% recyclable.
It must be disposed of in a safe and environmentally friendly way.
We suggest you take it to the local landfill site and discard in the designated bins.
V03.08.2021
VictoriaPlum.com, Unit 2, First Point Business Park,
Water Vole Way, Doncaster, DN4 5JP, England
21
DOP No.: ENC2001140GZ64E1
Shower enclosures with aluminium
profiles and safety glass
Clause 4.4 of BS EN
14428:2015+A1:2018
Clause 4.3 of BS EN
14428:2015+A1:2018
Clause 4.2 of BS EN
14428:2015+A1:2018
Essential
characteristics
Performance Harmonised
technical
specification
Cleanability
Impact
resistance/shatter
properties
Pass
Pass
Pass
Durability
This manual suits for next models
1
Table of contents
Popular Shower Cabin manuals by other brands

Home Decorators Collection
Home Decorators Collection WAVERLY 60 installation manual

April
April identiti installation instructions

Schulte
Schulte MasterClass D1209030 Assembly instructions

Duscholux
Duscholux COLLECTION 2 Round single-leaf installation instructions

RIHO
RIHO TIONE T101 80 installation instructions

RIHO
RIHO Scandic Soft Q203 manual