Modell Studio Schleicher Ka8 Instruction Manual

- 1 -
Schleicher Ka8
Schleicher Ka8Schleicher Ka8
Schleicher Ka8
Building Instruction
1. Fuselage
Fix both halves of the plan onto your building jig.
The plan sticks together on the markings on both halves.
Cover the plan with clear plastic sheeting.
Take both halves of the backbone chain and fix it on the plan with pins.
Do not break out the temporary fillings in the backbone chain before you have finished the first
halve of the fuselage!
Then start gluing the frame halves 1-13 onto the backbone chain.
Do not put any glue onto the pivot of the frames for the excess glue will close the slot in backbone
chain and you will not be able to put the 2nd frame halve from the opposite site into the same slot.
Put glue later on onto the second frame halves!
Put the wheel bearing between the frames 7, 7a and 7b.
All stringers have to be pre bend over steam of cooking water, especially those that have to be bent
very tight! All stringers that have to be extended must be shafted!
Glue in place the stringers G1-G5, 6x6mm pinewood,
Glue the rib 5 onto the frames 7, 7a and 8

- 2 -
Match and glue all those diagonals between the frames 8-12
After this, match and glue the diagonals D2 between frame 3 and 4 and D3 between frame 3 and 9
Match and glue the fillings F1 between frames 6 to 9 above the stringer G4 back to the stringer G5
Match and glue the lower fillings F2 between stringer G3 and the fuselage bottom.
Take the fuselage halve from your building jig, turn it round.
Cut some pinewood rails to a length of about 25cm and squeeze them with a clamp to your
building jig that about 20cm are riding out over the edge.
Then push the fuselage over these rails and you will now be able to build the 2
nd
halve of the
fuselage the same way.
Check that the fuselage stays straight!
The wheel housing will be lined out by 0,4mm plywood.
Glue the elevator saddle 24 in place.
Push the 4 mushroom-shaped aluminium dowels from the inside out through rib 5 and glue in
place using Epoxy resin!
The wing joining tube must be sanded before gluing it with Epoxy resin into the fuselage.
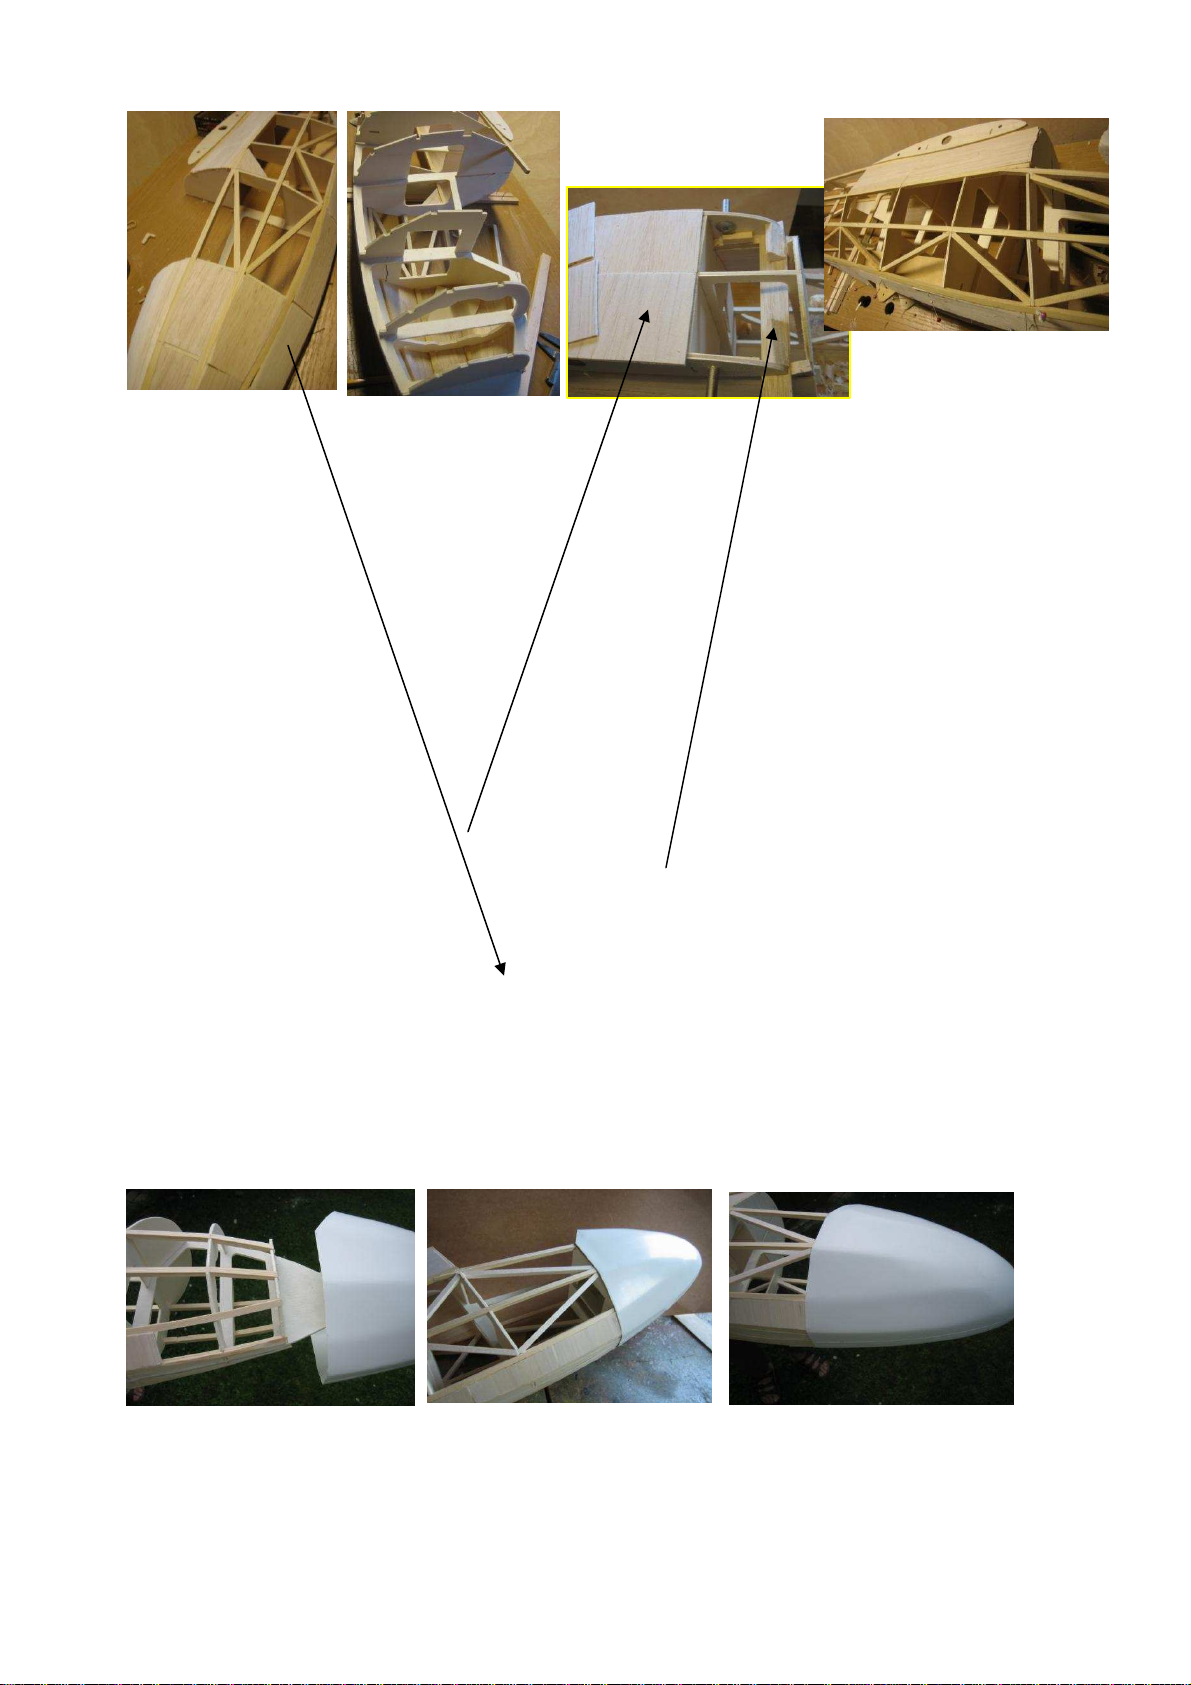
Match and glue in place the covering F2, balsawood 1,5mm, above rib 5.
Match and glue the covering F3 between stringer G5 and fuselage top and make it fit to the leading
edge as well as the trailing edge! It is roof top like at the trailing edge and radiuses to the leading
edge. (See picture of the Original Ka8 at the end of this instruction, above on the right side and
below the big picture in the middle)
Match and glue in place the bottom planking of the fuselage made from 4mm plywood underneath
the cockpit region.
Match and glue the tail skid 13b.
The main Skid is made of ash wood and already cut to length.
The only thing left to do is to sand it down on the front end like shown on the plan!
Triangle strips of balsawood are used as the bearing for the rubber suspension. Glue them to the
fuselage bottom as shown in the plan.
Match the nose cone and glue it in place by using Epoxy resin.
Fix the main skid to the fuselage bottom on both ends using a self-tapping screw.
Now the canopy frame will be glued together using parts 3b, 6a, and the pined wood stringer 6b.
Put a sheet of clear plastic between the canopy frame and the fuselage. This prevents the canopy
frame from sticking to the fuselage frame while gluing!

- 3 -
When dry, match and glue in place the canopy hinge on the right hand side of the fuselage showing
in flight direction! Take care to glue the hinges in that direction that you have to push the canopy
onto the fuselage from the rear end side and not from the front end side!
Then glue the canopy in place but trim it before for perfect fit.
2. Rudder
Fix part no 13 along with a bottom layer of 6x6 mm stringers onto your jig.
The bottom layer is necessary to keep the clearance for the later on planking reaches over the
rudder!
Glue the ribs 1-7 in place. Take care for a right angle!
Glue hinge reinforcement 13a and the edge gussets in place!
Match and glue the planking of the rudder in place.
Note the excess length of the planking that will line up with your jig, over part 13!
Sand the rudder frame now and then glue the leading edge in place following by the rudder tip
Elevator
Glue part no.12 and part no.11 together and fix it on the jig with pins.
Glue ribs 1-7 in place as before, watch the right angle!
Glue the trailing edge 8 and 15 and the reinforcement 15a, 14, 9a and 15b in place.
Cut away Part no12 in the area of the hinges about 10mm.
Glue elevator tips 9 in place and sand all smoothly after drying.
We use hinge points like Robart is offering, to attach all rudder. The holes are already predrilled.
3. Elevator
1.
Fix Part No.10 along with a 6x6 bottom layer onto your jig.
It is similar to the rudder construction described before.
Glue the elevator attachment parts 1, 1a, 1b, 1c and the reinforcement 1d (flush to the bottom)
together. When dry glue this unit along with the ribs 2-9 onto part No.10.
Let it dry and then add the planking that will line up with the jig.
Page4

- 4 -
Page 3
Glue the leading edge 12 and the elevator tips in place and, after drying, sand the elevator smooth!
For mounting the elevator to the fuselage, screw the 30x4mm screw into the slot of rib 1 a.
The gap between planking and the head of this screw should be around 12mm but you will get the
right gap when you push the elevator back into part 23 of the elevator saddle.
Glue part No. 11 to 11a and fix the unit onto your jig.
Glue ribs 2-9 in right angle!
When dry add the planking 14
Glue the doubler 15 and the tips 16
Cut off part No. 11a in the aerial around the hinge holes about 10mm. We use hinge points like
Robart is offering.
Glue the rudder horn in place using Epoxy resin. Watch the plan fort he right position.
4. Wings
Cover the plan fort he wings by a sheet of clear plastic.
Shaft the wing spar H1 and H2 carefully!
Never glue it blunt together!
Shaft the lower planking and fix it on the plan with pins.
Glue the wing spar H2 to the lower planking.
Along with rib 1 glue part R1a into R1 and the other ribs 2-30 in place onto the lower planking.
To adjust rib 1in the right angle you got to use the template.
Glue the half ribs in place then.
Use an underlayment along the leading edge to lift the lower planking to the ribs contour.
Glue the upper wing spar H1 along with the leading edge 32 in place.
Add the vertical grain spar webbing V1, starting at rib 4 to the wingtips.
The spar webbing between ribs 1 – 4 will be added after having glued in the wing joiner tube in
place.
The spar webbing is made from 2mm plywood between rib 1 and the airbrakes. Behind the brakes
to the tips we used 1,5mm balsawood with vertical grain to prevent the spar from snapping.
Sand the aileron spars 34 and 35 like shown in the plan, then glue in place to the ribs.
Vertical grain

- 5 -
Glue reinforcement 36 in place.
Glue the wing joiner outer fibreglass tubing after sanding the points of gluing in place using Epoxy
resin and now the vacant spar webbing between ribs 1-4.
Glue spar H3 to the airbrake section.
Shaft the upper planking now and glue in place as in one piece. Watch the plan for shafting!
The planking in the aerial of the airbrakes will be added later on after the airbrakes are glued in
place.
Glue the trailing edge 33 and the capping over the ribs.
Glue in place the planking over ribs 1-2 (planking covers these ribs!)
Take the wing from your jig after drying and turn it round.
Add the servo cables for aileron and airbrake servos now.
Cut off the stays from the ribs und glue the lower trailing edge in place now.
Use an underlayment along the trailing edge to keep it straight.
Glue the servo frames now in position and add the lower capping.
Screw the wing keepers into rib 1b
Glue in the leading edge, the wingtips and all triangle gussets. Sand the wing frame smoothly!
5. Airbrakes Attention!!!!!!!! Built up one right and one left airbrake!
First glue together the Airbrake housing from parts no. LK 1-3.
The cover will be glued in place later on after having installed the brakes.
Glue the pinewood spar LK1a on top of the parts LK 5+6.
Glue the plywood spacers LK11 onto the parts LK5-8 and put the housing together.
Attention! Take care that the predrilled holes are in axial alignment!
Check the space after having dried so the parts LK9+10 have to fit flush in to the housing and the
brakes should have a smooth running. Otherwise sand the gap in the housing or add spacers.
5 mm spacer

- 6 -
Glue the fibreglass steering arms LK9/LK10 together with the 5mm spacer and along with the
3mm shaft into the housing with Epoxy resin.
Then attach the airbrakes to the steering arms using the 2mm plastic tubing as an axle.
Push the 5mm spacer onto the axle and glue the cover LK4 to close the housing now.
Cut off the ribs 9-12 as shown that the airbrake housing will fit into that slot then.
After having checked to perfect fit glue the airbrake in place.
Glue the upper planking over the airbrake and its housing. Then cut around the moving part of the
airbrake. Sand all down as to follow the final contour of the ribs.
6. Covering
There are many ways to cover your airplane.
We recommend SOLARTEX in its different colours to get a scale finish.
PRODUCT DESCRIPTION:
Iron on self adhesive fabric. A very strong covering material. Weight 85-98 g.s.m.
FEATURES:
Very easy to apply. Much stronger than films but heavier. Has a matt surface which is already fuel
proofed by a coat of resin. Easily cleaned with soapy water to remove dirt or oil.
MODEL TYPE:
Large models. Old timer and vintage models. Medium and large models with open frame
construction. Scale models of fabric covered aircraft
APPLICATION:
Iron on. Can be painted with Clearcoat.(to add gloss) and with Solarlac. Can be trimmed buy
ironing on pieces of Solartex. Solartrim does not stick properly to Solartex. Do NOT use varnish or
polyurethane type fuel proofers or dope or car cellulose on Solartex.
SIZES: Rolls 2 metre and 10metre by 0.68m wide.

- 7 -
Picture of an Original:
Table of contents
Popular Toy manuals by other brands

Fisher-Price
Fisher-Price Laugh & Learn Bathtime Bongos instructions

Mega Bloks
Mega Bloks Nickelodeon Teenage Mutant Ninja Turtles Out of the Shadows KRAANG Cryo... manual

Fisher-Price
Fisher-Price Y4233 manual

Viessmann
Viessmann 5058 H0 Operation manual

LEGO
LEGO STAR WARS 75099 Building instructions

Faller
Faller 222134 quick start guide

Fisher-Price
Fisher-Price imaginext system 78519 instructions

EBMA Hobby & Craft
EBMA Hobby & Craft Wing Jig Construction Instructions

VTech Baby
VTech Baby Twist & Explore Caterpillar Parents' guide

MGA Entertainment
MGA Entertainment Little Tikes Fantastic Firsts 3-in-1 SwitchaRoo... quick start guide

LEXIBOOK
LEXIBOOK DMPJ1 instruction manual

Faller
Faller Racing building Conti Tower manual