Monacor TVSET-320 User manual

Digitales Bildspeicher-
system mit S/W-Kamera
1Übersicht der Komponenten und ihrer
Bedienelemente und Anschlüsse (Abb. 1)
1Steuereinheit mit Bildspeicher
2Kleinspannungsbuchse DC IN der Steuereinheit
zum Anschluss der Stromversorgung (12 V )*
3Kontrollanzeige (rote LED)
4Ein-/Ausschalter der Steuereinheit
5Videoausgang V-OUT (3,5-mm-Klinkenbuchse)
zum Anschluss eines Monitors oder eines Notfall-
tasters
6Kabel V-IN mit Mini-DIN-Kupplung zum Anschluss
der Kamera
7Anschlusskabel der Kamera mit Mini-DIN-Stecker
zur Verbindung mit der Steuereinheit
8S/W-Kamera mit Nadelöhrobjektiv und Infrarot-
Lichtgeber (4 Infrarot-LEDs)
9Fernbedienung (Details siehe Abb. 2)
aKontroll-LED leuchtet, wenn eine Taste gedrückt
wird
bTaste ARMED
nach dem Einschalten mit dem Schiebeschal-
ter (4) zum Scharfstellen des Systems
im Kontrollmodus zum Weiterblättern auf das
nächste aufgenommene Bild
im Einstellmodus zum Erhöhen des angewähl-
ten Wertes
cTaste OFF
bei scharfgeschaltetem System zum Deaktivi-
en des Systems
im Kontrollmodus zum Weiterblättern auf das
vorherige aufgenommene Bild
im Einstellmodus zum Verringern des ange-
wählten Wertes
dTaste EMERGENCY
bei scharfgeschaltetem System zum Aufnah-
mestart einer Bildfolge
im Einstellmodus zum Aufrufen des nächsten
Einstellmenüs
10 Steckernetzgerät für die 12-V-Stromversorgung*
des Bildspeichersystems über das 230-V-Strom-
netz
*Bei mobilem Betrieb des Bildspeichersystems kann die
Stromversorgung über das beiliegende Adapterkabel für
einen Zigarettenanzünder erfolgen. Siehe dazu Kapitel 4.
2Einsatzmöglichkeiten
Das digitale Bildspeichersystem TVSET-320 ist ein
Überwachungssystem für Innenräume, z. B. um die
Vorgänge bei einem Einbruch oder Überfall zu doku-
mentieren. Die aufgezeichneten Bilder (max. 32) las-
sen sich dann zu einem späteren Zeitpunkt auf einem
Monitor auswerten.
Das Bildspeichersystem besteht aus einer Steuer-
einheit (inkl. Montagematerial), einer S / W-Kamera
mit Nadelöhrobjektiv, zwei Schlüsselanhänger-Fern-
bedienungen und einem Steckernetzgerät für den
Betrieb des Systems über das 230-V-Stromnetz. Als
Zubehör liegt dem System ein Adapterkabel für den
Anschluss an eine Zigarettenanzünder-Buchse bei
sowie ein Videokabel für den Monitoranschluss. Das
Bildspeichersystem kann bei Bedarf noch um einen
Notfalltaster (nicht im Lieferumfang) ergänzt werden.
2.1 Zulassung
Die Zulassung für die Fernbedienung ist nach der
R+TTE-Richtlinie (Radio and Telecommunication
Technical Equipment) in den Staaten der Europä-
ischen Union gültig. Für den Betrieb in Staaten außer-
halb der EU fragen Sie bitte Ihren Fachhändler oder
die MONACOR-Niederlassung des entsprechenden
Landes.
In der Bundesrepublik Deutschland ist der Fre-
quenzbereich um 433 MHz für den Betrieb von Funk-
systemen freigegeben. Da dieser Frequenzbereich in
anderen Ländern der EU für diesen Anwendungs-
zweck möglicherweise nicht zur Verfügung steht,
informieren Sie sich bei Betrieb des Systems außer-
halb Deutschlands bitte bei Ihrem Fachhändler oder
bei der entsprechenden Behörde des Landes.
3Hinweise für den sicheren Gebrauch
Die Komponenten des Bildspeichersystems entspre-
chen der Richtlinie 89/336/EWG für elektromagne-
tische Verträglichkeit. Das Steckernetzgerät entspricht
zusätzlich der Niederspannungsrichtlinie 73/23/EWG.
Beachten Sie auch unbedingt die folgenden Punkte:
●Verwenden Sie das System nur im Innenbereich.
Schützen Sie die Geräte vor Tropf- und Spritzwas-
ser, hoher Luftfeuchtigkeit und Hitze (zulässiger Ein-
satztemperaturbereich 0 – 40 °C).
Achtung!
Das Netzgerät wird mit lebensgefährlicher Netzspan-
nung (230 V~) versorgt. Nehmen Sie deshalb nie-
mals selbst Eingriffe in diesem Gerät vor. Durch un-
sachgemäßes Vorgehen besteht die Gefahr eines
elektrischen Schlages. Außerdem erlischt beim Öff-
nen eines der Geräte jeglicher Garantieanspruch.
●Decken Sie die Gehäuseöffnungen an der Steuerein-
heit nicht ab und stecken Sie keine Gegenstände hin-
durch. Das Gerät kann dadurch beschädigt werden.
●Ist das System über das Netzgerät mit dem 230-V-
Stromnetz verbunden, nehmen Sie es nicht in Be-
trieb bzw. ziehen Sie sofort das Netzgerät aus der
Steckdose, wenn:
1. sichtbare Schäden an der Steuereinheit, an der
Kamera oder am Netzgerät vorhanden sind,
2. nach einem Sturz der Geräte oder Ähnlichem der
Verdacht auf einen Defekt besteht,
3. Funktionsstörungen auftreten.
Geben Sie die Geräte in jedem Fall zur Reparatur in
eine Fachwerkstatt.
●Verwenden Sie für die Reinigung nur ein trockenes,
weiches Tuch, niemals Chemikalien oder Wasser.
●Werden die Geräte zweckentfremdet, falsch be-
dient, nicht richtig angeschlossen oder nicht fachge-
recht repariert, kann für eventuelle Schäden keine
Haftung übernommen werden.
●Soll das Bildspeichersystem endgültig aus dem Be-
trieb genommen werden, übergeben Sie es zur um-
weltgerechten Entsorgung einem örtlichen Recyc-
lingbetrieb.
4Installation
1) Von der Halterung der Kamera (8) die Schutzfolie
des Klebestreifens abziehen und die Halterung an
geeigneter Stelle festkleben.
2) Die Steuereinheit (1) an geeigneter Stelle fest-
schrauben oder, wenn die Steuereinheit transpor-
tabel sein soll, um die aufgenommenen Bilder an
anderer Stelle auszuwerten, so befestigen, dass
sie leicht abnehmbar ist.
3) Den Kamerastecker (7) in die Kupplung (6) der
Steuereinheit stecken.
4) Zur Stromversorgung beim mobilen Einsatz das
beiliegende Adapterkabel in die Buchse DC IN (2)
stecken und in einen Zigarettenanzünder. Anderen-
falls das beiliegende Netzgerät an diese Buchse
anschließen und das Netzgerät in eine Steckdose
(230 V~ / 50 Hz) stecken.
5) Zum Ausrichten der Kamera an die Buchse V-OUT
(5) über das beiliegende Adapterkabel (3,5-mm-Klin-
ke/ Cinch-Stecker) einen Monitor anschließen. Mit
dem Schiebeschalter (4) die Steuereinheit einschal-
ten (ON) und auf der Fernbedienung die Taste
ARMED (b) drücken. Die Kamera ausrichten und das
System mit der Taste OFF (c) wieder ausschalten.
6) An die Buchse V-OUT lässt sich auch ein Notfall-
taster (nicht im Lieferumfang) anschließen, mit dem
bei Bedarf die Aufzeichnung einer Bildfolge gestar-
tet werden kann.
®
TVSET-320 Best.-Nr. 19.7630
Copyright©by MONACOR®INTERNATIONAL GmbH & Co. KG, Bremen, Germany. All rights reserved. A-0007.98.02.08.2002
®
®
➀
A
R
M
E
D
O
F
F
E
M
E
R
G
E
N
C
Y
image
➁
bc
a
d
10
5
234
9
6
7
1
8
®
D A CH
➀
A
R
M
E
D
O
F
F
E
M
E
R
G
E
N
C
Y
image
➁
bc
a
d
10
5
234
9
6
7
1
8

Hinweis: Wird das System über das Netzgerät betrieben
und längere Zeit nicht benutzt, ziehen Sie das Netzgerät
aus der Netzsteckdose, da es selbst bei ausgeschalte-
ter Steuereinheit einen geringen Strom verbraucht.
5Voreinstellungen
Die Menüs für die Voreinstellung können nur auf dem
Monitor angezeigt werden, wenn zuvor mindestens
ein Bild aufgenommen wurde. Ein Bild kann bereits
z. B. bei der Ausrichtung der Kamera aufgenommen
worden sein.
1) Die Steuereinheit mit dem Schiebeschalter (4) ein-
schalten und auf der Fernbedienung gleichzeitig die
beiden Tasten ARMED (b) und OFF (c) drücken. Auf
dem Monitor muss ein aufgenommenes Bild mit ein-
geblendetem Aufnahmedatum und -zeit erscheinen.
Wenn nicht, die Steuereinheit kurz aus- und wie-
der einschalten. Die Taste ARMED drücken und
dann die Taste EMERGENCY (d). Jetzt wird eine
Bildfolge entsprechend den aktuellen Voreinstel-
lungen aufgenommen. Danach das System mit der
Taste OFF deaktivieren. Jetzt gleichzeitig die bei-
den Tasten ARMED und OFF drücken. Das zuletzt
aufgenommen Bild erscheint auf dem Monitor.
2) Die Taste EMERGENCY (d) drücken. Es wird das
Menü zum Löschen der aufgenommen Bilder ein-
geblendet:
Jetzt nicht versehentlich die TasteARMED drücken,
sonst werden die aufgenommen Bilder gelöscht.
3) Die Taste EMERGENCY erneut betätigen. Es er-
scheint das Menü für die Datums- und Zeiteinstel-
lung:
(Jahr/Monat/Tag/Uhrzeit)
Die Minuten sind unterstrichen und können jetzt mit
der Taste ARMED erhöht oder mit der Taste OFF
verringert werden.
Mit der Taste EMERGENCY schrittweise von den
Minuten bis zur Jahreszahl springen und ggf. jeweils
mit der Taste ARMED oder OFF den Wert korrigie-
ren. Der unterstrichene Wert ist jeweils veränderbar.
4) Nach dem Anwählen der Jahreszahl durch erneu-
tes Betätigen der Taste EMERGENCY das Menü
zur Einstellung der Aufnahmeintervalle aufrufen:
Die Zahl zeigt an, dass z. B. alle 4 Sekunden ein
Bild aufgenommen wird. Mit der Taste ARMED die
Zeit auf max. 8 Sek. vergrößern oder mit der Taste
OFF auf min. 1 Sek. verkleinern.
REC Interval: 04
2002/06/25/15:03
DEL:ARM Exit:OFF
5) Nach dem Einstellen der Intervallzeit mit der Taste
EMERGENCY das Menü für die Anzahl der Bilder,
die bei einer Auslösung aufgenommen werden sol-
len, aufrufen:
Die Zahl zeigt an, dass z. B. 4 Bilder hintereinander
im zuvor eingestelltem Zeitabstand aufgenommen
werden. Mit der Taste ARMED die Anzahl auf max.
8 vergrößern oder mit der Taste OFF auf min. 1 ver-
kleinern.
6) Um den Einstellmodus zu verlassen die Taste
EMERGENCY abschließend erneut drücken. Der
Monitor zeigt danach kein Bild.
6System scharfstellen oder deaktivieren
1) Das Steuergerät mit dem Schiebeschalter (4) ein-
schalten (ON).
2) Auf der Fernbedienung die Taste ARMED (b) drü-
cken. Der Signalgeber in der Steuereinheit piept
zweimal.
3) Die Kontroll-LED (3) der Steuereinheit blinkt für
16 Sekunden. Dann ist das System scharfgestellt.
Die Verzögerung dient dazu, den Überwachungs-
bereich ohne Auslösung einer Bildaufzeichnung
verlassen zu können.
4) Registriert jetzt der interne Sensor eine Bewegung
im Kamerabild, wird eine Bildfolge entsprechend
den Voreinstellungen aufgenommen.
5) Bei einem Notfall entweder die Taste EMERGEN-
CY (d) drücken oder, falls vorhanden, den Notfall-
taster. Dadurch wird sofort die Aufzeichnung einer
Bildfolge gestartet.
6) Zum Deaktivieren des Systems die Taste OFF (c)
drücken.
7Aufgenommene Bilder betrachten und ggf.
löschen
1) An die Buchse V-OUT (5) über das beiliegende
Adapterkabel (3,5-mm-Klinke/ Cinch-Stecker) einen
Monitor anschließen.
2) Das Steuergerät mit dem Schiebeschalter (4) ein-
schalten (ON).
3) Auf der Fernbedienung gleichzeitig die beiden Tas-
ten ARMED (b) und OFF (c) drücken. Auf dem
Monitor erscheint das zuletzt aufgenommene Bild
mit eingeblendetem Aufnahmedatum und -zeit.
Bleibt der Bildschirm dunkel, wurde kein Bild auf-
genommen.
4) Mit der Taste OFF zum vorherigen Bild schalten
bzw. mit der Taste ARMED zum nächsten Bild.
REC Picture :04
5) Zum Löschen aller Bilder ein aufgenommes Bild
aufrufen und mit der Taste EMERGENCY (d) das
folgende Menü einblenden:
6) Zum Löschen die Taste ARMED drücken. Auf dem
Monitor erlischt das momentane Bild und das Menü
wird ausgeblendet (nur graue Fläche sichtbar).
7) Sollen die Bilder nicht gelöscht werden, das Menü
mit der Taste OFF verlassen.
8Batteriewechsel der Fernbedienung
Leuchtet die Kontroll-LED (a) beim Betätigen einer
Taste nur noch schwach oder gar nicht, muss die Bat-
terie ersetzt werden. Dazu auf der Rückseite die
Schraube herausdrehen und den Deckel abnehmen.
Nur eine 12-V-Batterie gleichen Typs einsetzen. Dabei
unbedingt auf die richtige Polung achten (Lage des
Plus- und Minuspols der Batterie). Siehe Aufdruck im
Batteriefach.
●Werfen Sie verbrauchte Batterien nicht in den Haus-
müll, sondern geben Sie sie nur in den Sondermüll
(z. B. Sammelbehälter bei Ihrem Einzelhändler).
9Technische Daten
Max. Speicherkapazität:. 32 Bilder
Synchronisation:. . . . . . . hor. 15 625 Hz, vert. 50 Hz
(CCIR)
Bildsensor: . . . . . . . . . . . 6,3 mm-CMOS-Chip (1/4")
Bildpunkte: . . . . . . . . . . . hor. 352 x vert. 288
Videopegel: . . . . . . . . . . 1 Vss/75 Ω
Mindestbeleuchtung: . . . 0,5 Lux
Objektiv-Brennweite: . . . 3,6 mm
Bild-Erfassungswinkel: . . hor. 45°, vert. 32°
Trägerfrequenz: . . . . . . . 433 MHz
Stromversorgung:. . . . . . 12 V /500 mA über bei-
liegendes Netzgerät an
230 V~/50 Hz/9 VA oder
12 V über eine andere
Spannungsquelle
Einsatztemperatur: . . . . . 0 – 40 °C
Abmessungen, Gewicht
Kamera: . . . . . . . . . . . 36 x 36 x 24 mm, 60 g
Steuereinheit: . . . . . . . 112 x 65 x 20 mm, 85 g
Laut Angaben des Herstellers.
Änderungen vorbehalten.
DEL:ARM Exit:OFF
®
TVSET-320 Best.-Nr. 19.7630
Copyright©by MONACOR®INTERNATIONAL GmbH & Co. KG, Bremen, Germany. All rights reserved. A-0007.98.02.08.2002
®
®
➀
A
R
M
E
D
O
F
F
E
M
E
R
G
E
N
C
Y
image
➁
bc
a
d
10
5
234
9
6
7
1
8

Digital Picture Storage System
with B/W Camera
1Overview of System Components with Oper-
ating Elements and Connections (fig. 1)
1Control unit with picture storage
2Low-voltage jack DC IN of the control unit for
power supply connection (12 V )*
3Indicating LED (red)
4Power switch of the control unit
5Video output V-OUT (3.5 mm jack) for connecting a
monitor or an emergency switch
6Cable V-IN with mini DIN inline jack for connecting
the camera
7Connection cable with mini DIN plug for connecting
the control unit
8B/W camera with pinhole lens and infrared light
source (4 infrared LEDs)
9Remote control (details see fig. 2)
aindicating LED; lights up when a button is
pressed
bbutton ARMED
arming of the system after switching on with
the sliding switch (4)
switching to the next picture recorded in the
control mode
increase of the selected value in the setting
mode
cbutton OFF
deactivation of the system when the system is
armed
switching to the previous picture recorded in the
control mode
decrease of the selected value in the setting
mode
dbutton EMERGENCY
start of recording of a picture sequence in case
of armed system
call of the next setting menu in the setting
mode
10 Plug-in power supply unit for the 12 V power sup-
ply* of the picture storage system via the 230 V
mains supply
*For mobile operation of the picture storage system, power
supply of the control unit can be made via the supplied adap-
ter cable for a cigarette lighter socket. See chapter 4.
2Applications
The digital picture storage system TVSET-320 is an
indoor surveillance system, e. g. for recording occur-
rences in case of burglary or robbery. The recorded
pictures (max. 32) can be evaluated later on a monitor.
The picture storage system consists of a control
unit (including mounting auxiliaries), a B/W camera
with pinhole lens, two key-ring remote controls, and a
plug-in power supply unit for operating the system via
the 230 V mains supply. The system is supplied with
the following accessories: an adapter cable for
connection to a cigarette lighter socket and a video
cable for monitor connection. If required, the picture
storage system can be supplemented by an emergen-
cy switch (not supplied with the system).
2.1 Approval
According to the R+TTE directive (Radio and Tele-
communication Technical Equipment), the approval of
the remote control is valid in the countries of the Euro-
pean Union. For operation in countries outside the EU,
please contact your retailer or the MONACOR subsid-
iary in the particular country.
In the Federal Republic of Germany, the frequency
range around 433 MHz has been approved for the
operation of wireless transmission systems. As it is
possible that this frequency range for this field of appli-
cation is not available in other countries of the EU,
please contact your retailer or the corresponding aut-
horities of the particular country if the system is oper-
ated outside the Federal Republic of Germany.
3Safety Notes
The components of the picture storage system corre-
spond to the directive for electromagnetic compatibili-
ty 89/336EEC. The plug-in power supply unit also cor-
responds to the low voltage directive 73/23/EEC.
Please observe the following items in any case:
●The system is suitable for indoor use only. Protect
the units against dripping water and splash water,
high air humidity, and heat (admissible ambient tem-
perature range 0 – 40 °C).
●Do not cover the openings of the control unit hous-
ing and do not insert any objects. The unit may
otherwise be damaged.
Attention!
The power supply unit is supplied with hazardous
mains voltage (230 V~). Leave servicing to skilled
personnel only. Inexpert handling may cause an elec-
tric shock hazard. Furthermore, any guarantee claim
will expire if one of the units has been opened.
●If the system is connected to the 230 V mains sup-
ply via the power supply unit, do not operate the
system or immediately disconnect the power supply
unit from the mains socket
1. if there is visible damage to the control unit, to the
camera, or to the power supply unit ,
2. if a defect might have occurred after a unit was
dropped or suffered a similar accident,
3. if malfunctions occur.
In any case the unit must be repaired by skilled per-
sonnel.
●For cleaning only use a dry, soft cloth; never use
chemicals or water.
●No liability for any damage will be accepted if the
units are used for other purposes than originally
intended, if they are not correctly operated or con-
nected or not repaired in an expert way.
●If the picture storage system is to be put out of oper-
ation definitively, take it to a local recycling plant for
a disposal which is not harmful to the environment.
4Installation
1) Remove the protective foil from the adhesive strip
on the camera support (8) and glue the support to
a suitable location.
2) Screw the control unit (1) to a suitable location or, if
the control unit is to be portable for evaluating of the
recorded pictures at a different place, fasten it in
such a way that it can be easily removed.
3) Connect the camera plug (7) to the inline jack (6) of
the control unit.
4) For power supply during mobile application, con-
nect the supplied adapter cable to the jack DC IN
(2) and to a cigarette lighter socket. Otherwise
connect the supplied power supply unit to this jack
and connect the power supply unit to a mains
socket (230 V~/50 Hz).
5) For aligning the camera, connect a monitor to the
jack V-OUT (5) via the supplied adapter cable
(3.5 mm plug/phono plug). Switch on the control
unit with the sliding switch (4) and press the button
ARMED (b) on the remote control. Align the camera
and switch off the system with the button OFF (c).
6) It is also possible to connect an emergency switch
(not supplied with the system) to the jack V-OUT.
This switch can be used to start recording of a pic-
ture sequence, if required.
Note: If the system is operated via the power supply
unit and is not used for a longer period, disconnect the
power supply unit from the mains socket, as it will have
a low current consumption even with the control unit
switched off.
®
TVSET-320 Order No. 19.7630
Copyright©by MONACOR®INTERNATIONAL GmbH & Co. KG, Bremen, Germany. All rights reserved. A-0007.98.02.08.2002
®
®
➀
A
R
M
E
D
O
F
F
E
M
E
R
G
E
N
C
Y
image
➁
bc
a
d
10
5
234
9
6
7
1
8
GB

5Presettings
The menus for the presettings can be displayed on the
monitor only if at least one picture has previously been
recorded. A picture may already have been recorded
e. g. during alignment of the camera.
1) Switch on the control unit with the sliding switch (4),
then press the two buttons ARMED (b) and OFF (c)
on the remote control simultaneously. The monitor
must show a recorded picture with the recording
date and time inserted.
If the picture fails to appear, shortly switch on
and off the control unit. Press the button ARMED,
then the button EMERGENCY (d). Now a picture
sequence will be recorded according to the current
presettings. Then deactivate the system with the
button OFF. Now press the two buttons ARMED
and OFF simultaneously. The last picture recorded
will appear on the monitor.
2) Press the button EMERGENCY (d). The menu for
deleting the recorded pictures will be inserted:
Do not press the button ARMED inadvertently now,
otherwise the recorded pictures will be deleted.
3) Press the button EMERGENCY once again. The
menu for setting the date and the time will appear:
(Year/month/day/time)
The minutes are underlined and can now be in-
creased with the button ARMED or decreased with
the button OFF.
Use the button EMERGENCY to go stepwise
from the minutes to the year and, if required, re-
adjust the value with the button ARMED or OFF
respectively. The underlined value can be changed
in each case.
4) After selecting the year, actuate the button EMER-
GENCY once again for calling the menu for setting
the recording intervals.
The number indicates that e. g. a picture is record-
ed every 4 seconds. Use the button ARMED to
increase the time to max. 8 seconds or the button
OFF to decrease it to min. 1 second.
5) After setting the interval time, use the button EMER-
GENCY for calling the menu for the number of pic-
tures to be recorded when the system is triggered:
The number indicates that e. g. 4 pictures are re-
corded successively at the time interval previously
REC Picture :04
REC Interval: 04
2002/06/25/15:03
DEL:ARM Exit:OFF
defined. Use the button ARMED to increase the
number to max. 8 or the button OFF to decrease it
to min. 1.
6) To exit the setting mode, finally press the button
EMERGENCY once again. The monitor will not
show any picture after that.
6Arming or Deactivating the System
1) Switch on (ON) the control unit with the sliding
switch (4).
2) Press the button ARMED (b) on the remote control.
The buzzer in the control unit will beep twice.
3) The indicating LED (3) of the control unit will flash
for 16 seconds. Then the system is armed. Due to
this delay, it is possible to leave the surveillance
zone without triggering a picture recording.
4) If the internal sensor detects a movement in the
camera picture, a picture sequence will be record-
ed according to the presettings.
5) In case of emergency, either press the button
EMERGENCY (d) or, if available, the emergency
switch. In this case, recording of a picture se-
quence will start immediately.
6) For deactivating the system, press the button
OFF (c).
7Viewing of Pictures and Deletion, if required
1) Connect a monitor to the jack V-OUT (5) via the
supplied adapter cable (3.5 mm plug/phono plug).
2) Switch on the control unit with the sliding switch (4).
3) Press the two buttons ARMED (b) and OFF (c) on
the remote control simultaneously. The monitor will
show the last picture recorded with the recording
date and time inserted. If the screen remains blank,
no picture has been recorded.
4) Go to the previous picture with the button OFF or to
the next picture with the button ARMED.
5) For deleting all pictures, call a recorded picture and
insert the following menu with the button EMER-
GENCY (d):
6) For deletion, press the button ARMED. The current
picture will disappear from the monitor and the
menu is faded out (the screen is blank).
7) If deletion of the pictures is not desired, exit the
menu with the button OFF.
DEL:ARM Exit:OFF
8Battery Replacement on the Remote Control
If the indicating LED (a) lights up only dimly or fails to
light up when actuating a button, the battery must be
replaced. For this purpose, unscrew the screw on the
rear side and remove the cover. Insert a 12 V battery
of the same type only. Observe the correct polarity
(position of the positive and negative poles of the bat-
tery). See imprint in the battery compartment.
●Exhausted batteries do not belong in the household
rubbish. Always take them to a special waste
disposal (e. g. battery container at your retailer).
9Specifications
Max. storage capacity: . . 32 pictures
Synchronization:. . . . . . . hor. 15 625 Hz,
vert. 50 Hz (CCIR)
Image sensor:. . . . . . . . . 6.3 mm (1/4") CMOS chip
Pixels:. . . . . . . . . . . . . . . hor. 352 x vert. 288
Video level:. . . . . . . . . . . 1 Vpp /75 Ω
Minimum illumination:. . . 0.5 lux
Focal length of lens: . . . . 3.6 mm
Camera range and angle: hor. 45°, vert. 32°
Carrier frequency:. . . . . . 433 MHz
Power supply:. . . . . . . . . 12 V /500 mA via
supplied power supply
unit connected to 230 V~/
50 Hz/9 VA or via another
12 VDC voltage source
Ambient temperature:. . . 0 – 40 °C
Dimensions, weight
Camera: . . . . . . . . . . . 36 x 36 x 24 mm, 60 g
Control unit: . . . . . . . . 112 x 65 x 20 mm, 85 g
According to the manufacturer.
Subject to technical change.
®
TVSET-320 Order No. 19.7630
Copyright©by MONACOR®INTERNATIONAL GmbH & Co. KG, Bremen, Germany. All rights reserved. A-0007.98.02.08.2002
®
®
➀
A
R
M
E
D
O
F
F
E
M
E
R
G
E
N
C
Y
image
➁
bc
a
d
10
5
234
9
6
7
1
8

Système digital de mémo-
risation d’images avec
caméra noir et blanc
1Composants et leurs éléments et branche-
ments (schéma 1)
1Unité de commande avec mémorisation d’images
2Prise d’alimentation DC IN de l’unité de comman-
de pour brancher l’alimentation (12 V )*
3LED rouge, témoin de contrôle
4Interrupteur Marche/Arrêt de l’unité de commande
5Sortie vidéo V-OUT (jack 3,5) pour brancher un
moniteur ou un interrupteur d’urgence
6Cordon V-IN avec fiche mini DIN femelle pour
brancher la caméra
7Cordon de liaison de la caméra avec fiche mini DIN
mâle pour connecter l’unité de commande
8Caméra noir et blanc avec objectif hyper miniatu-
re et source lumineuse infrarouge (4 LEDs infra-
rouges)
9Télécommande (voir détails schéma 2)
aLED de contrôle allumée lorsqu’une touche est
enfoncée
bTouche ARMED :
après la mise sous tension avec l’interrupteur
(4) pour activer le système
en mode contrôle pour passer à l’image en-
registrée suivante
en mode réglage pour augmenter la valeur
sélectionnée
cTouche OFF :
si le système est activé, pour le désactiver
en mode contrôle pour aller à l’image précé-
demment enregistrée
en mode réglage pour diminuer la valeur sélec-
tionnée
dTouche EMERGENCY :
si le système est activé, pour démarrer l’enre-
gistrement d’une séquence d’images
en mode réglage pour appeler le menu de
réglage suivant
10 Bloc d’alimentation secteur pour l’alimentation
12 V* du système de mémorisation d’images via
l’alimentation 230 V.
*Pour un fonctionnement mobile du système de mémorisation,
l’alimentation peut s’effectuer via le cordon adaptateur fourni
pour un allume-cigare ; voir chapitre 4.
2Possibilités d’utilisation
Le système digital de mémorisation d’images TVSET-
320 est un système de surveillance en intérieur, pour
attester de toute action d’effraction ou d’agression.
Les images enregistrées (32 maximum) peuvent être
évaluées ultérieurement sur un moniteur.
Le système de mémorisation d’images se compose
d’une unité de commande (avec matériel de montage),
d’une caméra noir et blanc avec objectif hyper minia-
ture, de deux télécommandes sous forme de porte-clé
et d’un bloc d’alimentation pour faire fonctionner le
système via l’alimentation 230 V. L’ensemble est livré
avec les accessoires suivants : un cordon adaptateur
pour le branchement à une prise allume-cigare et un
cordon vidéo pour le branchement moniteur. Le systè-
me de mémorisation d’images peut, si besoin, être
complété par un interrupteur d’urgence (non livré).
2.1 Autorisation d’utilisation
L’autorisation d’utilisation pour la télécommande est
valable dans les pays de l’Union européenne selon la
directive R+TTE (Radio and Telecommunication Tech-
nical Equipment). Pour un fonctionnement dans des
pays n’appartenant pas à l’Union européenne, vous
devez vous renseigner auprès de votre revendeur ou
de la succursale MONACOR du pays.
En Allemagne, la plage de fréquence 433 MHz est
homologuée pour le fonctionnement de systèmes de
transmission sans fil. Dans la mesure où cette bande
de fréquences dans d’autres pays de l’Union Euro-
péenne peut ne pas être disponible pour ce type d’uti-
lisation, vous devez vous renseigner auprès de votre
revendeur ou des autorités compétentes du pays pour
un fonctionnement du système hors de l’Allemagne.
3Conseils d’utilisation et de sécurité
Les composants du système répondent à la norme
89/336/CEE relative à la compatibilité électroma-
gnétique ; le bloc alimentation répond, en outre, à la
norme 73/23/CEE portant sur les appareils à basse
tension.
Respectez scrupuleusement les points suivants :
●Le système n’est conçu que pour une utilisation en
intérieur. Protégez-le de tout type de projections
d’eau, des éclaboussures, d’une humidité élevée et
de la chaleur (plage de température de fonctionne-
ment autorisée : 0 – 40 °C).
Attention ! Le bloc alimentation est alimenté par une
tension dangereuse 230 V~. Ne touchez jamais
l’intérieur de l’appareil car, en cas de mauvaise mani-
pulation, vous pourriez subir une décharge électri-
que. En outre, l’ouverture de chaque appareil rend
tout droit à la garantie caduque.
●Ne couvrez jamais les ouïes de ventilation du boîtier
sur l’unité de commande, et ne faites rien tomber à
l’intérieur. L’appareil pourrait être endommagé.
●Si le système est relié au secteur 230 V~ via le bloc
secteur, ne faites pas fonctionner le système et
débranchez immédiatement le bloc secteur lorsque :
1. des dommages apparaissent sur l’unité de com-
mande, la caméra ou le bloc secteur.
2. après une chute ou accident similaire..., l’appareil
peut présenter un défaut.
3. des dysfonctionnements apparaissent.
Seul un technicien habilité peut effectuer les répara-
tions.
●Pour les nettoyer, utilisez un chiffon sec et doux, en
aucun cas de produits chimiques ou d’eau.
●Nous déclinons toute responsabilité en cas de dom-
mage si les appareils sont utilisés dans un but autre
que celui pour lequel ils ont été conçus, s’ils ne sont
correctement branchés, utilisés ou réparés par une
personne habilitée.
●Lorsque les appareils sont définitivement retirés du
marché, vous devez les déposer dans une usine de
recyclage de proximité pour contribuer à leur élimi-
nation non polluante.
4Installation
1) Retirez la feuille de protection de l’adhésif sur le
support de la caméra (8) et collez le support à l’en-
droit voulu.
2) Vissez fermement l’unité de commande (1) à l’en-
droit souhaité ou, si elle doit être transportée pour
évaluer les images enregistrées à un autre endroit,
fixez-la de telle sorte qu’elle puisse être facilement
démontée.
3) Mettez la prise de la caméra (7) dans la prise (6)
femelle de l’unité de commande.
4) Pour l’alimentation en cas d’utilisation mobile, met-
tez le cordon adaptateur livré dans la prise DC IN
(2) et dans la prise allume-cigare.
Sinon, reliez le bloc secteur livré à cette prise et
reliez le bloc secteur à une prise 230 V~/50 Hz.
5) Pour orienter la caméra, connectez un moniteur à
la prise V-OUT (5) via le cordon adaptateur livré
(jack 3,5/RCA mâle) ; avec l’interrupteur (4) allu-
mez l’unité de commande (ON) et sur la télécom-
mande, enfoncez la touche ARMED (b). Orientez la
caméra et éteignez à nouveau le système avec la
touche OFF (c).
6) Il est également possible de brancher à la prise
V-OUT un interrupteur d’urgence (non livré) avec
lequel, si besoin, une série d’images peut être
enregistrée.
®
TVSET-320 N° réf. 19.7630
Copyright©by MONACOR®INTERNATIONAL GmbH & Co. KG, Bremen, Germany. All rights reserved. A-0007.98.02.08.2002
®
®
➀
A
R
M
E
D
O
F
F
E
M
E
R
G
E
N
C
Y
image
➁
bc
a
d
10
5
234
9
6
7
1
8
F B CH

Conseil : si le système fonctionne via le bloc secteur et
n’est pas utilisé pendant une durée assez longue,
débranchez le bloc secteur de la prise car même si
l’unité de commande est éteinte, le bloc secteur a une
faible consommation.
5Préréglages
Les menus pour le préréglage ne peuvent être affichés
sur le moniteur que si une image au moins a été
préalablement enregistrée. Une image peut être déjà
enregistrée p. ex. lors de l’orientation de la caméra.
1) Allumez l’unité de commande avec l’interrupteur
(4) et sur la télécommande, enfoncez simultané-
ment les deux touches ARMED (b) et OFF (c). Sur
le moniteur, une image enregistrée doit apparaître
avec la date et l’heure d’enregistrement affichées.
Si ce n’est pas le cas, éteignez puis rallumez
brièvement l’unité de commande ; enfoncez la tou-
che ARMED puis la touche EMERGENCY (d). Une
série d’images est alors enregistrée selon les pré-
réglages actuels. Désactivez ensuite le système
avec la touche OFF. Enfoncez simultanément les
deux touches ARMED et OFF ; la dernière image
enregistrée est visible sur le moniteur.
2) Enfoncez la touche EMERGENCY (d). Le menu
pour effacer les images enregistrées s’affiche :
N’enfoncez pas maintenant la touche ARMED par
inadvertance, les images enregistrées seraient
effacées.
3) Enfoncez une nouvelle fois la touche EMERGEN-
CY. Le menu suivant pour le réglage de la date et
l’heure s’affiche :
(année/mois/jour/heure)
Les minutes sont soulignées et peuvent être aug-
mentées avec la touche ARMED ou diminuées
avec la touche OFF.
Avec la touche EMERGENGY, allez, par palier
des minutes à l’année et, si besoin, corrigez la valeur
respectivement avec la touche ARMED ou OFF. La
valeur soulignée peut être modifiée dans ce cas.
4) Une fois l’année sélectionnée, appelez le menu sui-
vant par une nouvelle pression sur la touche EMER-
GENCY pour régler l’intervalle d’enregistrement.
Le nombre indique que, p. ex. toutes les 4 secondes,
une image est enregistrée. Avec la touche ARMED,
augmentez la durée à 8 secondes maximum ou dimi-
nuez-la à 1 seconde minimum avec la touche OFF.
REC Interval: 04
2002/06/25/15:03
DEL:ARM Exit:OFF
5) Une fois l’intervalle réglé avec la touche EMER-
GENCY, appelez le menu pour le nombre d’images
devant être enregistrées en cas d’alerte.
Le nombre indique que p. ex., 4 images sont enre-
gistrées l’une après l’autre dans la durée préala-
blement réglée. Avec la touche ARMED, augmen-
tez le nombre à 8 au plus ou avec la touche OFF,
réduisez-le à 1 au moins.
6) Pour quitter le mode réglage, enfoncez une nou-
velle fois la touche EMERGENCY. Le moniteur
n’affiche alors plus aucune image.
6Activation ou désactivation du système
1) Allumez l’unité de commande avec l’interrupteur
(4) [ON].
2) Enfoncez la touche ARMED (b) sur la télécomman-
de ; le buzzer de l’unité de commande émet un si-
gnal deux fois.
3) La LED de contrôle (3) de l’unité de commande cli-
gnote pendant 16 secondes. Le système est alors
armé : la temporisation permet de quitter la zone de
surveillance sans déclencher un enregistrement
d’images.
4) Si le capteur interne détecte maintenant un mouve-
ment sur l’image de la caméra, une série d’images
est enregistrée conformément aux réglages effec-
tués.
5) En cas d’urgence, enfoncez soit la touche EMER-
GENCY (d) soit, s’il est installé, l’interrupteur d’ur-
gence. L’enregistrement d’une série d’images dé-
marre aussitôt.
6) Pour désactiver le système, enfoncez la touche
OFF (c).
7Visualisation d’images enregistrées ou effa-
cement
1) Reliez un moniteur à la prise V-OUT (5) via le cor-
don adaptateur livré (jack 3,5/RCA mâle).
2) Allumez l’unité de commande avec l’interrupteur
(4) sur ON.
3) Sur la télécommande, enfoncez simultanément les
deux touches ARMED (b) et OFF (c). Sur le moni-
teur, la dernière image enregistrée apparaît avec la
date et l’heure d’enregistrement. Si l’écran reste
sombre, aucune image n’a été enregistrée.
4) Avec la touche OFF, allez à l’image précédente, ou
avec la touche ARMED, à l’image suivante.
REC Picture :04
5) Pour effacer toutes les images, appelez une image
enregistrée et avec la touche EMERGENCY (d),
affichez le menu suivant :
6) Pour effacer, enfoncez la touche ARMED. Sur le
moniteur, l’image à l’écran disparaît, le menu s’ef-
face (seule une surface grise est visible).
7) Si vous ne souhaitez pas effacer d’images, quittez
le menu avec la touche OFF.
8Remplacement de la batterie de la télécom-
mande
Si la LED de contrôle (a) brille faiblement ou ne brille
plus lorsqu’une touche est activée, la batterie doit être
remplacée. Pour ce faire, dévissez la vis sur la face
arrière, retirez le couvercle. Seule une batterie 12 V de
même type peut être insérée. Veillez à respecter la
polarité (positionnement des pôles plus et moins de la
batterie). Reportez-vous aux indications dans le com-
partiment batterie.
●Ne jetez jamais les batteries usagées dans la pou-
belle domestique ; vous devez les déposer dans un
endroit prévu à cet effet (chez votre revendeur p. ex.).
9Caractéristiques techniques
Capacité maximale
de mémorisation :. . . . . . 32 images
Synchronisation : . . . . . . hor. 15 625 Hz,
vert. 50 Hz (CCIR)
Capteur d’image :. . . . . . puce CMOS 6,3 mm (1/4")
Points : . . . . . . . . . . . . . . hor. 352 x vert. 288
Niveau vidéo :. . . . . . . . . 1 Vcc/75 Ω
Luminosité minimale :. . . 0,5 lux
Focale objectif : . . . . . . . 3,6 mm
Angle et portée caméra : hor. 45°, vert. 32°
Fréquence porteuse : . . . 433 MHz
Alimentation : . . . . . . . . . 12 V /500 mA par bloc
secteur livré relié au
secteur 230 V~/50 Hz/9 VA
ou 12 V via une autre
source d’alimentation
Température
de fonctionnement : . . . . 0 – 40 °C
Dimensions, poids
Caméra : . . . . . . . . . . 36 x 36 x 24 mm, 60 g
Unité de commande : . 112 x 65 x 20 mm, 85 g
D’après les données du constructeur.
Tout droit de modification réservé.
DEL:ARM Exit:OFF
®
TVSET-320 N° réf. 19.7630
Copyright©by MONACOR®INTERNATIONAL GmbH & Co. KG, Bremen, Germany. All rights reserved. A-0007.98.02.08.2002
®
®
➀
A
R
M
E
D
O
F
F
E
M
E
R
G
E
N
C
Y
image
➁
bc
a
d
10
5
234
9
6
7
1
8

Sistema digitale di memorizza-
zione immagini con telecamera
b/n
1Componenti, elementi di comando e collega-
menti (fig. 1)
1Unità di comando con memoria immagini
2Presa dell’unità di comando per piccole tensioni
DC IN, per l’alimentazione (12 V )*
3Spia di controllo (LED rosso)
4Interruttore on/off dell’unità di comando
5Uscita video V-OUT (presa jack 3,5 mm) per il col-
legamento di un monitor o di un pulsante d’emer-
genza
6Cavo V-IN con connettore femmina mini-DIN per il
collegamento della telecamera
7Cavo con connettore maschio mini-DIN per colle-
gare la telecamera con l’unità di comando
8Telecamera b/n con obiettivo a cruna d’ago e sor-
gente di luce infrarossa (4 LED IR)
9Telecomando (per particolari vedi fig. 2)
ail LED di controllo è acceso se il tasto viene pre-
muto
btasto ARMED
dopo l’accensione con l’interruttore (4) per atti-
vare il sistema
nella modalità di controllo per passare all’im-
magine successiva
nella modalità di impostazione per aumentare
il valore selezionato
ctasto OFF
nel sistema attivato per disattivare il sistema
nella modalità di controllo per passare all’im-
magine precedente
nella modalità di impostazione per ridurre il
valore selezionato
dtasto ERMGENCY
nel sistema attivato per iniziare la registrazio-
ne di una sequenza di immagini
nella modalità di impostazione per chiamare il
menù successivo di regolazione
10 Alimentatore 12 V* del sistema di memorizzazione
immagini attraverso la rete 230 V.
*In caso di funzionamento mobile del sistema di memorizzazio-
ne immagini, l’alimentazione può essere fatta per mezzo del
cavo adattatore in dotazione previsto per un accendisigari.
Vedi cap. 4.
2Possibilità d’impiego
Il sistema digitale di memorizzazione di immagini
TVSET-320 è un sistema di sorveglianza per interni,
p. es. per documentare un’effrazione o una rapina. Le
immagini registrate (max. 32) possono essere con-
trollate successivamente su un monitor.
Il sistema di memorizzazione immagini è composto
da un’unità di comando (con materiali di montaggio),
da una telecamera b/n con obiettivo a cruna d’ago, da
due telecomandi a portachiavi e da un alimentatore
per il funzionamento con la rete 230 V. Come acces-
sori sono in dotazione un cavo adattatore per il colle-
gamento ad una presa accendisigari, e un cavo video
per il collegamento di un monitor. Se necessario, il
sistema può essere integrato con un pulsante di emer-
genza (non in dotazione).
2.1 Omologazione
Secondo la direttiva R+TTE (Radio and Telecommuni-
cation Technical Equipment), l’omologazione del tele-
comando è valida negli stati dell’Unione europea. Per
l’impiego negli stati extra UE conviene rivolgersi al
negozio specializzato o alla filiale MONACOR del rela-
tivo paese.
In Germania, le frequenze intorno a 433 MHz sono
abilitate per i sistemi radio. Dato che queste frequen-
ze possono anche non essere libere in altre nazioni
dell’UE, conviene informarsi presso il rivenditore spe-
cializzato o presse le autorità competenti.
3Avvertenze di sicurezza
I componenti del sistema di memorizzazione immagi-
ni sono conformi alla direttiva CE 89/336/CEE sulla
compatibilità elettromagnetica. L’alimentatore è inoltre
conforme alla direttiva 73/23/CEE per apparecchi a
bassa tensione.
Durante l’uso si devono osservare assolutamente i
seguenti punti:
●Usare il sistema solo all’interno di locali. Proteggere
i componenti dall’acqua gocciolante e dagli spruzzi
d’acqua, da alta umidità dell’aria e dal calore (tem-
peratura d’impiego ammessa fra 0 °C e 40 °C).
●Non coprire le aperture del contenitore dell’unità di
comando e non inserirvi degli oggetti. Altrimenti l’ap-
parecchio potrebbe subire dei danni.
Attenzione!
L’alimentatore funziona con tensione di rete di
230 V~. Non intervenire mai al suo interno; la mani-
polazione scorretta può provocare delle scariche
pericolose. Se l’apparecchio viene aperto, cessa
ogni diritto di garanzia.
●Se il sistema è collegato, per mezzo del l’alimenta-
tore, con la rete 230 V, non metterlo in funzione o
staccare subito la spina rete se:
1. l’unità di comando, la telecamera o l’alimentatore
presentano dei danni visibili;
2. dopo una caduta degli apparecchi o dopo eventi
simili sussiste il sospetto di un difetto;
3. gli apparecchi non funziona correttamente.
Per la riparazione rivolgersi sempre ad un’officina
competente.
●Per la pulizia usare solo un panno morbido, asciut-
to; non impiegare in nessun caso prodotti chimici o
acqua.
●Nel caso d’uso improprio, d’impiego scorretto, di col-
legamenti sbagliati o di riparazione scorretta non si
assume nessuna responsabilità per eventuali danni.
●Se si desidera eliminare il sistema di memorizzazio-
ne immagini definitivamente, consegnarlo per lo
smaltimento ad un’istituzione locale per il riciclaggio.
4Installazione
1) Staccare la pellicola di protezione dal supporto
della telecamera (8) e incollare il supporto in un
punto adatto.
2) Avvitare l’unità di comando (1) in un punto adatto
oppure, se deve essere trasportabile per elaborare
le immagini registrate in un altro posto, fissarla in
modo tale da poterla staccare comodamente.
3) Inserire la spina della telecamera (7) nel connetto-
re femmina (6) dell’unità di comando.
4) Per effettuare l’alimentazione durante l’impiego
mobile, collegare la presa DC IN (2) con una presa
accendisigari servendosi del cavo adattatore in
dotazione. Altrimenti, collegare l’alimentatore in
dotazione con la medesima presa ed inserire l’ali-
mentatore in una presa di rete (230 V~/50 Hz.)
5) Per orientare la telecamera, collegare un monitor
con la presa V-OUT (5) per mezzo del cavo adatta-
tore in dotazione (jack 3,5 mm/maschio RCA).
Accendere l’unità di comando con l’interruttore (4)
su ON e premere il tasto ARMED (b) sul teleco-
mando. Orientare la telecamera e spegnere il siste-
ma di nuovo con il tasto OFF (c).
6) Alla presa V-OUT si può collegare anche un
pulsante di emergenza (non in dotazione) con cui si
può avviare, in caso di necessità, la registrazione di
una sequenza di immagini.
N.B.: Se il sistema funziona con l’alimentatore e se
non viene usato per un certo periodo, conviene stac-
care l’alimentatore dalla presa perché consuma una
piccola quantità di corrente anche se l’unità di coman-
do è spenta.
®
TVSET-320 N. di ord. 19.7630
Copyright©by MONACOR®INTERNATIONAL GmbH & Co. KG, Bremen, Germany. All rights reserved. A-0007.98.02.08.2002
®
®
➀
A
R
M
E
D
O
F
F
E
M
E
R
G
E
N
C
Y
image
➁
bc
a
d
10
5
234
9
6
7
1
8
I

5Preimpostazioni
I menù per le preimpostazioni sono visibili sul monitor
solo se prima è stata registrata per lo meno un’imma-
gine. Un’immagine può essere registrata p. es. duran-
te l’orientamento della telecamera.
1) Accendere l’unità di comando con l’interruttore (4) e
premere contemporaneamente i due tasti ARMED
(b) e OFF (c) sul telecomando. Sul monitor si deve
vedere ora un’immagine registrata con data e ora di
registrazione.
Altrimenti spegnere brevemente l’unità di
comando e riaccenderla subito. Premere il tasto
ARMED e quindi il tasto EMERGENCY (d). Ora
viene registrata una sequenza di immagini secon-
do le preimpostazioni attuali. Quindi disattivare il
sistema con il tasto OFF. Premere ora contempora-
neamente i due tasti ARMED e OFF. Sul monitor
appare l’ultima immagine registrata.
2) Premere il tasto EMERGENCY (d). Si vede ora il
menù per cancellare le immagini registrate:
Aquesto punto non premere per sbaglio il tasto
ARMED per non cancellare le immagini registrate.
3) Azionare nuovamente il tasto EMERGENCY. Appa-
re ora il menù per l’impostazione della data e
dell’ora:
(anno/mese/giorno/ora)
I minuti sono sottolineati e il valore può essere au-
mentato con il tasto ARMED o ridotto con il tasto
OFF.
Con il tasto EMERGENCY saltare passo passo
dai minuti fino all’anno, correggendo, se necessa-
rio, i valori con i tasti ARMED e OFF. Il valore che
può essere modificato è quello sottolineato.
4) Dopo aver selezionato l’anno, azionare di nuovo il
tasto EMERGENCY per chiamare il menù per l’im-
postazione degli intervalli di registrazione:
Il numero indica p. es. che ogni 4 secondi si registra
un’immagine. Con il tasto ARMED si può aumentare
il valore fino a 8 secondi max. e con il tasto OFF lo
si può ridurre fino all’intervallo minimo di 1 secondo.
5) Dopo l’impostazione degli intervalli, con il tasto
EMERGENCY si chiama il menù per il numero di
immagini da registrare quando viene attivata la
registrazione:
REC Picture :04
REC Interval: 04
2002/06/25/15:03
DEL:ARM Exit:OFF
Il numero indica, che nell’intervallo impostato pre-
cedentemente si devono registrare 4 immagini in
successione. Con il tasto ARMED si può aumenta-
re il valore fino a 8 max. e con il tasto OFF lo si può
ridurre fino ad 1 min.
6) Per uscire dalla modalità di impostazione premere
ancora il tasto EMERGENCY. Il monitor non farà
vedere nessun’immagine.
6Attivare o disattivare il sistema
1) Accendere l’unità di comando con l’interruttore (4)
su ON.
2) Premere il tasto ARMED (b) sul telecomando.
L’unità di comando emette un doppio beep.
3) Il LED di controllo (3) dell’unità di comando lampeg-
gia per 16 secondi; dopodiché, il sistema è attivato.
Il ritardo serve per uscire dalla zona sorvegliata
senza far scattare la registrazione delle immagini.
4) Se il sensore interno rivela ora un movimento nell’
immagine della telecamera, si avvia la registrazione
delle immagini secondo le impostazioni effettuate.
5) In un caso di emergenza premere il tasto EMER-
GENCY (d) oppure, se presente, il pulsante di
emergenza. In questo modo, la registrazione di una
sequenza di immagini viene avviata subito.
6) Per disattivare il sistema premere il tasto OFF (c).
7Guardare ed eventualmente cancellare le
immagini registrate
1) Collegare un monitor con la presa V-OUT (5) ser-
vendosi del cavo adattatore (jack 3,5 mm/maschio
RCA) in dotazione.
2) Accendere l’unità di comando con l’interruttore (4)
su ON.
3) Premere contemporaneamente i due tasti ARMED
(b) e OFF (c) sul telecomando. Sul monitor si vede
ora l’ultima immagine registrata con data ed ora. Se
il monitor rimane buio, non è stata registrata nes-
sun’immagine.
4) Con il tasto OFF passare all’immagine precedente
oppure con il tasto ARMED all’immagine succes-
siva.
5) Per cancellare tutte le immagini chiamare dappri-
ma un’immagine registrata e quindi con il tasto
EMERGENCY (d) aprire il seguente menù:
6) Per cancellare le immagini, premere il tasto
ARMED. Sul monitor spariscono l’immagine attua-
le e il menù (si vede solo lo schermo grigio).
DEL:ARM Exit:OFF
7) Se non si vogliono cancellare le immagini, uscire
dal menù con il tasto OFF.
8Sostituzione della batteria di telecomando
Se il LED di controllo (a) fa poca o nessuna luce quan-
do viene premuto un tasto, occorre sostituire la batte-
ria. Per fare ciò, svitare la vite sul retro del telecoman-
do e staccare il coperchio. Inserire una batteria 12 V
dello stesso tipo rispettando la corretta polarità (posi-
zione del positivo e del negativo). Vedi l’indicazione
stampata nel vano batteria.
●Non gettare le batterie scariche o difettose nelle
immondizie di casa bensì negli appositi contenitori
(p. es. presso il vostro rivenditore).
9Dati tecnici
Memoria immagini max. . 32 immagini
Sincronizzazione: . . . . . . orizz.15 625 Hz,
vert. 50 Hz (CCIR)
Sensore ottico: . . . . . . . . chip CMOS 6,3 mm (1/4")
N. pixel: . . . . . . . . . . . . . orizz. 352 x vert. 288
Livello video:. . . . . . . . . . 1 Vpp/75 Ω
Illuminazione minima:. . . 0,5 lux
Focale dell’obiettivo:. . . . 3,6 mm
Angolo rilevamento
immagine:. . . . . . . . . . . . orizz. 45°, vert. 32°
Frequenza portante:. . . . 433 MHz
Alimentazione: . . . . . . . . 12 V /500 mA tramite ali-
mentatore in dotazione
con 230 V~/50 Hz/9 VA
oppure 12 V tramite
un’altra fonte di energia
Temperatura d’impiego: . 0 °C – 40 °C
Dimensioni, peso
Telecamera: . . . . . . . . 36 x 36 x 24 mm, 60 g
Unità di comando: . . . 112 x 65 x 20 mm, 85 g
Dati forniti dal costruttore.
Con riserva di modifiche tecniche.
®
TVSET-320 N. di ord. 19.7630
Copyright©by MONACOR®INTERNATIONAL GmbH & Co. KG, Bremen, Germany. All rights reserved. A-0007.98.02.08.2002
®
®
➀
A
R
M
E
D
O
F
F
E
M
E
R
G
E
N
C
Y
image
➁
bc
a
d
10
5
234
9
6
7
1
8

Sistema digital de memorización
de imágenes con cámara blanco
y negro
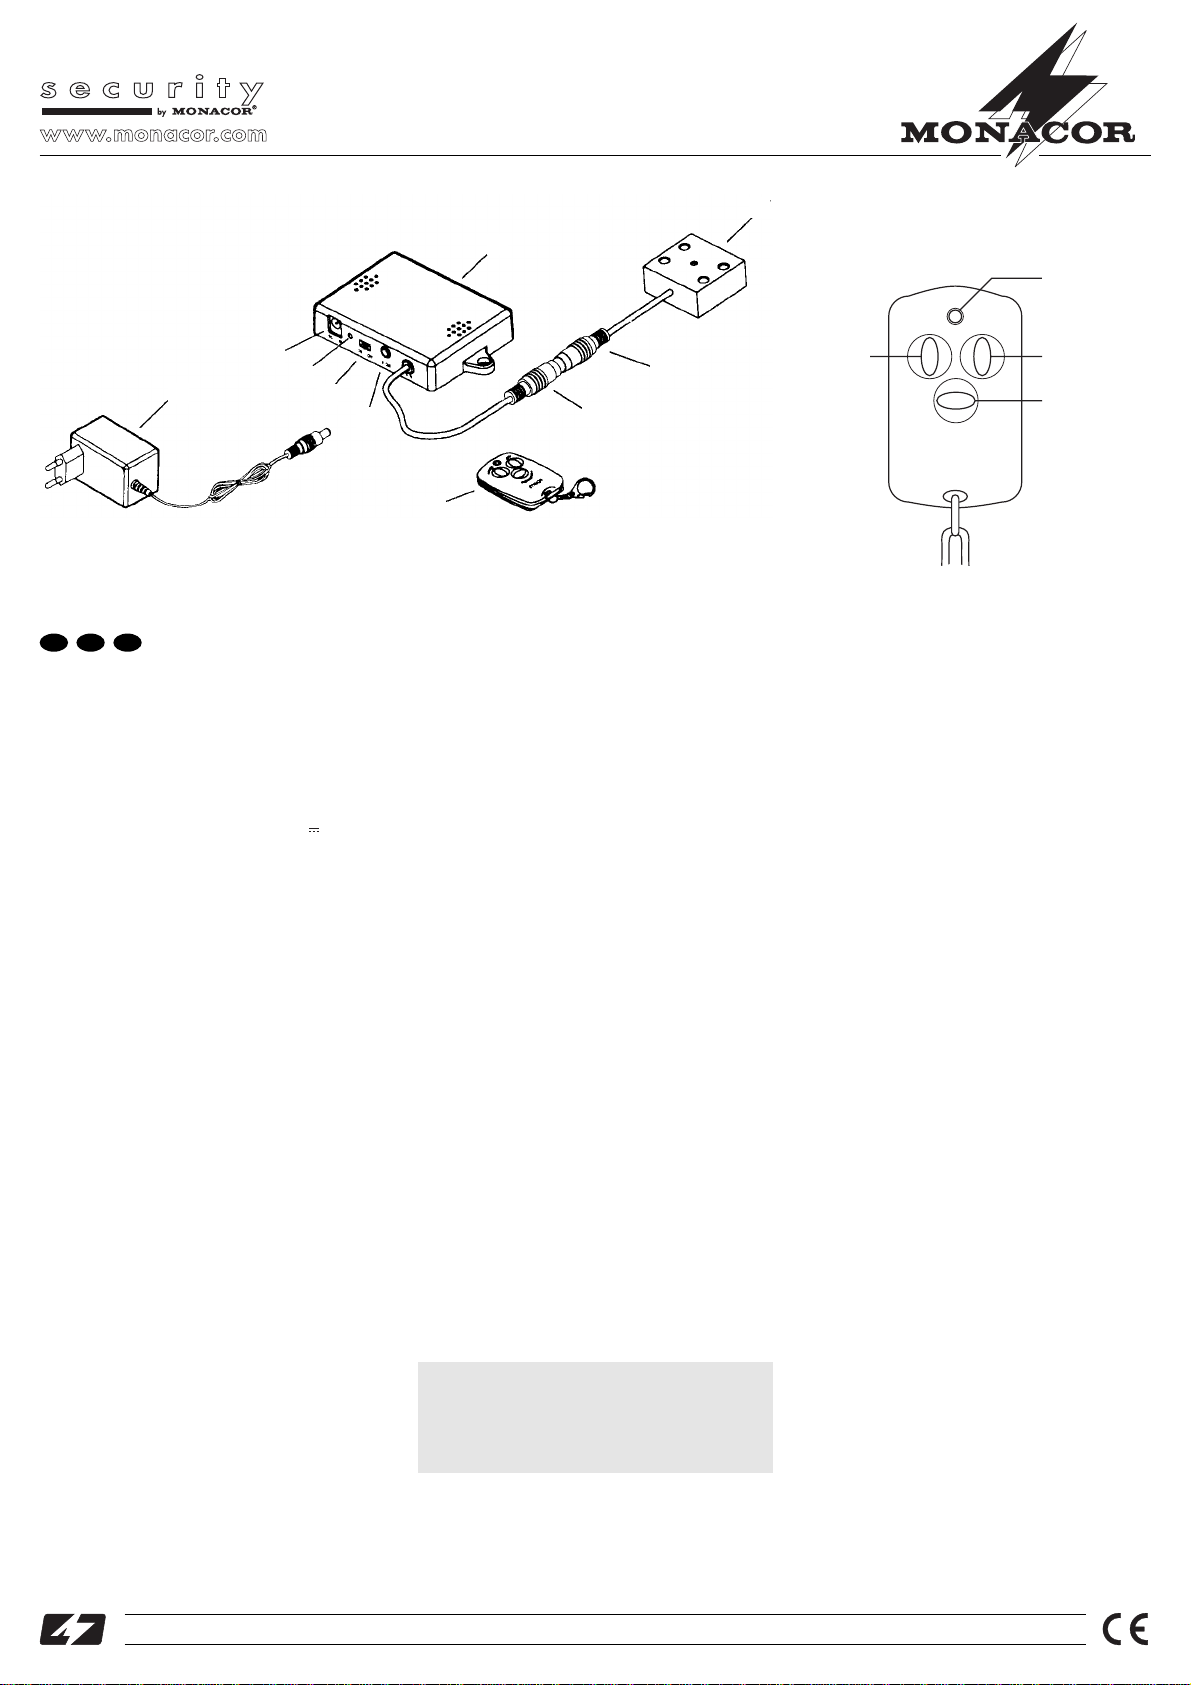
1Componentes y sus elementos y conexiones
(esquema 1)
1Unidad de control con memorización de imágenes
2Toma de alimentación DC IN de la unidad de con-
trol para conectar la alimentación (12 V )*
3LED rojo, testigo de control
4Interruptor ON/OFF de la unidad de control
5Salida vídeo V-OUT (jack 3,5) para conectar un
monitor o un interruptor de urgencia
6Cable V-IN con toma mini DIN hembra para conec-
tar la cámara
7Cable de conexión de la cámara con la toma mini
DIN macho para conectar la unidad de control
8Cámara blanco y negro, objetivo miniatura y fuen-
te luminosa infrarroja (4 LEDs infrarrojas)
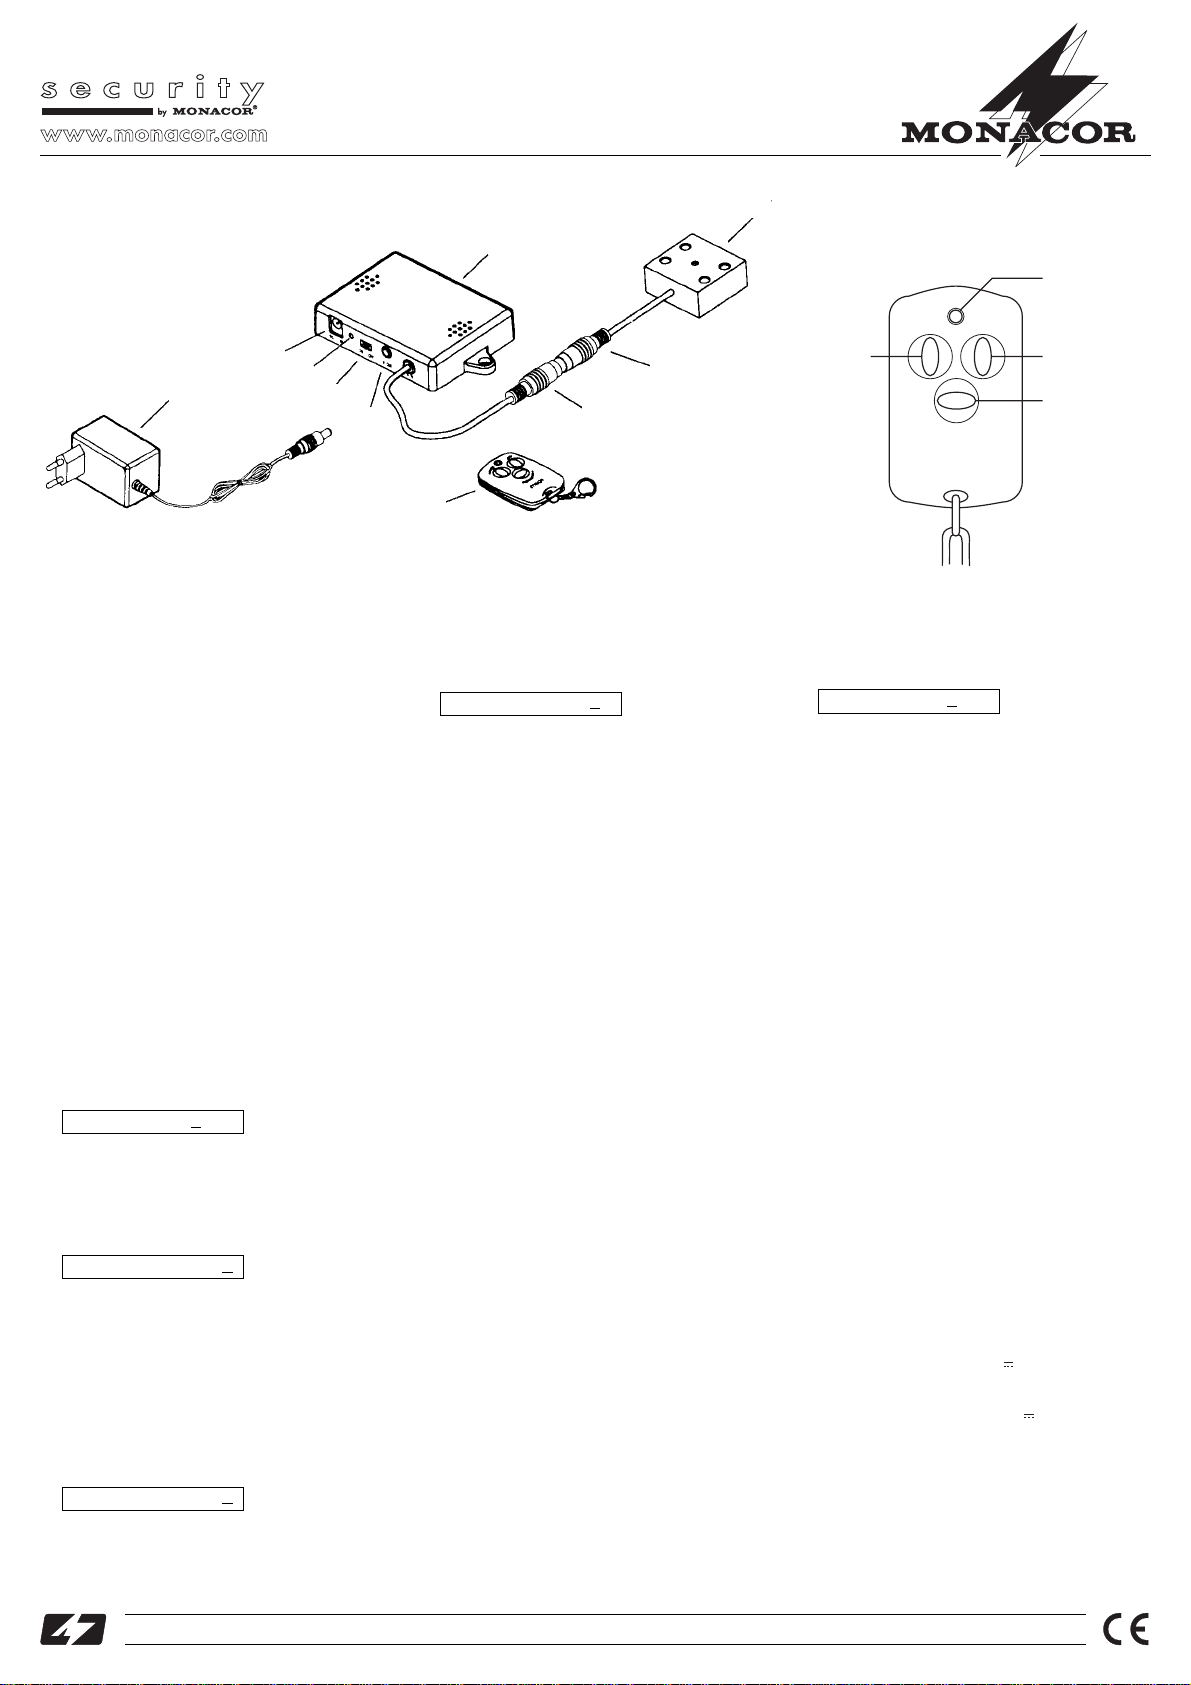
9Mando (vea detalles esquema 2)
aLED de control conectado cuando una tecla
está pulsada
bTecla ARMED:
después de la puesta en marcha con el inter-
ruptor (4) para activar el sistema
en modo control para pasar a la imagen gra-
bada siguiente
en modo reglaje para aumentar el valor selec-
cionado
cTecla OFF:
si el sistema está activado, para desactivarlo
en modo control para volver a la imagen pre-
cedentemente grabada
en modo reglaje para disminuir el valor selec-
cionado
dTecla EMERGENCY:
si el sistema está activado, para arrancar la
grabación de una seria de imágenes
en modo reglaje para llamar el menú de regla-
je siguiente
10 Bloque de alimentación para la alimentación 12 V*
del sistema de memorización de imágenes a tra-
vés de la alimentación 230 V.
*Para un funcionamiento móvil del sistema de memorización,
la alimentación puede efectuarse a través del cable adapta-
dor entregado para un encendedor; vea capítulo 4.
2Posibilidades de utilización
El sistema digital de memorización de imágenes
TVSET-320 es un sistema de vigilancia en interior,
p. ej. para atestiguar de toda acción de infracción o
agresión. Las imágenes grabadas (32 máximo) se
pueden evaluar ulteriormente en un monitor.
El sistema de memorización de imágenes se com-
pone de una unidad de control (con material de mon-
taje), de una cámara blanco y negro con objetivo
miniatura, de dos mandos bajo forma de llavero y de
un bloque de alimentación para hacer funcionar el
sistema a través una alimentación 230 V. El conjunto
está entregado con los accesorios siguientes: un
cable adaptador para la conexión a la toma del
encendedor y un cable vídeo para la conexión moni-
tor. El sistema de memorización de imágenes puede,
si necesario, estar completado por un interruptor de
urgencia (no entregado).
2.1 Autorización de utilización
La autorización de utilización para el mando es válido
en los países de la Unión europea según la directiva
R+TTE (Radio and Telecommunication Technical
Equipment). Para un funcionamiento en países que
no pertenecen a la Unión europea, debe pedir infor-
mación al vendedor especialista o a la empresa
MONACOR del país.
En Alemania, la banda de frecuencia 433 MHz está
homologada para el funcionamiento del sistema de
transmisión inalámbrico. En la medida o esta banda
de frecuencias en otro país de la Unión Europea
puede no estar disponible para este tipo de utilización,
debe pedir información a cerca de su vendedor espe-
cialista o las autoridades competentes del país para
un funcionamiento del sistema fuera de Alemania.
3Consejos de utilización y de seguridad
Los componentes del sistema responden a la norma-
tiva 89/336/CEE relacionada con la compatibilidad
electromagnética; el bloque de alimentación responde
adicionalmente a la normativa 73/23/CEE relaciona-
da con los aparatos de baja tensión.
Respete escrupulosamente los puntos siguientes:
●El sistema está fabricado solo para una utilización
en interior. Protége los aparatos de todo tipo de
proyección de agua, de salpicaduras, de una hume-
¡Atención!
El bloque de alimentación está alimentado por una
tensión peligrosa 230 V~. No manipule nunca el inte-
rior del aparato podría en caso de mala manipulación
sufrir una descarga eléctrica. Rechazamos cualquier
tipo de garantía relacionada con la apertura de uno
de los aparatos.
dad elevada y del calor (temperatura de funcio-
namiento autorizada: 0 °C – 40 °C).
●No cubra nunca los agujeros de ventilación de la
caja en la unidad de control, y no haga caer nada en
el interior. El aparato podría sufrir daños.
●Si el sistema está conectado con la red 230 V~
mediante el bloque de alimentación, no haga fun-
cionar el sistema y desconecte inmediatamente el
bloque de alimentación cuando:
1. daños aparecen en la unidad de control, la cáma-
ra o el bloque de alimentación.
2. después de una caída de los aparatos o acciden-
te similar, pueden presentar un defecto.
3. mal funcionamiento aparece.
Solo un técnico habilitado puede efectuar las repa-
raciones.
●Para limpiar, utilice únicamente un trapo seco y
suave, en ningún caso productos químicos o agua.
●Rechazamos cualquier tipo de garantía en caso de
daños si los aparatos se utilizan en otro fin para el
cual han sido fabricados, si no están correctamente
conectados, utilizados o reparados por un técnico
habilitado.
●Cuando el sistema de memorización de imágenes
está definitivamente sacado del servicio, debe
depositarlo en una fábrica de reciclaje adaptada.
4Instalación
1) Saque el folleto de protección del adhesivo en el
soporte de la cámara (8) y pegue el soporte en el
lugar deseado.
2) Atornille la unidad de control (1) en el lugar desea-
do o, si debe ser transportada para evaluar las
imágenes grabadas a otro lugar, fíjela de manera
que pueda ser desmontada fácilmente.
3) Ponga la toma de la cámara (7) en la toma (6) hem-
bra de la unidad de control.
4) Para la alimentación en caso de utilización móvil,
ponga el cable adaptador entregado en la toma DC
IN (2) y en un encendedor. Si no, conecte el bloque
de alimentación entregado con esta toma y con
una toma de 230 V~/50 Hz.
5) Para orientar la cámara, conecte un monitor con la
toma V-OUT (5) a través del cable adaptador en-
tregado (jack 3,5/RCA macho); con el interruptor
(4) conecte la unidad de control (ON) y en el mando,
pulse la tecla ARMED (b). Oriente la cámara y des-
conecte de nuevo el sistema con la tecla OFF (c).
6) También es posible conectar con la toma V-OUT un
interruptor de urgencia (no entregado) con el cual,
si necesario, una serie de imágenes puede ser gra-
bada.
®
TVSET-320 Best.-Nr. 19.7630
Copyright©by MONACOR®INTERNATIONAL GmbH & Co. KG, Bremen, Germany. All rights reserved. A-0007.98.02.08.2002
®
®
➀
A
R
M
E
D
O
F
F
E
M
E
R
G
E
N
C
Y
image
➁
bc
a
d
10
5
234
9
6
7
1
8
E

Consejo: si el sistema funciona a través del bloque de
alimentación y no está utilizado durante una duración
bastante larga, desconecte el bloque de alimentación
de la toma de red porque aunque la unidad de control
desconectada, el bloque de alimentación tiene un bajo
consumo de corriente.
5Prereglajes
Los menús para los prereglajes solo pueden visua-
lizarse en pantalla si una imagen como mínimo ha
sido grabada antes. Una imagen puede ser ya graba-
da por ejemplo durante la orientación de la cámara.
1) Conecte la unidad de control con el interruptor (4)
y en el mando, pulse simultáneamente las dos
teclas ARMED (b) y OFF (c). En el monitor, una
imagen grabada debe aparecer con la fecha y la
hora de grabación visualizada.
Si no es el caso, desconecte y conecte de
nuevo brevemente la unidad de control; pulse la
tecla ARMED y la tecla EMERGENCY (d). Una
serie de imágenes está entonces grabada según
los prereglajes actuales. Desactive después el
sistema con la tecla OFF. Pulse simultáneamente
las dos teclas ARMED y OFF; la última imagen gra-
bada es visible en el monitor.
2) Pulse la tecla EMERGENCY (d). El menú para bor-
rar las imágenes grabadas se visualiza:
No pulse la tecla ARMED por inadvertencia, si no
las imágenes grabadas se borran.
3) Pulse de nuevo la tecla EMERGENCY. El menú
siguiente para el reglaje de la fecha y la hora se
visualiza en pantalla:
(año/mes/día/hora)
Los minutos están subrayados y pueden aumen-
tarse con la tecla ARMED o ser disminuidos con la
tecla OFF.
Con la tecla EMERGENGY, vaya, por escala de
minutos al año y, si necesario, corrija el valor res-
pectivamente con la tecla ARMED o OFF. El valor
subrayado puede modificarse en este caso.
4) Una vez el año seleccionado, llame al menú
siguiente con una nueva presión en la tecla EMER-
GENCY para llamar los intervalos de grabación:
La cantidad indica que, por ejemplo todo los 4 se-
gundos, una imagen se graba. Con la tecla ARMED,
aumente la duración a 8 segundos máximo o dis-
minúyela a 1 segundo mínimo con la tecla OFF.
REC Interval: 04
2002/06/25/15:03
DEL:ARM Exit:OFF
5) Una vez el intervalo regulado con la tecla EMER-
GENCY, llame al menú para la cantidad de imáge-
nes que deben ser grabadas en caso de alerta:
La cantidad indica que por ejemplo, 4 imágenes
están grabadas una tras otra en la duración antes
regulada. Con la tecla ARMED, aumente la can-
tidad a 8 como mucho o con la tecla OFF, reduzca
a 1 como mínimo.
6) Para sacar el modo reglaje, pulse de nuevo la tecla
EMERGENCY. El monitor no visualiza nada en
pantalla.
6Activación o desactivación del sistema
1) Conecte la unidad de control con el interruptor (4)
[posición ON].
2) Pulse la tecla ARMED (b) en el mando; el buzzer
de la unidad de control emite una señal dos veces.
3) El LED de control (3) de la unidad de control parpa-
dea durante 16 segundos. El sistema está entonces
armado: la temporización permite salir de la zona de
vigilancia sin activar una grabación de imágenes.
4) Si el sensor interno detecta ahora un movimiento
en la imagen de la cámara, una serie de imágenes
se graba conforme a los prereglajes efectuados.
5) En caso de urgencia, pulse la tecla EMERGENCY
(d) o si está instalado, el interruptor de urgencia. La
grabación de una serie de imágenes arranca de
seguida.
6) Para desactivar el sistema, pulse la tecla OFF (c).
7Visualizar imágenes grabadas o borrarlas
eventualmente
1) Conecte un monitor con la toma V-OUT (5) medi-
ante el cable adaptador entregado (jack 3,5/RCA
macho).
2) Conecte la unidad de control con el interruptor (4)
en ON.
3) En el mando, pulse simultáneamente las dos teclas
ARMED (b) y OFF (c). En el monitor, la última ima-
gen gravada aparece con la fecha y la hora de gra-
bación. Si la pantalla queda oscura, ninguna ima-
gen se ha grabado.
4) Con la tecla OFF, vaya a la imagen precedente, o
con la tecla ARMED, a la imagen siguiente.
5) Para borrar todas las imágenes, seleccione una
imagen grabada y con la tecla EMERGENCY (d),
visualice el menú siguiente:
DEL:ARM Exit:OFF
REC Picture :04
6) Para borrar, pulse la tecla ARMED. En el monitor,
la imagen en la pantalla desaparece, el menú des-
aparece (solo una superficie gris es visible).
7) Si no desea borrar imágenes, salga del menú con
la tecla OFF.
8Cambio de la batería del mando
Si el LED de control (a) brilla muy poco o no brilla
cuando una tecla está activada, la batería debe cam-
biarse. Para proceder, destornille la tuerca en la parte
trasera, saque la tapa. Solo una batería 12 V de
mismo tipo puede insertarse. Respete la polaridad
(posición de los polos positivos y negativos de la
batería). Vea las indicaciones en el compartimiento
batería.
●No tire nunca las baterías usadas en la basura
doméstica; debe depositarlas en un lugar previsto a
este efecto (p. ej. déposito colector al vendedor
especialista).
9Características técnicas
Capacidad máxima
de memorización:. . . . . . 32 imágenes
Sincronización:. . . . . . . . hor. 15 625 Hz,
vert. 50 Hz (CCIR)
Sensor de imagen: . . . . . chip CMOS 6,3 mm (1/4")
Puntos: . . . . . . . . . . . . . . hor. 352 x vert. 288
Nivel vídeo:. . . . . . . . . . . 1 Vcc/75 Ω
Luminosidad mínima: . . . 0,5 lux
Focal objetivo: . . . . . . . . 3,6 mm
Angulo y portada cámara: hor. 45°, vert. 32°
Frecuencia portadora: . . 433 MHz
Alimentación: . . . . . . . . . 12 V /500 mA por bloque
de alimentación conectado
a la red 230 V~/50 Hz/
9VAo12 V mediante
otra fuente de alimentación
Temperatura de func.: . . 0 – 40 °C
Dimensiones, peso
Cámara: . . . . . . . . . . . 36 x 36 x 24 mm, 60 g
Unidad de control: . . . 112 x 65 x 20 mm, 85 g
Según datos del fabricante.
Todo derecho de modificación reservado.
®
TVSET-320 Best.-Nr. 19.7630
Copyright©by MONACOR®INTERNATIONAL GmbH & Co. KG, Bremen, Germany. All rights reserved. A-0007.98.02.08.2002
®
®
➀
A
R
M
E
D
O
F
F
E
M
E
R
G
E
N
C
Y
image
➁
bc
a
d
10
5
234
9
6
7
1
8
This manual suits for next models
1
Table of contents
Languages: