manuals.online logo
Brands
  1. Home
  2. •
  3. Brands
  4. •
  5. Montezuma
  6. •
  7. Music Equipment
  8. •
  9. Montezuma EASYMix12 User manual

Montezuma EASYMix12 User manual

Montezuma
Sound
QUICK START GUIDE: EASYMix12
Montezuma Sound
PO Box 186
Montezuma, KS 67867
www.easymix.net
(620) 846-2633
Faders
Channel Buttons
Faders Buttons
System Buttons
EQ Buttons
Power Switch
Auto and Mute buttons are backlit. Use the Auto
button to add or remove a microphone input from
the automixer.
Select between microphones 1-6 and 7-12.
Use the faders to adjust the gain of the microphone.
The faders are motorized to allow for multipoint
control.
System buttons are backlit. Presets and system
conguration can be linked to these buttons.
EQ Buttons allow the faders to be used for individual
tone control on each input. Pressing HIGH changes
each fader to a high tone control for each
microphone. Pressing LOW changes each fader to a
low tone control for each microphone. The EQ
function reverts back to level controls after a preset
time. (10 seconds by default)
The Power switch provides contact closure to
control a power squencer or power control. The LED
is controlled by the power sequencer logic out to
indicate system power status. The Power switch
does not turn the EASYMix on or o.
Switch and LED input
Connect the Switch input to a power sequencer or
power control.
Connect the Led + and Led - to the logic output on
the power control. Observe correct polarity. An
internal jumper allows you to choose 5V, 12V, or 24V.
Default is 12V.
Power Input
Use the included 24VDC power supply to power the
EASYMix12. The shield should be connected to
ground through the power supply.
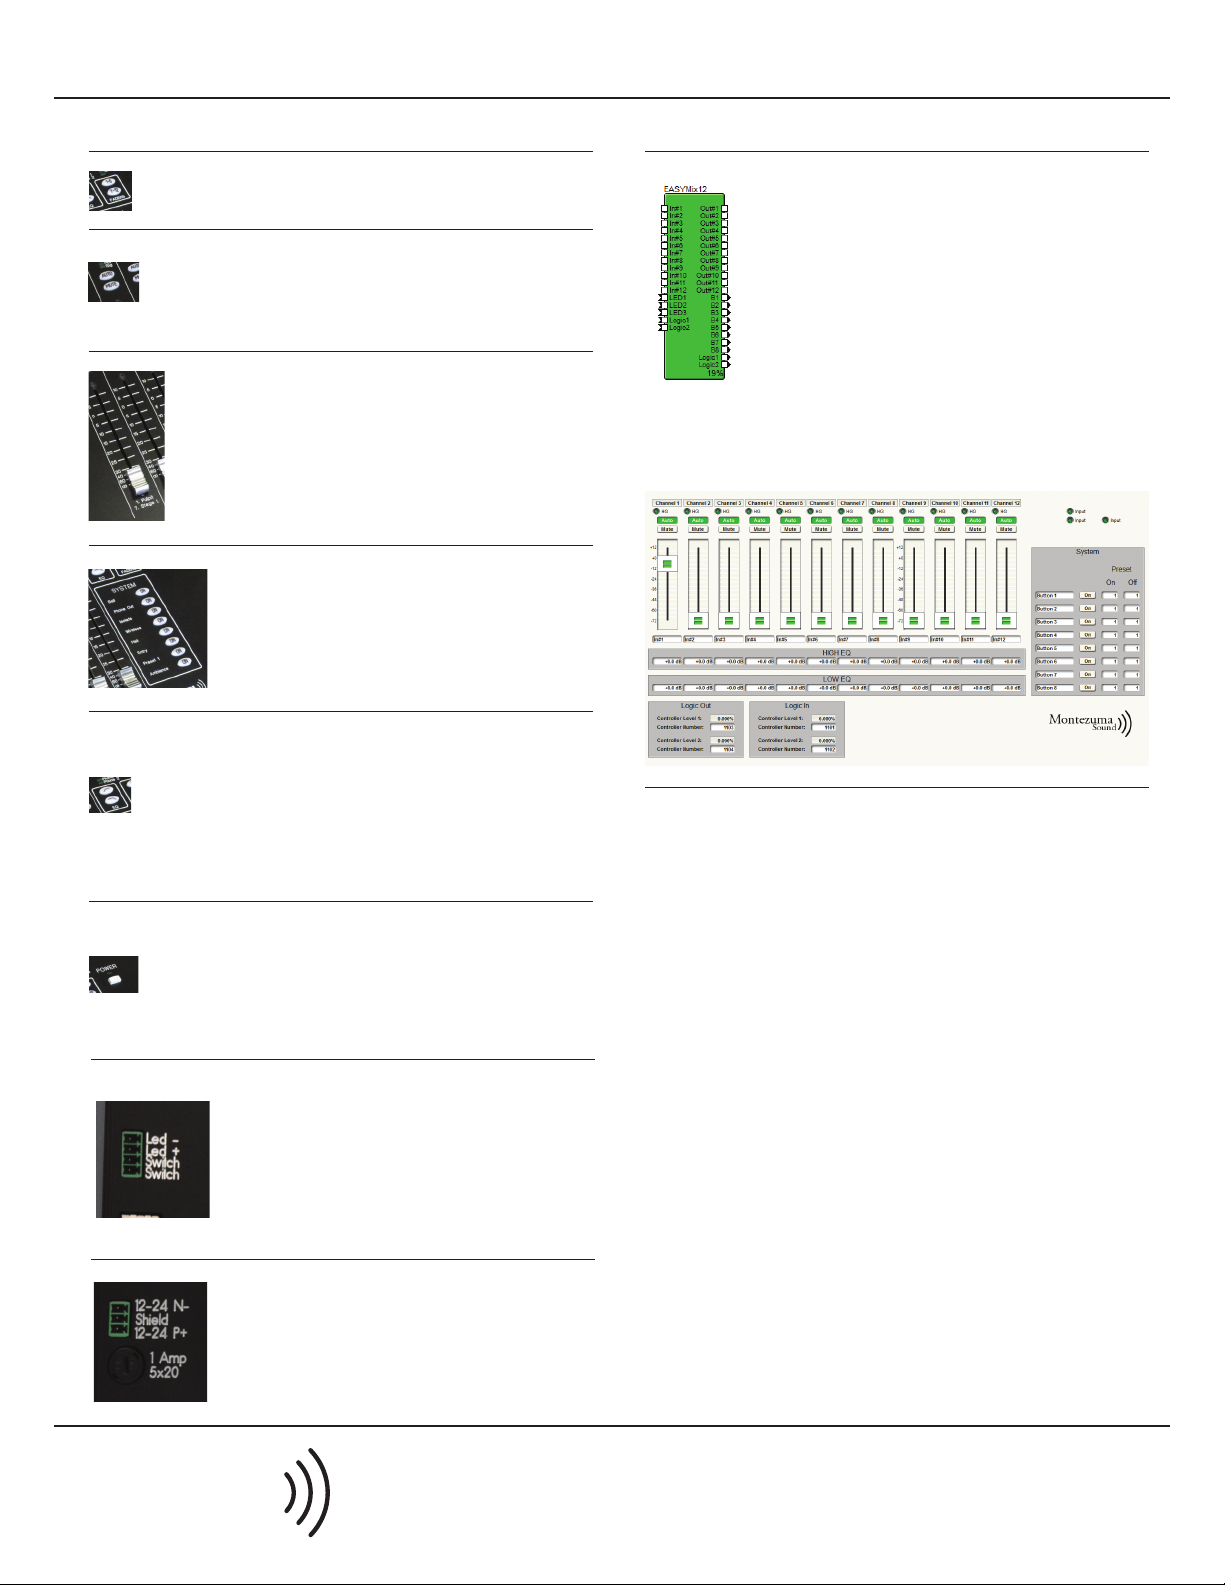
EASYMix12 Supermodule
For quickest conguration, use the supermodule
available from www.easymix.net. This allows all
controls and controller numbers to be quickly
imported into Symnet Designer™or Symnet
Composer™software.
After inserting the EASYMix12 supermodule in your
design, wire up the audio inputs and outputs. You
also have the option of wiring up LED status
indicators and the system buttons to controls in
your design. You may optionally use the presets tied
to the system buttons. The preset numbers are
congured through the supermodule control
screen.
System Design
Contact us for help with your system design or send us your site le for
review for proper operation of the EASYMix12 control surface.
Initial Setup
Montezuma
Sound
QUICK START GUIDE: EASYMix12
Montezuma Sound
PO Box 186
Montezuma, KS 67867
www.easymix.net
(620) 846-2633
Channel Type Controller #
1 Fader 1001
2 Fader 1002
3 Fader 1003
4 Fader 1004
5 Fader 1005
6 Fader 1006
7 Fader 1007
8 Fader 1008
9 Fader 1009
10 Fader 1010
11 Fader 1011
12 Fader 1012
1 Auto 1013
2 Auto 1014
3 Auto 1015
4 Auto 1016
5 Auto 1017
6 Auto 1018
7 Auto 1019
8 Auto 1020
9 Auto 1021
10 Auto 1022
11 Auto 1023
12 Auto 1024
1 Mute 1025
2 Mute 1026
3 Mute 1027
4 Mute 1028
5 Mute 1029
6 Mute 1030
7 Mute 1031
8 Mute 1032
9 Mute 1033
10 Mute 1034
11 Mute 1035
12 Mute 1036
1 High Gain LED 1037
2 High Gain LED 1038
3 High Gain LED 1039
4 High Gain LED 1040
5 High Gain LED 1041
6 High Gain LED 1042
7 High Gain LED 1043
8 High Gain LED 1044
9 High Gain LED 1045
10 High Gain LED 1046
11 High Gain LED 1047
12 High Gain LED 1048
1 Signal LED 1049
2 Signal LED 1050
3 Signal LED 1051
4 Signal LED 1052
5 Signal LED 1053
6 Signal LED 1054
Channel Type Controller #
7 Signal LED 1055
8 Signal LED 1056
9 Signal LED 1057
10 Signal LED 1058
11 Signal LED 1059
12 Signal LED 1060
1 Lo Shelf 1061
2 Lo Shelf 1062
3 Lo Shelf 1063
4 Lo Shelf 1064
5 Lo Shelf 1065
6 Lo Shelf 1066
7 Lo Shelf 1067
8 Lo Shelf 1068
9 Lo Shelf 1069
10 Lo Shelf 1070
11 Lo Shelf 1071
12 Lo Shelf 1072
1 Hi Shelf 1073
2 Hi Shelf 1074
3 Hi Shelf 1075
4 Hi Shelf 1076
5 Hi Shelf 1077
6 Hi Shelf 1078
7 Hi Shelf 1079
8 Hi Shelf 1080
9 Hi Shelf 1081
10 Hi Shelf 1082
11 Hi Shelf 1083
12 Hi Shelf 1084
1 System Button 1085
2 System Button 1086
3 System Button 1087
4 System Button 1088
5 System Button 1089
6 System Button 1090
7 System Button 1091
8 System Button 1092
1 Button LED 1093
2 Button LED 1094
3 Button LED 1095
4 Button LED 1096
5 Button LED 1097
6 Button LED 1098
7 Button LED 1099
8 Button LED 1100
A Control In 1101
B Control In 1102
1 Logic Out 1103
2 Logic Out 1104
1 Status LED 1105
2 Status LED 1106
3 Status LED 1107
Controller Numbers New units ship with an IP address of 192.168.0.205. Enter this IP address in
a browser to log into the web interface. The web interface will allow you to
change the unit IP address and DSP IP address. Various other settings can
also be modied.
The EQ timeout determines the amount of time before the EQ function will
revert back to the normal mix mode. Time is in seconds.
You can program the system buttons to be either latched or momentary by
typing a value next to the corresponding button. Use 0 for latched.
Momentary is programmed by entering a time value in ms. You can also
change the status of the LED by choosing Reg or Inv.
Backup and System Settings
You can backup your system settings by inserting a ash drive into the USB
port and then pressing the bottom “system”button while powercycling the
unit. This saves a le named EASYMIX.txt to the ash drive. Open this le to
review the saved unit settings. This is also a good way to obtain the IP
address used to access the web interface.
Example:
EasyMix IP 192.168.0.205
Symetrix IP 192.168.0.215
Symetrix UDP port 48630
EQ on time 10
Minimum loop 100
Momentary buttons
#1 0
#2 500
#3 500
#4 0
#5 0
#6 0
#7 0
#8 0
Fader cals
1 Zero 405 Thirty 70
2 Zero 405 Thirty 70
3 Zero 405 Thirty 70
4 Zero 405 Thirty 70
5 Zero 405 Thirty 70
6 Zero 405 Thirty 70
This device complies with Part 15 of the FCC Rules. Operation is subject to the following two conditions: (1) this device may not cause harmful interference, and (2) this
device must accept any interference received, including interference that may cause undesired operation.

Popular Music Equipment manuals by other brands

Creative SB1590 user guide

Creative

Creative SB1590 user guide

Glyph GPM-216 brochure

Glyph

Glyph GPM-216 brochure

CESYG DUALFO Installation and user manual

CESYG

CESYG DUALFO Installation and user manual

Ashly Parametric Notch Filter SC68 operating instructions

Ashly

Ashly Parametric Notch Filter SC68 operating instructions

Fishman NEO-D user guide

Fishman

Fishman NEO-D user guide

flight of harmony V'Amp user guide

flight of harmony

flight of harmony V'Amp user guide

Phonic PCL 2700 user manual

Phonic

Phonic PCL 2700 user manual

Covox Voice Master user manual

Covox

Covox Voice Master user manual

WaveReX WaveU operating manual

WaveReX

WaveReX WaveU operating manual

Electro-Harmonix NEO HOLY GRAIL user guide

Electro-Harmonix

Electro-Harmonix NEO HOLY GRAIL user guide

TerraTec SiXPack 5.1+ manual 

TerraTec

TerraTec SiXPack 5.1+ manual 

Kawai Q-80 owner's manual

Kawai

Kawai Q-80 owner's manual

SetonixSynth Macropod user manual

SetonixSynth

SetonixSynth Macropod user manual

Vintage Revolution PedalPro owner's manual

Vintage Revolution

Vintage Revolution PedalPro owner's manual

Icy Box IB-3620U3 user manual

Icy Box

Icy Box IB-3620U3 user manual

Akai XE8 Operator's manual

Akai

Akai XE8 Operator's manual

Clearaudio Statement TT1 user manual

Clearaudio

Clearaudio Statement TT1 user manual

Behringer Blue Devil GX112 user manual

Behringer

Behringer Blue Devil GX112 user manual

manuals.online logo
manuals.online logoBrands
  • About & Mission
  • Contact us
  • Privacy Policy
  • Terms and Conditions

Copyright 2025 Manuals.Online. All Rights Reserved.