manuals.online logo
Brands
  1. Home
  2. •
  3. Brands
  4. •
  5. Morgan
  6. •
  7. Cooktop
  8. •
  9. Morgan MCC-2002 User manual

Morgan MCC-2002 User manual

USER MANUAL
Ceramic
Cooker
MCC-2002
E-mail: electrical.appliance@dksh.com
www.morgan.my
Market Expansion
Services by
www.dksh.com.my
facebook.com/morganappliances
3
SAFETY PRECAUTIONS
14. Use this appliance only for its intended use as detailed in this manual.
15. DO OT leave the appliance unattended while in use.
16. DO OT attempt to move the appliance while in use.
17. If the surface of the hot plate is chipped or damaged in any manner, turn off the power,
unplug from the power supply, and send it for immediate repair at any of our authorised
service centres.
AFTER USE
1. DO OT TOUCH the plate surface as the plate surface has a high temperature after
cooking.
2. When the heating plate or the casing of the cooker is damaged, turn off the power
immediately and stop using to prevent electric shocks.
3. Turn off the power and leave the heating plate to cool completely before cleaning it.
4. DO OT attempt to repair or replace a damaged power cord yourself. You are advised
to send it to service centre or to a qualified maintenance centre for replacement.
5. DO OT immerse the hot plate in water or any other liquids.
6. DO OT allow water to come into contact with electrical connections. If the connections
get wet, unplug from the power supply immediately and dry thoroughly before use.
7. DO OT leave the appliance where children can easily touch it.
8. DO OT place the hot plate under kitchen wall cabinet or under other objects. Keep it
at a distance of at least 20cm away from the wall for safety purpose.
9. DO OT allow heavy objects to fall onto the cooker’s surface, or it may get chipped.
NOTICE: Do not unplug within 5-20 minutes after the stove is turned off. This is
because the ventilation system installed inside the stove will help cool the stove
quickly.
2
FEATURES
The electric ceramic hot plate uses an infrared element to heat the surface. It is
designed for modern family cooking. The main features are as follow:
1. High-Tech infrared heating, no electromagnetic radiation, no flame, no smoke, no carbon
monoxide emission during cooking.
2. Any cooking utensils may be used including items made of stainless steel, aluminium,
copper, ceramic, iron, heat-resistant glass and any other heat-resistant cooking utensils.
3. The self-detect function makes automatic protection to prevent overheating, high-voltage
and low-voltage situations.
4. Multiple functions: Hot Pot, Fry, BBQ, Soup, Boil, etc.
5. Easy to clean and maintain due to full-size ceramic plate.
SAFETY PRECAUTIONS
BEFORE USE
1. Ensure that the voltage on the rating plate corresponds with your power supply’s voltage
before using.
2. DO OT use the appliance if the power cord is damaged in any manner.
3. Keep the power plug clean and ensure nothing covers the power supply.
4. DO OT touch the power cord or power plug with wet hands.
5. Do not attempt to disassemble, repair or modify the hot plate.
6. Do not use the cooker in a wet place, near a fire or near flammable sources.
7. ALWAYS USE the hot plate on well-balanced and stable surfaces.
8. This appliance is not intended for use by persons (including children) with reduced
physical, sensory or mental capabilities, or lack of experience and knowledge, unless
they have been given supervision or instruction concerning use of the appliance by a
person responsible for their safety.
9. Children should be supervised to ensure that they do not play with the appliance.
10. Ensure that the bottom of boiler or pan is clean before placing onto the hot plate.
11. DO OT heat up an empty pot or pan.
12. DO OT place plastic cases, paper, aluminium foil, cloth or other flammable materials
onto the surface of the hot plate during use. This is to prevent accidents and fire.
13. This hot plate should be placed on a level surface while in use. Ensure that tablecloth
or other objects do not cover the air vent as this will affect the performance of the
appliance.
PLEASE READ THIS MANUAL BEFORE USING.
Lock Timer Down ON/OFF Energy FunctionUp
Hot Pot Fry BBQ Soup Boil
HOT
WºC
54
OPERATION INSTRUCTIONS
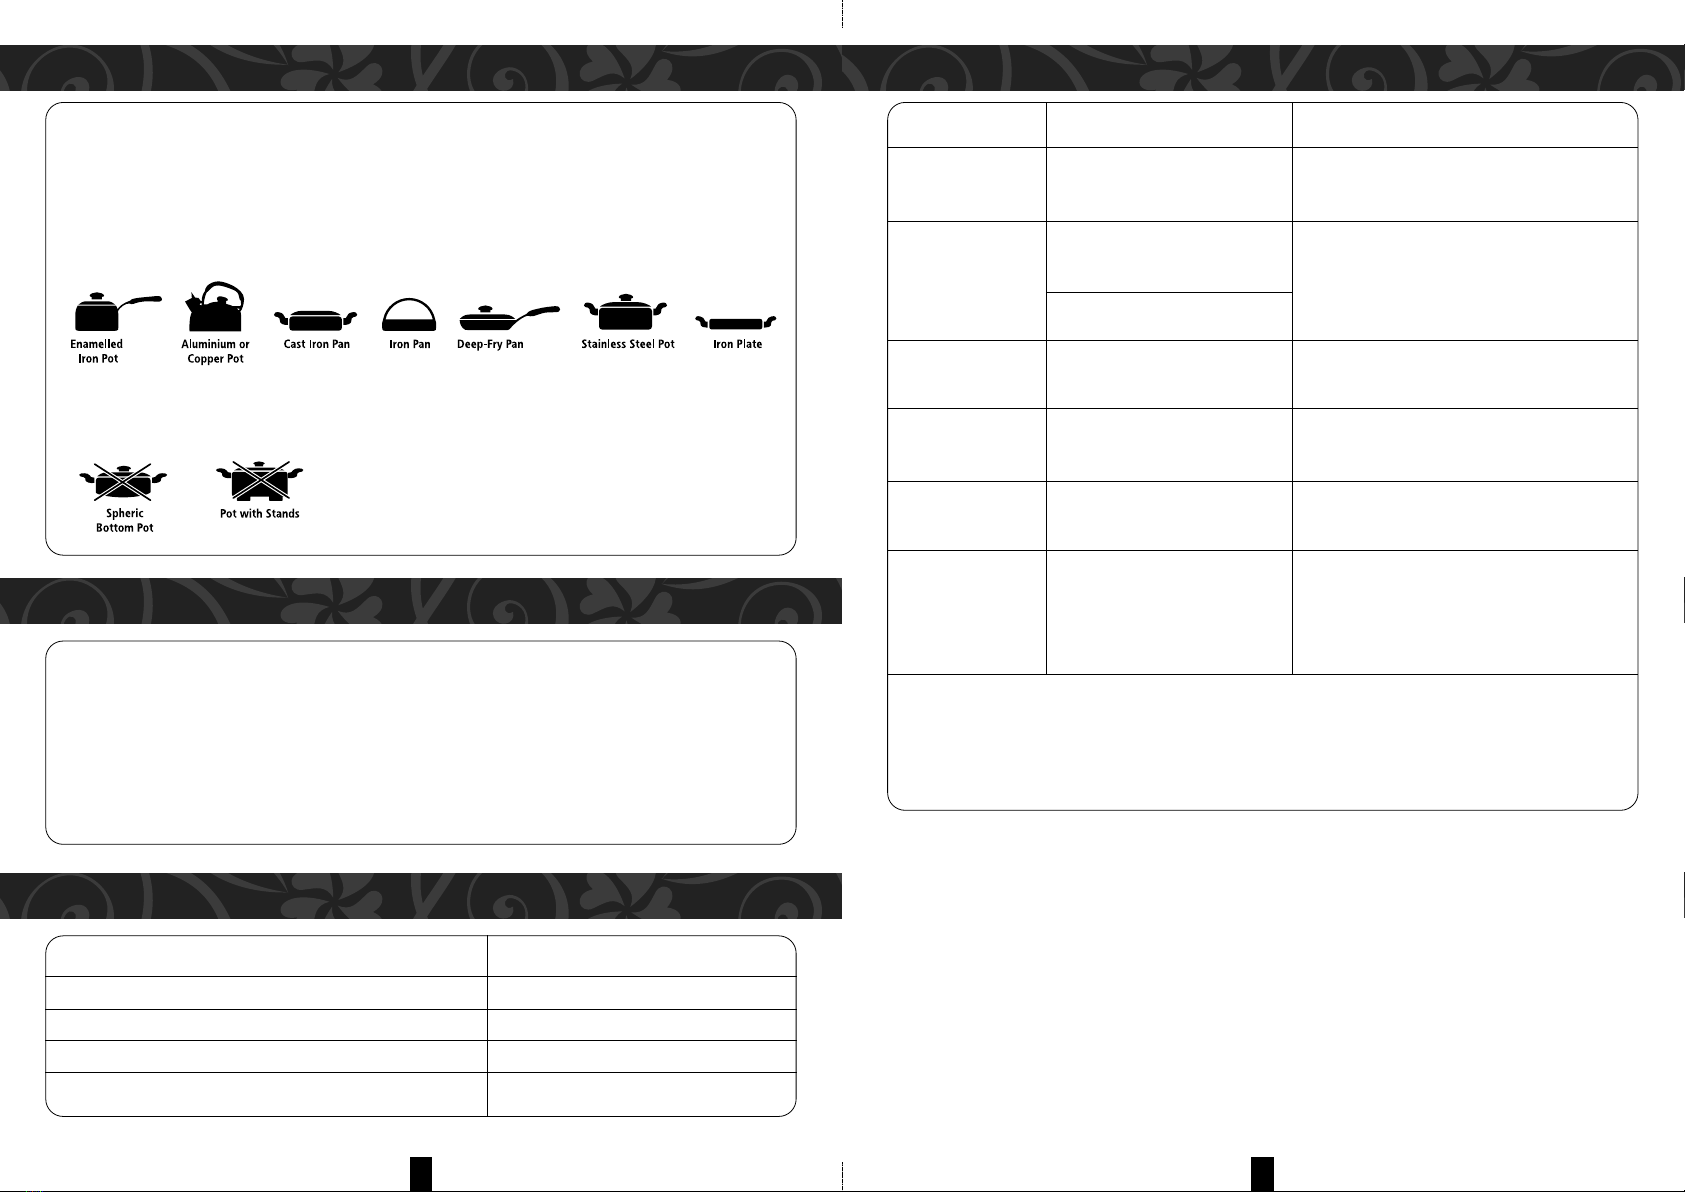
6. BBQ (Manual-control Function)
a) After power on, press “Function” button until the BBQ indicator light is illuminated.
The cooker will then enter into BBQ function. Default Power: 500ºC.
b) Press “h” button to increase the temperature, press “i” button to decrease the
temperature
c) Press “Timer” button and enter desired time.
7. SOU (Automatic-control Function)
a) After power on, press “Function” button, until the Soup indicator light is illuminated.
The cooker will then enter into Soup function. The LED will display “AU” and Power
alternately.
b) Default power: 1200W, default operating duration is 90 minutes
c) DO OT preset the timer.
8. BOIL (Automatic-control Function)
a) After power on, press “Function” button until the Boil indicator light, then, is
illuminated. The cooker will then enter into Boil function. The LED will display “AU”
and Power alternately.
b) Default power: 2000W, default operating duration is 18 minutes
c) DO OT preset the timer.
9. CHILD LOCK
Hold on the “Child Lock” key for 3 seconds, the lock indicator light will illuminate and all
other function keys will be locked (“On/Off” key is also locked.).When in lock mode, hold
on “Child Lock” key for 3 seconds again to unlock all functions when the lock indicator
goes out.
10. ENERGY ( Electricity Consumption)
a) After power on, press "Energy" key, the "Energy" indicator light and the LED will
display the electricity consumption ( unit: kwh).
b) For example, the LED shows 0.02, it means 0.02kwh electricity has been consumed
from plug in till now.
c) Press "Energy" key again or it will disappear automatically after 5 seconds.
11. HIGH-TEM ERATURE INDICATOR
When in operating mode, the cooker can self-detect the top plate temperature, when it
is over 50ºC, the high-temperature indicator will illuminate. After operation stops and in
standby status, the indicator will flash and will not go out until the top plate temperature
falls below 50ºC.
NOTE
• This cooker will automatically turn off its power if it is not in operation for 2 hours.
• Please DO OT remove the power plug off immediately after using since the cooling fan
will still be operating. Do not touch the cooking plate within 30 minutes after turning the
power off to prevent an accidents or physical injuries.
OPERATION INSTRUCTIONS
CONTROL PANEL
1. OWER ON
When cooker is plugged, the cooker will buzz and LED displays “----”. Then press
“On/Off” key, LED displays “O ”, the cooker goes into standby. ow press function to
choose the desired cooking mode.
2. OWER OFF
During working mode or standby status, press “On/Off” key to stop working, LED displays
“----”. Remove power plug from the power supply.
3. TIMER
When in cooking mode, press “Timer” key, Time indicator lights up and LED tube displays
“00:00” and flickers. Press “h” to increase the time by 1 minute progressively and press
“i” key to decrease it by 1 minute progressively. Hold on “h” or “i” to adjust the time by
10 minutes progressively. After setting the time, press “Timer” again to confirm the
time, or if timer function is not selected within 5 seconds it will automatically confirm the
time. Time can be set ranging from 1 min to 24 hours, and in timer mode, LED displays
the working power and time alternately.
During timer mode, you can press “Timer” key again to cancel the timer function.
4. HOT OT (Manual-control Function)
a) After power on, press “Function” button, the cooker is defaulted to hot pot mode,
or in other operation mode, press “Function” button, choose hot pot function, the
default power is: 1200W, LCD will display 1200 and the hot pot indicator light will
illuminate.
b) Press “h” button to increase the output power, press “i” button to decrease
the power.
c) Press “Timer” button and enter desired time.
5. FRY (Manual-control Function)
a) After power on, press “Function” button until the Fry indicator light is illuminated. The
cooker will then enter into Fry function. Default temperature is: 650ºC, and the temp
indicator light will be on.
b) Press “h” button to increase the temperature, press “i” button to decrease the
temperature
c) Press “Timer” button and enter desired time.
7
TROUBLESHOOTING
TROUBLE OTENTIAL CAUSES RESOLUTION
Power indicator Power cord is not Please ensure the plug inserted into
not on connected well. the wall socket.
Power off Cooking time is reached Restart the cooker or return it to the
automatically in timer mode service centre for inspection.
o operation in two hours
LED displays E2 Temperature sensor open Restart the cooker or return it to the
circuit or short circuit service centre for inspection or repairs.
LED displays E3 Excessively high voltage Ensure 120V < voltage < 270V,
220V ~ 240V is selected.
LED displays E4 Excssively low voltage Ensure 120V < voltage < 270V,
220V ~ 240V is selected.
LED displays E6 SCR overheat Inspect the air intake and outlet for an
obstructing objects. If not, return the
cooker to the service centre for
inspection and repairs.
If problems still persists after troubleshooting, DO NOT disassemble the appliance
yourself. Return to the repair service centre for inspection and repairs. If you
disassemble the appliance yourself, you will void your warranty. The manufacturer
will not be responsible for any accidents or injuries.
6
NOTE: ENSURE COMBINED WEIGHT LACED ON THE COOKER IS UNDER 10 KGS.
1. USABLE UTENSILS
Steel, cast iron, enameled iron, stainless steel, pyroceram ceramic clay, copper,
aluminium, heat-resistant glass flat-bottom pans/pots with diameter less than 26cm
Ceramic Pot Heat-Resistant Glass Pot
2. NON-USABLE UTENSILS
Spheric-bottom or point-bottom pans/pots, or pots with stands.
TYPES OF UTENSILS THAT CAN BE USED
CLEANING & MAINTENANCE
1. Before cleaning or maintenance, ensure that the power supply is disconnected and the
ceramic plate has completely cooled down.
2. Clean the cooker with a damp cloth or other special cleaner.
3. Do not wash the cooker with water directly or immerse in water or any other liquids.
4. DO OT use abrasive sponges or chemical detergents to clean the cooker.
5. Avoid any surface friction between the pots and cooking plate.
SPECIFICATIONS
MODEL MCC-2002
RATED VOLTAGE / FREQUENCY 220-240V~ 50Hz
RATED WATTAGE 2000W
UNIT SIZE (mm) 280 x 360 x 65
NET WEIGHT 2.3Kg

Popular Cooktop manuals by other brands

Svan SGW3600X user manual

Svan

Svan SGW3600X user manual

Frigidaire FFEC3603LW Product dimensions

Frigidaire

Frigidaire FFEC3603LW Product dimensions

Frigidaire FEC3X5XHCA owner's guide

Frigidaire

Frigidaire FEC3X5XHCA owner's guide

Avalon Stove user manual

Avalon

Avalon Stove user manual

White-Westinghouse 318200659 owner's guide

White-Westinghouse

White-Westinghouse 318200659 owner's guide

Kenmore Induction cooktop installation instructions

Kenmore

Kenmore Induction cooktop installation instructions

Jenn-Air JEC8430 installation instructions

Jenn-Air

Jenn-Air JEC8430 installation instructions

Frigidaire Gallery GLEF389H Use & care manual

Frigidaire

Frigidaire Gallery GLEF389H Use & care manual

U.S. Range "REGAL" SERIES Installation and operation manual

U.S. Range

U.S. Range "REGAL" SERIES Installation and operation manual

hestan KGC30-LP installation manual

hestan

hestan KGC30-LP installation manual

Signature Kitchen Suite UPCG3054ST owner's manual

Signature Kitchen Suite

Signature Kitchen Suite UPCG3054ST owner's manual

Dacor Millennia ETT304-1 installation instructions

Dacor

Dacor Millennia ETT304-1 installation instructions

CASO DESIGN IP 3500 Pro manual

CASO DESIGN

CASO DESIGN IP 3500 Pro manual

Highland HT3IFC-2 Use and care guide

Highland

Highland HT3IFC-2 Use and care guide

Jenn-Air JED4430WS Use and care guide

Jenn-Air

Jenn-Air JED4430WS Use and care guide

Asko HIG1944MF installation guide

Asko

Asko HIG1944MF installation guide

GE JGP326AEV Dimensions

GE

GE JGP326AEV Dimensions

KitchenAid KECC567RBL03 parts list

KitchenAid

KitchenAid KECC567RBL03 parts list

manuals.online logo
manuals.online logoBrands
  • About & Mission
  • Contact us
  • Privacy Policy
  • Terms and Conditions

Copyright 2025 Manuals.Online. All Rights Reserved.