1. This button cycles through the functions of the camera. The LED indicator lights
show what mode the camera is currently in. If Indicator A is on, the camera is in the
Still Image Capture Mode. Pressing the SNAP button captures an image onto the SD
Card. If Indicator B is on, the camera is in the Live Image Capture Mode. Pressing the
SNAP button captures a video file onto the SD Card. If both Indicators A and B are on,
the camera is in the ALBUM mode, use buttons 2 and 3 to scroll through the images
on the SD Card.
2. When an analog device is connected to the camera, this button switches the output
between NTSC and PAL outputs. When the camera is in ALBUM Mode use this button
to scroll left.
3. Pressing this button activates the camera’s hardware White Balance function. Use
this function to calibrate a white background depending on the microscope’s illumina-
tion. When the camera is in ALBUM Mode use this button to scroll right.
4. This button will Capture a Still Image or Start/Stop the Video Recording depending
on what Mode the camera is in.
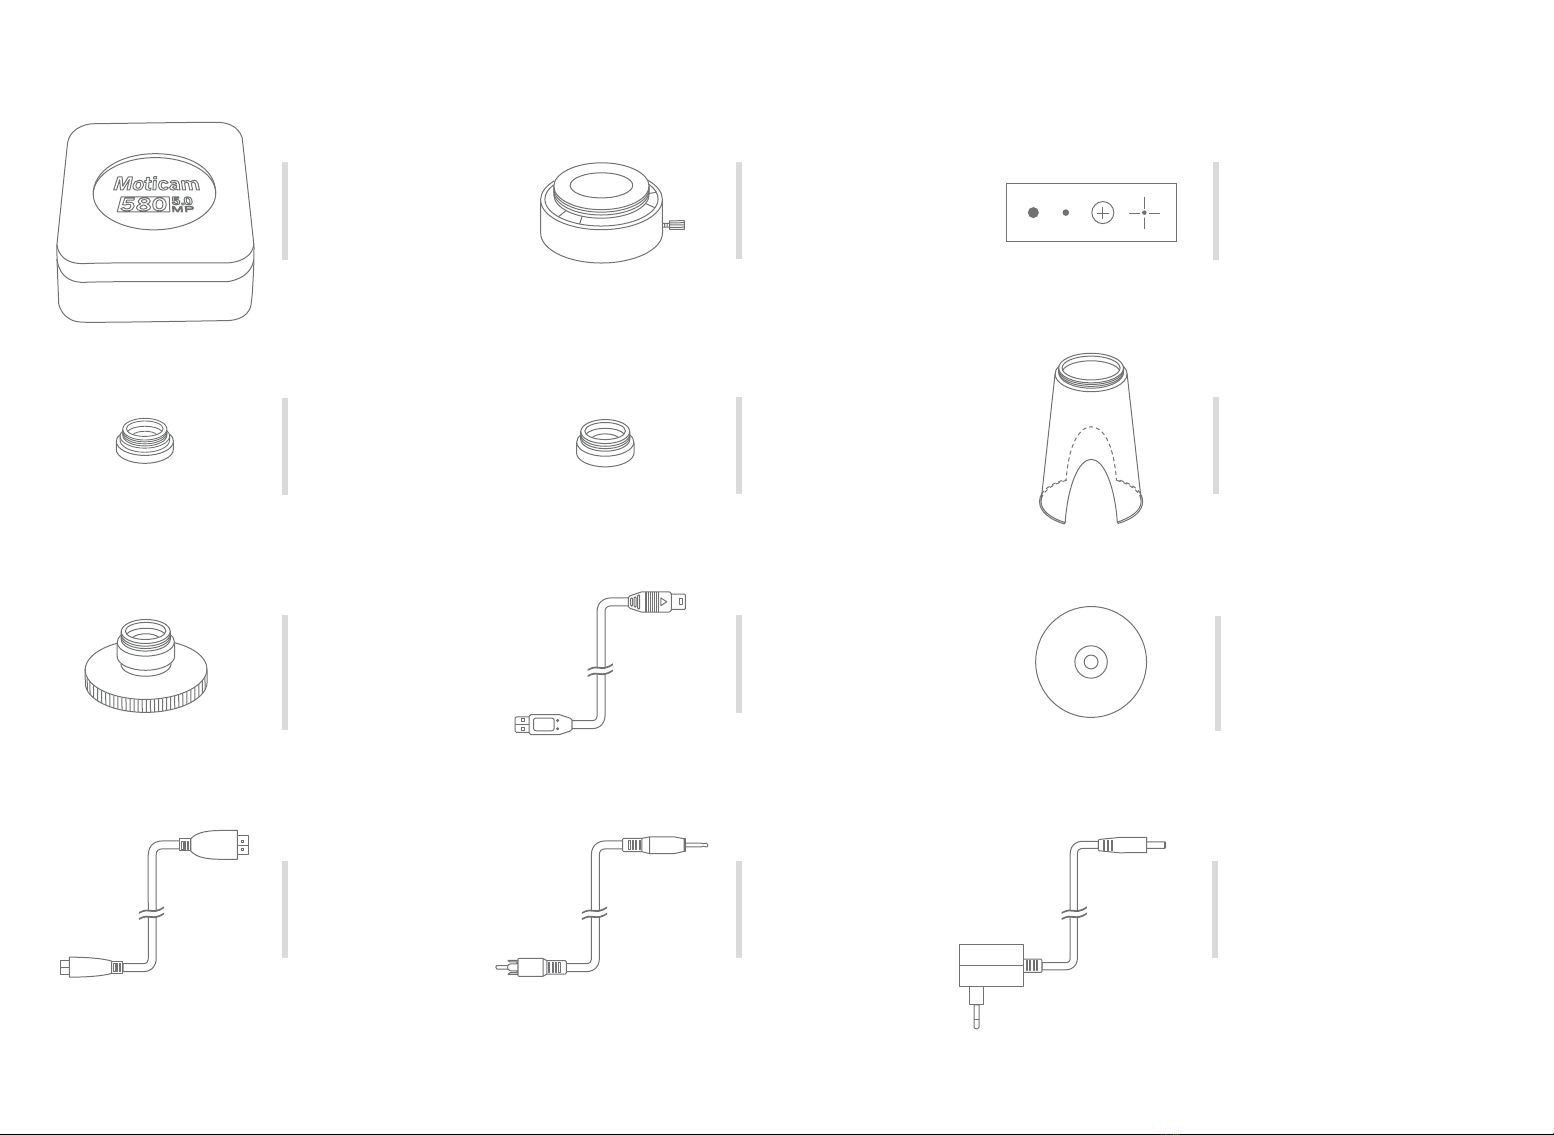
5. AV out for connecting to an Analog Display (the cable is provided in the Moticam
580 box)
6. USB port for connecting to a Computer (the cable is provided in the Moticam 580
box)
7. Mini-HDMI port for connecting to an HDMI ready Display (the cable is provided in
the Moticam 580 box)
8. Power port for connecting the included Power Supply.
9. SD Card slot for capturing images and video files onto an SD card. The maximum
size compatible is 32GB SDHC.
NOTE: The remote control for the Moticam 580 is an optional extra available in the
premium pack
10. Pressing this button switches off the camera completely. Please note that you will
need to replug the power supply to switch it on.
11. This button will Capture a Still Image or Start/Stop the Video Recording depend-
ing on what Mode the camera is in.
12. This toggle pad allows you to scroll through the images in the ALBUM and also
through the camera’s custom setup MENU.
13. Access the camera’s custom setup by pressing this button. Please note that all
settings go back to the default once the camera is disconnected from the power
supply.
14. This button cycles through the functions of the camera. The LED indicator lights
show what mode the camera is currently in. If Indicator A is on, the camera is in the
12. Estos botones de desplazamiento le permitirán desplazarse por las imágenes del
ALBUM y también por el MENU de ajustes de la cámara.
13. Botón para acceder al MENU de ajustes de la cámara. Tenga en cuenta que si
desconecta la cámara de la fuente de alimentación, todos los ajustes realizados se
perderán y quedarán por defecto los ajustes de fábrica.
14. Este botón activa las distintas funciones de la cámara. Los indicadores LED mues-
tran en qué modo esta la cámara. Si el indicador A está activado, la cámara está en
modo captura de imagen fija. Pulsando el botón SNAP captura imágenes en la tarjeta
SD. Si el indicador B está activado, la cámara está en modo de captura de imágenes
en vivo. Pulsando el botón SNAP captura en formato video en la tarjeta SD. Si ambos
indicadores A y B están activos, la cámara está en modo ALBUM, use los botones de
desplazamiento (12) para desplazarse por las imágenes almacenadas en la tarjeta SD.
15. Pulsando este botón se activa la función de balance de blancos de la cámara. Use
esta función para calibrar un fondo blanco dependiendo de la iluminación del micros-
copio.
1. Mit dieser Taste werden die Einstellungen der Kamera gewählt. Die LED-Anzeige
zeigt den augenblicklichen Modus der Kamera an. Ist die Anzeige A an, dann ist die
Kamera in der Standbildaufnahme. Beim Drücken des Schnappschuss-Knopfs wird ein
Bild auf die SD-Karte aufgenommen. Ist die Anzeige B an, dann ist die Kamera im
Livebild-Aufnahmemodus. Durch Drücken des Schnappschuss-Knopfs wird eine
Videodatei auf die SD-Karte aufgenommen. Sind beide Anzeigen A und B an, ist die
Kamera im ALBUM Modus. Mit Taste 2 und 3 scrollen Sie durch die Bilder auf der
SD-Karte.
2. Wenn ein Analoggerät mit der Kamera verbunden ist, schaltet diese Taste zwischen
NTSC und PAL – Ausgängen. Wenn die Kamera im ALBUM-Modus ist, benutzen Sie
die Taste, um nach links zu scrollen.
3. Diese Taste aktiviert den Weißabgleich der Kamera. Mit dieser Funktion können Sie
einen weißen Hintergrund abhängig von der Mikroskop-Beleuchtung kalibrieren. Im
ALBUM-Modus der Kamera scrollen Sie mit dieser Taste nach rechts.
4. Dieser Knopf verursacht die Aufnahme eines Standbildes oder startet/stoppt die
Video-Aufzeichnung abhängig vom gegenwärtigen Kameramodus.
5. AV-Ausgang für eine Verbindung zu einer Analog-Anzeige (das Kabel ist in der
Moticam 580 Verpackung).
6. USP-Ausgang zur Verbindung mit einem Computer (das Kabel ist in der Moticam
580 Verpackung).
7.Mini-HDMI-Ausgang zur Verbindung mit einem HDMI-fähigen Display (das Kabel ist
in der Moticam 580 Verpackung).
8. Netzanschluss zum vorhandenen Netzteil.
9. SD-Kartenschlitz zur Bildaufnahme und Videofilmen auf eine SD-Karte. Die maximale
DE
kompatible Größe ist 32GB SDHC.
Bemerkung: die Fernbedienung für die Moticam 580 ist optional erhältlich im
Premiumpaket.
10. Mit dieser Taste schalten Sie die Kamera aus. Um Sie einzuschalten, muss die
Netzversorgung wieder eingesteckt sein.
11. Mit dieser Taste nehmen Sie ein Standbild auf oder Sie starten/stoppen die
Video-Aufzeichnung abhängig vom gegenwärtigen Kameramodus.
12. Mit diesem Kippschalter scrollen Sie durch die Bilder im ALBUM und auch durch
das individuelle Einstellungs-Menu der Kamera.
13. Mit Hilfe dieses Knopfes gelangen Sie zur individuellen Einstellung der Kamera.
Bitte beachten Sie, dass alle Einstellungen zur Standardeinstellung zurückfallen,
wenn die Kamera von der Stromversorgung genommen wird.
14. Mit dieser Taste werden die Einstellungen der Kamera gewählt. Die LED-Anzeige
zeigt den augenblicklichen Modus der Kamera an. Ist die Anzeige A an, dann ist die
Kamera in der Standbildaufnahme. Beim Drücken des Schnappschuss-Knopfs wird
ein Bild auf die SD-Karte aufgenommen. Ist die Anzeige B an, dann ist die Kamera im
Livebild-Aufnahmemodus. Durch Drücken des Schnappschuss-Knopfs wird eine
Videodatei auf die SD-Karte aufgenommen. Sind beide Anzeigen A und B an, ist die
Kamera im ALBUM Modus. Mit den Pfeiltasten scrollen Sie durch die Bilder auf der
SD-Karte.
15. Diese Taste aktiviert den Weißabgleich der Kamera. Mit dieser Funktion können
Sie einen weißen Hintergrund abhängig von der Mikroskop-Beleuchtung kalibrieren.
1. Ce bouton permet de faire apparaître les différentes fonctions de la caméra. Les
indicateurs lumineux LED indiquent sur quel mode travaille la caméra. Si le témoin
lumineux A est allumé, la caméra est en Mode de Capture d’Image figée. En pressant
le bouton SNAP l’image est capturée sur la carte SD directement. Si les deux témoins
lumineux A et B sont allumés, la caméra est en Mode Album, utilisez les boutons 2 et
3 pour faire défiler les images sur la carte SD.
2. Quand un dispositif analogique est connecté à la caméra, ce bouton change la
sortie entre les formats NTSC et PAL. Quand la caméra est en mode ALBUM utiliser
ce bouton pour se déplacer vers la gauche.
3. Ce bouton permet d’activer la fonction de Balance de Blancs de la caméra. Utilisez
cette fonction pour déterminer un fond blanc qui dépendra de l’éclairage du micros-
cope. Quand la caméra est en mode ALBUM utiliser ce bouton pour se déplacer vers
la droite.
4. En fonction du mode sur lequel est la caméra ; ce bouton capture une image figée,
ou servira de commande pour Démarrer/Arrêter l’enregistrement d’une vidéo.
5. Sortie AV pour connecter à un dispositif analogique (Le câble est fourni dans la
boite de la Moticam 580)
FR