Motomaster 037-6931-6 User manual
headline bars
tabs
continuation tabs
notes
warnings
MAINTENANCE
headline bars
tabs
continuation tabs
notes
warnings
headline bars
tabs
continuation tabs
notes
warnings
headline bars
tabs
continuation tabs
notes
warnings
headline bars
tabs
continuation tabs
notes
warnings
headline bars
tabs
continuation tabs
notes
warnings
headline bars
tabs
continuation tabs
notes
warnings
headline bars
tabs
continuation tabs
notes
warnings
headline bars
tabs
continuation tabs
notes
warnings
headline bars
tabs
continuation tabs
notes
warnings
headline bars
tabs
continuation tabs
notes
warnings
headline bars
tabs
continuation tabs
notes
warnings
MAINTENANCE
KNOW YOUR CLAMP LIGHT
CLAMPING
HANDHELD LED
WORKLIGHT
IMPORTANT:
Please read this manual carefully before running this
device and save it for reference
2
4
model no. 037-6391-6 | contact us 1-888-942-6686
model no. 037-6391-6 | contact us 1-888-942-6686
WARNINGS
OPERATION
3
65
BEFORE YOU USE THIS DEVICE FOR THE FIRST TIME, PLEASE READ THE FOLLOWING NOTES IN
THIS MANUAL AND HEED ALL WARNINGS, EVEN IF YOU ARE FAMILIAR WITH HANDLING ELECTRONIC
DEVICES. KEEP THIS MANUAL IN A SAFE PLACE FOR FUTURE REFERENCE.
WARNING
• Do not shine light directly into eyes.
• Do not expose to fire or high temperatures; the battery may explode.
• Lens may become hot during operation.
• Do not operate light with the light facing down on any surface, or fabric.
• Turn light off and allow it to cool before attempting any cleaning or maintenance.
• Keep out of reach of children.
CAUTION
• Batteries may explode when exposed to or disposed of in fire.
• Do not mix old and new batteries.
• Failure to insert batteries in the correct polarity may shorten the life of batteries or cause batteries
to leak.
• Batteries should always be recycled or disposed of as per state and local guidelines.
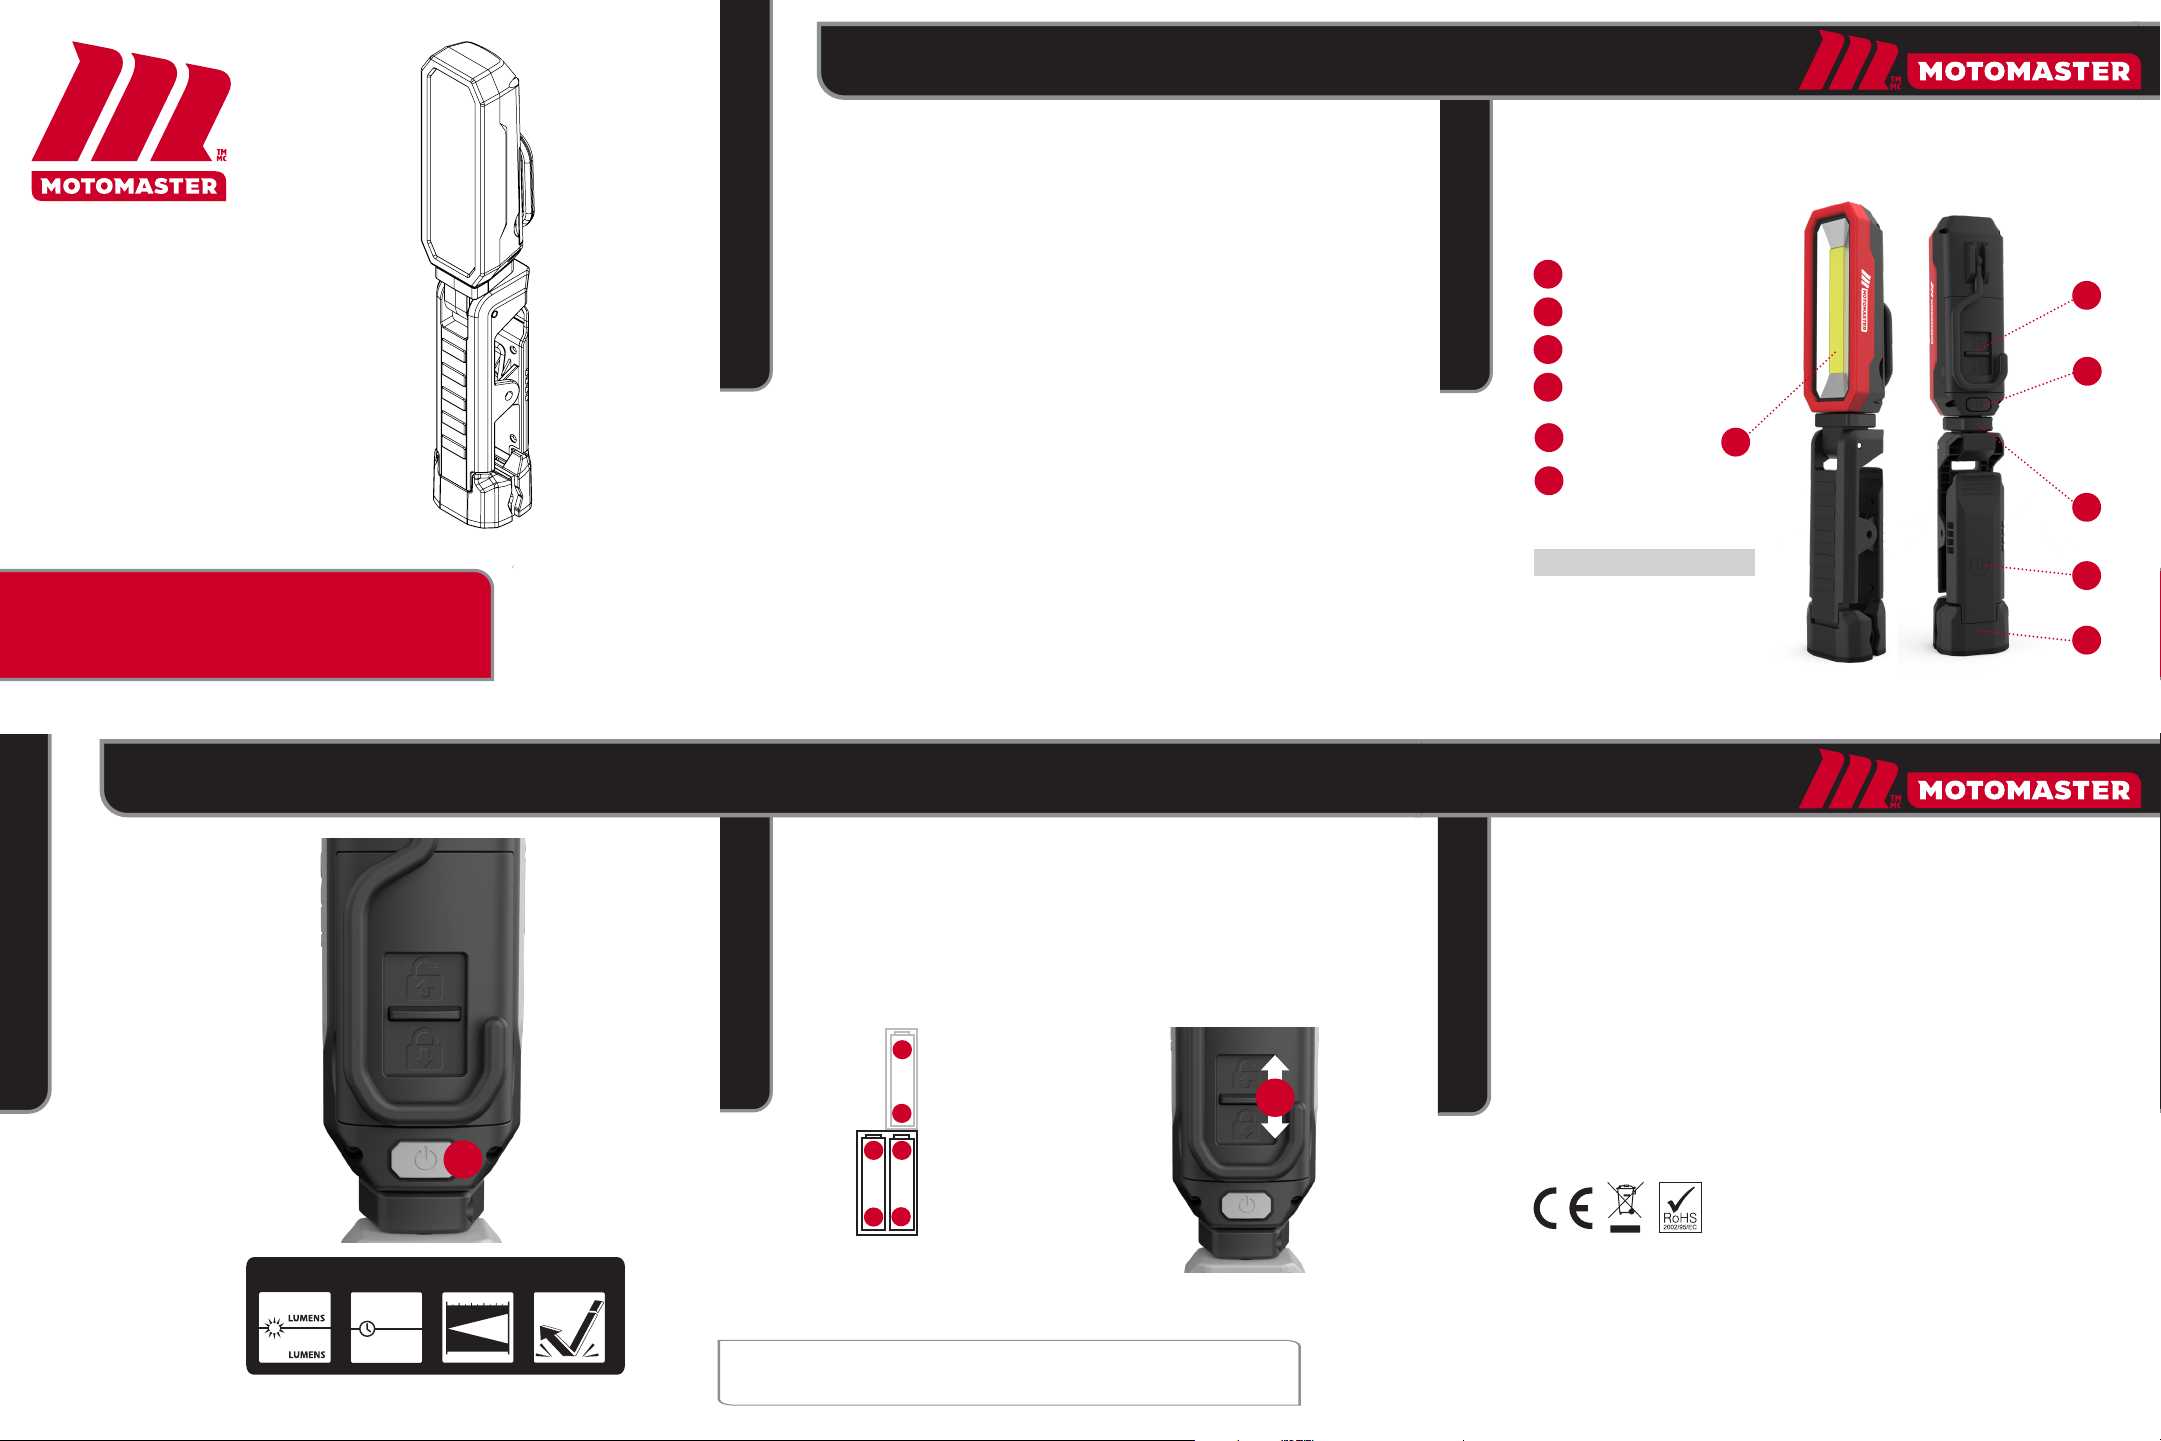
PRODUCT DESCRIPTION
The clamping light is especially useful for activities that require hands-free use.
PACKAGE CONTENTS
Clamp Light
3 AA alkaline batteries
Power Switch
Battery Compartment Door
LED
Pivots 360°Horizontally
Pivots 90°Vertically
Magnet
Clamping Feet
1
2
3
4
OPERATING THE UNIT
1POWER SWITCH
• First Click - ON | HIGH
• Second Click - ON | LOW
• Third Click- OFF
BATTERY REPLACEMENT (NEW AA BATTERIES ONLY)
2BATTERY DOOR LOCK
• Slide the battery cover lock up to access the battery compartment.
• Remove the old batteries.
• Insert 3 new AA batteries, being careful to insert them in the correct polarity (+ and -).
• Replace the battery cover and slide lock down to close battery compartment.
• Always replace with all new AA batteries. Never mix old and new batteries.
Replace the batteries according to the following illustration:
BATTERY DISPOSAL
To protect the environment, batteries should always be recycled or disposed of as per state local
guidelines.
Batteries may explode when exposed to or disposed of in fire.
CLEANING & CARE
Clean the cooled lens with household window cleaner; then wipe with a soft, clean, dry cloth.
Clean ABS housing with a clean, dry cloth.
STORAGE
Store light in a dry, clean area. Avoid high humidity.
ENVIRONMENTAL CONCERNS
Should your clamp light need replacement after extended use, do not dispose of it with domestic
waste. Dispose of it in an environmentally safe way. Used electronic products should not be
disposed of with household waste. Please recycle where facilities exist. Check with your local
authority or retailer for recycling advice.
Imported by Motomaster Canada Toronto, Canada M4S 2B8.
IMPORTANT NOTE:
Always replace with new AA batteries. Never mix old and new batteries.
model no. 037-6931-6
INSTRUCTION
MANUAL
CAN ICES-005(B)/NMB-005(B)
3
1
2
4
5
6
5
6
1
2
2
+
+
+
-
-
-
HIGH
LOW
500
250
HIGH
LOW
3h
6h
25m
1 m
FL1 STANDARD
LUMENS RUNTIME RANGE IMPACT
RESISTANCE

headline bars
tabs
continuation tabs
notes
warnings
ENTRETIEN
headline bars
tabs
continuation tabs
notes
warnings
headline bars
tabs
continuation tabs
notes
warnings
headline bars
tabs
continuation tabs
notes
warnings
headline bars
tabs
continuation tabs
notes
warnings
headline bars
tabs
continuation tabs
notes
warnings
headline bars
tabs
continuation tabs
notes
warnings
headline bars
tabs
continuation tabs
notes
warnings
headline bars
tabs
continuation tabs
notes
warnings
headline bars
tabs
continuation tabs
notes
warnings
headline bars
tabs
continuation tabs
notes
warnings
ENTRETIEN
CONNAÎTRE VOTRE BALADEUSE À PINCE
BALADEUSE À DEL
À PINCE
IMPORTANT:
Veuillez lire attentivement ce guide d’utilisation avant
de faire fonctionner cette baladeuse et le conserver à
titre de référence.
2
4
No de modèle 037-6391-6 | au 1 888 942-6686
No de modèle . 037-6391-6 | au 1 888 942-6686
AVERTISSEMENTS
FONCTIONNEMENT
3
65
AVANT D’UTILISER CET APPAREIL POUR LA PREMIÈRE FOIS, VEUILLEZ LIRE LES NOTES SUIVANTES
DANS CE MODE D’EMPLOI ET TENIR COMPTE DE TOUS LES AVERTISSEMENTS, MÊME SI VOUS ÊTES
FAMILIARISÉ AVEC LA MANIPULATION DES APPAREILS ÉLECTRONIQUES. CONSERVEZ CE MODE
D’EMPLOI DANS UN ENDROIT SÛR AUX FINS DE CONSULTATION ULTÉRIEURE.
AVERTISSEMENT
• Ne projetez pas le faisceau directement dans les yeux.
• Ne l’exposez pas au feu ou à des températures élevées; la batterie peut exploser.
• Le diffuseur peut devenir chaud pendant le fonctionnement.
• N’utilisez pas la baladeuse avec la lumière tournée vers le bas sur une surface ou un tissu.
• Éteignez la baladeuse et laissez-la refroidir avant de commencer toute opération de nettoyage
ou d’entretien.
• Tenir hors de la portée des enfants
CAUTION
• Les piles peuvent exploser lorsqu’elles sont exposées ou jetées au feu.
• Ne mélangez pas des piles neuves avec des piles usagées.
• Ne pas respecter la polarité au moment de l’installation des piles peut réduire leur durée de vie ou
les faire couler.
• Ne jetez pas les piles au feu. Les piles doivent toujours être recyclées ou éliminées selon les
directives de la municipalité.
DESCRIPTION DU PRODUIT
Cette baladeuse est conçue pour un usage intérieur et extérieur. Toutefois, elle n’est pas étanche,
et une utilisation prolongée sous la pluie ou la neige devrait être évitée. La baladeuse à pince est
particulièrement utile pour les activités nécessitant une utilisation mains libres.
CONTENU DE LA BOÎTE
Baladeuse à pince
3 piles alcalines de type AA
Interrupteur d’alimentation
Couvercle du compartiment à piles
DEL
Pivote de 360° horizontalement
Pivote de 90° verticalement
Aimant
Pieds de serrage
1
2
3
4
UTILISATION DE
LA BALADEUSE
1POWER SWITCH
• Premier clic – MARCHE | INTENSITÉ ÉLEVÉE
• Deuxième clic – MARCHE | INTENSITÉ FAIBLE
• Troisième clic – ARRÊT
REMPLACEMENT DES PILES (NOUVELLES PILES AA UNIQUEMENT)
2VERROU DU COUVERCLE DU COMPARTIMENT À PILES
• Faites glisser le verrou du couvercle du compartiment à piles vers le haut pour accéder au
compartiment à piles.
• Retirez les anciennes piles.
• Insérez 3 nouvelles piles AA, en prenant soin de les insérer dans le bon sens de polarité (+ et -).
• Remettez le couvercle sur le compartiment à piles et faites glisser le verrou vers le bas pour
fermer le couvercle du compartiment à piles.
• Remplacez toujours les anciennes piles par de nouvelles piles AA. Ne mélangez jamais des piles
neuves avec des piles usagées.
Remplacez les piles conformément
à l’illustration suivante :
ÉLIMINATION DES PILES
Les piles doivent toujours être recyclées ou éliminées selon les
directives de la municipalité. Les piles peuvent exploser lorsqu’elles sont exposées
ou jetées au feu.
NETTOYAGE ET ENTRETIEN
Nettoyez les lentilles refroidies avec un produit nettoyant pour vitre, puis essuyez avec un chiffon
doux, sec et propre. Nettoyez le boîtier ABS avec un chiffon propre et sec.
RANGEMENT
Rangez la baladeuse dans un endroit sec et propre. Évitez une humidité élevée.
PRÉOCCUPATIONS EN MATIÈRE D’ENVIRONNEMENT
Si votre baladeuse doit être remplacée après une utilisation prolongée, ne la jetez pas avec le
reste des ordures ménagères Jetez-la dans des conditions respectueuses de l’environnement. Les
produits électriques usés ne doivent pas être jetés avec les déchets ménagers. Veuillez le recycler
aux installations de recyclage existantes. Contactez les autorités locales ou votre revendeur pour
obtenir des conseils en matière de recyclage.
Importé par Motomaster Canada, Toronto, Canada M4S 2B8.
REMARQUE IMPORTANTE :
Remplacez toujours les anciennes piles par de nouvelles piles AA. Ne mélangez
jamais des piles neuves avec des piles usagées.
No de modèle : 037-6391-6
GUIDE
D’UTILISATION
CAN ICES-005(B)/NMB-005(B)
3
1
2
4
5
6
5
6
1
2
2
+
+
+
-
-
-
ÉLEVÉE
FAIBLE
500
250
ÉLEVÉE
FAIBLE
6h
3h
25 m
1 m
NORME FL 1
LUMENS DURÉE VARIER RÉSISTANCE
AUX CHOCS
Table of contents
Languages:
Other Motomaster Work Light manuals


