MPL MIP470 User manual

MEH-10121-001
MIP470 Preleminary
USERS MANUAL
MPL Industrial PC with Freescale P werPC™ Pr cess r
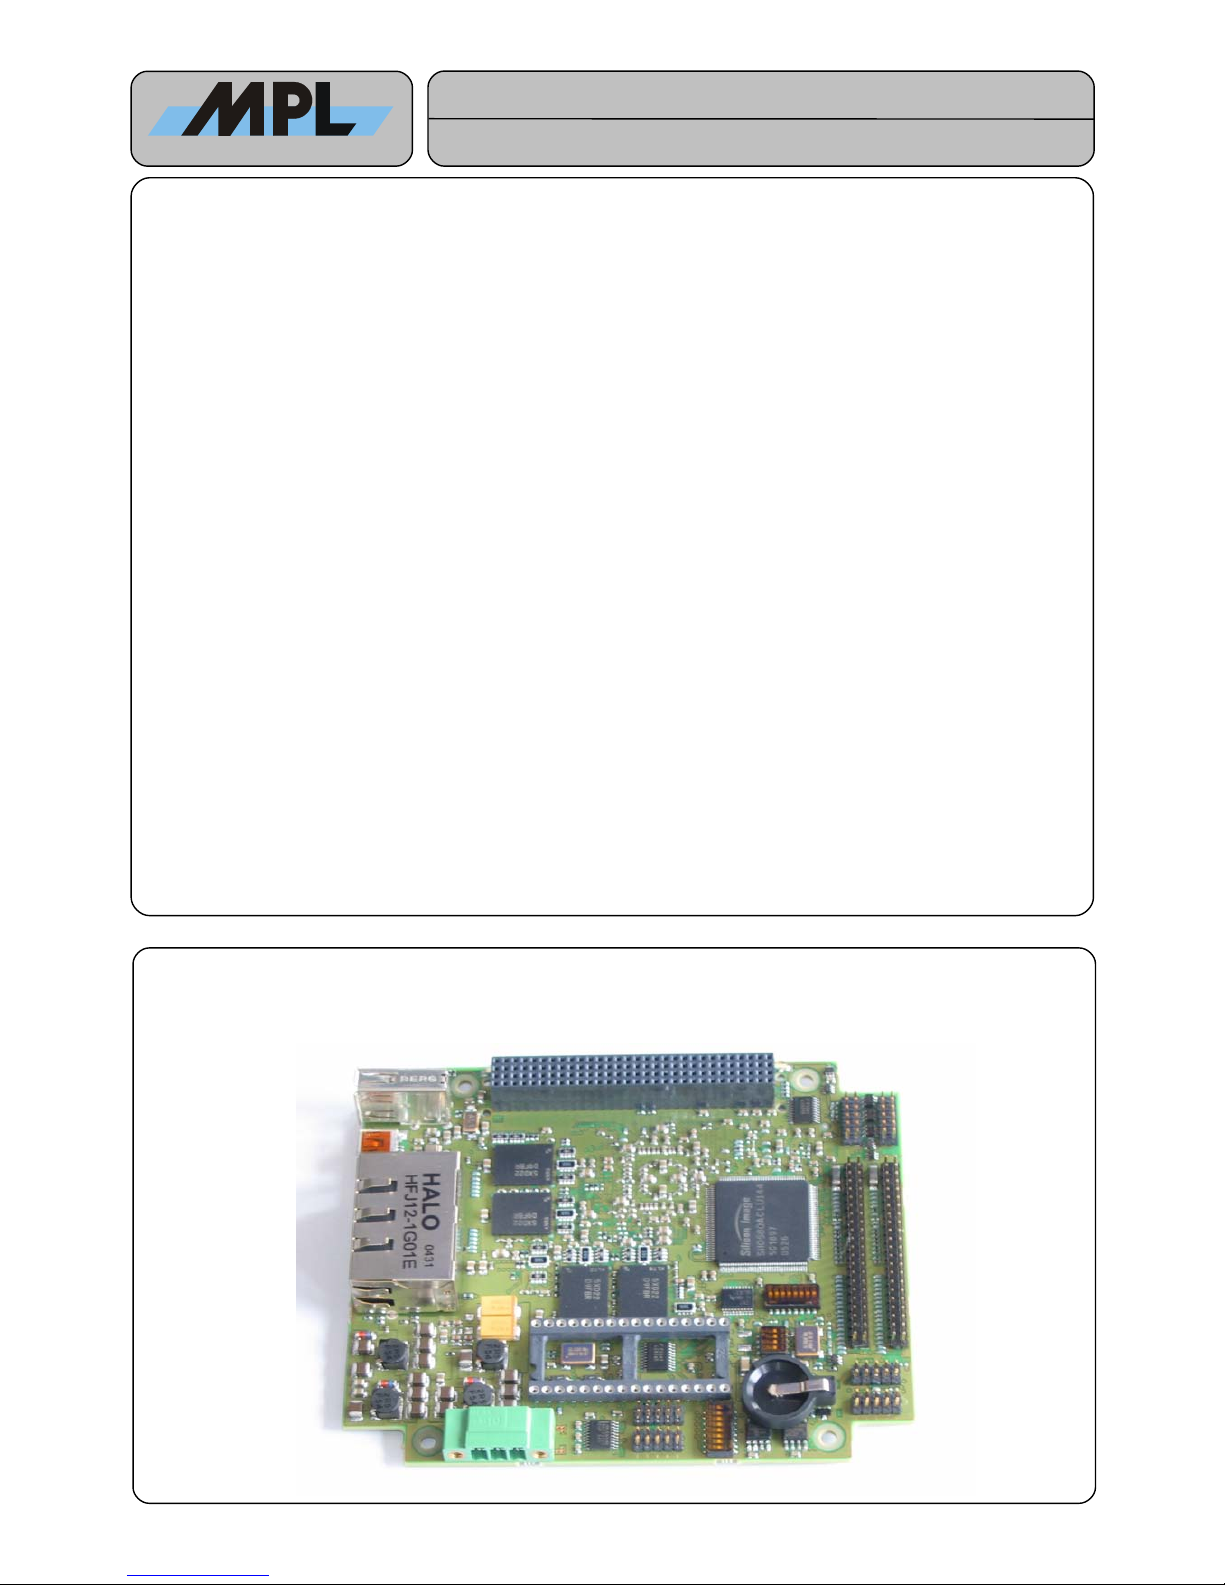
The MIP470 is a highly integrated industrial single board computer in P /104 form factor. Build around the
MP 8347 Freescale PowerP ™ Processor it is well suited for applications requiring small size, high
performance and Low Power. The MIP470 can be used in a standard operating environment without the
necessity of a fan.
All major components required to build a industrial P system are implemented on a single P /104 sized
board. It features two E-IDE, two 10/100/1000Base TX Ethernet, two USB Ports, four serial ports, and a real
time clock. The P /104+ (P I) interface offers easy and flexible expansion capabilities.
Integration of the MIP470 into a system is facilitated by the fact of offering standard connectors E-IDE (44
pin header) and LAN (RJ45). The serial interfaces can be accessed through 2mm 10pin headers. Particular
precaution has been taken to the EM so that an entire system can fulfill the E and F requirements.
The DDR SDRAM is soldered on board and is available with E .
All these features make the MIP470 to the ideal solution for any low-cost embedded control application
where a flexible industrial P is needed.
Features
●Low Power Freescale MP 8347 PU with
FPU
●Processor clock up to 400 MHz
●Up to 512MByte E DDR SDRAM soldered
on board.
●Up to 64MByte Flash on board
●2 x Integrated 10/100/1000 Mbit/s Ethernet
ontroller
•P /104 Plus P I only interface
•2 x USB 2.0 Ports
•Two EIDE HDD ports
•Four RS232 ports
•Low power consumption
2006 by MPL AG
1
High-Tech • Made in Switzerland

MEH-10121-001
MIP470
USERS MANUAL
TABLE OF CONTENTS
1. INTRODU TION.............................................................................................................................................................. 3
1.1 About this manual........................................................................................................................................................ 3
1.2 MIP470 Variants.......................................................................................................................................................... 3
1.3 Safety precautions and handling................................................................................................................................. 3
1.4 Electrostatic discharge (ESD) protection..................................................................................................................... 3
1.5 Equipment safety......................................................................................................................................................... 3
2. GENERAL INFORMATION AND SPE IFI ATIONS...................................................................................................... 4
2.1 Specifications.............................................................................................................................................................. 4
2.1.1 Electrical................................................................................................................................................................ 4
2.1.2 Physical / Power.................................................................................................................................................... 6
2.1.3 Environment.......................................................................................................................................................... 6
2.2 Dimensions ................................................................................................................................................................. 7
3. PREPARATION FOR USE............................................................................................................................................... 8
3.1 Parts Location............................................................................................................................................................. 8
3.2 Switch settings............................................................................................................................................................ 8
3.2.1 S1 User Switch – Software configuration Switch...................................................................................................8
3.2.2 S2 System Switch – Hardware onfiguration Switch............................................................................................ 9
3.2.3 S3 System Switch – Hardware configuration Switch............................................................................................. 9
3.3 Indicators................................................................................................................................................................... 10
3.4 onnectors................................................................................................................................................................ 10
3.4.1 J1 USB Host connector....................................................................................................................................... 10
3.4.2 J2 USB OTG connector....................................................................................................................................... 10
3.4.3 J3-1 & J3-2 Ethernet connectors......................................................................................................................... 11
3.4.4 J4- Power onnector........................................................................................................................................... 11
3.4.4.1 onnecting an external Reset Switch............................................................................................................ 11
3.4.5 J5 P 104 P I onnector.................................................................................................................................... 12
3.4.6 J6 Serial 0............................................................................................................................................................ 12
3.4.7 J7 Serial 1............................................................................................................................................................ 13
3.4.8 J8 Debug............................................................................................................................................................. 13
3.4.9 J9 Factory only.................................................................................................................................................... 13
3.4.10 J10 Secondary IDE onnector.......................................................................................................................... 14
3.4.11 J11 Serial 2........................................................................................................................................................ 14
3.4.12 J12 Serial 3........................................................................................................................................................ 15
3.4.13 J13 Primary IDE onnector............................................................................................................................... 16
3.5 BT1 Battery............................................................................................................................................................... 16
3.6 U4 - Multi purpose socket.......................................................................................................................................... 17
3.6.1 Mounting Memory Modules................................................................................................................................. 17
3.6.2 Switch settings for the Multi Purpose Socket...................................................................................................... 17
3.6.3 Required module properties................................................................................................................................ 17
3.6.4 Device types Examples for the Multi Purpose Socket:........................................................................................ 18
3.6.5 External bootloader............................................................................................................................................. 18
4. OPERATION.................................................................................................................................................................. 19
4.1 Block diagram............................................................................................................................................................ 19
4.2 Memory Map............................................................................................................................................................. 20
4.3 Board Peripherals Mapping....................................................................................................................................... 20
4.4 Extension Registers.................................................................................................................................................. 20
4.4.1 PLD Part number................................................................................................................................................. 21
4.4.2 PLD Version........................................................................................................................................................ 21
4.4.3 Board Revision and onfiguration Register........................................................................................................ 21
4.4.4 System Register.................................................................................................................................................. 22
4.4.5 Mode Register..................................................................................................................................................... 22
4.4.6 Software onfiguration Register..........................................................................................................................23
4.4.7 MPS Register...................................................................................................................................................... 23
4.5 Booting...................................................................................................................................................................... 23
2006 by MPL AG
2

MEH-10121-001
MIP470
USERS MANUAL
1. Intr ducti n
1.1 Ab ut this manual
This manual assists the installation and initialization procedure by providing all hardware related information necessary
to handle and configure the MIP470.
For all Bootloader related information please refer to the “U-Boot User Manual for MPL SB (MEH-10082-002)” supplied
by MPL AG or your local MIP470 supplier. The U-Boot User Manual for MPL SB ” is also available on the Internet under
http://www.mpl.ch in PDF format.
The manual is written for technical personnel responsible for integrating the MIP470 into their system.
1.2 MIP470 Variants
Since the MIP470 is available in various population options, the information in this Manual about Memory size, Processor
speed etc. may vary with your MIP470. The table below lists the actual (as of December 2005) variants, for an actual
table please consult http://www.mpl.ch.
Variants CPU DDR SDRAM Flash Temperature Range
MIP470-1 MP 8347/400MHz 512MByte E 64MByte 0° ... 60°
Table .1 MIP470 Variants
N te: N t all f the variants may be available. Please c nsult f r http://www.mpl.ch available
variants.
1.3 Safety precauti ns and handling
For personal safety and safe operation of the MIP470, follow all safety procedures described here and in other sections
of the manual.
•Power must be removed from the system before installing (or removing) the MIP470 to prevent the possibility of
personal injury (electrical shock) and/or damage to the product.
•Handle the product carefully, i.e., dropping or mishandling the MIP470 can cause damage to assemblies and
components.
•Do not expose the equipment to moisture.
WARNING
There are n user-serviceable c mp nents n the MIP470
1.4 Electr static discharge (ESD) pr tecti n
Various electrical components within the product are sensitive to static and electrostatic discharge (ESD). Even a non-
sensible static discharge can be sufficient to destroy or degrade a component's operation!
1.5 Equipment safety
Great care is taken by MPL that all its products are thoroughly and rigorously tested before leaving the factory to ensure
that they are fully operational and conform to specification. However, no matter how reliable a product, there is always
the remote possibility that a defect may occur. The occurrence of a defect on this device may, under certain conditions,
cause a defect to occur in adjoining and/or connected equipment. It is the user’s responsibility to ensure that adequate
protection for such equipment is incorporated when installing this device. MPL accepts no responsibility whatsoever for
such kind of defects, however caused.
2006 by MPL AG
3

MEH-10121-001
MIP470
USERS MANUAL
2. General inf rmati n and specificati ns
This chapter provides a general overview over the MIP470 and its features. It outlines the electrical and physical
specifications of the product, its power requirements and a list of related publications.
2.1 Specificati ns
2.1.1 Electrical
Pr cess r:
●Freescale MP 8347 PowerP ™ 32Bit RIS Processor
●High-performance, superscalar processor core
●Floating-point, integer, load/store, system register, and branch processing units
●Eight-way set-associative instruction (32-Kbyte) and data (32-Kbyte) cache
●Low power consumption
B tl ader ROM:
●Up to 64MB Flash EEPROM (population Option)
●512kB U-Boot (open source) boot loader
●Easy boot loader update
Mem ry:
●up to 512MByte DDR SDRAM on board
●E Support
Multi Purp se S cket:
●Supports different SRAM/FLASH/EPROM, 32 Pin DIL memory components
●Memory sizes up to 2MByte (EPROM)
RTC:
●Backed with onboard battery
●Year 2000 compliant
PC/104-Plus Interface:
●32 Bit /33MHz P /104 Plus Interface (P I Host) up to 4 Busmasters
2006 by MPL AG
4

MEH-10121-001
MIP470
USERS MANUAL
USB:
●2 USB 2.0 ports for serial transfers up to 480Mbit/s
●ESD protected
Serial p rts:
●Four serial Ports 16 550 compatible
●Two serial ports with RS232 signaling (serial 0 and serial 1).
●Two serial port with TTL signaling (serial 2 and serial3)
●Standard transfer rates up to 460 kBaud
●Optional transfer rates up to 1.15 MBaud
●2 ports with full modem handshake (serial 2 and serial 3)
●Available on four 10pin 2mm headers
E-IDE p rts:
●2 separate channels for up to 4 drives
●available on 44 pin header, 2 mm pitch, for 2,5” Notebook hard disk.
●PIO Mode 4 and Bus Master IDE, transfers up to 16.7 Mbytes/s
●Ultra DMA/33 mode, synchronous DMA mode transfers up to 33 Mbytes/s
●Activity indicator on board
Ethernet:
●2 x Freescale integrated 10/100/1000 MBit/s Ethernet ontroller (TSE )
●IEEE802.3 10BASE-T, 100BASE-TX and 1000Base-T compatible
●IEEE 802.3u Autonegotiation Support
●IEEE 802.3x 100BASE-TX Flow ontrol support
●MDI crossover
●Indicators for activity and link/speed detection for 10MBit, 100MBit and 1000MBit on board.
●ESD protected
Indicat rs:
●Power LED (green)
●Reset / Power Fail LED (red)
●Error LED (red)
●HDD activity LED (green)
●LAN LED (green)
●LAN Speed/Link LED (red/green/amber)
●1 user programmable LED (green)
2006 by MPL AG
5

MEH-10121-001
MIP470
USERS MANUAL
2.1.2 Physical / P wer
F rm fact r:
P /104, with connectors in defined I/O connectors overhang regions
Length: 95.9 mm (3.775 inches)
Width: 115.6 mm (4.550 inches)
Height: 14.0 mm (0.550 inch) (excluding P /104 bus connectors)
Weight:
Typical 110g (fully equipped)
P wer supply:
Over P /104 bus interface or through separate 3-pin Mini- ombicon power connector.
Input P wer requirement:
+5V: +5VD ± 5%
P wer c nsumpti n:
MIP470 @ 400MHz, DDR266, 512Mbyte E DDR and 64MByte Flash:
Typical. 1300mA@5V
2.1.3 Envir nment
Temperature range:
0° to +60° (+32°F to +140°F) @ 400 MHz PU speed without heat sink
extended temperature range available
Relative humidity:
10% ... 90% non condensing
2006 by MPL AG
6

MEH-10121-001
MIP470
USERS MANUAL
2.2 Dimensi ns
Drawing not to scale.
Since the MIP470 is implemented as P I Host, it is n t a stack-through board. Please see hapter tbd for further
information.
2006 by MPL AG
7
Figure 1: Dimensions MIP470
1O
N
2
3
4
5
6
7
8
1O
N
2
3
4
5
6
7
8
1O
N
2
3
4
8.3
90.2
85.1
5.1
12.7
12.7
115.6
5.1
87.6
90.8
95.9
90.8
82.5
16.51
8.9
UNITS: mm

MEH-10121-001
MIP470
USERS MANUAL
3.Preparati n f r use
3.1 Parts L cati n
3.2 Switch settings
3.2.1 S1 User Switch – S ftware c nfigurati n Switch
The Software configuration switch is readable by reading the register EXT_REG.
Switch Off On S1
S1-1 N t yet defined Not yet defined
S1-2 N t yet defined Not yet defined
S1-3 N t yet defined Not yet defined
S1-4 N t yet defined Not yet defined
S1-5 N t yet defined Not yet defined
S1-6 N t yet defined Not yet defined
S1-7 N t yet defined Not yet defined
S1-8 N t yet defined Not yet defined
Table 2: S1 Switch settings
2006 by MPL AG
1O
N
2
3
4
5
6
7
8
8
Figure 2: Parts Location
1O
N
2
3
4
5
6
7
8
1O
N
2
3
4
5
6
7
8
1O
N
2
3
4
J1 USB Host
J2 USB OTG
J3-1 Ethernet 0
J3-2 Ethernet 1
J4 Power
J7 Serial 1
J6 Serial 0
S1 User Switch BT1 Battery
U4 MPS
J12 Serial A
J11 Serial B
S2 System Switch
S3 System Switch
J13 IDE0
J10 IDE1
J9 factory use only
J8 Debug
J5 P 104 P I
1
11
1
1
1
1
1
A1
1

MEH-10121-001
MIP470
USERS MANUAL
3.2.2 S2 System Switch – Hardware C nfigurati n Switch
Switch Off On S2
S2-1 RTC Battery Off RT Battery On
S2-2 B t Flash n t write pr tected Boot Flash write protected
S2-3 IDE n rmal IDE controller has class RAID
S2-4 N t c nnected Not connected
Table 3: S2 System switch settings
Notes:
●S2-1 should be switched On when the MIP470 is normally used. The switch is only set to Off for shipping.
●S2-3 changes the P I lass ode of the IDE ontroller. If switched Off the P I lass code is 010185h (RAID
lass), if switched On it is 010400h (IDE lass).
3.2.3 S3 System Switch – Hardware c nfigurati n Switch
Switch Off On S1
S3-1 Envir nment EEPROM write
enabled
Environment EEPROM write
disabled
S3-2 BOOT EEPROM write enabled Boot EEPROM write disabled
S3-3 Boot FG0
S3-4 Boot FG1
S3-5 Boot from MPS B t fr m Flash
S3-6 MPS FG0
S3-7 MPS FG1
S3-8 MPS FG2
Table 4: S3 System switch settings
Notes:
●The Environment EEPROM is the EEPROM in which the Bootloader stores its variables, such as boot source,
boot parameters etc.
●The BOOT EEPROM is where the Hardware configuration Words are stored. They are used to initialize the
PU in terms of frequency, boot port size etc. See chapter 4.5 Booting for more information.
●The Boot FG0 and FG1 selects one of the 4 possible Hardware configuration Word. See chapter 4.5 Booting
for more information
●Boot from Flash indicates that the Bootloader will be loaded from the flash. Boot from MPS should only be used
in case of an emergency update of the Bootloader.
●MPS FG0 to MPS FG2 must be set according the device mounted on the MPS. See chapter 3.6 Multi
purpose socket for more information.
2006 by MPL AG
O
N
1
2
3
4
1O
N
2
3
4
5
6
7
8
9

MEH-10121-001
MIP470
USERS MANUAL
3.3 Indicat rs
Ref Color Description LEDs
D13 Green Power On if 5V is Ok
D12 Red Error Lit on Error
D11 Green User On if Bit ULED is set
D10 Green HDD Activity on IDE ports
D9 Red Reset Lit on Reset
D8 Green Activity ETH0 Activity on ETH0
D5 Red/Green/amber Speed ETH0 Speed of ETH0
D6 Green Activity ETH1 Activity on ETH1
D3 Red/Green/amber Speed ETH1 Speed of ETH1
Table 5: Indicators
Notes:
●The Ethernet speed LEDs are encoded as follows:
Dark No link
Red 10 Mbit link
Green 100 Mbit link
Amber 1 Gbit link
●The Error LED is not working
3.4 C nnect rs
3.4.1 J1 USB H st c nnect r
Pin no Signal Description J1
1 Vbus+ able Power +5VD
2 Data- Balanced Data Line-
3 Data+ Balanced Data Line +
4 GND able Power GND
Table 6: J1 USB Host onnector
3.4.2 J2 USB OTG c nnect r
Pin no Signal Description J2
1 Vbus+ able Power +5VD
2 Data- Balanced Data Line-
3 Data+ Balanced Data Line +
4 ID
5 GND able Power GND
Table 7: USB OTG onnector
2006 by MPL AG
D13 Power
D12 Error
D11 User
D10 HDD
D9 Reset
D8 Activity ETH0
D6 Activity ETH1
D5 Speed ETH0
D3 Speed ETH1
1
2
3
4
1 2 3 4 5
10

MEH-10121-001
MIP470
USERS MANUAL
3.4.3 J3-1 & J3-2 Ethernet c nnect rs
Pin no. Signal Ethernet Description J3
A1 TD0+
A2 TD0-
A3 TD1+
A4 TD2+
A5 TD2-
A6 TD1-
A7 TD3+
A8 TD3-
Eth0
Data Pair 0 +
Data Pair 0 -
Data Pair 1 +
Data Pair 2 +
Data Pair 2 -
Data Pair 1 -
Data Pair 3 +
Data Pair 3 -
B1 TD0+
B2 TD0-
B3 TD1+
B4 TD2+
B4 TD2-
B6 TD1-
B7 TD3+
B6 TD3-
Eth1
Data Pair 0 +
Data Pair 0 -
Data Pair 1 +
Data Pair 2 +
Data Pair 2 -
Data Pair 1 -
Data Pair 3 +
Data Pair 3 -
Table 8: J3 Ethernet onnectors
3.4.4 J4- P wer C nnect r
3-pin power connector Phoenix ontact AG type M 1,5/3-G-3.81 pinout:
Pin no Signal Description J
1 Vin Input voltage (+5 VD )
2 GND Ground
3 SRESET# System Reset Input (active low)
Table 9: J4 Power onnector
ounterpart is the Phoenix ontact AG connector type M 1,5/3-ST-3.81 (5-10A).
WARNING
Be aware f the input v ltage p larizati n !
Wr ng p larizati n f the input v ltage can cause seri us damage t the MIP440GX and attached
peripherals!
3.4.4.1 C nnecting an external Reset Switch
On the SRESET# input on the External Power onnector exists the possibility to mount an external Reset Switch for
system reset, see . The SRESET# input is active low and can be connected directly to an open drain output (internal 10k
Ω pull up resistor to 3.3V).
2006 by MPL AG
A1 A8 B1 B8
+-
V
IN
Reset
Button
1 2 3
1 2 3
11

MEH-10121-001
MIP470
USERS MANUAL
3.4.5 J5 PC104 PCI C nnect r
Pin no
Row A
Row B
Row C
Row D
J5
1 GND N +5V AD0
2 +5V AD2 AD1 +5V
3 AD5 GND AD4 AD3
4 /BE0 AD7 GND AD6
5 GND AD9 AD8 GND
6 AD11 +5V AD10 (M66EN) 1
7 AD14 AD13 GND AD12
8 (+3.3V)2/BE1 AD15 (+3.3V) 2
9 SERR GND (SBO) 1 PAR
10 GND PERR (+3.3V) 2 (SDONE) 1
11 STOP (+3.3V) 2 (LO K) 1 GND
12 (+3.3V) 2 TRDY GND DEVSEL
13 FRAME GND IRDY (+3.3V) 2
14 GND AD16 (+3.3V) 2 /BE2
15 AD18 (+3.3V) 2 AD17 GND
16 AD21 AD20 GND AD19
17 (+3.3V) 2 AD23 AD22 (+3.3V) 2
18 IDSEL0 GND IDSEL1 IDSEL2
19 AD24 /BE3 +5V IDSEL3
20 GND AD26 AD25 GND
21 AD29 +5V AD28 AD27
22 +5V AD30 GND AD31
23 REQ0 GND REQ1 +5V
24 GND REQ2 +5V GNT0
25 GNT1 +5V GNT2 GND
26 +5V LK0 GND LK1
27 LK2 +5V LK3 GND
28 GND INTD +5V RST
29 (+12V) 1 INTA INTB INT
30 (-12V) 1 REQ3 GNT3 GND
Table 10: J5 P 104 P I onnector
Notes:
1. Signal not available. (SBO, SDONE and LOCK are pull-up to 5V, M EN is connected to GND and +12V and
-12V are not connected).
2. 3.3V pins are connected to a plane, but due to Power supply constrains, they are not connected to the 3.3V of
the Power Supply.
3.4.6 J6 Serial 0
The Serial 0 Interface is the primary serial line port of the PU and supports RxD, TxD, RTS and TS. The Signal level
are RS232. This is the default C ns le Interface
Pin no Signal Description J6
1 N Not connected
2 N Not connected
3 RxD Receive Data
4 RTS Request to send
5 TxD Transmit Data
6 TS lear to send
7 N Not connected
8 N Not connected
9 GND Ground
10 Earth Shield
Table 11: J6 Serial 0 onnector
2006 by MPL AG
1
2
9
10
AB D
1
30
12

MEH-10121-001
MIP470
USERS MANUAL
3.4.7 J7 Serial 1
The Serial 1 Interface is the second serial line port of the PU and supports RxD, TxD, RTS and TS. The Signal level
are RS232.
Pin no Signal Description J7
1 N Not connected
2 N Not connected
3 RxD Receive Data
4 RTS Request to send
5 TxD Transmit Data
6 TS lear to send
7 N Not connected
8 N Not connected
9 GND Ground
10 Earth Shield
Table 12: J7 Serial 1 onnector
3.4.8 J8 Debug
The debug Interface is used to connect an debugger to the MIP470.
Pin no Signal Description J7
1 V Target 100E Pull Up to 3.3VD
2 GND Ground
3 PU TDO PU JTAG Data Out
4 PU TDI PU JTAG Data In
5 PU TRST PU JTAG Reset In
6 PU T K PU JTAG lock
7 PU TMS PU JTAG Mode Select
8 SRESET# Soft Reset
9 HRESET# Hard Reset
10 HKSTP_OUT# heck Stop Out
11 HKSTP_IN# heck Stop In
12 N Not onnected
Table 13: J8 Debug onnector
Notes:
●Please refer to chapter xxx for details how to connect a Debugger
3.4.9 J9 Fact ry nly
The onnector J9 is used during manufacturing by MPL.
2006 by MPL AG
1
2
9
10
12
910
13

MEH-10121-001
MIP470
USERS MANUAL
3.4.10 J10 Sec ndary IDE C nnect r
Pin No Signal Description Pin No Signal Description
1 /RESET Reset
3 D7 Data bit 7
5 D6 Data bit 6
7 D5 Data bit 5
9 D4 Data bit 4
11 D3 Data bit 3
13 D2 Data bit 2
15 D1 Data bit 1
17 D0 Data bit 0
19 GND Ground
21 DRQ DMA request
23 IOW I/O write strobe
25 IOR I/O read strobe
27 IORDY I/O ready
29 DA K DMA acknowledge
31 IRQ Interrupt request
33 A1 Address 1
35 A0 Address 0
37 S0 hipselect 0
39 A TLED Activity LED
41 V +5V
43 GND Ground
2 GND Ground
4 D8 Data bit 8
6 D9 Data bit 9
8 D10 Data bit 10
10 D11 Data bit 11
12 D12 Data bit 12
14 D13 Data bit 13
16 D14 Data bit 14
18 D15 Data bit 15
20 KEY Key / not connected
22 GND Ground
24 GND Ground
26 GND Ground
28 HDBALE Spindle sync / cable select
30 GND Ground
32 IO S16 I/O chipselect16
34 N Not connected
36 A2 Address 2
38 S1 hipselect 1
40 GND Ground
42 V +5V
44 GND Ground
Table 14: J10 Secondary IDE onnector
3.4.11 J11 Serial 2
The Serial 2 Interface is the first serial line port of the additionally DUART. It is a full Modem Interface with TTL Signal
Level only.
Pin no Signal Description J11
1 D D arrier detect
2 DSR Data set ready
3 RXD Receive data
4 RTS Request to send
5 TXD Transmit data
6 TS lear to send
7 DTR Data terminal ready
8 RI Ring indicator
9 GND Ground
10 V 5 5VD
Table 15: J11 Serial 2 onnector
2006 by MPL AG
1
2
9
10
1
2
44 43
14

MEH-10121-001
MIP470
USERS MANUAL
3.4.12 J12 Serial 3
The Serial 3 Interface is the second serial line port of the additionally DUART. It is a full Modem Interface with TTL Signal
Level only.
Pin no Signal Description J11
1 D D arrier detect
2 DSR Data set ready
3 RXD Receive data
4 RTS Request to send
5 TXD Transmit data
6 TS lear to send
7 DTR Data terminal ready
8 RI Ring indicator
9 GND Ground
10 V 5 5VD
Table 16: J12 Serial 3 onnector
Notes:
●MPL provides kits to connect the TTL Interfaces to different other standard interfaces, such as RS232, RS485,
RS422 and even a GPS module is available. Refer to www.mpl.ch for more information.
2006 by MPL AG
1
2
9
10
15

MEH-10121-001
MIP470
USERS MANUAL
3.4.13 J13 Primary IDE C nnect r
Pin No Signal Description Pin No Signal Description
1 /RESET Reset
3 D7 Data bit 7
5 D6 Data bit 6
7 D5 Data bit 5
9 D4 Data bit 4
11 D3 Data bit 3
13 D2 Data bit 2
15 D1 Data bit 1
17 D0 Data bit 0
19 GND Ground
21 DRQ DMA request
23 IOW I/O write strobe
25 IOR I/O read strobe
27 IORDY I/O ready
29 DA K DMA acknowledge
31 IRQ Interrupt request
33 A1 Address 1
35 A0 Address 0
37 S0 hipselect 0
39 A TLED Activity LED
41 V +5V
43 GND Ground
2 GND Ground
4 D8 Data bit 8
6 D9 Data bit 9
8 D10 Data bit 10
10 D11 Data bit 11
12 D12 Data bit 12
14 D13 Data bit 13
16 D14 Data bit 14
18 D15 Data bit 15
20 KEY Key / not connected
22 GND Ground
24 GND Ground
26 GND Ground
28 HDBALE Spindle sync / cable select
30 GND Ground
32 IO S16 I/O chipselect16
34 N Not connected
36 A2 Address 2
38 S1 hipselect 1
40 GND Ground
42 V +5V
44 GND Ground
Table 17: J13 Primary IDE onnector
3.5 BT1 Battery
The Battery is only used as backup power supply for the real time clock. Please switch on the switch S2-1 after installing
the battery. The battery must be mounted with the positive pol up.
The battery type is CR1202
2006 by MPL AG
1
2
44 43
16

MEH-10121-001
MIP470
USERS MANUAL
3.6 U4 - Multi purp se s cket
The Multi Purpose Socket allows to add various Memory devices to the MIP470:
●SRAM (with or without Battery backup) up to 4MBit (512kByte).
●Flash (bulk or sector erase) up to 4MBit (512kByte).
●EPROM/ROM up to 8MBit (1MByte).
●Disk On hip
As a special feature the MIP470 allows to boot directly from the MPS.
3.6.1 M unting Mem ry M dules
When selecting a component for the MPS, please check out first, if the pin-out is compatible with one of the pin
configuration modes (refer to the Table 18: MPS Switch settings).
When mounting a Memory Device on the socket, remind the markers on the socket and the module for pin 1.
3.6.2 Switch settings f r the Multi Purp se S cket
With the DIP switch S3-6 to S3-8 the Pins of the MPS are configurable. The following Table shows all possible Pin
mappings:
Device No S3 Pins
6 7 8 1 3 29 30 31
DIL32 1MBit SRAM 0 On On On A14 WE# E2 A15
DIL32 4MBit SRAM 1 On On Off A18 A14 WE# A17 A15
DIL32 2MBit Flash (bulk) 2 On Off On V 3 A15 A14 A17 WE#
DIL32 4MBit Flash (sector) 3 On Off Off A18 A15 A14 A17 WE#
DIL32 2MBit EPROM (default) 4 Off On On PU A15 A14 A17 PU
DIL32 8MBit EPROM 5..7 Off X Off A19 A15 A14 A17 A18
Table 18: MPS Switch settings
3.6.3 Required m dule pr perties
●‘5V only’ types
●8 bit data width
●TTL compatible signaling
●Access time should not exceed 250ns
●32 pin, 600 mil wide DIL case
●MPS compatible pin-out (refer to Table 18: MPS Switch settings)
●Since the MIP470 delivers only 3.3V (max 12mA) VPP Flash programming may not be possible with some
Devices.
2006 by MPL AG
marker
132
1615
DIL32
17

MEH-10121-001
MIP470
USERS MANUAL
3.6.4 Device types Examples f r the Multi Purp se S cket:
C nfigurati n N Type N Manufacturer VIH
DIL32 1MBit SRAM 0 1MBit SRAM 5V S62 1024L ISSI 2.2V
01MBit SRAM 5V KM681000 Samsung 2.2V
DIL32 4MBit SRAM 1 4MBit SRAM KM684000 Samsung 2.2V
14MBit nonVolatile SRAM DS1250Y/AB Dallas 2.2V
DIL32 2MBit Flash (bulk) 2 2MBit Flash Bulk Erase 12V P28F020 Intel 2.0V
21MBit Flash Bulk Erase 12V P28F010 Intel 2.0V
22MBit Flash Bulk Erase 12V Am28F020 AMD 2.0V
21MBit Flash Bulk Erase 12V Am28F010 AMD 2.0V
DIL32 Disc On Chip 2 Do 2000 / Millenium M-Systems 2.0V
DIL32 4MBit Flash (sect r) 3 4MBit Flash Sector Erase 5V Only Am29F040 AMD 2.0V
DIL32 2MBit EPROM 4 2MBit EPROM Am27 020 AMD 2.0V
41MBit EPROM HN27 101AG Hitachi 2.2V
DIL32 8MBit EPROM 5 4MBit EPROM Am27 040 AMD 2.0V
54MBit EPROM NH27 4001G Hitachi 2.2V
58MBit EPROM Am27 080 AMD 2.0V
Table 19: MPS Devices
Notes:
●Since the MIP470 delivers no 12V Vpp, only the 4MBit AMD Flash is erasable and writeable on Board. All other
Flash types are read only.
●For the Disk On hip use Mode 3
3.6.5 External b tl ader
It is also possible to boot from the MPS. The device containing the bootloader must be stuffed on the MPS and the
switch S3 must be set according the Table 18: MPS Switch settings
This feature is useful if a boot flash update has failed.
2006 by MPL AG
18

MEH-10121-001
MIP470
USERS MANUAL
4. Operati n
4.1 Bl ck diagram
2006 by MPL AG
19
Figure 3: Block Diagramm
RTC
RTC
2 x RS232
Drivers
2 x RS232
Drivers
1GBit PHY
1GBit PHY
1GBit PHY
1GBit PHY
PLD
PLD
up t
64MByte
Flash
up t
64MByte
Flash
DUART
DUART
MPC8347 (up
t 400MHz)
with FPU
MPC8347 (up
t 400MHz)
with FPU
MPS
MPS
RJ45
RJ45
RGMII1
RGMII2
10Pin
Header
10Pin
Header
10Pin
Header
10Pin
Header
P /104-
Plus
onnector
44Pin ATA
onnector
Serial1 & Serial2
Up t 512Mbyte
DDR RAM with
ECC
Up t 512Mbyte
DDR RAM with
ECC
ATA
C ntr ller
ATA
C ntr ller
DDR266
L cal Bus
44Pin ATA
onnector
PCI t PCI
Bridge
PCI t PCI
Bridge
3.3V nly PCI
USB 2.0
PHY
USB 2.0
PHY
USB 2.0
PHY
USB 2.0
PHY
USB1
USB0
USB
onnector
USB
onnector

MEH-10121-001
MIP470
USERS MANUAL
4.2 Mem ry Map
The MP 8347 provides a flexible memory mapping, so the following information describes the mapping which is set-up
by the bootloader. The mapping can be adjusted, if not mentioned that it is fixed, by set-up the appropriate registers of
the MP 8347.
Start End Size Region Remarks
0x0000_0000 0x7FFF_FFFF 2GB DDR SDRAM Real size depends on the populated devices
0x8000_0000 0x87FF_FFFF 128MB Flash ( S0) Real size depends on the populated device
0x8800_0000 0x8FFF_FFFF 128MB MPS ( S1) Real size depends on the populated device
0x9000_0000 0x903F_FFFF 4MB Misc ( S3) PLD, RT , and DUART
0xFF40_0000 IMMR MMR Base address Register
Table 20: Memory Map
4.3 B ard Peripherals Mapping
The Board Peripherals (Extension Registers, UART0, UART1 and RT ) are fixed mapped. This means, that the Base
Address of the Board Peripherals is configurable via the S3 BR and OR. The mapping inside the S3 Area is fixed.
Please note that the S3 Area is 8Bit wide for all peripherals.
Start End Size Region Remarks
S3 + 0x00 S3 + 0x06 7Byte Extension Registers See chapter xxx
S3 + 0x10 S3 + 0x17 8Byte UART0
S3 + 0x20 S3 + 0x27 8Byte UART1
S3 + 0x30 S3 + 0x3F 16Byte RT The RT is only 4 Bit accessible. Following the
PowerP Notation, the MSB is Bit 0, the LSB is Bit 3.
Table 21: Board Peripheral Mapping
4.4 Extensi n Registers
The Extension Registers are located at the S3# on the peripheral local bus. The bit notations are in big Endian Format
(That is D0 MSB, D7 LSB)
Offset Name Type Function
6 MPS_REG Read only MPS onfiguration Register
5 EXT_REG Read only Software onfiguration Register
4 MODE_REG Read/Write Mode Register
3 SYS_REG Read/Write System Register
2 BOARD_REV Read only Board Revision and populated onfiguration
1 PLD_VERS Read only Versions Number of the PLDs
0 PLD_PART Read only Part Number of the PLDs
Table 22: Extension Registers
2006 by MPL AG
20
Table of contents