MQT PT40024 User manual

2.5
HP
10"
TILE
SAW
INSTRUCTION
MANUAL
PT40024
Model
No.
TS250
WARNING:
Before
operating
tile
saw,
read
this
manual
and
follow
all its
safety
and
operating instructions,
and
keep
this manual
for
future
reference.
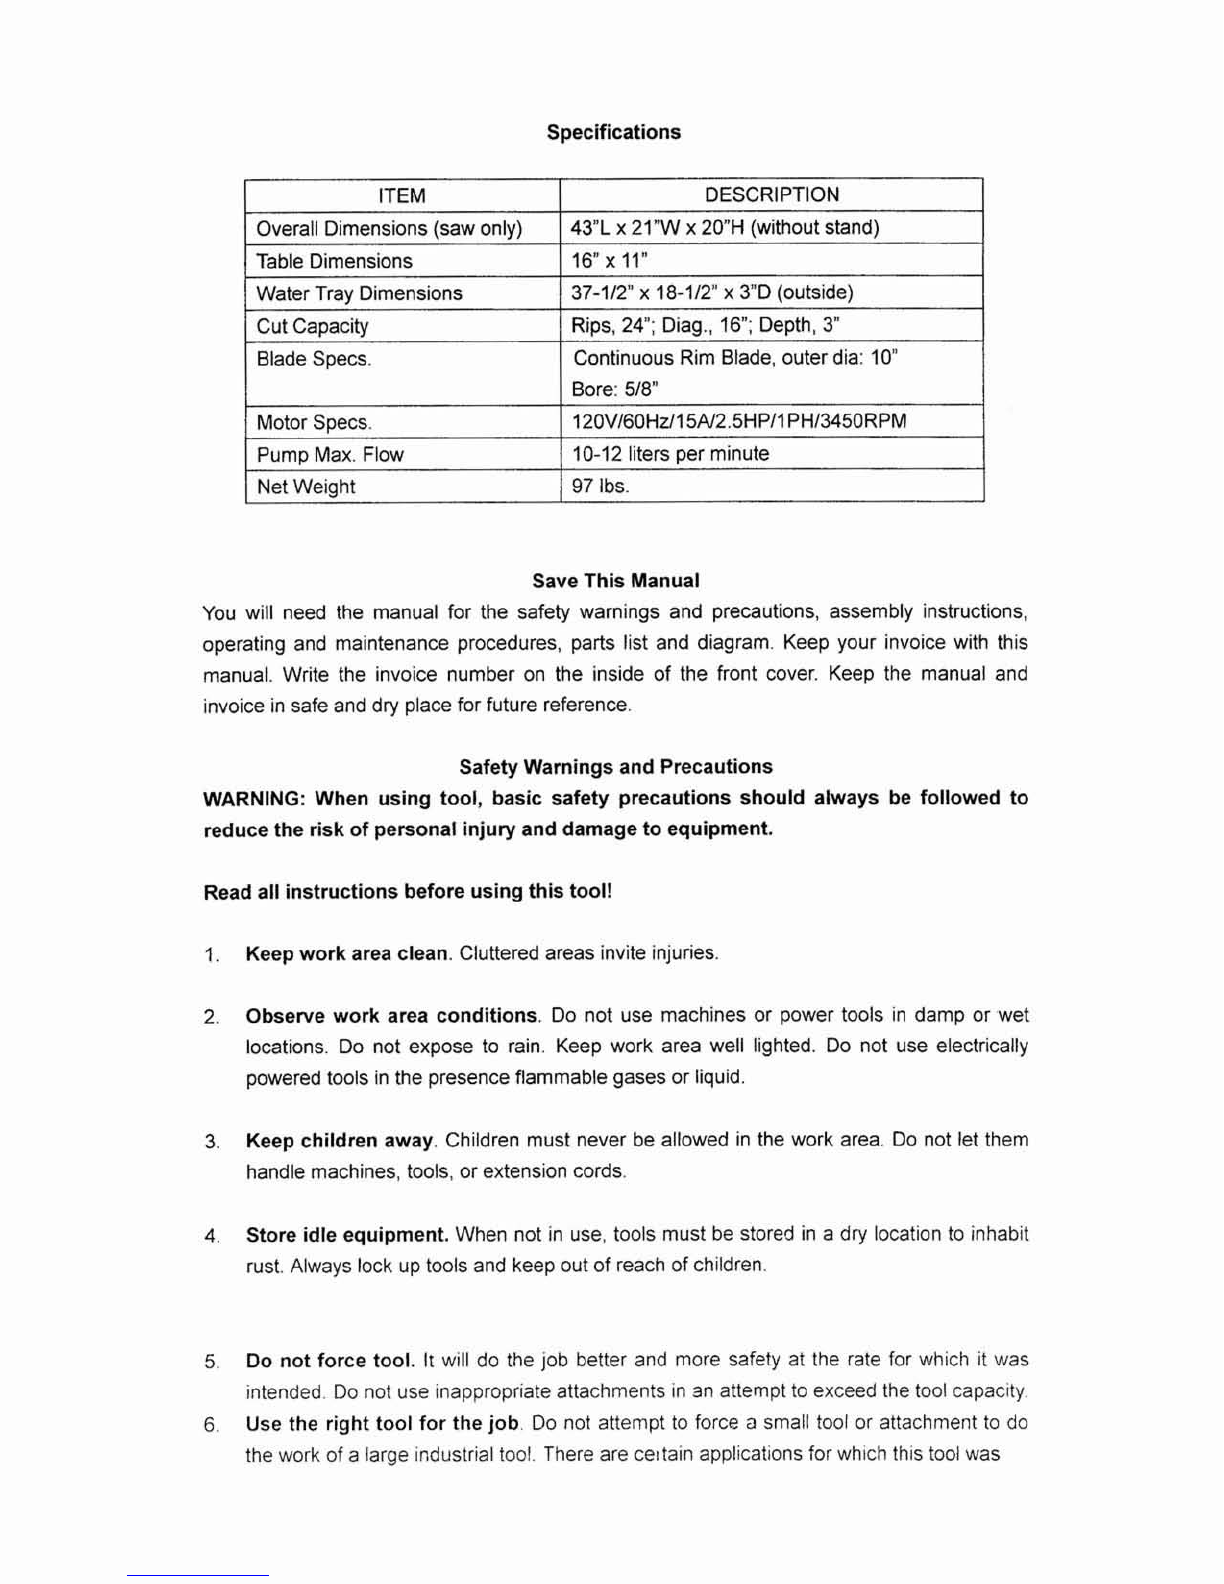
Specifications
Save
This
Manual
You
will need the manual for
the
safety
warnings
and precautions, assembly
instructions,
operating
and
maintenance
procedures,
parts
list
and
diagram.
Keep
your invoice with this
manual.
Write
the
invoice
number on the inside
of
the front cover.
Keep
the
manual
and
invoice
in
safe
and
dry
place
for
future reference.
ITEM
Overall Dimensions
(saw
only)
Table
Dimensions
Water Tray
Dimensions
Cut
Capacity
Blade
Specs.
Motor
Specs.
Pump
Max.
Flow
Net
Weight
Safety
Warnings
and
Precautions
WARNING:
When
using
tool,
basic
safety
precautions
should
always
'be
folIowed
to
reduce
the
risk
of
personal injury
and
damage
to
equipment.
DESCRIPTION
43*L
x
21"W
x
20nH
(without
stand)
16"
x
11"
37-1/2"
x
18-112
x
3"D
(outside)
Rips,
24';
Diag.,
16";
Depth,
3"
Continuocrs
Rim
Blade,
outer
dia:
10"
Bore:
518"
120V160H~ll5A12.5HPll
PH13450RPM
10-12
liters per minute
97
Ibs.
Read
all
instructions
before
using
this
tool!
1.
Keepwork
area
clean.
Cluttered
areas
invite
injuries
2.
Observe
work
area
conditions.
Do
not
use
machines
or
power
tools in
damp
or
wet
locations. Do not
expose
to rain.
Keep
work area well lighted.
Do
not
use
electrically
powered
tools
in
the
presence
flammable
gases
or
liquid.
3.
Keep
children
away.
Children
must
never
be
allowed
in
the
work
area.
Do
not
let
them
handle
machines,
tools,
or
extension
cords.
4.
Store
idle
equipment.
When
not
in
use,
tools
must
be
stored
in
a
dry
location
to
inhabit
rust.
Always
lock
up
tools
and
keep
out
of
reach
of children.
5.
Do
not
force
tool.
It
will
do
the job
better
and
more
safety
at
the
rate
for
which
it
was
intended Do
not
use
tnappropriate
attachmentsin
an
attemptto
exceed
the
tool
capacity.
6
Use
the
right
tool
for
the
job
Do
not
attempt
to
force
a
small
tool
or
attachment
to
do
the work
of
a
large
industrial
too!.
There
ate
ce~
tain applications
for
which this tool
was

designed. Do not modify this
tool
and
do
not
use
this tool
for
a
purpose
for which it
was
not intended.
7.
Dress
properly.
Do
not
wear
loose
clothing
or
jewelry
as
they can be caught in
moving
parts.
Protective, electrically non-conductive clothes and non-skid
footwear
are
recommended
when
working.
Wear
restrictivehair
covering
to
contain
long
hair.
8. Use
eye
and
ear
protection.Always wear ANSI
approved
impact
safety
goggles.
9.
Do
not
overreach.
Keep
proper footing
and balance
at
all times. Do not
reach
over
or
across
runningmachines.
70.
Maintain
tools
with
care.
Keep
tools sharp and clean for better and safer
performance.
Follow instructions for lubricating
and
changing
accessories.
Inspect tool cords
periodically and
if
damaged,
have
them repaired
by
an
authorized technician. The
handles must
be
keptclean,
dry
and
free
from
oil and greaseat all
times.
11.
Disconnect
power.
Unplug tool when not
in
use.
12.
Remove
adjusting
keys
and
wrenches.
Check
that
keys
and
adjusting
wrenches
are
removedfrom the tool
or
machinework surface
before
plugging it
in.
13.
Avoid
unintentional
starting.
Be
sure
the switch is in the
Off
position
when
not in
use
andbefore pluggingin.
14.
Stay
alert. Watchwhat
you
are doing,
use
common sense.
Do
not operate
any
tool when
you
aretired.
15.
Check
for
damaged
parts.
Before using any
tool,
any
part
that
appears
damaged
should
be
carefully
checked
to determine that it will operate properly and perform its intended
function.
Check
for alignment
and
binding
of
moving
parts;
any broken
parts
or
mounting
fixture,
and
any other condition
that
may
affect
properoperation.
Any
part
that
is
damaged
should
be
properly repaired
or
replaced
by
a
qualified technician.
Do
not
use
the tool
if
any
switch
does not turn On
and
Off
property.
16.
Guard
against
electric
shock.
Prevent
body contact
with
grounded
surface
such
as
pipes,
radtators,
rangesand refrigeratorenclosures.
17.
Replacement
parts
and
accessories.
When
servicing,
use
only identical replacement
parts.
Use
of
any
other
parts
will
void
the
warranty.
Only
use accessories
~ntended
for
use
with
this
tool.
Approved
accessories
are
available
from
your
local
retaller
I
8
Po
not
operate
tool
if
underthe influence
of
alcohol
or
drugs.
Read
warning labels
on
prescriptions
to
determine
if
your
judgment or
reflexes
are impairedwhile taking
drugs.
If
there
is
any
doubt,
do
not
operate
the
tool.
9
Use
proper
size
and
type
extension cord. If
an
extensioncord
is
required, it must
be
of
the
proper
size
and
type
to
supply the
correct
current to
the
tool
without heating
up.
Otherwise, the extension
cord
could melt
and
catchfire,
or
cause
electrical damage
to
the
tool.
If
you
are
using
the
tool outdoors,
use
an
extension
cord
rated
for
outdoor
use
(signified
by
"WA"
on
the
jacket).
20.
Maintenance.
For
your
safety,
service and maintenance should be performed regularly
by
a
quafified
technician.
Note: Performance
of
this
tool
(if
powered
by
line
voltage)
may
vary
dependingon variations in
local
line
voltage. Extension
cord
usage
may also
affect
tool
performance.
Warning:
The
warnings,cautions and instructions
discussed
in
this
instruction
manual
cannot
cover
all
possible
conditions
and
situations
that
may
occur.
It
must
be
understood
by
the operator
that
common
sense
and
caution
are
factors which
cannot
be
built into
this
product,but
must
be
supplied
by
the
operator.
GroundingNoltageWarning
Warning:
Before
using
this
tool,
make
sure
that
the
power
cord
wit1
be
plugged
into
an
outlet
which
has
a
three-prong ground,
is
120V
AC,
is
protected
by
a
30
Amp. Circuit
breaker
and
has
a
Ground
Fault
Interrupter.
Common
household
current
is
110-7
20V.
As
long
as
the
outlet
used
with
the
Tile
Saw
is
rated
from
110-120V
there will be
no
complicationsusing it with householdreceptacles. Plug the tool
into
a
11
0-720V
properly grounded outlet protected
by
a
1
SAmp,
dual
element
time delay
or
circuit
breaker.
NEVER
try
to plug
a
110-120V
tool into
a
220-240V
circuit, or serious complications
and
possible
injury
to
the
operator
may
occur.
The
plugs
have
different
shapes
to
preventthis.
This
tool
has
a
three-prong
plug.
The
third round prong is the ground. Cutting
off
the
ground
will result in
a
safety
hazard
and
void warranty.
If
the
outlet
you
are
planning
to
use
is
the
two-prong
type,
do
not
remove
or alter
the
grounding
prong
in
any
way.
Use
an
adapter and
always
connect thegrounding
lug
to
a
known grounding
source, It is recommended that
you
have
a
qualified electrician
replace
the two-prong outlet
with
a
properlygrounded three-prong outlet.
Extension
Cords
Your
tool
has
a
three-prong plug, therefore
you
must
use a
three-prong
extension
cord
Only
use
rounded
jacket
extenscon cords l~stedby the
UL
Improper use
of
extens~oncords
may
cause
ineffiaent
operationof your tool
whrch
can
result in overheating.
Be
sure
your
extens~on
cord is
rated
to
allow
sufficient
current
flow
to
the
motor. Ifyou
are
using
the
tool
outdoors.
use
an
extension
cord
rated
for outdoor use
(signified
by
"WA"
on
the
jacket).

Unpacking
When
unpacking,
check
to
make
all
parts
listed on pages
8-10
is
included.
If
any
parts
are
missing
or
broken,
please
call
your
localretailer.
Notes:
Table Stand
is
specifically
designed
for
use
with
this
10"
Tile
Saw
and
is
not included.
Stand
is
available for
purchase
from your local retailer.
And
table stand
is
packed
in
an
individual
carton.
If
the
stand
is
no2
to
be
used
with
the
tile
saw,
the
saw
must
be
securely
mounted
onto
a
flat,
level
surface
capable of supporting the
weight
of
the
tile
saw
in
addition to
the
weight
of
all
work
pieces.
AssembIy
1.
Slide the
water
tank through
the
slot in
the
machine
frame
so
that
the
entire
tank
rests
inside
the
machine
frame.
2.
Mountthe motor to
the
machineframe
by
connecting
the
supporting
frame
to
the
machine
frame
at the
point
shown En
the
assembly
diagram on
page
10.
Secure
using
two
bolts,
elastic
washers
and big
flat
washers
as
shown.
3.
Next,
attach
the
blade
guard
to
the
motor
using
the locking
knob
and
flatwasher
provided.
Please note:
this
product does
not
include
a
blade.
Please
see
the following
section,
"Changinglinstallingthe Blade." for instructions
on
howto properlyinstall
a
now
blade.
4.
Plug
the pumpintothe
back
ifthe
back
of the
motor
andattachthe
pump
to
the water tank
using the four suction feet on the
bottom
of
the
pump.
5.
Slide
the
table
holder
through
the
middle of
the
rail
cover
and
fit the
two
inserts
aver the
ends
of
the cover
to
prevent
the
table holderfrom slipping out.
6.
Attach the rail
and
table
assembly you created in
step
5
to
the
frame
using
two
sets
of
the
bolts,flatwashers and
teeth
washers
as
shown
in
the
assembly
diagram.
7.
Before
operating
this
tool, mountthe
table
saw
to
the
table
stand
by following
the
steps
outlined
in
the
assembly
and
operating instructions
far
the table stand. If the stand
is
not
to
be
used
with
the
tile saw,
the
saw
must
be
securely
mounted
onto
a
Rat,
level
surface
capable of supporting
the
weight
of
the
tile
saw
inaddition
to
theweight
of
all
work
pieces.
Changinglinstalling
the
Blade
I.
Be
sure
to
power
cord
is
unpluggedfrom
its
power
source.
2. Loosen
the locking knob locatedon the
side
of
the blade
guard
and
raise
guard.
Tighten
the
knob
to lock
the
guard
in
an
"upnposition.
3.
Depress
the
brake
shaft
button
(see
Fig.
1
on
page
7)
whileturning the blade
(or
spindle if
you
have
not
yet
installed
a
blade)
with
your
hand
until
the
shaft
button depresses fully.
This will prevent the spindle from spinning
and
allow you
to
unscrew the
nut
and
outer
flange.
4
Slrde
the
new
blade
over
the
spindle,
and
refasten the
outer
flange
and
nut
Be
sure
to
t~ghten
the
nut
fully
before
use.
5.
Lower
the
blade
guard
and
tighten the lockingknob.

Installing
the
Water
Supply
To prevent excessivewear on
the
blade,
be
sure to maintain
a
continuous
flow
of water over
the blade
while
cutting.
Never
cut
anything
if
the
water flow
is
notcontinuous.
1
Attach
the
pump
as
described
in
step
4,
"Assembly."
Position the
pump
so
it
will
not
interfere
with
the
motion
of
thetable
while
cutting.
2.
Fill
the water
tank
with enough water so
that
the
pump
is
completely submerged,
but
not
so
muchwater
that
the
tank
overflows.
Note:When
using
thetile
saw,
extreme care
must
betaken
to
insurethat
the
saw's
power
cord
is
positioned to remain dry
and
free
from
water
at
all times. Severe personal
injury
or death
can
occur
if
the
power cord
or
the operator
of
this tool should
become
wet
at
any
time
while
this
tool
is
in
use.
Care
and
common
sense
must
be
usedin planning
a
safe
work area.
Operation
Preparingto
Cut:
1.
Placeyour markedtile you wish to
cut
and
place
it
aside
for
a
moment.
2.
Fill
the
tank with water
as
described
in "Installingthe
water
supply"
above.
3.
Plug the
pump's
power cord into power unit. Make sure
the
pump power cord
is
positioned
so
it
will
remain
in
a
dry
location
once
the
machine
is
in
use.
4
When
it is
safe
to
do so, plug the power unit cord into an appropriateoutlet.
5
Put
on
your
ANSI
approved
eye
protection.
6.
Flipthe power switch locatedon the front of the motorto the
"on"
position.
7.
Before
operatingthe tile
saw,
tet
the motor
run
for
approximately one minute.
Make
sure
the
bSade is
rotating
at full
speed
and
there
are
no
unusual noises.
If
you
feel
the
units is
no2
operating
properly,
do
not
use
this tool.
CuttingTile:
I
Placeyour
marked
tile on
the
table
and
brace
it
against
the
upturned
edge
(fence)
on
the
back
of
the table. Align the
cut
markwith the blade.
2.
Once
the
ti!e
saw
has
been
turned
on,
allowthe bladeto
spin
up
to fult
speed.Watch
to
be
sure
that
the
pump
is supplying
a
continuousflow
of
water to the blade.
3.
Keepingyour
hands
clear
of
the
blade, movethe table and
the
tile
underneaththe blade.
Feed
the tile underneath
the
bladevery
slowly.
Do
notforce
it.
If the rotationaj
feed
of
the
bhde
slows
down
significantly,
then you
are
forcing the tile.
No
spectators
should
be
allowed
in
the
working
area.
4.
While
cutting,
watch
to
be sure that
the
blade
remains
wet. If
it
runs
dry,
check
the
action
of the pump
and
the
water levelof the tub.
5.
If the motor
stops
suddenly,flip the power
switch
to the
"off'
position.
Walt
approximately
15
minutes, remove
the
circuit
breaker
cap
located directly
above
the power sw~tch,
and
push the reset button.
Using
the
parallel
guide:
If
you
have
to
cut
a
number
of
tile to the
same
dirnens~on,using
the
Parallel
Guide
may
save
you
a
srgnificantamount of time.

I.
Mark
the
firsttile
to
the
correctdimensions, allowing
space
for
grout
2.
Nth
the
motorturned off,
place
the
marked tile
on
the table against the
fence.
Align
the
cut
mark
with
the
blade.
3.
Loosen
the locking
knob
on
the parallel
guide.
Place
the
hooked portionof
the
guide over
the upturnededge
of
the table, on
the
side
of
the cutting
groove
where
you
have
placed
the
part
of
the
marked
tile that you intendto
keep
and use
after
cutting.
The
parallelguide
will be parallel
to
the
tile
and
perpendicular
to
the
fence.
4.
Slidethe
parallelguide
along
the
fence
until it
abuts
the
tile,
keeping
surethat the mark
on
your tile remains in linewith the blade.
5.
Tighten
the
locking
knob on the parallelguide
6.
When
you
are
satisfied
that
the
tile is aligned
with
the
blade,
and
the guide
Is
in
place,
and
it
is
safe
to do so, turn on the power
switch.
Cut
the
tile
as
described in previous
instructions.
7.
Check
to
be
sure
that
the tile
has
been
cut to proper dimensions beforeusing the parallel
guide to cut your other tiles. Periodically
test
the
fit of
each
tile
as
you
continue cutting, to
be sure the parallelguide
has
not moved
Usingthe Angle Guide:
Use
the angle guide for cutting
angjed
edges
on your tiles.
1.
Attach
the
angle
guide to the
fence
as
you
did
the
paralle!
guide,
using
the
two
locking
knobs
ta
holdthe
guide
in
place.
2.
Use
the
cutting groove in
the
middle
of
thetableto
brace
the
edge
of
your tile
as
you slide
thetile
and
the table underneaththe blade.
Maintenance
Always unplugthe
power
cord
before
servicingand before performing
any
maintenance
General
Maintenance:
1.
Regularly
inspect
the diamond
saw
blade.
Using
a
dull
blade
will
cause
excessive
wear
on
the
motor, and will not produce
a
satisfactory cut. Replace with
a
new
one
when
needed.
2.
Inspect the mounting
screw
on
all
safety
coven,
and
the arbor
nut
on
the
cutting wheel
shaft.
T~ghtenany that appear loose.
3.
Protect the motor and electr~calcomponents from
prolonged
or
excessive exposure to
water
or wet conditions. Wipe
the
unit
dry
as
needed.
4.
Periodically
apply
a
light lubricantto
the
rat1 cover.
Note.
The
pump
is non-serviceable. If
~'r
should
fail,
first
try clearingthe
intake
of
debris
and
be
sure
the bole
is
not
plugged.
If
the pumpstilt
does
not
work,
it
must
be replaced.
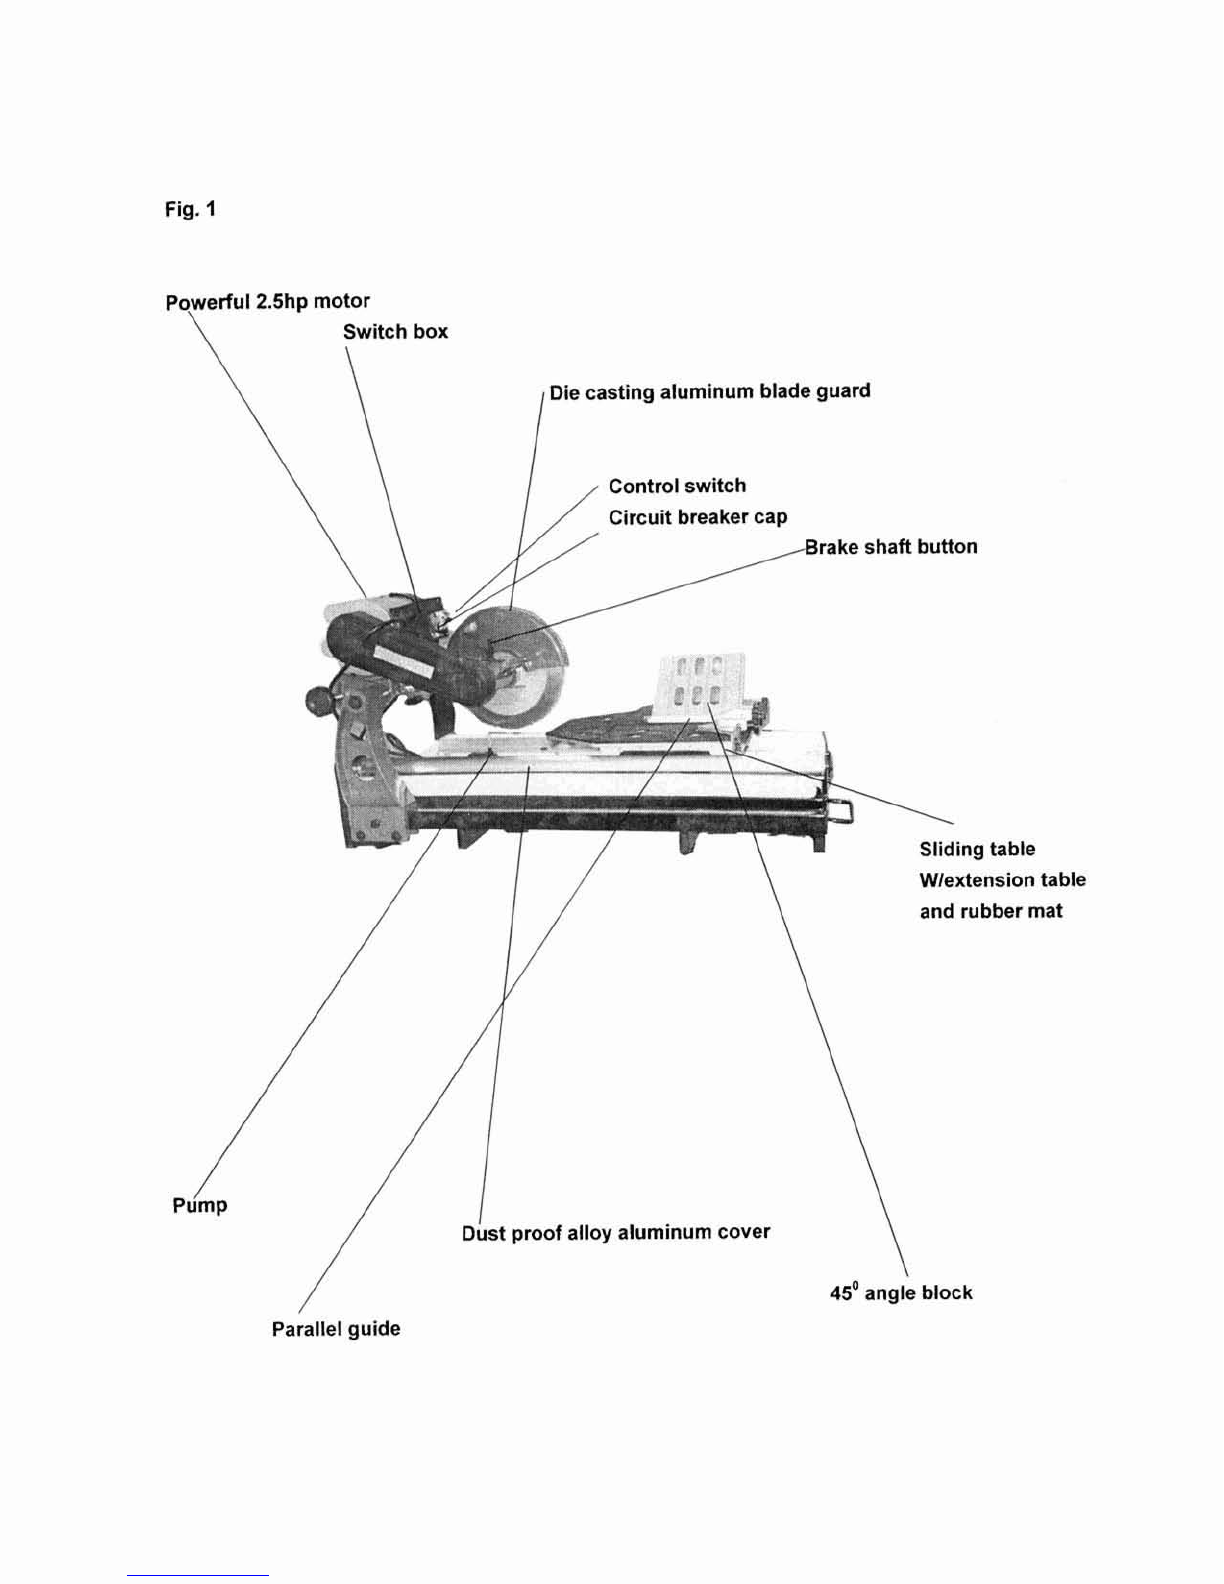
Fig.
1
Powerful
2.5hp
motor
\
Switch
box
Die
casting
aluminum
blade
guard
Control
switch
Circuit
breaker cap
button
\
Sliding
table
Wlextension
table
and
rubber
mat
45'
angle block
Parallel
guide

PART
LIST

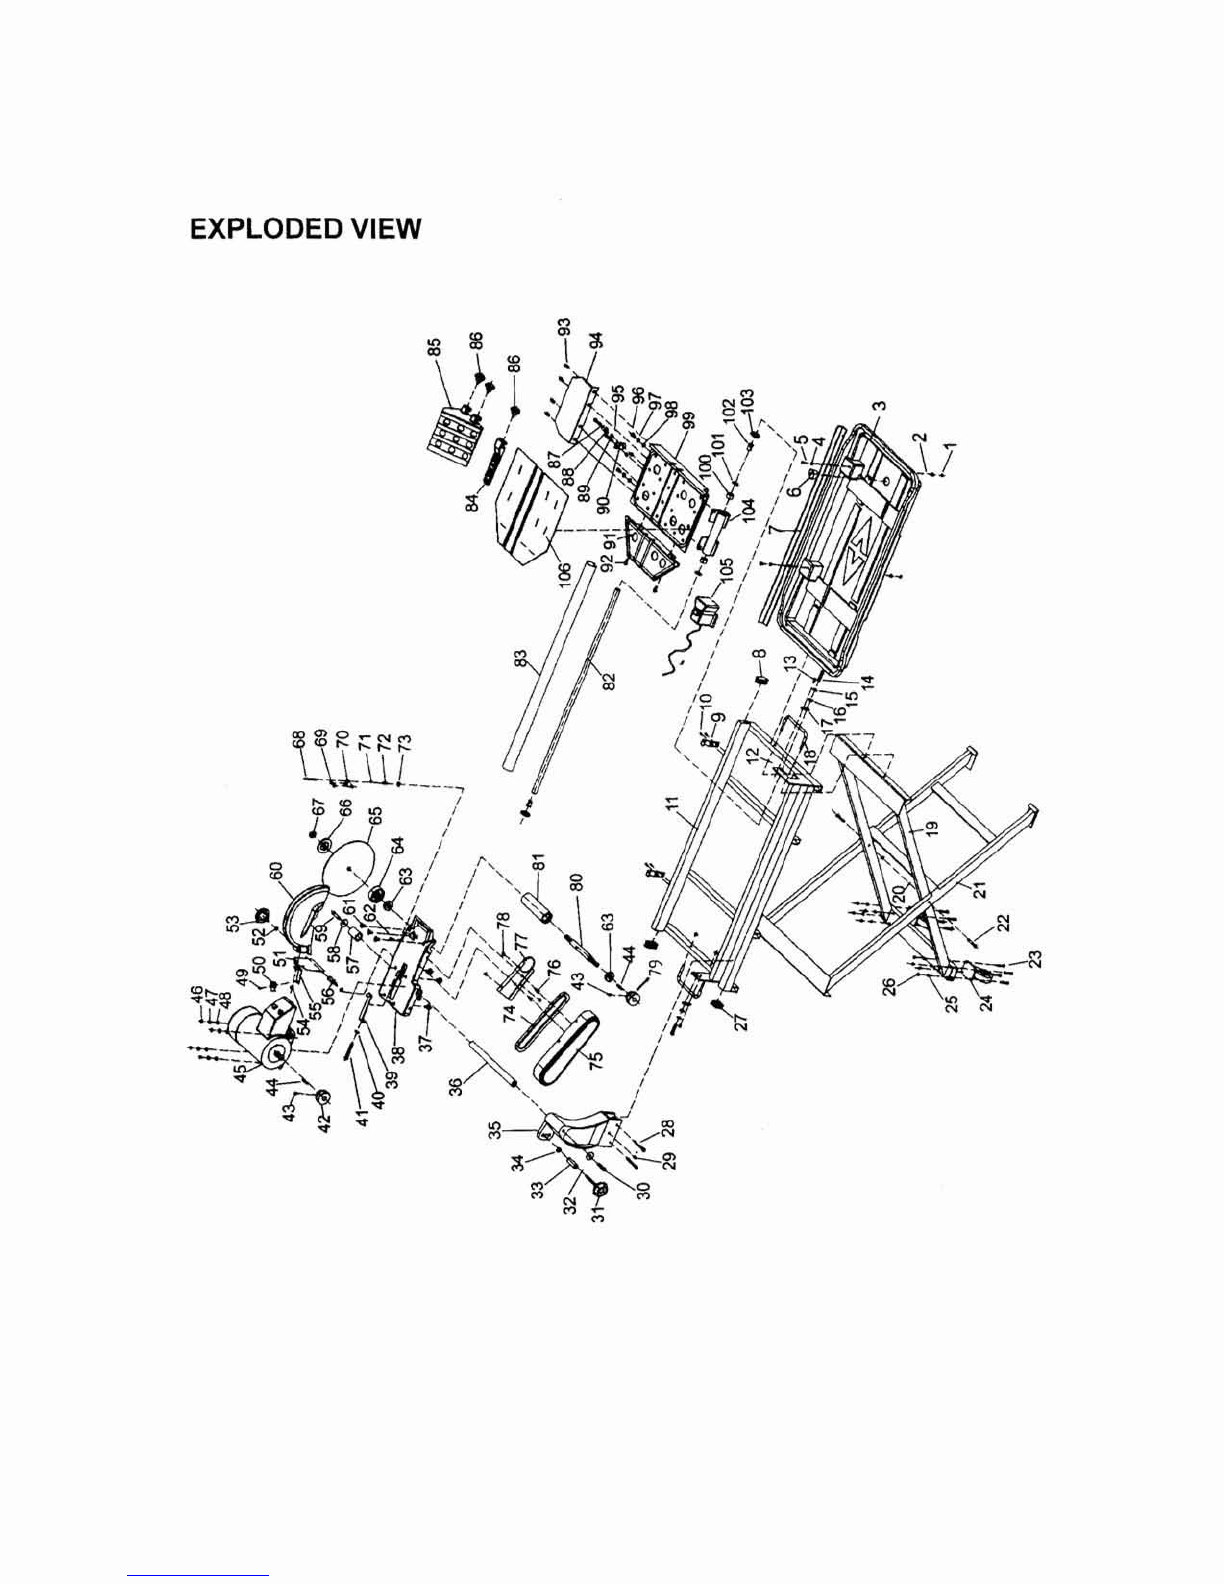
EXPLODED
VIEW
Table of contents
Popular Saw manuals by other brands


Jet
Jet J-7020 Operating instructions and parts manual

Parkside
Parkside PHKS 1350 C2 Translation of the original instructions

Craftsman
Craftsman 315.271030 owner's manual

Axminster Craft
Axminster Craft AC216TS Original instructions

Brobo
Brobo FA 3000K Product and maintenance manual

Craftsman
Craftsman 113.241680 owner's manual