H. PRODUCT
WARRANTY
The SELLER warrants the SUBR8/SUBR10
free from defects in the material and workman-
ship for 1 year from the date of purchase from
the SELLER or an authorized dealer. Should
this product fail to be in good working order
within 1 year warranty period, the SELLER, at
its option, repair or replace the unit, provided
that the unit has not been subjected to acci-
dent, disaster, abuse or any unauthorized
modifications including static discharge and
power surge. This warranty is offered by the
SELLER for its BUYER with direct transaction
only. This warranty does not apply to products
that have been abused, incorrectly installed,
modified, disassembled and/or repaired by
anyone other than Elura or our appointed repair
facility.
A unit that fails under conditions other than
those covered will be repaired at the current
price of parts and labor in effect at the time of
repair. Such repairs are warranted for 90 days
from the day of reshipment to the BUYER. If
the unit is delivered by mail, customers agree
to insure the unit or assume the risk of loss or
damage in transit. Under no circumstances will
a unit be accepted without a return authoriza-
tion number.
The warranty is in lieu of all other warranties
expressed or implied, including without limita-
tions, any other implied warranty or fitness or
merchantability for any particular purpose, all
of which are expressly disclaimed.
Proof of sale may be required in order to claim
warranty.
The content of this manual has been carefully
checked and is believed to be accurate.
However, the SELLER assumes no responsi-
bility for any inaccuracies that may be con-
tained in this manual. The SELLER will NOT
be liable for direct, indirect, incidental, special,
or consequential damages resulting from any
defect or omission in this manual, even if
advised of the possibility of such damages.
Also, the technical information contained here-
in regarding the SUBR8/SUBR10 features and
specifications are subject to change without
further notice.
8
G. TROUBLESHOOTING
& SERVICE
Before returning your Elura SUBR8/SUBR10 for
service, you can save time (and often embar-
rassment) by checking for a few problems that
are most often encountered.
Power light is not lit. No sound.
1. Is your Elura SUBR8/SUBR10 plugged in to a
live AC wall socket?
2. Is the power switch on?
3. Has the Elura SUBR8/SUBR10 overheated
and shut off temporarily?
No sound from either set of speakers.
1. Are your other components turned on?
2. Is the receiver, preamp, or TV set to the appro-
priate input and is that sound source playing?
3. Do you have an unconnected tape monitor
selected?
4. Is the Elura SUBR8/SUBR10 correctly con-
nected to your receiver, preamplifier, integrat-
ed amplifier, or TV and turned on?
Sound comes from main speakers but not
the subwoofer
1. Is the Elura SUBR8/SUBR10 turned on (power
light in the blue mode) and VOLUME control
turned up?
2. Check the speaker connections for small
strands of wire touching both terminals.
3. Some digital receivers only send a sub out
signal when in the movie or digital mode. In the
2 channel (stereo music) mode, no sub out
signal is sent to the sub.
You may need to set your main speakers to
“small” mode in your receiver setup to get the
receiver’s subwoofer output to turn on. Check
your receiver’s owner’s manual for subwoofer
operation.
4. For digital receivers – make sure the sub-
woofer is “ON” and the subwoofer level is set
to “0dB” or greater.
Sound comes from the subwoofer but not
your main speakers
1. • Confirm that the power amplifier is turned on.
• Check the RCA patch cord
• Check the speaker wire connections between
the receiver and main or satellite speakers.
Bass is muffled or weak
1. Check speaker wire polarity of all connections.
2. Reposition your subwoofer. At some points in
the room, its output may be cancelled by the
geometry of the room. Moving the Elura
SUBR8/SUBR10 can eliminate this problem.
Please refer to Item 10 in the Safety Instruc-
tions for conditions that ALWAYS require ser-
vice by qualified personnel.
If you have tried all the above and still can’t get
the Elura SUBR8/SUBR10 to operate properly,
consult your dealer or contact MSTR BRAND.
Amplifier
Digital (Class D) with switching power supply,
thermal protection, overload protection, soft
clipping, short circuit protection, high-efficency,
with low power consumption in standby mode.
Power
Elura SUBR8 150 watts RMS, 180 watts peak
Elura SUBR10 200 watts RMS, 230 watts
peak
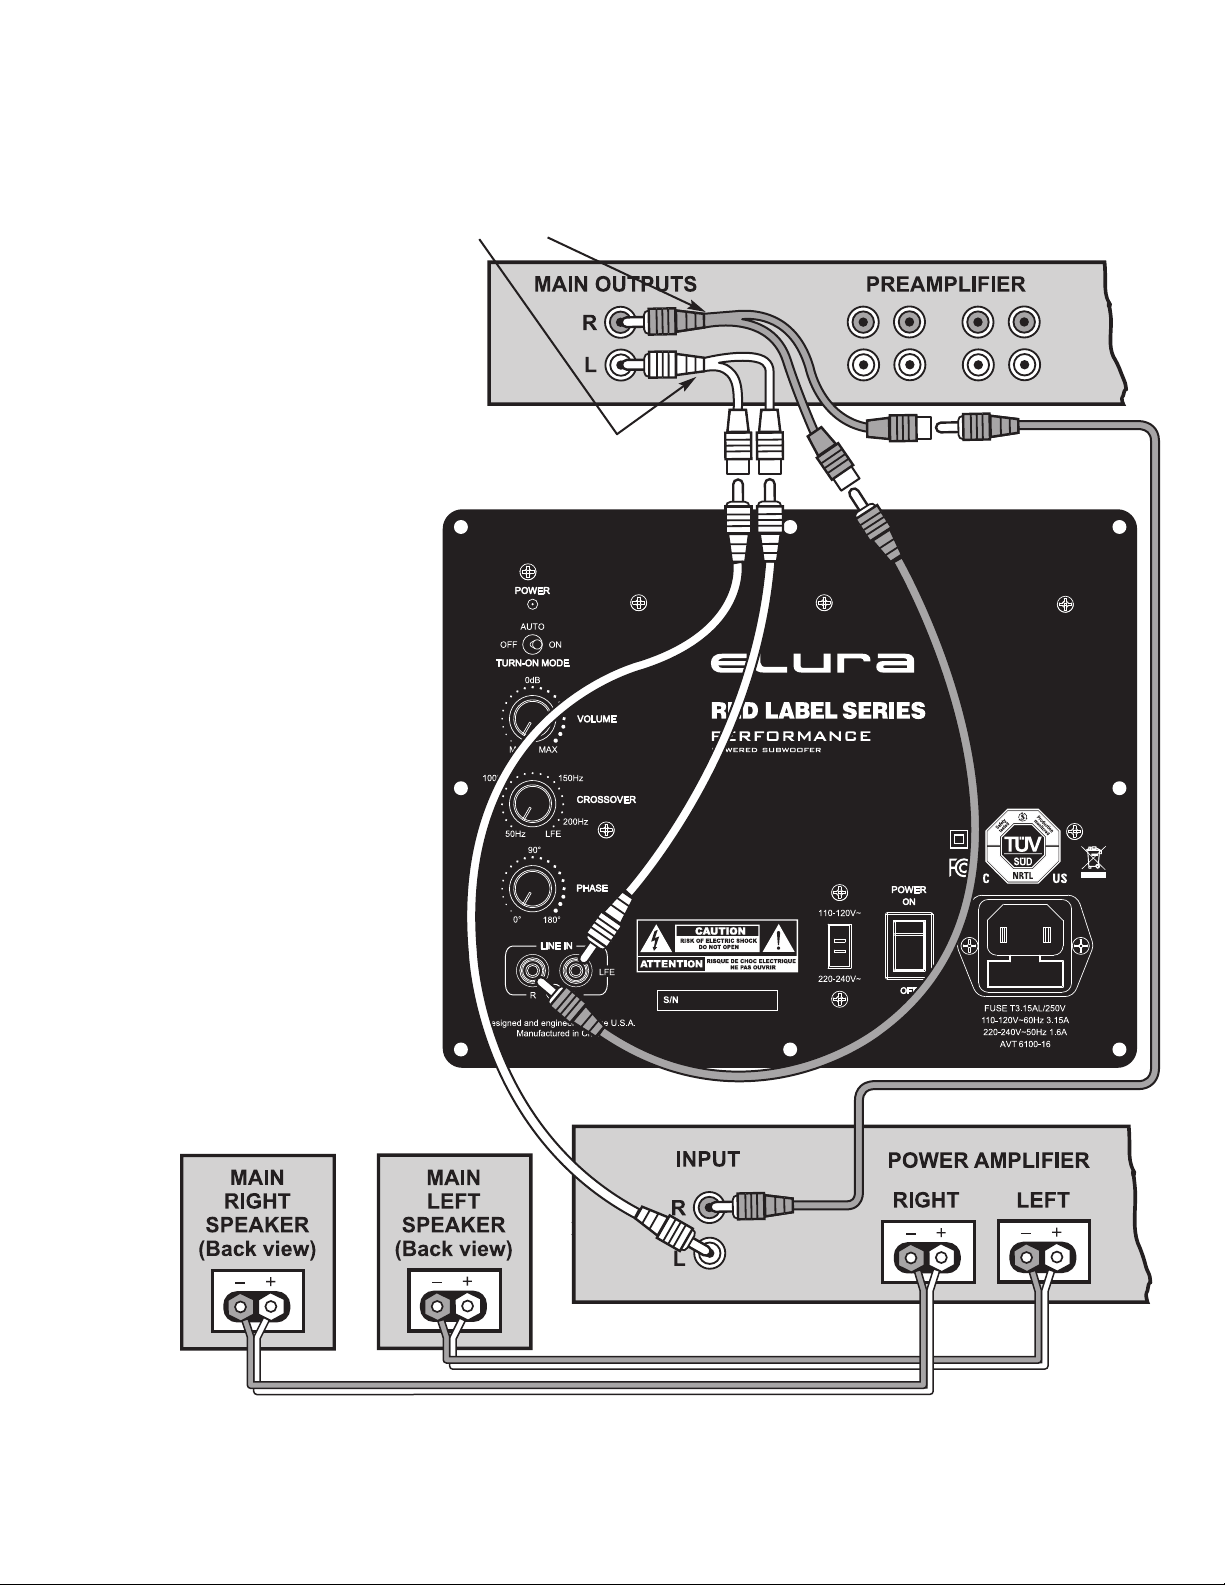
Input Connections
RCA L/R, LFE Line Level
Input Impedance
44K ohms
System Design
Sealed Enclosure with Front-Firing Woofer
Woofer
Elura SUBR8: 8˝High-Excursion,
1.5˝(38mm) Voice-Coil, Woven Fiberglass
Cone with Rubber Surround
Elura SUBR10: 10˝High-Excursion,
1.5˝(38mm) Voice-Coil, Woven Fiberglass
Cone with Rubber Surround
Frequency Response
Elura SUBR8: 30Hz - 200 Hz Variable
Elura SUBR10: 26Hz - 200 Hz Variable
Crossover Control
50 - 200 Hz Variable
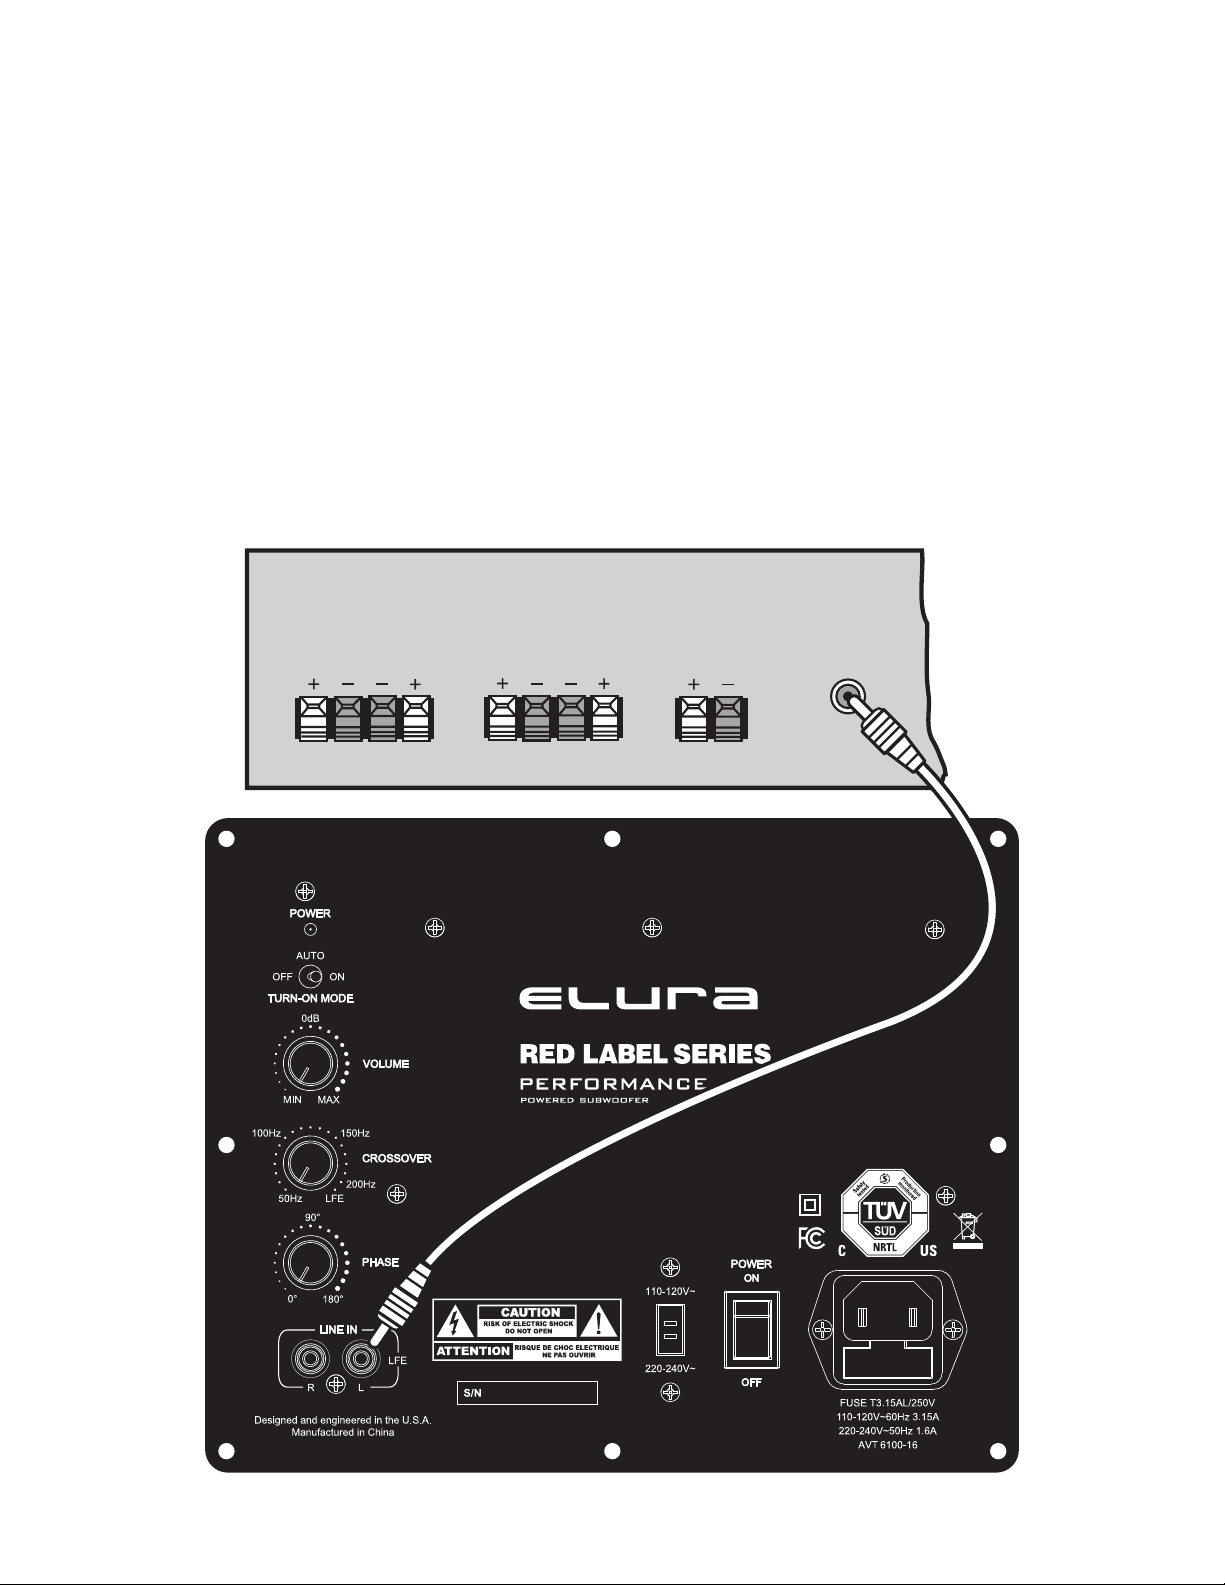
Controls
Power, Volume, Off/Auto/On, Phase, Cross-
over Frequency, Operating Voltage Selection
Video-Shielded
No
Dimensions (including feet & grille)
Elura SUBR8: 101/4˝H x 913/16˝W x 109/32˝D
(260mm H x 250mm W x 261mm D)
Elura SUBR10: 1229/32˝H x 121/2˝W x 1215/16˝D
(328mm H x 318mm W x 329mm D)
Weight
Elura SUBR8: 15.7 lbs.
Elura SUBR10: 26.2 lbs.
Finish
High Gloss Black
F. SPECIFICATIONS
Caring for Your
Elura SUBR8/SUBR10
The Elura SUBR8 / SUBR10 enclosure is
finished in a very high - quality polyure-
thane satin black finish that is both attractive
and excellent protection for the wood cabinet.
To remove dust, finger prints, and light water
marks you can use a soft, dry cloth. Never
use a solvent like paint thinner, Ketone, gaso-
line, MEK, lighter fluid, etc., on the enclosure
surface or it will cause permanent damage.
www.elura.audio