MUFU V10S User manual

V10S
Moto Cam
User Manual

1
Thank you for purchase MUFU moto cam. This product is specifically
designed to record real time video hen riding a scooter or motorcycle.
The content in this document is for informational purpose only and is
subject to change ithout prior notice. We have made every effort to
ensure that this User Guide is accurate and complete, ho ever, no liability is
assumed for any errors or omissions.
The manufacturer reserves the right to change the technical specifications
or accessories ithout prior notice.
Notice
1. Please peel off the protective film from the camera lens before use.
2. Do not touch the lens ith your fingers. Finger grease may be left on the
lens, resulting in unclear videos or pictures. Inspect and clean the lens
ith a soft, non-abrasive cloth regularly.
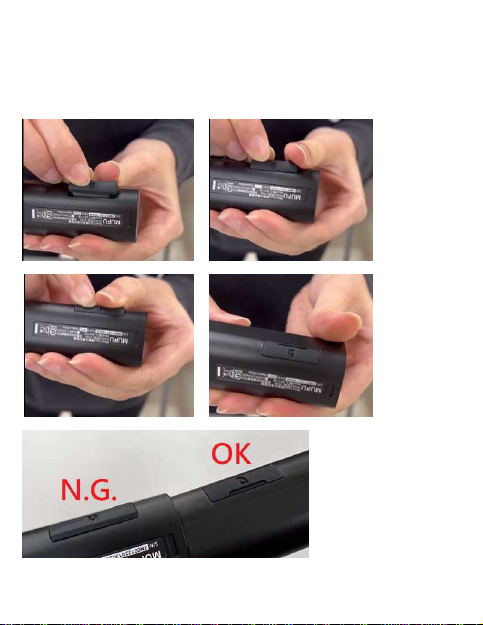
3. Please charge the unit to full before first use using the provided USB
Type-C cable or optional charge station. Please do not use another
brand of charging cable to avoid a potential equipment malfunction. The
red LED on the camera ill illuminate hen charging, and ill turn off
upon reaching full charge.
4. If the unit ill not be used for an extended period of time, please charge
at least once every 6 months to maintain the battery's health and avoid
lo -voltage related damage.
5. Please do nload MUFU MoTo app from iOS app store or Google Play
Store before use. The Wi-Fi pass ord is 12345678.
6. By default, Wi-Fi is ON for 3 minutes hen the camera is po ered on. If
it doesn’t connect to the MUFU MoTo app ithin 3 minutes, the camera
ill disable Wi-Fi automatically to save po er. To turn on again Wi-Fi,
simply po er the camera OFF then ON again.
NOTE: An active Wi-Fi connection will affect total recor ing time.
7. Recommend to use microSD card V30 or higher and capacity 16GB or
higher (up to 128GB).
8. Format microSD card regularly and synchronize date/time.
(Recommended: Once per month.)
9. In a high humi ity environment or when travelling between areas with

2
a large temperature ifference, light moisture or fog may appear on
the lens. This is normal. If this happens, remove the microSD car , an
remain the microSD car slot cover opening, let the microSD car slot
face up for several hours until the internal moisture or fog evaporates,
an then reinsert the car an resume use.
10. Due to local la s and for your o n safety, DO NOT operate the camera
or MUFU MoTo app hile driving or riding.
11. Use the MUFU MoTo app to synchronize your date and time before first
use.
12. This product is intended only for non-commercial use, ithin the
maximum limits permitted by la . We take no responsibility for any
losses as a result of use of this product.
13. The camera may get arm during use; this is normal.
14. Improper use or operation of the camera may result in damage to the
camera or its accessories and ill void the arranty.
Prohibition of co-location
This device and its antenna(s) must not be co-located or operated in
conjunction ith any other antenna or transmitter.
WEEE Notice
Disposal of Waste Electrical an Electronic Equipment an /or Battery by
users in private househol s in the European Union
This symbol on the product or on the packaging indicates that
this cannot be disposed of as a household aste. You must
dispose of your aste equipment and/or battery by handling it
over to the applicable take-back scheme for the recycling of
electrical and electronic equipment and/or battery. For more
information about recycling of this equipment and/or battery,
please contact your city office, the shop here you purchased
the equipment or your household aste disposal service. The
recycling of materials ill help to conserve natural resources and ensure
that it is recycled in a manner that protects human health and environment.

3
CE Regulatory Notice
The product here ith complies ith the requirements of IEC 62368-1:2014,
the EMC Directive 2014/30/EU, the RED-Directive 2014/53/EU and the RoHS
Directive 2011/65/EU.
EU Health Protection: This equipment should be installed and operated ith
minimum distance 20cm bet een the radiator & your body.
FCC Regulatory Compliance
This device complies ith Part 15 of the FCC Rules. Operation is subject to
the follo ing t o conditions: (1) this device may not cause harmful
interference, and (2) this device must accept any interference received,
including interference that may cause undesired operation.
Note: This equipment has been tested and found to comply ith the limits
for a Class B digital device, pursuant to Part 15 of the FCC Rules. These limits
are designed to provide reasonable protection against harmful interference
in a residential installation. This equipment generates, uses and can radiate
radio frequency energy and, if not installed and used in accordance ith the
instructions, may cause harmful interference to radio communications.
Ho ever, there is no guarantee that interference ill not occur in a
particular installation.
If this equipment does cause harmful interference to radio or television
reception, hich can be determined by turning the equipment off and on,
the user is encouraged to try to correct the interference by one or more of
the follo ing measures:
-- Reorient or relocate the receiving antenna.
-- Increase the separation bet een the equipment and receiver.
-- Connect the equipment into an outlet on a circuit different from that to
hich the receiver is connected.
-- Consult the dealer or an experienced radio/TV technician for help.
Warning: changes or modifications not expressly approved by the party
responsible for compliance could void the user’s authority to operate the
equipment.

4
Contains FCC ID: 2ACFIGM2WM
RF Exposure Compliance
This equipment complies ith FCC radiation exposure limits set forth for an
uncontrolled environment. This equipment should be installed and operated
ith minimum distance 20cm bet een the radiator and your body. This
transmitter must not be co-located or operating in conjunction ith any
other antenna or transmitter.
Regulatory Notice
This document provides country- and region-specific non- ireless and
ireless regulatory notices and compliance information for your
product. Some of these notices may not apply to your product.
Disposal of a battery into fire or a hot oven, or mechanically crushing
or cutting of a battery, that can result in an explosion.
Leaving a battery in an extremely high temperature surrounding
environment that can result in an explosion or the leakage of
flammable liquid or gas.
Wi-Fi Signals are unable to pass through the building. The limit of
signal transmission is 5m.
Wi-Fi Operation Channel: Ch1~Ch11
The product employs ireless data communication hich may
interfere, or be interfered by, a near-by camcorder.
Never use this camcorder in the vicinity of a micro ave oven or at
places here there is radio interference.
Radio ave reception may be orsened in specific environments.
Please be advised that if another camcorder is also using the same
2.4GHz band as this product, the processing speed of both
camcorders may slo do n.
The radio frequency (RF) generated by this RF electronic camcorder
may cause adverse effects on the operation of other electronic
camcorders and result in malfunctioning. Wireless transmitters and

5
circuitry may also interfere ith other electronic camcorders.
Therefore, do observe the follo ing precautions:
•Aircraft: Never use a radio transmitter hen you are in an airplane.
Please s itch off the Wi-Fi function of the camcorder.
•Vehicle: The radio frequency transmitted by this camcorder may
affect the electronic system in a motorized vehicle. Please consult
the manufacturer or dealer of your vehicle on the possible effect.
•Pacemaker: In order to prevent any potential interference to a
pacemaker, anyone ho uses a pacemaker should be advised, that,
hen using this camcorder, a minimum distance of 15cm (6 inch)
should be kept bet een the camcorder and the pacemaker; and
never put this camcorder in a chest pocket. In case of any doubt of
interference, s itch off the camcorder immediately.
•Medical Camcorder: If you use a personal medical camcorder,
consult the camcorder manufacturer or your physician to confirm if
your camcorder is sufficiently shielded from the RF transmission of
this camcorder.
•Medical Facilities: Hospitals and medical institutes may use facilities
that are sensitive to an external RF energy. Observe such
instructions hen the medical care personnel or any posted sign
requests you to s itch off any camcorder that may interfere the
radio frequency.
•Explosion sites or any location ith a posted sign: In order to
prevent interfering ith an explosion activity, observe all the
signage and instructions in the Explosion Area or in a zone ith a
“S itch Off 2- ay Radios” sign by s itching off camcorders that
may interfere ith the radio frequency.
MUFU is NOT responsible for the loss of any data/content during
operation.
By using
the
pro uct
, it is assum
e that you agree to
all of
the above statement
s
.

6
Step 1: Check What’s Insi e
The package contains the follo ing items. If any items are missing
or damaged, please contact the original place of purchase
immediately.
Main Unit 3-in-1 Mount
Hex Wrench
Safety Cord USB Cable (type C)
User Manual

7
Step 2: Pro uct Overview
No
Description
No
Description
1
LED
indicator
4
microSD
slot / Reset
2
Po er on/off
sensor area 5 USB port (type C)
3
Microphone
6
Lens

8
Step 3: Insert microSD Car
Insert the micro SD memory card ith the pins facing for ard and
the Main Unit lens facing for ard too. (See belo for proper
installation orientation.) Once the memory card locks into place,
replace the slot cover securely over the slot.

9
The slot cover must be tightly sealed to prevent moisture from
entering, causing the lens to fog. Insert the lo er edge of the slot
cover, then press the top edge and sides of the slot cover to create
a good seal. See belo .
(1) (2)
(3) (4)
(5)

10
Step 4: LED In icator
Indicator Light Status Description
Recording
Blue, slo flashing Recording
Blue, solid Po er on, No recording
Blue, rapid flashing Emergency recording
Charging
Red, solid Charging
No Red light Full charged
Battery Green, rapid flashing
Lo battery
Note: Before first use, use the supplied USB type-C charging cable to
fully charge the Main Unit. Charge for at least 5 hours until the red LED
turns off.

11
Step 5: Downloa the App
When using the camera for the first time, use your smartphone to
do nload and install the MUFU MoTo app.
Scan belo QR code or search “MUFU MoTo” in the iOS App Store
Google Play Store.
iOS
Android
APP layout an features may be change subject to
ifferent software versions. Please refer to Google
Play Store or iOS App Store for the latest version.

12
Step 6: Wi-Fi Connection
Put Main Unit into Main Unit Mount, the Main Unit ill
automatically po er on. Using your smartphone, serach
nearby Wi-Fi net orks for MUFU_V10S_xxxxxx (last 6 digits
are system random numbers) and tap to connect. Enter initial
pass ord 12345678 to connect to and control V10S main
unit.
Once Wi-Fi is connected, open the MUFU MoTo app
and start to set up preferred options or operate other
functions. For detail app operation, please refer to
[Step10. App Operation]
Note:
1. Wi-Fi is turned on automatically hen Main Unit po ers on. If the Main Unit
doesn’t connect ith the MUFU MoTo app ithin 3 minutes, Wi-Fi ill be
disabled automatically to save battery life. If you ant to turn on Wi-Fi once
again, simply unplug the Main Unit from the mount, ait for all indicator lights
to turn off, and plug it in once again to po er on the camera and activate the
Wi-Fi.
2. Your smartphone must be ithin a maximum of 5-meter distance from the
Main Unit ith no buildings in bet een.
3. The language of MUFU MoTo app ill be consistent ith your smartphone.
Beyond the language options, the app ill be activated ith default language.

13
Step 7: Main Unit Installation
Main Unit can be installed either on the right or left rearvie
mirror. Please use Rear-mirror Mount and Adjustable Mount to
adjust and fine tune installation position of the camera. See belo
for an example of a left side installation.
Unbolt the rearvie mirror and install 3-in-1 Mount as seen
belo .
Reinstall the mirror and 3-in-1 Mount onto the handlebar.

14
Note:
Regar less of whether the
Main Unit
is installe
on
left
or right si e, the MUFU logo on the mount must always be
upright an face out, with the LED in icator lights always facing
up. Below are installation examples for reference.
R
ight side
(inner) installation.
L
eft side
installation
.
Ri
ght side
(outer) installation.

15
Slip the safety cord into the safety cord hole of the Main Unit.
Plug in Main Unit into Main Unit Mount, and push it to the
bottom until “click” sound is heard. The blue LED light ill blink
slo ly to indicate that the camera is no recording. If blue LED
light is not blinking, check if microSD card is inserted properly.
Make Sure your smartphone is connected via Wi-Fi ith
MUFU_V10S_xxxxxx, open the MUFU MoTo app to
check previe image, and adjust Rear-mirror Mount and
Adjustable Mount to optimize recording vie angle. When you
have the desired position, use the included hex tool to tighten
the mount scre s.

16
Fasten the safety cord from the Main Unit to the safety ring on
the mount to protect your camera from accidentally falling out of
the mount hile riding.

17
Step 8: Main Unit Calibration an Use
After adjusting your vie ing angle, tap in the MUFU MoTo
app to enter “Camera Setting”. On first use, be sure to calibrate
“Tilt Sensor” and “Format” microSD card.
Calibrate the Tilt Sensor
Hold your motorcycle upright, straight and still as possible,
then tap on “Tilt Sensor” in the menu so the Main Unit can
calibrate the internal tilt sensor. After the calibration is
completed, if the camera detects that the motorcycle is
toppled over, it ill trigger emergency recording automatically.
This is indicated by the blue LED going from a slo flash to a
rapid flash. Emergency recordings are stored in the emergency
video folder.
Format microSD car
Tap “Format” in the menu to format microSD card. It is
recommended to format your card at least once a month to
ensure that it is orking properly.
Note:
1. When the Main Unit is inserted into Main Unit Mount (or used ith the
optional carry-on Po er Key), it ill automatically po er on and start
recording, indicated by a slo -flashing blue LED indicator light. The recording
file ill be saved onto the microSD card. When the card reaches capacity, the
loop recording function ill over rite the oldest file to make room for ne
files and continue recording.
2. Memory cards have a service life. Long-term use may lead to rite speed
degradation and file save failure. If this happens, it is recommended that you
purchase a ne memory card to use.

18
Step 9: Change Passwor
To change the Wi-Fi pass ord, follo the steps belo . If left
unchanged, the default pass ord is 12345678.
Open MUFU MoTo app , and tap to enter
“Camera Setting”. Next, tap “Wi-Fi Pass ord”,
Enter old pass ord. (Default pass ord: 12345678)
→ Enter your ne pass ord.
→ Enter your ne pass ord again to confirm.
→ tap “Yes”, and screen ill sho message of “Setting Success,
Connect Wi-Fi again”
→ close app, and follo by step
to re-connect Wi-Fi

19
iPhone users: Open the Wi-Fi connection and tap the icon (i)
by side of MUFU_V10S_xxxxxx. Next, tap “Forget This
Net ork”. Belo image ill sho up, tap “Forget”.
*Note: Android phone user can skip this step.
Next, tap MUFU_V10S_xxxxxx net ork again to re-enter your
ne pass ord and reconnect your smartphone to the camera.
Note:Be sure to remember your new passwor . If you forget
your new passwor , a factory reset will be necessary.
Table of contents
Other MUFU Digital Camera manuals