Mugnaini Piccolo 80 User manual

Residential Wood-fiRed oven
installation Manual
A MAJOR CAUSE OF OVEN-RELATED FIRES IS FAILURE TO MAINTAIN
REQUIRED CLEARANCES (AIR SPACES) TO COMBUSTIBLE MATERIALS.
IT IS OF UTMOST IMPORTANCE THAT THIS OVEN BE INSTALLED ONLY
IN ACCORDANCE WITH THESE INSTRUCTIONS.
Factory Assembled
residential wood-fired oven
Mugnaini Imports, Inc.
11 Hangar Way, Watsonville CA 95076
888.887.7206 |831.761.1767 |Fax: 831.728.5570
Includes: Venting and Oven Curing Instructions
Mugnaini Residential Wood-Fired Ovens have been tested to:
UL 737–2007
ITALY’S ORIGINAL PIZZA OVENITALY’S ORIGINAL PIZZA OVEN

Residential Factory-Assembled Manual Mugnaini Imports, Inc. 2
READ ALL INSTRUCTIONS BEFORE INSTALLING AND USING THIS OVEN
THIS MANUAL COVERS THE FOLLOWING FACTORY ASSEMBLED SERIES MODELS:
PICCOLO 80 ♦MEDIO 100 ♦MEDIO 110 ♦PRIMA 100 ♦ PRIMA 120
WARNING
WHEN THIS OVEN IS NOT PROPERLY INSTALLED, A FIRE MAY RESULT. TO
REDUCE THE RISK OF FIRE, FOLLOW THE INSTALLATION INSTRUCTIONS.
PLEASE READ THIS ENTIRE MANUAL BEFORE YOU INSTALL THE OVEN.
FAILURE TO FOLLOW INSTRUCTIONS MAY RESULT IN PROPERTY DAMAGE,
BODILY INJURY AND EVEN DEATH.
WARNING
DO NOT PACK THE REQUIRED 2”AIR SPACES WITH INSULATION OR
OTHER MATERIAL.
FOR USE WITH SOLID WOOD FUEL ONLY
INSTALLATION OF THE EXHAUST VENT SHALL BE IN ACCORDANCE
WITH THE STANDARD FOR VENTILATION CONTROL AND FIRE
PROTECTION OF RESIDENTIAL COOKING OPERATIONS, NFPA96.
SEEK OUT QUALIFIED INSTALLERS IN YOUR AREA
AND OBTAIN THE PROPER PERMITS.
CONTACT LOCAL BUILDING OR FIRE OFFICIALS CONCERNING ANY INSTALLATION
RESTRICTIONS OR NEED FOR INSPECTION OF THE INSTALLATION.
FOR YOUR SAFETY
DO NOT STORE OR USE GASOLINE OR OTHER FLAMMABLE VAPORS OR
LIQUIDS IN THE VICINITY OF THIS OR ANY OTHER APPLIANCES.
SAVE THESE INSTRUCTIONS FOR FUTURE USE

Residential Factory-Assembled Manual Mugnaini Imports, Inc. 3
TABLE OF CONTENTS
1. RECEIVING THE OVEN
Delivery Location......................................................................................................................................................4
Crate Contents...........................................................................................................................................................4
Forklift and Pallet Jack Requirements................................................................................................................4
2. UNLOADING, MOVING AND SETTING THE OVEN
Unloading the Oven: Forklift Required! ............................................................................................................5
Opening the Crate....................................................................................................................................................5
Tools Required ..........................................................................................................................................................5
Moving the Oven......................................................................................................................................................6
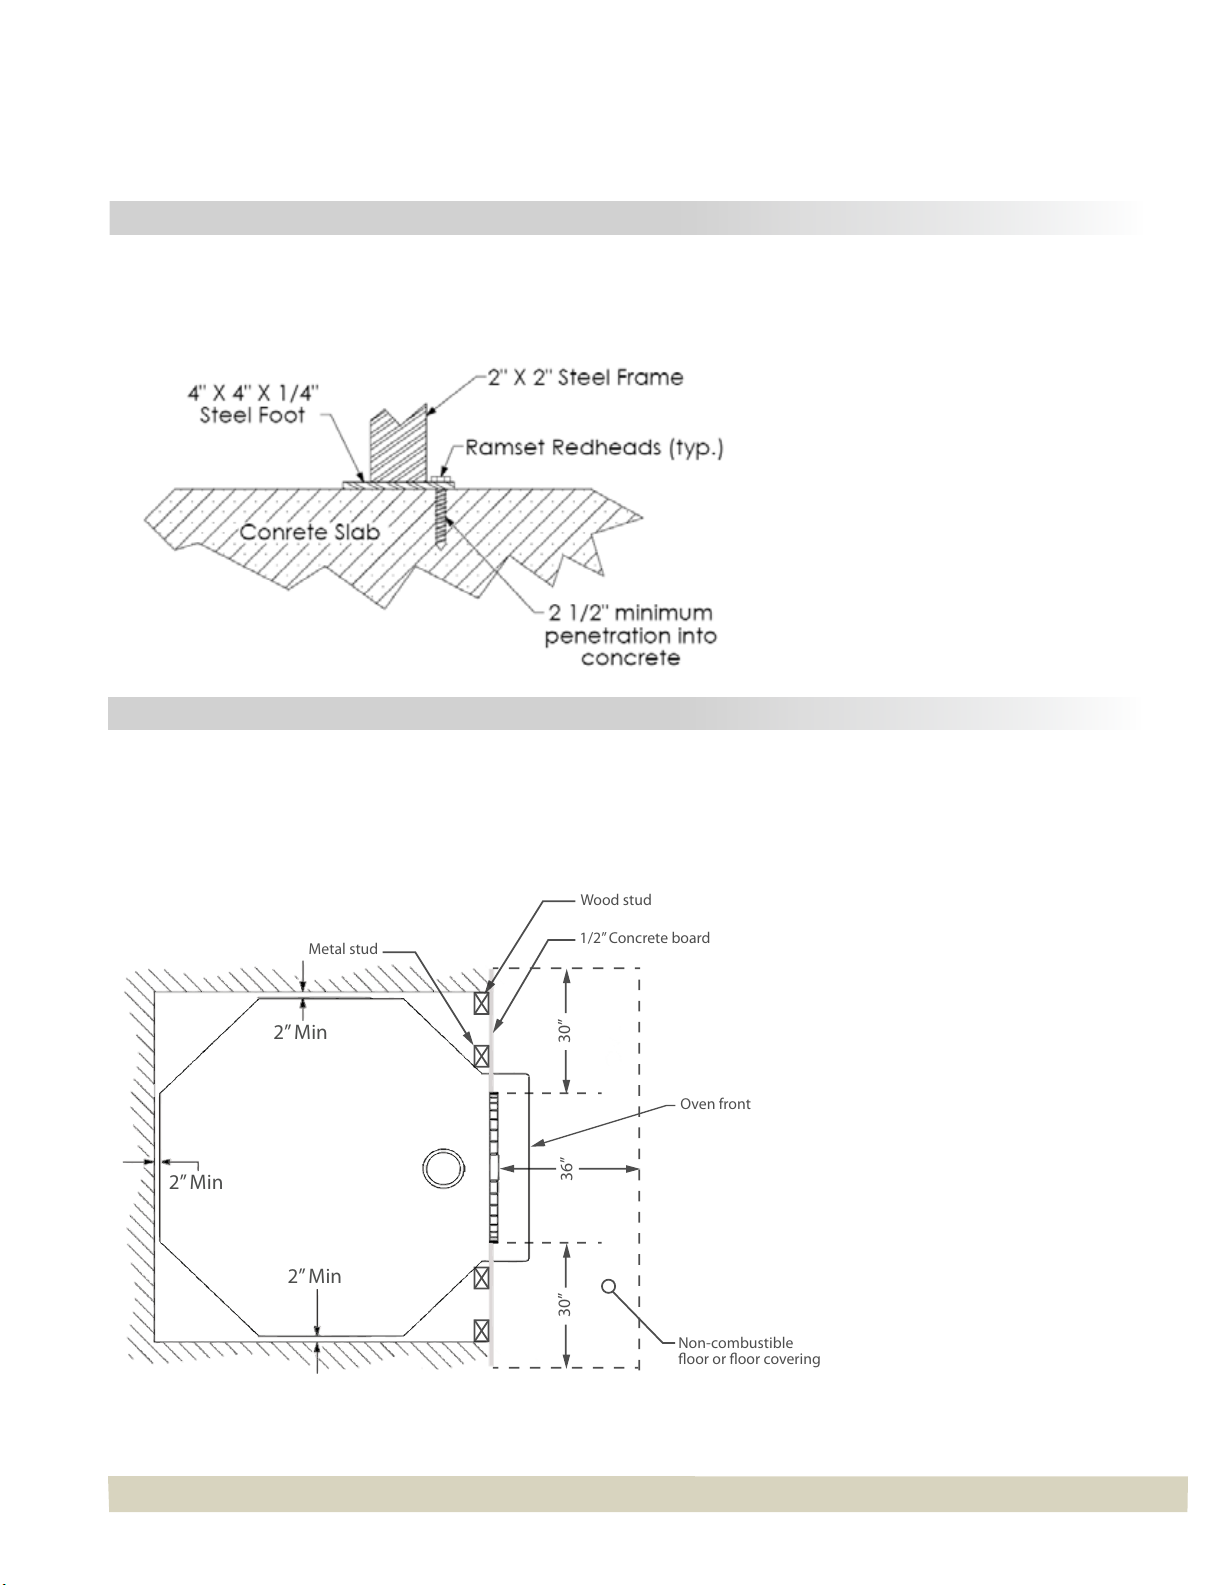
3. CLEARANCES AND FACADES
Setting the Oven.......................................................................................................................................................7
Clearances to Combustible Construction.........................................................................................................7
Installation Accessories ..........................................................................................................................................8
Finish Materials .........................................................................................................................................................8
Covering the Arch ....................................................................................................................................................8
4. VENTING THE OVEN
Overview.....................................................................................................................................................................9
Exhaust Vent Requirements ..................................................................................................................................9
5. DIRECT VENTING WITH FACTORY BUILT CHIMNEY
Direct Vent Requirements Using Factory Built Chimneys......................................................................... 10
Additional Requirements for Canada.............................................................................................................. 10
Oven Flue Outlet.................................................................................................................................................... 10
6. CURING A WOODFIRED OVEN............................................................................................................................ 11
Instructions.............................................................................................................................................................. 12
Selecting The Proper Wood For Your Oven ................................................................................................... 12
Fire Starting Tools.................................................................................................................................................. 12
Using The Door....................................................................................................................................................... 13
How to Measure Oven Temperature ............................................................................................................... 13
Starting a Fire.......................................................................................................................................................... 14
Curing The Oven.................................................................................................................................................... 14
Curing Schedule .................................................................................................................................................... 18
7. LIMITED WARRANTY ............................................................................................................................................... 19

Residential Factory-Assembled Manual Mugnaini Imports, Inc. 4
INSTALLATION INSTRUCTIONS
RECEIVING THE OVEN
Your oven will be shipped via Common Carrier from our Watsonville, California facility. You will need a
forklift to remove the crated oven from the truck. Once o the truck the oven can be moved with a pallet
jack. We will notify you when your oven is shipped and provide you with the PRO number (tracking
number) and the trucking company’s contact number. It is always important to call the trucking company
in advance to coordinate the delivery.
NOTE: Once your oven is loaded onto a truck you have created a contract between you and the
trucking company. Mugnaini Imports does not control the delivery of your oven.
Delivery Location
Proper planning is essential to a successful delivery. Be realistic about where you plan to take delivery of
your oven; residential ovens are large and top heavy! Be sure to take into account the size of your oven
and entry into your building. It is common to remove doors, windows or open walls to gain access. Seek
out a qualied professional to ensure you are prepared for your installation. The trucker will require a at,
level surface safe from trac. A forklift will need to maneuver to remove the crated oven from the truck
and place it on the ground for un-crating.
NOTE: It is your responsibility to have a safe delivery location for the trucking company.
Re-delivery and re-consignment fees may be assessed if the oven cannot be o loaded. If you do not
have a safe or convenient location for unloading the truck, consider receiving the oven at another
location and having a professional deliver the oven to your location.
Crate Contents
• Fully assembled wood-red oven on steel stand
• Metal door (loose)
Forklift and Pallet Jack Requirements
Model Approx. Wt. Forklift Req’d Fork Length
Piccolo 80 1500 lb. 5000 lb. 48 inches min.
Medio 100 2100 lb. 5000 lb. 48 inches min.
Medio 110 2300 lb. 5000 lb. 48 inches min.
Prima 100 2600 lb. 5000 lb. 48 inches min.
Prima 120 3200 lb. 6000 lb. 48 inches min.

Residential Factory-Assembled Manual Mugnaini Imports, Inc. 5
UNLOADING, MOVING AND SETTING THE OVEN
Unloading the Oven: Forklift Required!
The oven is shipped bolted to a sturdy pallet with open slat walls on all sides to allow for visual inspection.
Remove the crated oven from the truck using the appropriate forklift (see Receiving the Oven). Be sure
the forks are long enough to reach the rear supporting members of the crate.
IF THE FORKS ARE NOT LONG ENOUGH TO SUPPORT THE ENTIRE CRATE DO NOT ATTEMPT TO MOVE
THE OVEN - IT WILL TIP OVER. OBTAIN ANOTHER FORKLIFT OR USE FORK EXTENSIONS.
Once the oven is lifted from the truck immediately lower it to the ground, do not attempt to move the
oven while crated. Remove the plastic wrap and inspect the oven. Note any damage to the crate, oven
or accessories.
DO NOT SIGN THE DELIVERY BILL UNTIL THE OVEN HAS BEEN INSPECTED AND ANY DAMAGE
NOTED ON THE DELIVERY BILL. CALL OUR OFFICE IMMEDIATELY IF THERE ARE ANY SIGNS OF
DAMAGE: 888.887.7206.
Opening the Crate
The oven crate is wrapped in plastic and metal banding. Parts and any accessories will be strapped to the
base and sides of the crate. The wooden slats that form the walls and roof are attached with screws, nails
and staples. The oven feet are lag bolted to the pallet base. Remove all strapping, parts and accessories
and disassemble the crate. Remove the lag bolts. The oven is now ready to be moved.
Tools Required
• Diagonal cutters and razor knife
• Hammer and pry bar
• Screw gun and bits
• Socket set
WARNING
ONLY PROPER HEAVY LIFTING MACHINERY AND HEAVY LIFTING EQUIPMENT SHOULD BE USED
FOR UNLOADING, MOVING AND INSTALLING THE OVEN. THIS DUTY SHOULD BE PERFORMED BY
PROFESSIONALS TRAINED IN THIS KIND OF WORK. IMPROPER HANDLING OF THE EQUIPMENT
COULD RESULT IN DAMAGING THE OVEN OR PERSONAL INJURY AND EVEN DEATH.

Residential Factory-Assembled Manual Mugnaini Imports, Inc. 6
Moving the Oven
Use the forklift to move the oven (paying careful attention to the grade) to the entry point of the
restaurant. You may lift from any side but make sure to lift at the base of the oven body letting the steel
stand hang below. The stand can be removed if necessary.
Once the oven has been placed near or inside of the restaurant, use the pallet jack to move the oven to
the installation location. It may be necessary to place steel bars or heavy wood beams across the forks
of the pallet jack to fully engage the pallet jack. Move into place and slowly lower. You can make ne
adjustments using a long pry bar or length of wood against the stand to nudge the oven into place. Shim
as necessary to level oven.
Lift from under the body of the oven
Use bar across pallet jack to support oven
Move with pallet jack under stand

Residential Factory-Assembled Manual Mugnaini Imports, Inc. 7
30” 30”
36”
Non-combustible
oor or oor covering
Oven front
1/2” Concrete board
Wood stud
Metal stud
2” Min
2” Min
2” Min
CLEARANCES AND FACADES
Setting the Oven
Secure oven to oor with four [4] fasteners a minimum of 3/8” diameter. Insert at least one fastener,
appropriate for the oor, per steel mounting foot embedded 2 ½” minimum.
Clearances to Combustible Construction
The oven requires a 2”clearance on back wall and side walls to any combustible materials. Do not pack
the air gap with insulation or other material. You may bridge the gap between the oven and façade wall
with metal stud framing and concrete board. A metal stud may be fastened directly to the steel sides of
the oven. Use ½” Durock brand concrete board, or similar, to transition to any wood framing.
Clearances to Combustible Construction

Residential Factory-Assembled Manual Mugnaini Imports, Inc. 8
Installation Accessories
A wood storage box may be built on site utilizing the steel stand below the oven or purchased as an
optional accessory. Maintain 8” of clearance from the bottom of the oven to any wood storage below.
Finish Materials
Use only non-combustible materials such as tile, brick or stone, to nish your installation. You may attach
½” concrete board directly to the oven’s metal enclosure. Use metal framing braced to the oven in order to
build a facade wall or transition to combustible construction.
Framing for a facade wall or site built side panel should be assembled using metal studs and ½” concrete
board. Non-combustible nish materials may be applied to the concrete board.
Optional wood
storage box Optional side
panels
Metal stud framing with ½”
concrete board
Optional wood
storage box
Metal stud
framing
1/2” Concrete
board
Side panels for free standing ovens
attach to the oven stand.
Covering the Arch
The arch is not removable but may be covered with ceramic tile or similar non-combustible material.
Use Thinset or other cement based product to mount tiles. Do not use adhesives or glue to attach nish
materials to front panel or arch.
CHECK WITH LOCAL HEALTH DEPARTMENT REGARDING ACCEPTABLE MATERIALS FOR COVERING
THE ARCH OR FRONT PANEL.

Residential Factory-Assembled Manual Mugnaini Imports, Inc. 9
VENTING THE OVEN
Overview
The oven may be vented in a variety of ways depending upon the usage, the building the oven is installed
in and restrictions due to local codes. It is very important to take into consideration the complete venting
system, including maintenance, before committing to a location.
SEEK OUT QUALIFIED INSTALLERS IN YOUR AREA AND OBTAIN THE PROPER PERMITS. MANY
BUILDING AND PLANNING DEPARTMENTS REQUIRE MECHANICAL DRAWINGS OF THE VENTING
SYSTEM DEMONSTRATING CODE COMPLIANCE.
Exhaust Vent Requirements
Installation of the exhaust vent shall be in accordance with the Standard for Ventilation Control and Fire
Protection of Cooking Operations, NFPA 211. This code references UL 737 for direct venting.
The oven may be vented in the following method:
1. Direct vent by connecting the oven to an approved 6” factory built chimney pipe per UL 737.
SINGLE WALL AND B-TYPE VENT PIPES ARE NOT ACCEPTABLE FOR THIS TYPE OF APPLIANCE!
IT IS IMPORTANT FOR THE INSTALLER TO CONTACT THE LOCAL BUILDING OR FIRE INSPECTOR TO
DETERMINE WHICH VENTING METHOD IS ACCEPTABLE.

Residential Factory-Assembled Manual Mugnaini Imports, Inc. 10
DIRECT VENTING WITH FACTORY BUILT CHIMNEY
Direct Vent Requirements Using Factory Built Chimneys
• Oven installations utilizing direct vent insulated chimneys must comply with UL 737 and NFPA 211
• DO NOT CONNECT THIS UNIT TO A CHIMNEY FLUE SERVING ANOTHER APPLIANCE
• Factory built insulated chimneys must be listed to UL 103 HT or ULC S627.
• Example chimney pipe: Simpson DuraTech www.duravent.com
• Applicable for building with chimneys 3 stories or less
• 2 sets of osets (elbows) allowed (15° or 30° angles only)
• Chimney must be installed per chimney manufacturer’s installation instructions
• Chimney must terminate to an approved chimney cap with spark arrestor (screen mesh)
• Chimney lengths 20 feet or longer may require an exhaust fan. The Enervex GSV series fan is listed
for use with a wood burning pizza oven see: http://www.greasefans.com
Additional Requirements for Canada
• The use of smoke detectors is highly recommended
• The chimney connector shall not pass through an attic, roof space, closet oor, ceiling, or similar
concealed space. Where passage through a wall or partition of combustible construction is desired,
the installation shall conform with CAN/CSA-B365
Oven Flue Outlet
• Flue size: 6” round (internal diameter)
• Flue location: on top of oven centered above arch,
8 ½” (+/- 1”) on center behind the front panel

Residential Factory-Assembled Manual Mugnaini Imports, Inc. 11
WARNING
FOLLOW THE COMPLETE CURING SCHEDULE BEFORE COOKING IN THIS OVEN.
FAILURE TO DO SO MAY CAUSE PERMANENT DAMAGE TO YOUR OVEN AND WILL
VOID THE WARRANTY.
DO NOT START A FIRE OR INITIATE THE CURING PROCESS UNTIL THE EXHAUST VENT
HAS BEEN INSTALLED AND APPROVED BY THE LOCAL BUILDING OR FIRE OFFICIALS.
NEVER USE GASOLINE, GASOLINE TYPE LANTERN FUEL, KEROSENE, CHARCOAL
LIGHTER FLUID OR SIMILAR LIQUIDS TO START OR “FRESHEN UP”A FIRE IN THIS OVEN.
KEEP ALL SUCH LIQUIDS WELL AWAY FROM THE OVEN WHEN IN USE.
NEVER USE WATER TO LOWER TEMPERATURE INSIDE THE OVEN OR TO EXTINGUISH
THE FIRE.
USE SOLID WOOD FUEL ONLY. DO NOT USE RESINOUS WOOD SUCH AS PINE
OR SPRUCE.
CURING YOUR MUGNAINI WOODFIRED OVEN
This section covers the following Mugnaini series models:
Piccolo 80 ♦Medio 100 ♦Medio 110 ♦Prima 100 ♦ Prima 120
READ ALL INSTRUCTIONS
BEFORE STARTING A FIRE AND CURING YOUR OVEN
FOR USE WITH SOLID WOOD FUEL ONLY
FOR YOUR SAFETY
DO NOT STORE OR USE GASOLINE OR OTHER FLAMMABLE VAPORS OR LIQUIDS IN THE
VICINITY OF THIS OR ANY OTHER APPLIANCES.

Residential Factory-Assembled Manual Mugnaini Imports, Inc. 12
OVEN CURING INSTRUCTIONS
Your Mugnaini wood-red oven is made from Refrattari Cotto or refractory clay. The water used to form the
clay must be cooked out before your oven can be put into use. Curing is the process of slowly heating an
oven to rst drive out the moisture from the oven components and surrounding mass, and then to temper
the oven dome. This process is simply a matter of starting res according to a schedule for several hours a
day over a four-day period. It is crucial that this curing schedule be followed in order to not “thermally shock”
the oven components which will result in a crack. A crack does not ruin the oven but it should be avoided to
prolong the life of your oven.
NOTE: Fine shallow cracks may become noticeable on the inside of the oven dome. This is a natural
occurrence with refractory castable components and does not indicate a failure of the material.
These procedures are only used for curing an oven. You only need to cure an oven once. However, if the oven
has not been used for a long period it is recommended to allow one full day to slowly bring the oven up to
maximum temperature.
SELECTING THE PROPER WOOD FOR YOUR OVEN
You should use only seasoned hardwood (moisture content of 20% or less). The type of wood available to
you will depend on where you are located and what your local rewood vendors stock. Oak, ash or maple
are common hardwoods but fruit and nut woods such as apple, almond, cherry, walnut and pecan are all
good choices. Avoid using soft resinous woods with a lot of sap and oil such as
spruce, pine, eucalyptus or birch.
The size of the wood is crucial to controlling the oven environment. We recommend
double split wood in lengths of 12–16”. Double split logs are typically triangular in
shape approximately 2–5”in diameter. Plan on using one cord of wood every 3–6
weeks depending upon usage.
FIRE STARTING TOOLS
In addition to double split hardwood, you will want to
stock some kindling (small pieces of wood approximately
1” in diameter, preferably hardwood), and re starters. We
recommend Weber® brand Firestarters or any other non-
toxic, non-resinous starters.
The curing process will require 20 pounds of kindling.
You will nd restarters and kindling are very helpful for
starting and refreshing a re.

Residential Factory-Assembled Manual Mugnaini Imports, Inc. 13
USING THE DOOR
The door has two positions and functions. In its’fully closed position the
door is inserted at an angle through the arch and then straightened up and
pushed back to close the bake chamber. This position is only used when
there is no live ame in the oven.
The door may also be placed outside of the arch on the shelf in a partially
closed position to“damp down” the oven which will keep it in a holding
pattern. It is important to allow enough room for combustion air to enter the
bake chamber if you intend on keeping a re going. We will use this partially
closed position during the curing process to control any smoke roll out.
HOW TO MEASURE OVEN TEMPERATURE
Mugnaini wood-red ovens will self regulate based on the size of the ame and the oor temperature. We
measure temperature inside a wood-red oven with an infrared thermometer for accuracy. By checking the
oor temperature, using visual cues and ame size we can create distinct repeatable oven environments for
dierent styles of cooking.
NOTE: For curing your oven read the temperature of the dome in the center of the oven walls just below
the curve. Measure left and right sides of the oven and average the temperature. This method is for curing
only—see diagram below for details.

Residential Factory-Assembled Manual Mugnaini Imports, Inc. 14
STARTING A FIRE
To start a re, rst place two small pieces of wood on the oven oor aligned front to back. Lay 5–6 pieces
of kindling across the rst two pieces as per the diagram. Place 3 Weber® brand re starters in between the
wood and light. Push the pile to the center of the oven.
TIP: Use the long handled peel to push the wood to the center of the oven. Then light the re starters and
push them under the woodpile using a piece of kindling.
5-6 or ≈ 1 lb. kindling
sticks—aligned
perpendicular to the
hardwood
Two small pieces
double split
hardwood—aligned
front to back
3 Weber brand re
starters
1) 2) 3)
CURING THE OVEN
The goal is to increase the temperature of the oven at a rate of 50–75° F per hour by making a small re
every hour. Use the chart at the end of this manual to record the starting time and temperature of the oven.
Start a small re per the instructions. Allow the re to burn and adjust the wood if necessary. You can place
the door in the partially closed position to establish a draft and keep smoke from rolling out. After the re
has gone out place the door in the fully closed position until the next hour’s re.
Prior to starting the next re, open the door slowly and measure the temperature of the sides of the dome
paying attention to use the same spot each time you measure. Average left and right side temperatures and
record on the chart.

Residential Factory-Assembled Manual Mugnaini Imports, Inc. 15
NOTE: If the oven has reached the target temperature – skip the next re and check again after one hour.
Repeat the res until the oven has reached the target temperature for the day. When nished, spread any
coals evenly across the oven oor and place the door in the fully closed position.
DAY 1: (4 ½ hr. time commitment) Build res hourly and bring the oven up to a maximum of 250° F. Place
a small re in the center of the oven as per the diagram. After the re goes out, place the door
through the arch into the fully closed position. The door should stay in place unit the next day’s re.
Day 2: (5 ½ hr. time commitment) Record the oven temperature in the chart and repeat the hourly res
as necessary to reach a maximum 400° F. You may need to add a single piece of hardwood to the
re if the temperature is not increasing. Use your common sense and let the chart help guide the
amount of wood you use. After the re goes out, place the door through the arch into the fully
closed position. The door should stay in place unit the next day’s re.
Piccolo 80 ♦Medio 100 ♦Medio 110 ♦Prima 100 ♦ Prima 120

Residential Factory-Assembled Manual Mugnaini Imports, Inc. 16
DO NOT OVER FIRE
IF FLAMES EXTEND BEYOND THE OVEN DOOR OPENING AND UP THE EXHAUST FLUE
YOU ARE OVER FIRING THE OVEN.
CONGRATULATIONS—you have fully cured your pizza oven!
You can now re your oven as per the operating instructions and start cooking.
NOTE: The rst two days are the most critical. Be careful not to over re the oven. If this happens just use
the long handled peel to knock the re down.
Day 3: (5 hr. time commitment) Repeat the hourly res, increasing the oven temperature at a rate of
50–75° per hour to maximum of 600° F. At this point you will be adding more wood to the re. After
the re goes out, place the door through the arch into the fully closed position. The door should
stay in place unit the next day’s re.
Day 4: (4 hr. time commitment) Repeat the hourly res starting slowly and then adding enough wood
to create a large enough re to roll across the dome. Soon the black soot will burn o the dome
right above the re. Spread the re out and move it slightly to burn o all of the black soot on the
dome. After the re goes out, place the door just inside the arch so the ue is open to the cooking
chamber. This will allow the re to burn down and vent up the chimney.
NOTE: When the black soot has burned o the dome; this is your visual reference that the oven is fully
heated. If this has not happened by the end of Day 4 just repeat the same steps for a 5th day making sure
to add enough wood to raise the temperature appropriately.
Piccolo 80 ♦Medio 100 ♦Medio 110 ♦Prima 100 ♦ Prima 120

Residential Factory-Assembled Manual Mugnaini Imports, Inc. 17
HELPFUL TIPS
TIMING
Starting the curing schedule on a Thursday night and working through the weekend is very eective. If you
miss one of your curing res just repeat the last step and continue.
The rst two days are the most important and should be completed together. Like wise the last two days
should be completed together. If this is the case add an extra one hour burn to the beginning of the Day
Three cycle.
TEMPERATURE READINGS
The temperature in the oven will vary greatly when starting a re. If you are reading the temperature with
a thermometer do not be alarmed. Most of what you read with an infrared thermometer gun is the surface
temperature which will regulate down in the pauses between res.
FIRE PLACEMENT
If you have trouble reaching into the oven place the re within your reach in order to start it. Then push it
deeper in the oven with the metal peel supplied with your oven. It is good to vary the placement slightly
from one re to the next.
ASHES
Keep a metal can with a tight tting lid to collect the ashes with. It is OK to let them build up for a couple of
rings. Use the metal peel to shovel the ashes out of the oven.
TECHNICAL ASSISTANCE
We want your experience to be rewarding. Please call the oce at 888.887.7206 if you have any questions or
need help understanding these steps.

Residential Factory-Assembled Manual Mugnaini Imports, Inc. 18
CURING SCHEDULE
Measure the oven temperature before each re and increase the oven temperature at a rate of 50–75° F per
hour until the daily target temperature is reached. Close door until the next day’s ring.
DAY 1 DAY 2
Time Temperature Time Temperature
Target 250° F maximum Target 400° F maximum
DAY 3 DAY 4
Time Temperature Time Temperature
Target 600° F maximum Target Burn o all soot

Residential Factory-Assembled Manual Mugnaini Imports, Inc. 19
LIMITED WARRANTY
MUGNAINI IMPORTS, INC. (“Mugnaini”), a California corporation, is a distributor of Italian wood-burning
residential and residential ovens (the “Oven(s)”). Mugnaini warrants to the original purchaser only
(“Original Purchaser”) that the Oven will be free from defects in materials and workmanship for a period of
five (5) years from the date of delivery (“Warranty Period”).
Remedies available to the Original Purchaser against Mugnaini under this warranty are limited to: (i) repair
and replacement of parts and/or the necessary labor and services required to repair the Oven; or, (ii) at
Mugnaini’s option, refund of the purchase price.
Information in Mugnaini’s catalog or other information provided by Mugnaini is given after the exercise of
due care in its compilation, preparation, and issuance; however, Mugnaini disclaims any liability resulting
from such information, except for the obligation under the warranty provided herein.
NO OTHER EXPRESS WARRANTY IS GIVEN, AND NO AFFIRMATION OF MUGNAINI, BY WORDS OR ACTION,
SHALL CONSTITUTE AN ADDITIONAL WARRANTY. THIS WARRANTY IS NONTRANSFERABLE.
THIS WARRANTY IS EXPRESSLY IN LIEU OF AND EXCLUDES ALL OTHER EXPRESS OR IMPLIED WARRANTIES
WITH RESPECT TO THE OVEN OR ANY RELATED EQUIPMENT OR ACCESSORY, INCLUDING, BUT NOT LIMITED
TO, WARRANTIES OF MERCHANTABILITY AND OF FITNESS FOR PARTICULAR PURPOSE, USE OR APPLICATION
AND ALL OTHER OBLIGATIONS OR LIABILITIES ON THE PART OF MUGNAINI, UNLESS SUCH OTHER
WARRANTIES, OBLIGATIONS OR LIABILITIES ARE EXPRESSLY AGREED TO IN WRITING BY MUGNAINI.
This warranty shall not apply:
(a) to any Oven or related equipment or accessory that is improperly installed or maintained;
(b) to products resold in other than Mugnaini original packaging or to Ovens modified or altered by the
Original Purchaser;
(c) to failure or malfunction of the Oven or any related accessories that is caused by improper use or any
failure to assemble or install pursuant to factory instructions; to any Oven or related accessories that
have been materially altered from the condition in which they were shipped to the Original Purchaser;
(e) to any cracking caused by over-firing, by failure to follow a proper curing schedule, or by expansion or
contraction in either refractory mortar or refractory Oven component;
(f) to normal wear and tear; and
(g) to freight and shipping charges for sending an Oven to Mugnaini for repair.
All claims under warranty (“Warranty Claim(s)”) must be made within fifteen (15) days after
occurrence of circumstances giving rise therein and all Warranty Claims must be received within the
applicable Warranty Period by Mugnaini or its authorized representative. Any and all rights under this
warranty or at law of Original Purchaser against Mugnaini shall terminate and be void in the event Warranty
Claims are not submitted within the time set forth in the immediately preceding sentence. Such Warranty
Claims must be in writing and include the Oven type, the model and serial number of the Oven, the

Residential Factory-Assembled Manual Mugnaini Imports, Inc. 20
purchase date and a full description of the circumstances giving rise to the Warranty Claim. Warranty Claims
under this warranty are to be mailed to:
MUGNAINI IMPORTS, INC.
11 Hangar Way
Watsonville, California 95076
Before any Oven is returned for repair, written authorization must be obtained from Mugnaini or its
authorized representative for the return and instructions, as to how and where the Oven should be shipped.
Any Oven returned to Mugnaini for examination shall be shipped with all shipping charges prepaid,
at Original Purchaser’s expense, via the means of transportation indicated as acceptable by Mugnaini.
Mugnaini reserves the right to reject any Warranty Claim not promptly reported and any Warranty Claim
on any Oven that has been altered or has been shipped by non-acceptable means of transportation. When
an Oven is returned for examination and inspection or for any other reason, Original Purchaser shall be
responsible for all damages resulting from improper packing or handling and the risk of loss in transit,
notwithstanding any defect or nonconformity in the Oven.
In all cases, Mugnaini has sole responsibility in its reasonable judgment for determining the cause and
nature of failure, and Mugnaini’s determination with regard thereto shall be final and binding upon
the Original Purchaser. If it is found that Mugnaini’s Oven has been returned without cause and is still
serviceable, Original Purchaser will be notified and the Oven returned at Original Purchaser’s expense. In
addition, a charge for testing and examination may, in Mugnaini’s sole and reasonable discretion, be made
on any Oven so returned.
THE LIABILITY OF MUGNAINI FOR WARRANTY CLAIMS (REGARDLESS OF THE LEGAL THEORY ASSERTED,
SUCH AS BREACH OF CONTRACT, BREACH OF WARRANTY, NEGLIGENCE, TORT, VIOLATION OF STATUTE
OR REGULATION, STRICT PRODUCTS LIABILITY, CONSUMER PROTECTION STATUTES OR DECEPTIVE TRADE
PRACTICES STATUTES); OR (2) DAMAGES (INCLUDING SETTLEMENTS, JUDGMENTS AND AWARDS, AND
COSTS, INCLUDING ATTORNEYS’FEES AND EXPENSES INCURRED IN DEFENDING CLAIMS) ARISING OUT OF
THE OVEN, SHALL NOT BE GREATER THAN THE ACTUAL PRICE OF THE OVEN WITH RESPECT TO WHICH THE
WARRANTY CLAIM OR DAMAGES ARISES.
UNDER NO CIRCUMSTANCES IS MUGNAINI LIABLE FOR CONSEQUENTIAL, SPECIAL, INCIDENTAL OR INDIRECT
DAMAGES OF ANY KIND OR TYPE INCLUDING WITHOUT LIMITATION, CLAIMS FROM ORIGINAL PURCHASER,
OR OTHER THIRD PARTIES, PROSPECTIVE OR PRESENT LOSS OF PROFITS, BUSINESS REPUTATION OR
GOODWILL, EVEN IF MUGNAINI WAS AWARE OF A POTENTIAL FOR SUCH DAMAGE.
If Original Purchaser is not satisfied with the warranty service, the Original Purchaser must submit a Warranty
Claim in writing to Mugnaini’s Dispute Settlement Representative at 11 Hangar Way, Watsonville, California
95076. The written notice must include the Oven type, the model and serial number of the Oven, the
purchase date, a detailed description of the problem and the address at which the Original Purchaser can be
reached. Mugnaini will review each notice and respond to the Original Purchaser in an eort to settle such
dispute. Under federal law, no lawsuit may be initiated unless and until the dispute settlement procedures
outlined in this warranty have been exhausted. Any Warranty Claim shall be governed by and construed in
accordance with the internal laws of the State of California. Original Purchaser consents to the jurisdiction
and venue of any court, federal or state, sitting in the State of California, County of Santa Cruz, for the
resolution of any dispute arising out of the Warranty Claim.
This warranty gives Original Purchaser specific legal rights, and Original Purchaser may also have other
rights that vary from state to state. Some states do not allow the exclusion or limitation of incidental or
consequential damages, so the above limitation or exclusion may not apply.
This manual suits for next models
3
Table of contents
Other Mugnaini Oven manuals
Popular Oven manuals by other brands

AEG
AEG COMPETENCE D81005 Operating and installation instructions

Angelo Po
Angelo Po FX61 E 2 Installation and operation manual

Henny Penny
Henny Penny FlexFusion Electric SpaceSaver installation manual

Russell Hobbs
Russell Hobbs 26095-56 manual

Beko
Beko BBIE12300XMP user manual

Electrolux
Electrolux EON4630 operating instructions