Mugnaini COMMERCIAL 140 AOS User manual

COMMERCIAL 140 ASSEMBLY ON SITE/
MASONRY CONSTRUCTION MANUAL
ITALIAN WOOD-FIRED OVEN
W140 Oven
Includes: Venting and Oven Curing Instructions
Mugnaini Commercial Wood-Fired Ovens have been tested to:
UL 737–2007 ♦ UL 2162–2001
NSF-4 Sanitation Standards ♦ CAN/ULC S627-M93
A MAJOR CAUSE OF OVEN-RELATED FIRES IS FAILURE TO MAINTAIN
REQUIRED CLEARANCES (AIR SPACES) TO COMBUSTIBLE MATERIALS.
IT IS OF UTMOST IMPORTANCE THAT THIS OVEN BE INSTALLED ONLY
IN ACCORDANCE WITH THESE INSTRUCTIONS.
Mugnaini Imports, Inc. • 1530 Grove Street, Healdsburg, CA 95448
main: (707) 416-4106 • toll free: (888) 887-7206 • fax: (707) 857-7177
Masonry Assembled
MODEL: COMMERCIAL 140 AOS
WOOD-FIRED OVEN

Commercial 140 Wood AOS Manual Mugnaini Imports, Inc. 2
GENERAL INFORMATION
This construction manual contains information regarding the construction of a support base and assembly
of your Commercial 140 wood-burning AOS Oven. The foundation and base provide a support structure for
the oven and serve as a wood storage compartment. Concrete masonry units (CMU’s), cast-in-place concrete
or similar materials are typically used to construct the base on a poured-in-place, reinforced concrete
foundation. Consult your Architect, Designer, Engineer, or Masonry Contractor for more specic design and
construction criteria.
WARNING
WHEN THIS OVEN IS NOT PROPERLY INSTALLED, A FIRE MAY RESULT. TO
REDUCE THE RISK OF FIRE, FOLLOW THE INSTALLATION INSTRUCTIONS.
PLEASE READ THIS ENTIRE MANUAL BEFORE YOU INSTALL THE OVEN.
FAILURE TO FOLLOW INSTRUCTIONS MAY RESULT IN PROPERTY DAMAGE,
BODILY INJURY AND EVEN DEATH.
WARNING
DO NOT PACK THE REQUIRED 1”AIR SPACES WITH INSULATION OR
OTHER MATERIAL.
FOR USE WITH SOLID WOOD FUEL ONLY
INSTALLATION OF THE EXHAUST VENT SHALL BE IN ACCORDANCE
WITH THE STANDARD FOR VENTILATION CONTROL AND FIRE
PROTECTION OF COMMERCIAL COOKING OPERATIONS, NFPA96.
SEEK OUT QUALIFIED INSTALLERS IN YOUR AREA
AND OBTAIN THE PROPER PERMITS.
CONTACT LOCAL BUILDING OR FIRE OFFICIALS CONCERNING ANY INSTALLATION
RESTRICTIONS OR NEED FOR INSPECTION OF THE INSTALLATION.
FOR YOUR SAFETY
DO NOT STORE OR USE GASOLINE OR OTHER FLAMMABLE VAPORS OR
LIQUIDS IN THE VICINITY OF THIS OR ANY OTHER APPLIANCES.
SAVE THESE INSTRUCTIONS FOR FUTURE USE

Commercial 140 Wood AOS Manual Mugnaini Imports, Inc. 3
TABLE OF CONTENTS
1. INTRODUCTION
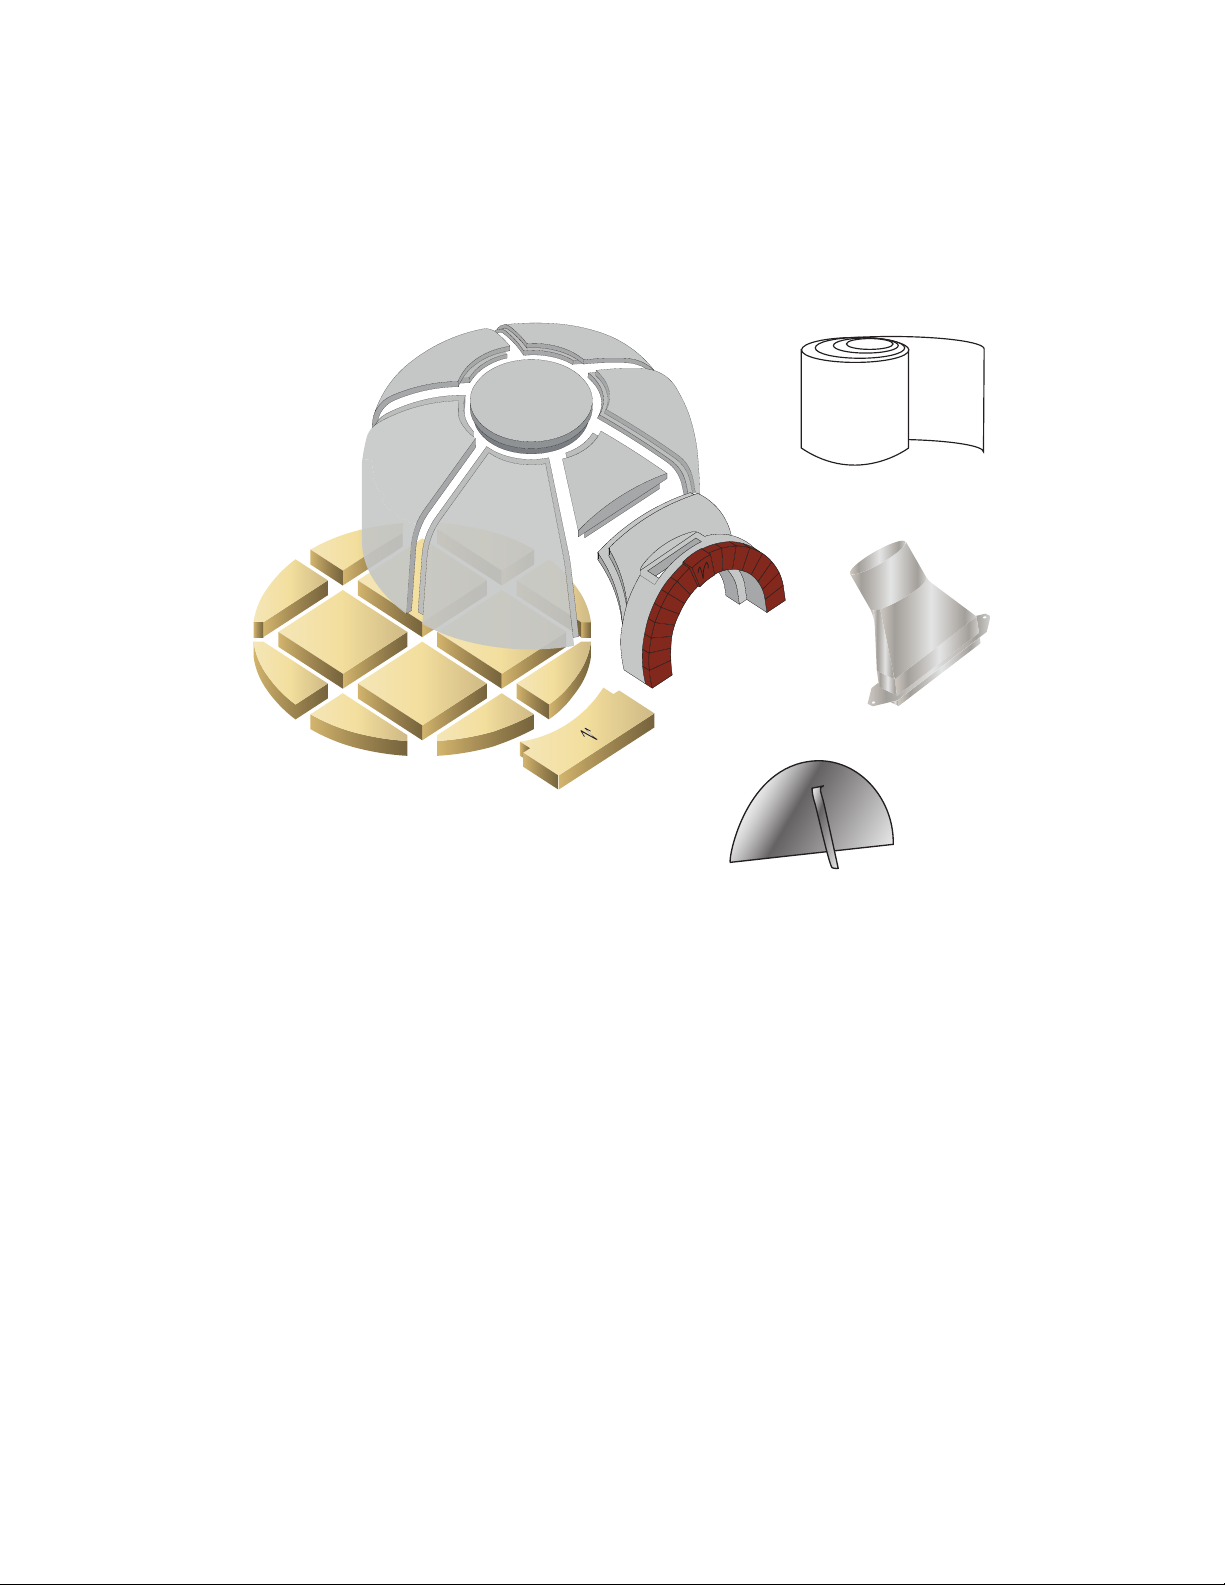
Package Contents and Dimensions....................................................................................................................4
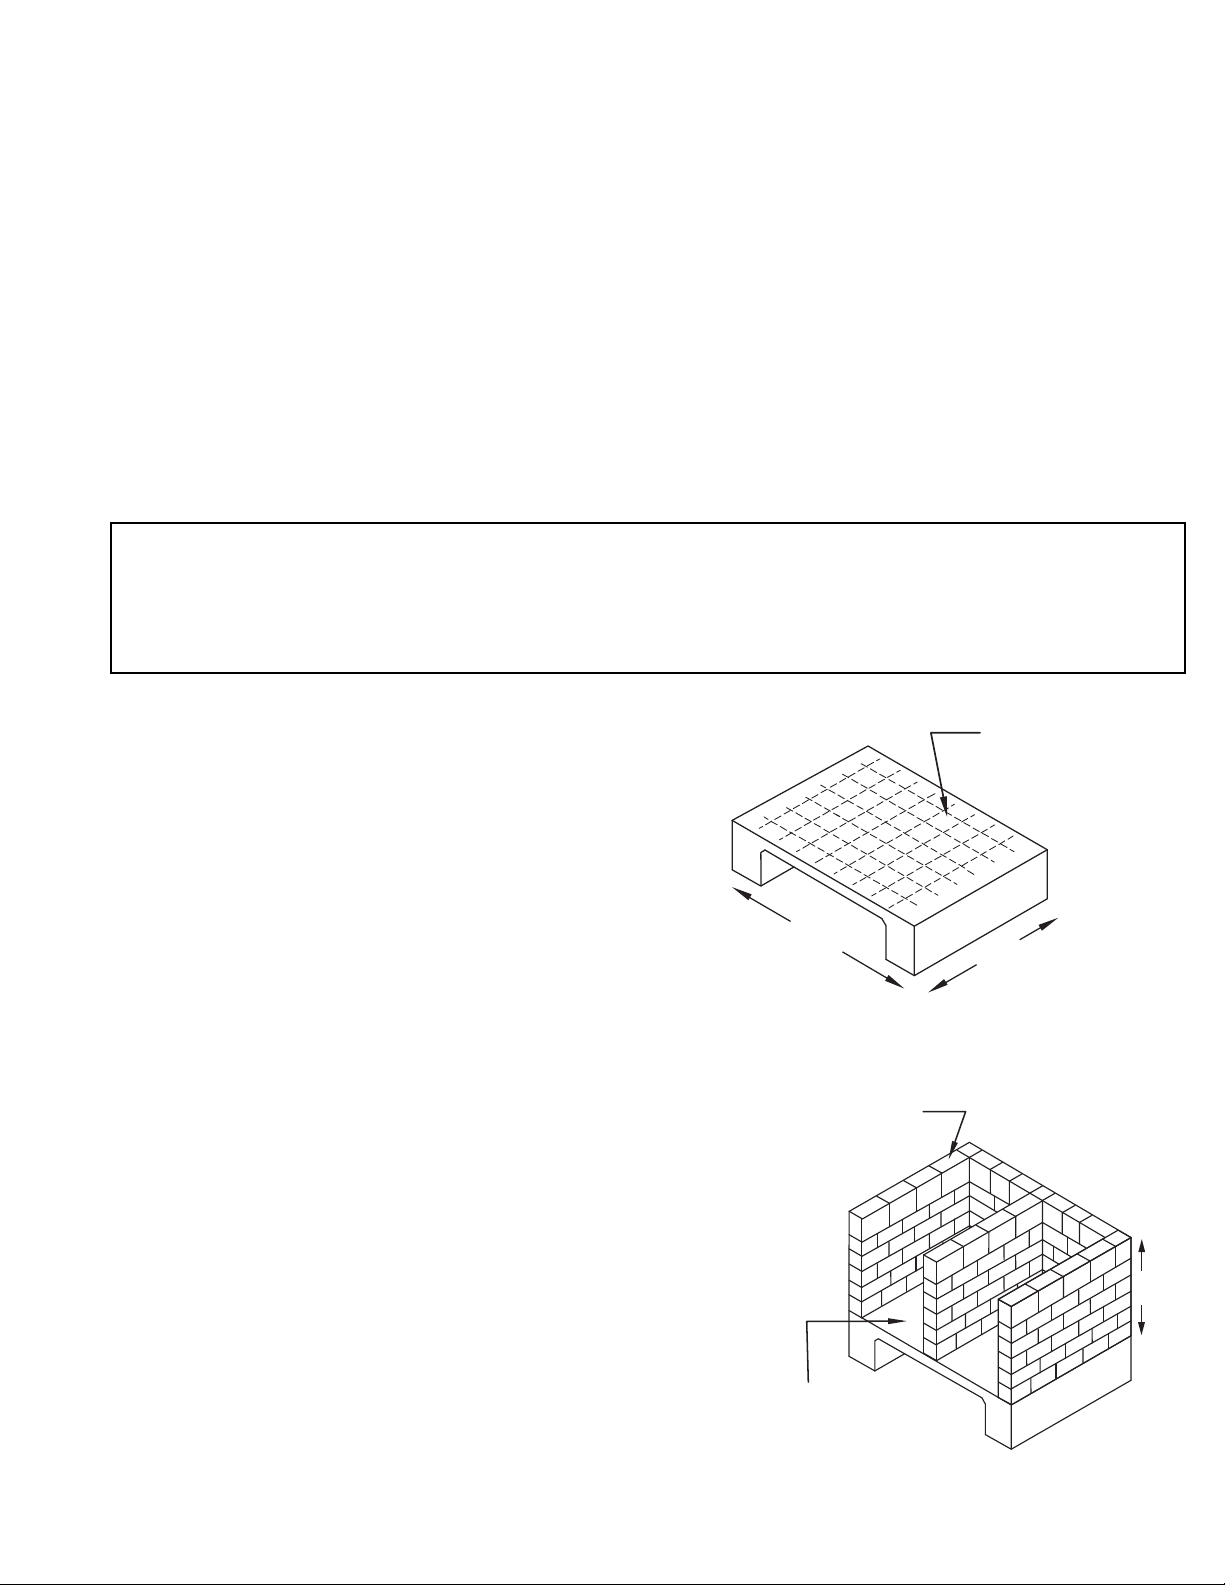
2. CONSTRUCTING THE OVEN BASE
Materials List and Step-by-Step Instructions...................................................................................................5
3. OVEN ASSEMBLY
Materials List ..............................................................................................................................................................7
Step 1 – Floor Layout...............................................................................................................................................7
Step 2 – Mortaring The Floor................................................................................................................................7
Step 3 – Crown Assembly ......................................................................................................................................8
Step 4 – Mortaring Crown Base ...........................................................................................................................9
Step 5 – Mortaring Crown Joints.........................................................................................................................9
Step 6 – Installing Flue Manifold ...................................................................................................................... 10
Step 7 – Insulation ................................................................................................................................................ 10
Step 8 – Oven Venting ......................................................................................................................................... 11
4. ENCLOSING THE OVEN
Flat Roof Enclosure Diagrams............................................................................................................................ 12
5. OVEN VENTING INSTRUCTIONS
Overview .................................................................................................................................................................. 14
Conditions of Acceptability................................................................................................................................ 14
Recommended Chimney Pipe........................................................................................................................... 15
Elbow Oset Chart................................................................................................................................................ 16
Precautions.............................................................................................................................................................. 17
6. CURING A WOOD-FIRED OVEN ............................................................................................................. 18
Instructions.............................................................................................................................................................. 19
Selecting The Proper Wood For Your Oven ................................................................................................... 19
Fire Starting Tools.................................................................................................................................................. 19
Using The Door....................................................................................................................................................... 20
How to Measure Oven Temperature ............................................................................................................... 20
Starting a Fire.......................................................................................................................................................... 21
Curing The Oven.................................................................................................................................................... 21
Curing Schedule .................................................................................................................................................... 25
6. LIMITED WARRANTY ............................................................................................................................................... 26

Commercial 140 Wood AOS Manual Mugnaini Imports, Inc. 4
INTRODUCTION
The following is intended to be used as a general reference for the installation of the Mugnaini Commercial
140 wood-burning oven, and more specically for those individuals (like yourself, your architect, or your
contractor) who will be involved with the design and the construction of your oven.
Package Contents Check List
❑Oven Crown Elements (Items A–H)
❑Metal Flue Manifold with Screws (Item I)
❑Removable Iron Door (Item J)
❑Thermal Insulating Blanket (Item K)
❑Floor Elements (Items 1–13)
Dimensions: W 140
Exterior:
• Crown Width: 62”
• Crown Length: 67”
• Crown Height: 24”
• Arch width: 32”
Interior:
• Cooking Floor: 55”W x 60” L
• Arch Opening: 23”W x 10” H
W140 Oven
B
C
ED
G
1
23
4
5
F
H
6
7
8
9
10
11 12
13 A
K
I
J

Commercial 140 Wood AOS Manual Mugnaini Imports, Inc. 5
INSTRUCTIONS
STEP 1
Construct 6” min. reinforced concrete foundation
on top of 6” aggregate base and 95% compacted
native soil. (See Step 1 for a typical cross section.)
Footing dimensions are 12”x 12”.
STEP 2
Construct 2 side walls and 1 back wall using 6” concrete
blocks (or other) with #4 rebar at 16”o.c. The height for this
rst block layer is typically 30”. Note that the stated height of
the base has been formulated for use by individuals 5’6” to
5’9” in height. If elevation adjustments are desired, modify
the height of the lower base only (the wood storage area).
Contractor to verify height of nal installation with the owner.
Oven Base Materials List Using 6” CMU Block
❑6 Sack Concrete
• Foundation ~ 1 yd.
• 1st Load Bearing Floor ~ 5/8 yd.
• Final Elevated Slab ~ ½yd.
❑#4 Rebar ~ 180 LF
❑6” CMU Block ~ 56 blocks
❑Sand ~ 5/8 yd.
❑6”x6” – 10/10 WWF ~ 34 sq. ft.
❑Construction Paper (free of oil, tar, or resins) ~ 34 sq. ft.
CONSTRUCTING THE OVEN BASE
STOP
Before you begin construction, determine your nished oven oor height. Oven oor height
should be about users elbow height.
82”
86”
(minimum
outside
dimensions)
STEP 1
Construct
Foundation
(wood storage area)
STEP 2
Construct
Walls
~ 30”

Commercial 140 Wood AOS Manual Mugnaini Imports, Inc. 6
STEP 3
Place #4 rebar 12” o.c.,
each way, 2” above CMU block
and pour a leveled 6”concrete slab.
STEP 4
Install/extend 6” or 8”concrete block around perimeter
of load bearing oor to a height ~ 8”). Fill with 6” of
dry sand. Cover dry sand with Brown Rosin Paper
(free of oil, tar or resins) or similar product (NO PLASTIC!)
as moisture barrier. Before progressing to step 5
determine desired length and depth of extended
shelf — may extend beyond minimum of
10” deep x 32 ½” wide.
STEP 5
Notch front row of block. Place 6”x6” – 10/10
welded wire fabric
(1” above sand using wire dobies) and place
#4 rebar for a front shelf 10” deep x 32 ½”
wide (minimum--wider if preferred) as
support for shelf.
Pour a leveled 3” concrete slab on top
of the rosin paper and sand base.
Once cured, go to Section 3 —
Oven Assembly.
STEP 3
Construct Elevated
Load Bearing Floor.
STEP 4
Construct Additional
Block Layer. Fill with
Sand and Cover with
Brown Builder’s
Paper.
STEP 5
Pour Final
Concrete Slab

Commercial 140 Wood AOS Manual Mugnaini Imports, Inc. 7
OVEN ASSEMBLY
Materials List
❑Refractory Mortar
• 1 - 80lb. bag dry
• or 1 - 75lb. bucket, pre-mixed
• Final Elevated Slab ~ ½ yd.
❑Perlite
• 8 bags (32 cubic ft. total)
INSTRUCTIONS
Note: Photos are for your assistance and may be of an oven other than the one in this manual.
STEP 1 FLOOR LAYOUT
Lay out oor elements (Items 1 thru 13) onto the concrete slab to establish the center point. Next, using a
pencil, mark an outline of the pre-assembled oor on the concrete slab for easy assembly.
STEP 2 MORTARING THE FLOOR
Using refractory mortar, place each oor element in the following succession (Item 1 thru 13). Floor pieces
should t together as snug as possible.
Note: Due to the handmade characteristics of this product, a 1/8” gap may exist between oor elements.
DO NOT mortar or grout in between the oor element joints.
The natural gap between oor elements is designed to allow for thermal expansion.
W140 Oven
B
C
ED
G
1
23
4
5
F
H
6
7
8
9
10
11 12
13 A
K

Commercial 140 Wood AOS Manual Mugnaini Imports, Inc. 8
STEP 2 MORTARING THE FLOOR continued
STEP 3 CROWN ASSEMBLY
First, place and interconnect the crown elements (Items A and H) around the oor elements.
(Item B and C must slide into item A). All other items overlap each other. You may use a small pry bar at
base to manipulate into place the dome pieces on the exterior of the dome.
DO NOT place mortar in the crown element joints.
A small gap of roughly ¼”– ½”will also exist between the oven oor and crown elements.

Commercial 140 Wood AOS Manual Mugnaini Imports, Inc. 9
STEP 4 MORTARING CROWN BASE
Wet sponge joints. Apply refractory mortar to the outside base of crown elements.
(Approximately 3”wide x ½” thick over the outside perimeter).
STEP 5 MORTARING CROWN JOINTS
Wet sponge joints. Apply refractory mortar over the joints. (Approximately 4” wide x ½” thick over
each joint). Do not allow mortar to enter joints.

Commercial 140 Wood AOS Manual Mugnaini Imports, Inc. 10
STEP 6 INSTALLING THE FLUE MANIFOLD
Place ue manifold on arch and mark fro screws. Drill 2 holes with masonry bit (1/8”w – 1 ¼”d). Attach ue
manifold with provided screws. Mortar base of metal manifold (½” – 2”).
Note: Ensure the ue manifold is level on top of crown elements.
STEP 7 INSULATION
Cover the entire oven with 2-layers of 1”or 1-layer of 2” Thermal Insulation Blanket (Item K).

Commercial 140 Wood AOS Manual Mugnaini Imports, Inc. 11
STEP 7 INSULATION continued
STEP 8 OVEN VENTING
Based on the overall oven design and architecture, each chimney system will vary. Contact your local
licensed chimney or mechanical contractor. See page 14 for “Oven Venting Instructions”.

Commercial 140 Wood AOS Manual Mugnaini Imports, Inc. 12
ENCLOSING THE OVEN
Your Mugnaini Oven is now ready for the nal step of the construction process – which relies entirely
on your level of creativity and desired architectural eect. The oven enclosure protects the oven from
atmospheric moisture, supplies ventilation to the oven (so that condensation does not occur within the
compartment), and retains the insulating materials placed over and around the oven crown itself.
Chimney pipe length will vary depending on oven enclosure design. Consider this when determining
your oven roof height. See page 19 & 20 for chimney pipe information.
BUILT IN GABLE
DOME WIDE DOME NORMAL

Commercial 140 Wood AOS Manual Mugnaini Imports, Inc. 13
ENCLOSING THE OVEN
Your Mugnaini Oven is now ready for the nal step of the construction process – which relies entirely
on your level of creativity and desired architectural eect. The oven enclosure protects the oven from
atmospheric moisture, supplies ventilation to the oven (so that condensation does not occur within the
compartment), and retains the insulating materials placed over and around the oven crown itself.
The example below shows a at roof enclosure, if you are planning on enclosing the oven as a Gable, Hip,
etc. please call the oce for assistance at 888.887.7206.
Chimney pipe length will vary depending on oven enclosure design. Consider this when determining
your oven roof height. See page 15 & 16 for chimney pipe information.
Arch opening
Arch width
10” × 38” (min. width)
cantilevered hearth
extension, subject
to owner preference
32”
23 ⁄”
86”
82”
Top View
1 ⁄” arch
Dome outside diameter
70”
4” min. sides & back
2” Clearance from
combustible materials
2” 6” Concrete
block wall
Perlite granules
8” Stainless
steel ue-
manifold
Flue setback:
approx. 10 ½”
on center
from arch
front when
using 30°
elbow
140 FLAT ROOF ENCLOSURE TOP VIEW

Commercial 140 Wood AOS Manual Mugnaini Imports, Inc. 14
140 FLAT ROOF ENCLOSURE FRONT VIEW
6” Packed dry
sand base
Valoriani®
commercial 3 ¼"
modular dome
6" Concrete slab
w/#4 rebar @ 12”on
center each way
Approx. 45”
verify with owner
minimum
insulation
space
23 ⁄”
80 ⁄” min.
12"
3" Concrete or
perforated metal cap
Direct vent using 8” Ø listed
class A chimney. Chimney
must terminate to an
approved spark arrestor. Perlite insulation
or equivalent
Thermal insulating
blanket
6" Concrete block
w/#4 rebar @ 16”
on center
4" Rebar @ 16” on
center footing to
concrete block
Center block wall
can run in opposite
direction
Open Wood Storage
Open Wood Storage
oven height
arch height
2" Clearance to
combustible materials
Front View
17 ⁄"
3” Concrete slab
w/6x6 - ⁄WWF
(wire mesh) over
moisture barrier
Valoriani®
commercial 2 ¼"
floor tile

Commercial 140 Wood AOS Manual Mugnaini Imports, Inc. 15
DOME SHAPED ENCLOSURE
Example
STEP 1
Attach the appropriate Simpson DuraTech chimney (or
similar product) on top of the ue and extend, based on
your overall dimensions.
STEP 2
Drill holes to accommodate ¼” steel pencil rod rebar
around the perimeter of the concrete slab 12” apart.
STEP 3
Place Pour Stone™ or equivalent and 6ft. lengths of the
above mentioned rebar in the drilled holes and bend to
desired shape, then wait for the Pour Stone™ to cure.
STEP 4
Once the Pour Stone™ or equivalent has cured, reshape
the rebar and wire all the ends together at the top around
the chimney, leaving the excess for now.
STEP 5
Begin at the bottom of the rebar and wrap with expanded
metal lath around the perimeter. Work your way to the
top, wiring the lath together as you go. Cut out a 12”x
12” access hole in the back at least 10”up from the oven
crown to pour in the Perlite granules. Place a 2” diameter
metal weatherproof air vent on the back near the top of
your structure at the chimney to prevent condensation
within the oven enclosure.

Commercial 140 Wood AOS Manual Mugnaini Imports, Inc. 16
STEP 6
Begin again at the bottom and work your way to the top
overing the expanded metal lath with the rst (scratch)
coat 3/8”thick exterior stucco. Pour in the Perlite granules
then wire and stucco the access hole closed and wait for
this coat to cure.
STEP 7
Once the rst coat has cured you may now cut o the
excess rebar at the chimney. Begin again at the bottom
and cover the rst coat with the second (brown) coat
3/8” thick exterior stucco right up to the chimney to seal
completely. Wait for this to cure.
STEP 8
After second coat of stucco has cured, you may now
paint or use nished stucco coat.
NOTE: If placing the oven under an overhang or patio
structure follow local Building Codes and Fire Marshall
requirements for passing the chimney through
combustible ceilings.

Commercial 140 Wood AOS Manual Mugnaini Imports, Inc. 17
86”
82”
6” conc. block
10”
1” arch
2” clearance from combustable
materials
2”
12”
min.
16”
Outside diameter: 70”
4” Min.
Arch
10”x 38” (min width)
Cantilevered hearth extension,
subject to owers preference.
8” diameter flue-manifold
Flue setback: approx. 12” from
arch front using 30° elbow
23”
Arch opening
32”
Arch width
Perlite granules
Thermal insulating
blanket (1”)
140 FLOOR AND BASE PLAN
Chimney cap with
spark arrestor
Simpson Dura-tech or
equivalent
7/8” exterior cement plaster
1/4” steel pencil rod rebar
Perlite insulation
Thermal insulating
blanket (1”)
Wood burning oven
model: Commercial 140
3” conc. Slab with 6 x 6—10/10
WWF over construction paper
6” dry sand base
6” conc. slab with #4 bars
@ 12” O.C. each way
6” conc. block
#4 bars @ 16” o.C.
Finish materials: stucco,
stone, brick, etc.
4” conc. slab with #4 bars
@ 16” O.C. each way
#4 dowels @ 16” o.C.
footing to conc. block
4” aggregate base
12”
min.
Tile, plaster or metal roof cap
12” min.
Verify with owner
+/- 3’– 9” 2’– 0’ min.
6” 6” 3”
2” clr.
OPEN WOOD STORAGE
#4 cont.
22 3/4” 12”
140 DOME SECTION SAMPLE DIMENSIONS
Verify
Oven Floor
DOME SECTION SAMPLE DIMENSIONS
DOME FLOOR AND BASE PLAN

Commercial 140 Wood AOS Manual Mugnaini Imports, Inc. 18
OVEN VENTING INSTRUCTIONS
Commercial Model Wood-Fired Ovens
OVERVIEW
Your Mugnaini wood-red oven has been listed to the UL Standard for Safety for Fireplace Stoves,
UL 737 8th edition.
These requirements cover replace stoves that are freestanding assemblies having re chambers intended
to be operated open to the room with the door either open or closed.
Ovens covered by these requirements are intended for attachment to a commercial chimney capable of
being used for use with solid wood or coal fuels.
Mugnaini wood-red ovens are intended for installation in accordance with the Standard for Chimneys,
Fireplaces, Vents and Solid Fuel Burning Appliances, NFPA 211.
CONDITIONS OF ACCEPTABILITY
• The wood-burning oven is not provided with a chimney system. The oven must be connected to any
listed chimney assembly.
• The chimney assembly must be installed in accordance with NFPA 211 Standard for Chimneys.
• The chimney diameter size is 8”.
• Factory-built chimneys or clay ue liners are acceptable.
• The chimney must have at least 36” of vertical rise.
• The oven is not designed to support the weight of a chimney length greater than 36” without
additional support. Failure to properly support the chimney pipe may damage the oven and void your
warranty. Follow chimney manufacturer’s installation instructions for proper chimney support.
• Chimney must terminate to an approved chimney cap with spark arrestor (screen mesh).
• Single wall and B-type vent pipes are NOT acceptable for this type if appliance.
• DO NOT CONNECT THIS UNIT TO A CHIMNEY FLUE SERVING ANOTHER APPLIANCE.
• CONTACT LOCAL BUILDING OR FIRE OFFICIALS ABOUT RESTRICTIONS AND INSTALLATION INSPECTION
IN YOUR AREA.

Commercial 140 Wood AOS Manual Mugnaini Imports, Inc. 19
• DuraTech is an all-fuel chimney system designed for appliances that require a UL 103 chimney system.
With a Thermal Tech blanket insulation encased between dual walls, DuraTech oers safety and
performance. It keeps the outer wall cool, while ensuring high ue gas temperatures for optimum draft.
• Clearances: 2” clearance to combustibles.
• Direct vent by connecting the oven ue outlet to a 8-inch diameter listed chimney rated for use as a
2100° F chimney system. Chimney must terminate to an approved spark arrestor.
• Your Mugnaini wood-red oven was evaluated to meet the re safety standards of UL 737-Eighth Edition
by Intertek Testing Laboratories, ETL Listing Report #J20020124 www.interteksemco.
• The oven is designed for use with dry wood fuel only.
RECOMMENDED CHIMNEY PIPE
Mugnaini Imports recommends the Simpson DuraTech chimney pipe.
Simpson products can be found on the web at www.duravent.com. Proper planning of the chimney
venting system is essential for a safe and successful installation.
CAP WITH SPARK ARRESTOR
WALL STRAP
ELBOW STRAP
CHIMNEY SECTION
ELBOW
CHIMNEY RUN WITH ELBOWS
SAMPLE SAMPLE
STRAIGHT PIPE
CAP WITH SPARK ARRESTOR
STRAIGHT CHIMNEY SECTION
ELBOW
ADAPTER ASSEMBLY (if using simp/dura) METAL MANIFOLD
TAPCON SCREW

Commercial 140 Wood AOS Manual Mugnaini Imports, Inc. 20
ELBOW OFFSET CHART
SIZE 5”, 6”, 7”, 8” Diameter
Elbow Angle
from Vertical
Chimney Length
between Elbows
Offset
inches
Rise
inches
15°
15°
15°
15°
15°
15°
15°
15°
15°
15°
15°
15°
15°
30°
30°
30°
30°
30°
30°
30°
30°
30°
30°
30°
30°
30°
0”
6”
9”
12”
18”
24”
36”
48”
48“+ 6”
48“+ 9”
48“+ 12”
48“+ 18”
48“+ 24”
0”
6”
9”
12”
18”
24”
36”
48”
48” + 6”
48“+ 9”
48“+ 12”
48“+ 18”
48“+ 24”
2”
3 1/4”
4”
4 3/4”
6 1/4”
8”
11”
14 1/4”
15 1/2”
16 1/4”
17”
18 1/2”
20”
4”
6 1/4”
7 3/4”
9 1/4”
12 1/4”
15 1/4”
21 1/4”
27 1/4”
29 3/4”
31 1/4”
32 3/4”
35 3/4”
38 3/4”
16 1/2”
21 1/4”
24 1/8”
27”
32 3/4”
38 1/2”
50 1/4”
61 3/4”
66 1/2”
69 3/8”
72 1/4”
78”
83 3/4”
15 3/4”
20”
22 5/8”
25 1/4”
30 1/4”
35 1/2”
46”
56 1/4”
60 1/2”
63 1/8”
65 3/4”
71”
76”
< >
< >
RISE
OFFSET
Table of contents
Other Mugnaini Oven manuals
Popular Oven manuals by other brands

Siemens
Siemens VB554DFR0 instruction manual

Kenmore
Kenmore 790.4034 Series Use & care guide

Frigidaire
Frigidaire GLEB30T9D Factory parts catalog

Jenn-Air
Jenn-Air JMW2427WB00 Use & care guide

GE
GE Profile PLD617 Owner's manual and installation instructions

DèLonghi
DèLonghi EOS160 User operating instructions