Music Computing CoreMC 2 User manual

CoreMC™2 Reference Guide - http://musiccomputing.com/support 1 | P a g e
CoreMC™2 Reference Guide

CoreMC™2 Reference Guide - http://musiccomputing.com/support 2 | P a g e
Contents
1.1 Motherboard Features Reference ................................................................ 3
2.1 Jumper Reference..................................................................................... 4
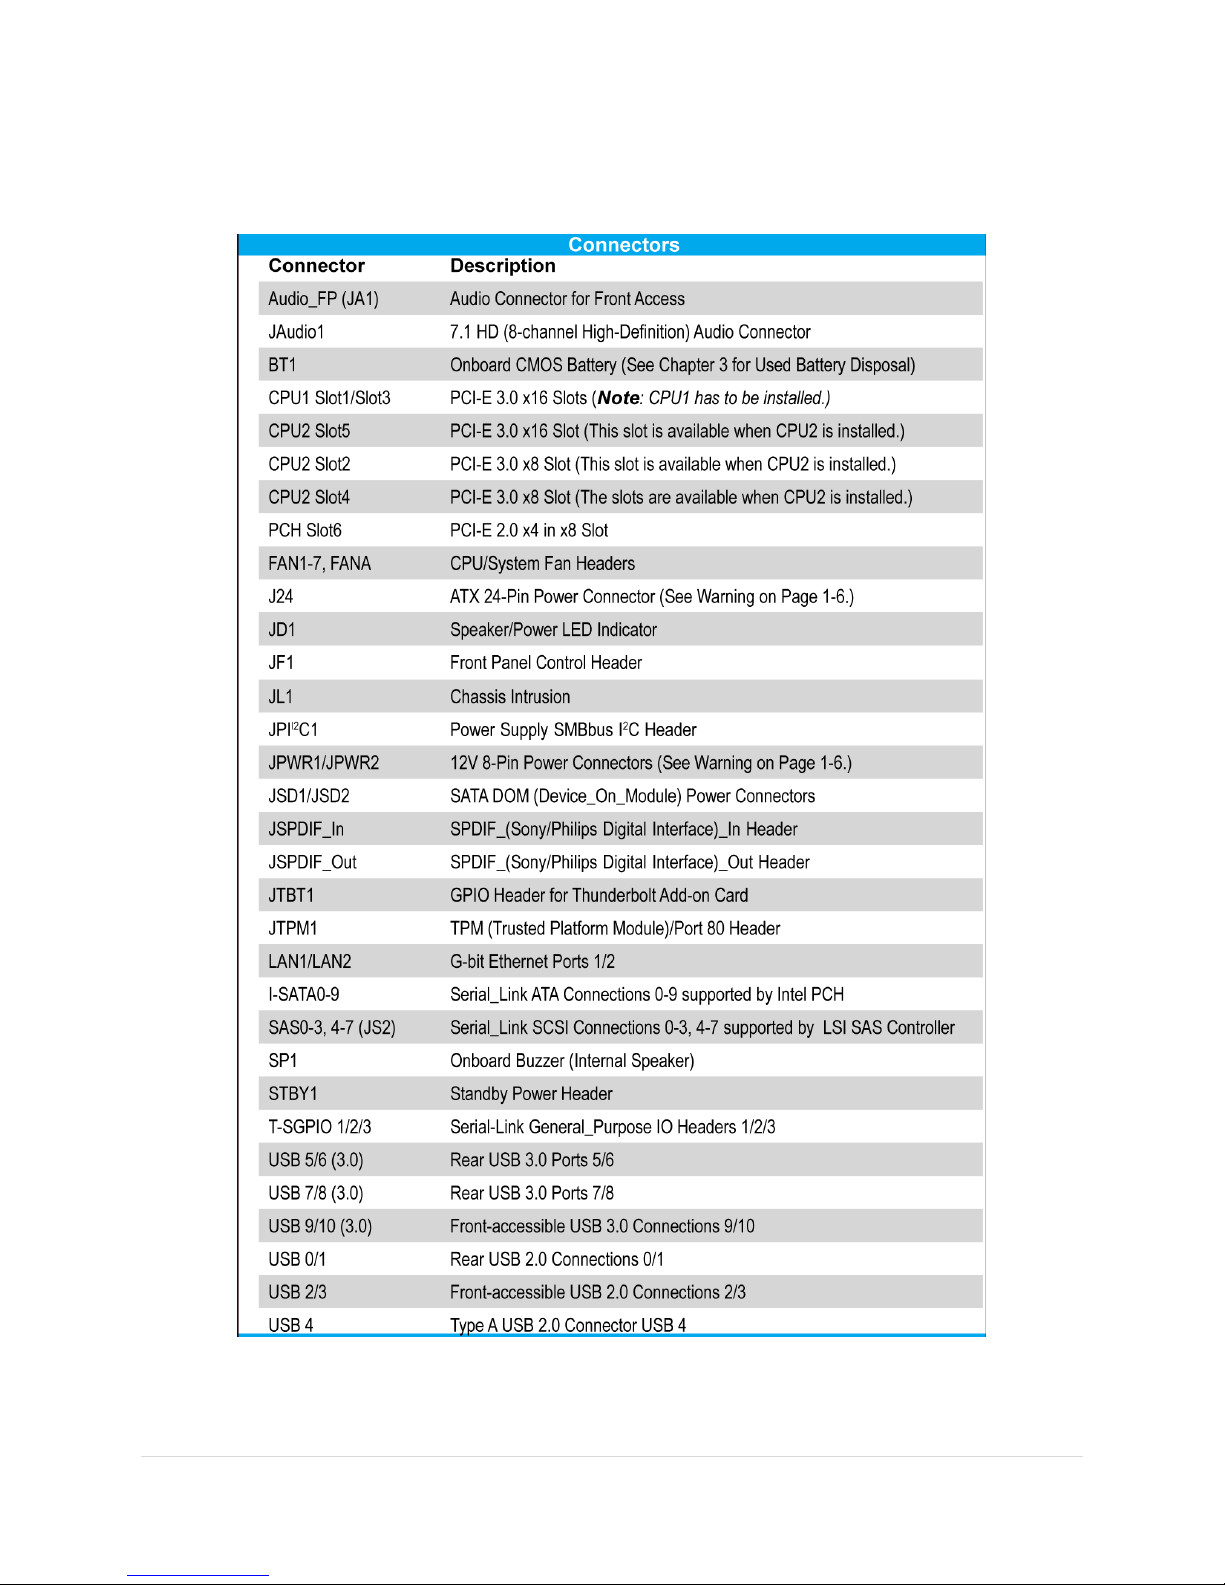
3.1 Motherboard Connectors Reference............................................................. 5
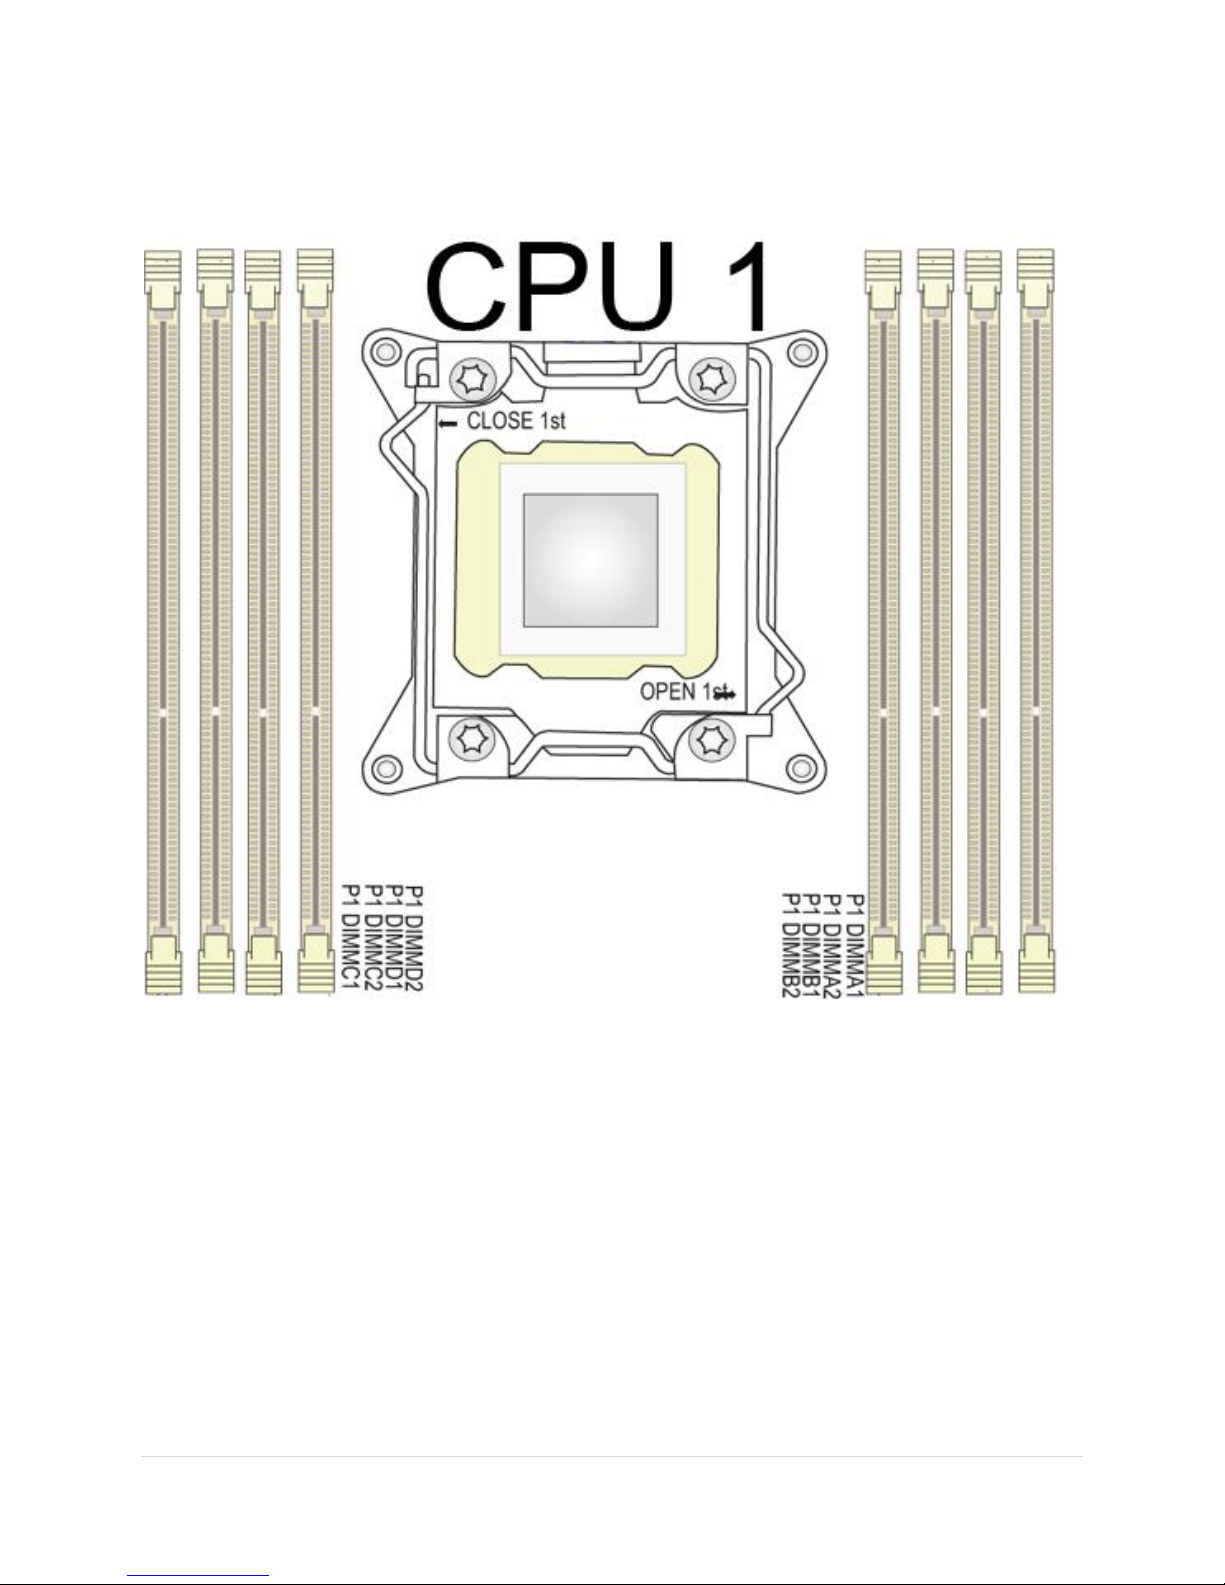
4.1 Memory Reference.................................................................................... 6
CPU 1 DIMM Slots ....................................................................................... 7
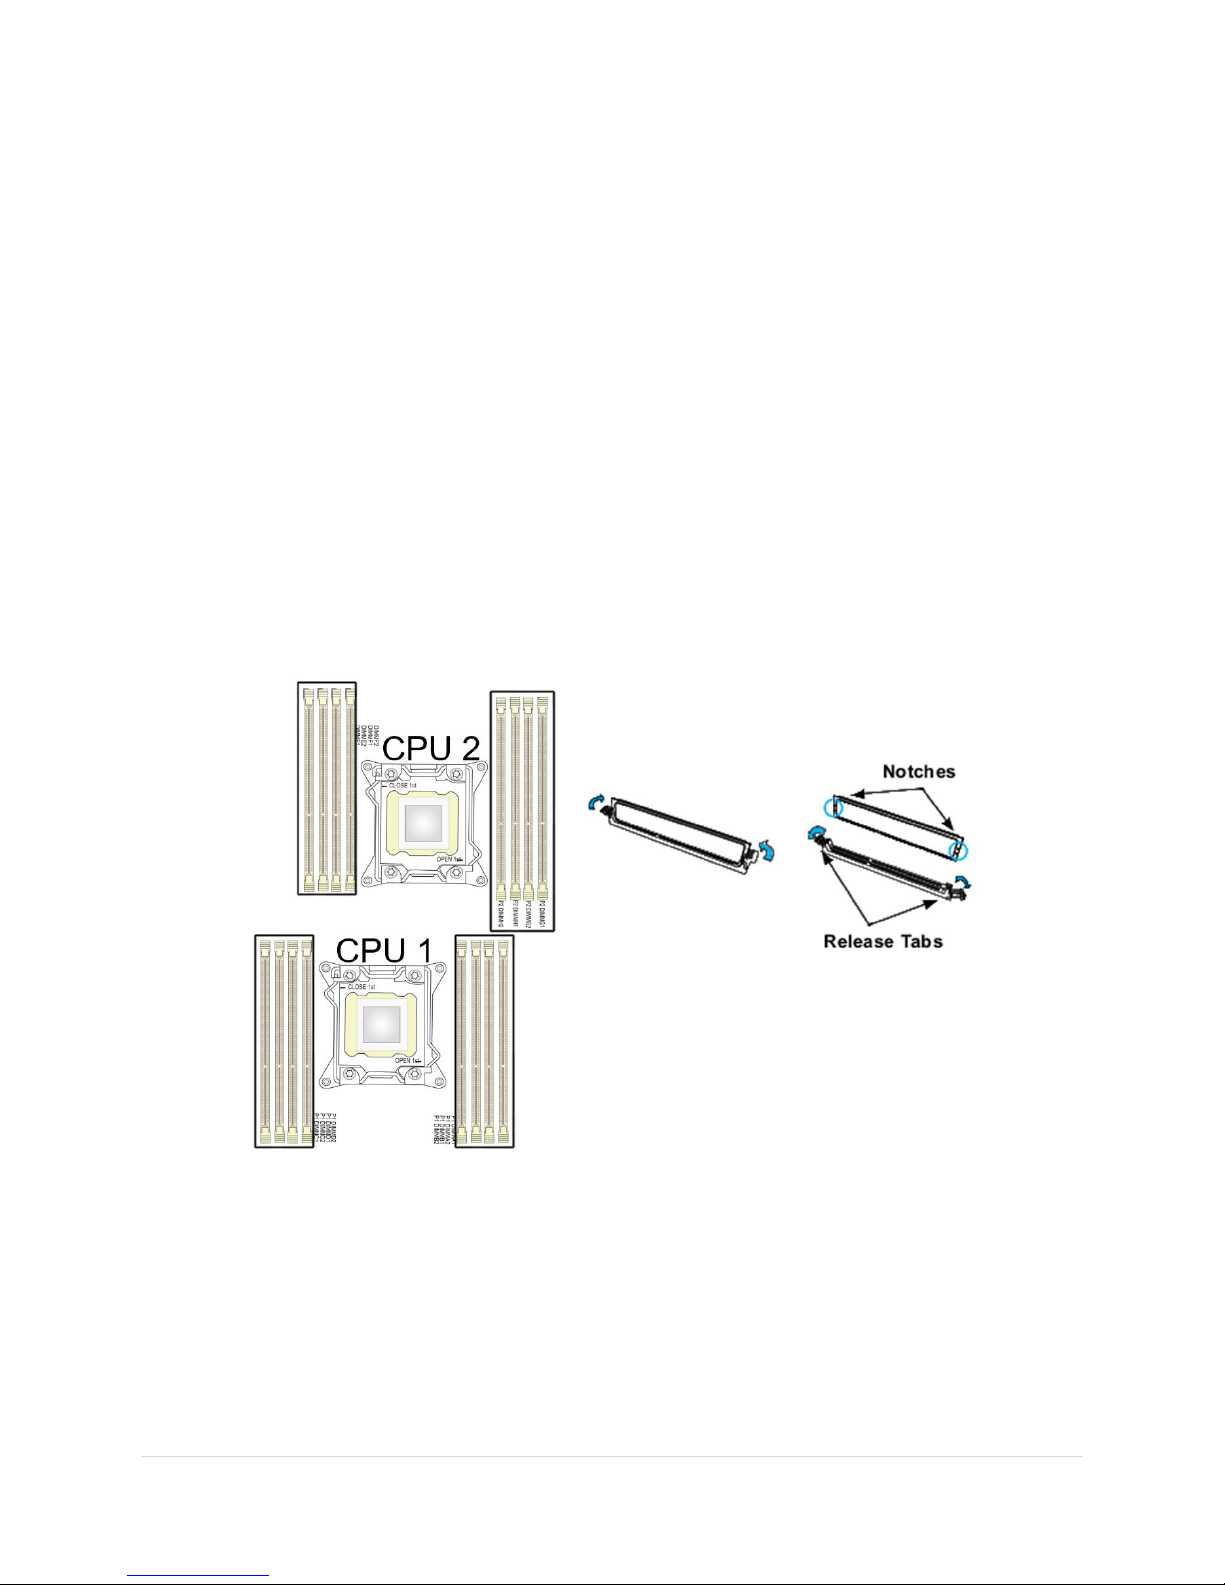
CPU 2 DIMM Slots ....................................................................................... 8
4.2 Installing and Removing the Memory Modules ........................................... 9
5.1 PCI Reference ........................................................................................ 11
6.1 Back I/O Panel Reference ........................................................................ 12
7.1 Processor and Heat Sink Installation Reference .......................................... 13
7.2 Installing the LGA2011 Processor........................................................... 14
7.3 Installing a CPU Heatsink...................................................................... 17
7.4 Removing a CPU Heatsink..................................................................... 18
8.1 Music Computing Warranty Information..................................................... 19
Return Policy for Products Purchased through Amazon ................................... 20
Return Policy for Products Purchased directly from Music Computing ............... 20

CoreMC™2 Reference Guide - http://musiccomputing.com/support 3 | P a g e
1.1 Motherboard Features Reference
CoreMC™2 Motherboard Layout and Features
All graphics, drawings, and pictures shown in this manual are for illustration only.
The components that came with your CoreMC™2 may or may not look exactly
the same as those shown in this manual.

CoreMC™2 Reference Guide - http://musiccomputing.com/support 4 | P a g e
2.1 Jumper Reference
If you need assistance, and to avoid any warranty issues please contact Music
Computing Support before attempting any system changes.

CoreMC™2 Reference Guide - http://musiccomputing.com/support 5 | P a g e
3.1 Motherboard Connectors Reference

CoreMC™2 Reference Guide - http://musiccomputing.com/support 6 | P a g e
4.1 Memory Reference

CoreMC™2 Reference Guide - http://musiccomputing.com/support 7 | P a g e
CPU 1 DIMM Slots

CoreMC™2 Reference Guide - http://musiccomputing.com/support 8 | P a g e
CPU 2 DIMM Slots

CoreMC™2 Reference Guide - http://musiccomputing.com/support 9 | P a g e
4.2 Installing and Removing the Memory Modules
CAUTION
Exercise extreme care when installing or removing DIMM modules to prevent any
possible damage.
If you need assistance, and to avoid any warranty issues please contact Music
Computing Support before attempting any system changes.
Installing & Removing DIMMs
1. Insert the desired number of DIMMs into the memory slots, starting with P1-
DIMMA1. (For best performance, please use the memory modules of the same
type and the same speed.)
2. Push the release tabs outwards on both ends of the DIMM slot to unlock it.
3. Align the key of the DIMM module with the receptive point on the memory
slot.
4. Align the notches on both ends of the module against the receptive points on
the ends of the slot.
5. Use two thumbs together to press the notches on both ends of the module
straight down into the slot until the module snaps into place.

CoreMC™2 Reference Guide - http://musiccomputing.com/support 10 | P a g e
6. Press the release tabs to the locking positions to secure the DIMM module
into the slot.
Removing Memory Modules
Press both notches on the ends of the DIMM module to unlock it. Once the DIMM
module is loosened, remove it from the memory slot.

CoreMC™2 Reference Guide - http://musiccomputing.com/support 11 | P a g e
5.1 PCI Reference
CPU1 Slot1/Slot3 - PCI-E 3.0 x16 Slots (Use with CPU1 only.)
CPU2 Slot5 - PCI-E 3.0 x16 Slot (This slot is ONLY available when CPU2
is installed.)
CPU2 Slot2 - PCI-E 3.0 x8 Slot (This slot is ONLY available when CPU2 is
installed.)
CPU2 Slot4 - PCI-E 3.0 x8 Slot (This slot is ONLY available when CPU2 is
installed.)
PCH Slot6 - PCI-E 2.0 x4 in x8 Slot (Please Contact Support with any
questions)

CoreMC™2 Reference Guide - http://musiccomputing.com/support 12 | P a g e
6.1 Back I/O Panel Reference
Back Panel Connectors and I/O Ports

CoreMC™2 Reference Guide - http://musiccomputing.com/support 13 | P a g e
7.1 Processor and Heat Sink Installation Reference
If you need assistance, and to avoid any warranty issues please contact Music
Computing Support before attempting any system changes.
CoreMC™2 uses up to two Dual Intel® E5-2600v3 Series Processors (Socket R3-
LGA 2011); each processor supports dual full-width Intel QuickPath Interconnect
(QPI) links (of up to 9.6 GT/s one direction per QPI.
Warning: When handling the processor package, avoid placing direct pressure on
the label area. Also, improper CPU installation or socket/pin misalignment can
cause serious damage to the CPU or the motherboard that will require RMA repairs.
Be sure to read and follow all instructions thoroughly before installing your CPU and
heatsink.
Make sure that you install the processor into the CPU socket before you install the CPU heatsink.
•If you buy a CPU separately, make sure that you use an Intel-certified multi-directional
heatsink only.
•When receiving a server board without a processor pre-installed, make sure that the plastic
CPU socket cap is in place and none of the socket pins are bent; otherwise, contact your Music
Computing immediately.
•Contact Music Computing for updates on CPU support.

CoreMC™2 Reference Guide - http://musiccomputing.com/support 14 | P a g e
7.2 Installing the LGA2011 Processor
1. There are two load levers on the LGA2011 socket. To open the socket cover,
first press and release the load lever labeled "Open 1st."
2. Press the second load lever labeled "Close 1st" to release the load plate that
covers the CPU socket from its locking position.

CoreMC™2 Reference Guide - http://musiccomputing.com/support 15 | P a g e
3. With the lever labeled "Close 1st" fully retracted, gently push down on the
lever labeled "Open 1st" to open the load plate. Lift the load plate to open it
completely.
4. Use your thumb and index finger to loosen the lever and open the load plate.
5. Using your thumb and index finger, hold the CPU by its edges. Align the CPU
keys, which are semicircle notches, against the socket keys.

CoreMC™2 Reference Guide - http://musiccomputing.com/support 16 | P a g e
6. Once they are aligned, carefully lower the CPU straight down into the socket.
Do not drop the CPU on the socket or move the CPU horizontally or vertically.
Do not rub the CPU against the surface or against any of the socket pins to
avoid damaging the CPU or the socket.
7. With the CPU inside the socket, inspect the four corners of the CPU to make
sure that the CPU is properly installed.
8. Close the load plate with the CPU inside the socket. Lock the lever labeled
"Close 1st" first, then lock the lever labeled "Open 1st" second. Using your
thumb, gently push the load levers down to the lever locks.

CoreMC™2 Reference Guide - http://musiccomputing.com/support 17 | P a g e
7.3 Installing a CPU Heatsink
1. Check the heatsink to make sure there is thermal grease applied.
2. If so, do not apply any additional thermal grease to the heatsink or the CPU
die -- the required amount has already been applied.
3. If not, please refer to the heatsink documentation for the correct amount
needed.
4. Place the heatsink on top of the CPU so that the four mounting holes are
aligned with those on the motherboard's and the heatsink bracket
underneath.
5. Screw in two diagonal screws (i.e., the #1 and the #2 screws) until just snug
(-do not over-tighten the screws to avoid possible damage to the CPU.)
6. Finish the installation by fully tightening all four screws.
For optimized airflow, please follow your chassis airflow direction to install the correct CPU heatsink direction.
Graphics shown in this manual are for reference only. They may or may not look the same as the components
installed in your system.

CoreMC™2 Reference Guide - http://musiccomputing.com/support 18 | P a g e
7.4 Removing a CPU Heatsink
Warning: We do not recommend that the CPU or the heatsink be removed.
However, if you do need to uninstall the heatsink, please follow the instructions
below to uninstall the heatsink to prevent damage done to the CPU or the CPU
socket.
1. Unscrew the heatsink screws from the motherboard in the sequence as
shown in the illustration below.
2. Gently wriggle the heatsink to loosen it from the CPU. (Do not use excessive
force when wriggling the heatsink!)
3. Once the CPU is loosened, remove the heatsink from the CPU socket.
4. Remove the used thermal grease and clean the surface of the CPU and the
heatsink, Reapply the proper amount of thermal grease on the surface before
reinstalling the CPU and the heatsink.

CoreMC™2 Reference Guide - http://musiccomputing.com/support 19 | P a g e
8.1 Music Computing Warranty Information
USA WARRANTY
All new Music Computing products come with a 1 year parts and labor
warranty
All new Music Computing products have 90-day support provided through our
ticket system online
All new Music Computing products have a 30 day telephone and remote
desktop support
Extended warranties and support can be purchased
Any damage resulting from the mis-use or failure to follow instructions and
precautions as stated in the product manual will void this warranty.
Warranty repairs: If you purchased the products through Amazon, please
contact them directly
Warranty repairs: If you purchased the products directly from Music
Computing or any authorized reseller (except Amazon), Music Computing will
assume responsibility for the repair service. DO NOT RETURN THE PRODUCT
TO THE DEALER. Contact Music Computing directly using these methods.
oPhone: 512-777-4298
oEmail: support@musiccomputing.com
oSupport Online: http://www.musiccomputing.com/support
This warranty is void if the original serial number has been altered or
removed, or if the unit has been altered in any way
Music Computing reserves the right to make changes in the design and/or
improvements upon their products without any obligation to include those
changes in any products previously manufactured

CoreMC™2 Reference Guide - http://musiccomputing.com/support 20 | P a g e
Return Policy for Products Purchased through Amazon
If the product was purchased from Amazon, please contact them directly.
Please refer to their guidelines for returns for more information
Return Policy for Products Purchased directly from Music
Computing
If the product is defective, Music Computing can elect to repair or replace the
product at its sole discretion
If DOA, Music Computing will pay for Ground shipping both ways, otherwise
customer is responsible for shipping to Music Computing and Music
Computing will be responsible for return Ground shipping to customer
Upgraded return shipping will be an additional charge
Returning products MUST be shipped in original shipping packaging,
otherwise contact Music Computing for replacement packaging. A fee of
$100 will be charge per replacement shipping package
There are no returns for refunds
Upgrading/Modifying/Altering your Music Computing products with unauthorized,
incompatible, or unsupported hardware or software will invalidate your warranty
and support. Systems infected with computer viruses are also not covered
under our warranty and support. A charge will be assessed for us to assist you
in eradicating the viruses and setting up your products again. The charge will be
based on a case-by-case basis.
At Music Computing, we have tried to keep our warranty and service policies simple
and easy to use. Should you encounter any problems with your Music Computing
product, you should contact our Customer Support Department at 512-777-4298.
Also, we have a support ticket system that can be accessed by visiting
http://musiccomputing.com/support.
Table of contents