Mustcam H SERIES V3.3 User manual

Wi-Fi IP Camera
Quick Start Guide
====================
H Series V3.3
Mustcam Mustcam
iOS
App Store
Android
play.google.com

1. Package Contents
IP Camera
5V Power Adaptor
Bracket and Screws
Wi-Fi Antenna
Network Cable
Quick Start Guide
2. Get Started
Step-1 Download and Install App
iOS: Search and download Mustcam from App Store.
Android: Search and download Mustcam from play.google.com.
Install App. After installed, click to start it.
Note: The operation interface of iOS and Android maybe different slightly.
Step-2 Install the IP Camera
Power on the IP Camera by using the supplied power adaptor. The camera will
then start and initialize itself by rotating Pan/Tilt one round respectively. The
green LED (at 6-o’clock position) will flash quickly, which indicates that the
camera is ready for configuration.

Step-3 Add IP Camera to App
1) Add New Camera by Wi-Fi: recommended, for camera that has not
joined network.
Start the App, from the bottom main menu enter Camera page, click +at the
right-top corner, and then choose Add New Camera by Wi-Fi.
①②③④
UID:
Input the camera UID by typing or Scan QR. The UID is on the label at the bottom
of the Camera.
Network:
This column shows the Smart phone’s current Wi-Fi network automatically. This
network will be the one that the camera will join. So if it is not the target network
for the camera, please configure the Smart Phone to that target network firstly.
Password:
Input password of the Wi-Fi network.
Start Configuring Wi-Fi:
Finally, click this button to start configuration. This may take 5-90 seconds. Finally
the added camera shows on a list. Click the camera and then it will start to work.
Note: If configuration failed due to wrong password or the target network is invalid,
please power off the camera and configure again after power it on.

2) Add an Online Camera: if the camera is already online (added early
either by Wi-Fi or cable and within the same network with your phone), you can
add it to App by this way.
Start the App, from the bottom main menu enter Camera page, click +at the
right-top corner, and then choose Add an Online Camera.
Name: You can name the camera as you need e.g. Living room.
UID:
Input the camera UID by typing or Scan QR. The UID is on the label at the bottom
of the Camera.
You can also search online cameras that are within the same LAN with your
Smart Phone and choose a target camera.
Password:
The default password is 8888. You can change the password at the Setting page
later. Finally, click ok to confirm the adding.
Note: To protect your info, please make sure to change P2P Password from
Advance Config page soon after you log in.
①②③④
Then back to Camera page, the added camera will list there, and you can start
live video now (see point-4).
If the added camera is online by net cable, you can configure it to Wi-Fi
connection (see point-3).

3. Configure IP Camera to Wi-Fi Connection
If needed, you can configure camera connected by net cable to Wi-Fi connection.
From Camera page and click , choose Advance Config and then Wi-Fi
Config.
Choose a target Wi-Fi Network and input password, and then disconnect net
cable when the camera starts initialization. After initialized, the camera will switch
to Wi-Fi connection in 60 seconds.
Note:
1) Please make sure that the target Wi-Fi Network works normally and you
have access to it (password is correct); otherwise the Wi-Fi configuration will
fail (although the camera will initialize too), and you need to configure again.
2) The interface of iOS and Android maybe different slightly.
Then back to Camera page, the added camera will list there, and you can start
live video now (see point-4).

4. View Live Video
There are two ways to view live video.
4.1 From the Video page
① ② ③ ④
①Click ,(If there is no camera online, it will show No online camera, please
go to Camera page and add camera.)
②Choose an online camera.
③Live video is shown in the window.
④You can click to switch between one window and four windows.
4.2 From Camera page
Click an online
camera, and then
enter the Live
Video interface.

4.3 Preview Interface Icon Definition
Audio On/Off Cruise (up/down)
Mic On/Off, Press to
talk, release when
finished.
Cruise (left/right)
Snapshot Resolution
Record Video Brightness
Mirror Contrast
Flip Setting
Single Window Four Window
5. Settings
5.1 By clicking , you can enter setting page, with options as follows:
Modify Camera:
Modify camera
Name/UID/Password.
Delete Camera:
Delete an online camera.
Reconnect:
Connect the camera again.
Advance Config:
Enter into more settings as 5.2.

5.2 Advance Config:
Motion Detection Sensitivity: sensitiveness
to trigger the motion detection.
Alarm Interval: interval time for snapshot
Change Wi-Fi network for the IP Camera.
Switch connection from wired to wireless.
See 5.3.
Setup record time, resolution and file length.
Setup the Pan/Tilt rotation speed.
Setup the brightness (darkness) to trigger
IR-LED.
Setup the IP Camera date/time.
Change P2P access password.
Reboot the camera.

5.3 Wi-Fi Config
The interface of iOS and
Android maybe different
slightly.
Here you can:
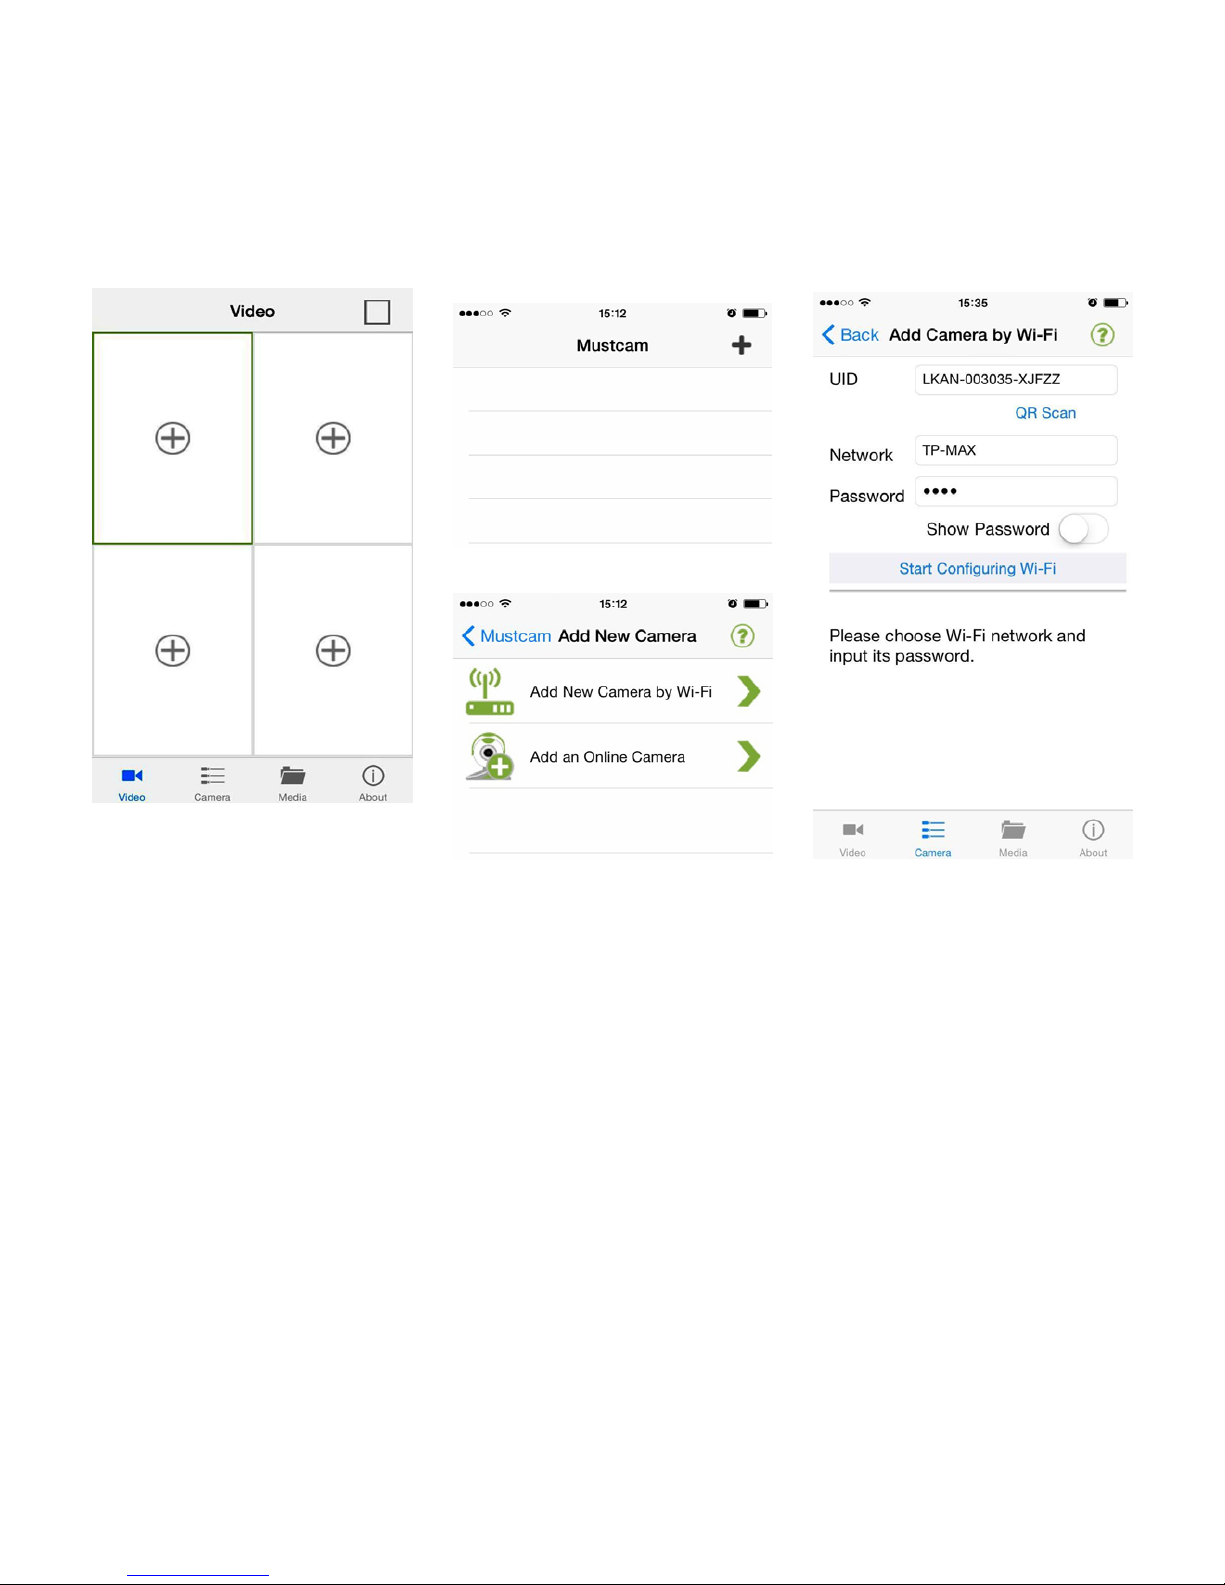
1) Switch the IP Camera connection from
one Wi-Fi network to another.
2) Switch connection from wired to
wireless (Wi-Fi).
Choose a target Wi-Fi Network and input
password, and then disconnect net cable
when the camera starts initialization. After
initialized, the camera will switch to Wi-Fi
connection in 60 seconds.
Note:
Please make sure that the target Wi-Fi
Network works normally and you have access
to it (password is correct); otherwise the Wi-Fi
configuration will fail (although the camera will
initialize too), and you need to configure
again.
6. View Record Picture & Video
Click Media from the bottom main menu.
Alarm Records:
View pictures captured when alarm
triggered. You can switch different camera
by clicking .
Snapshots Files:
View taken pictures. You can switch different
camera by clicking .
Record Files:
View recorded video clips. You can switch
different camera by clicking .
Camera SDCard Files:
View files on SD card of IP Camera. The
vide file format is .asf. Since the file size is
bigger, it is recommended to download and
play the files on PC.

7. Access the Camera by PC
7.1 Install the software Mustcam IPC Viewer (you can download it from
www.mustcam.com/download) and start it.
User Name: admin
Password: Default password is
8888; you can change the
password from Setting page
later.
7. 2 Main Interface

7.3 Add IP Camera
(1) Click to enter Setting page, as follows:
(2) Click +, and there are two ways to add an IP Camera:
①By IP Address: Input the camera’s IP address, port, Username/Password.
② By P2P (recommended): Input UID (on the label at the bottom of the camera)
and P2P Password (8888 by default). If there is both IP and P2P, then IP will be
adopted firstly.
(3) You can also click to search online camera within LAN.
(4) Click OK to confirm the input.
(5) Back to the main interface, choose a target window, and then double-click the
camera from the IP Camera List. Live video will start in that window.

8. Other Operations
8.1 WPS
By WPS, you can establish Wi-Fi connection between IP Camera and router
directly too. This requires that your router has WPS function. If you are not sure
about this, please refer to your router user manual.
After the camera powered on and when its green LED flashes press the WPS
button on your router and its WPS light will flash, waiting for match. Then press
the WPS button on your IP Camera for 3 seconds and release it, after round 10
seconds the matching will finish.
If IP Camera or Router powered on and off or restarted, WPS connection should
be configured again.
8.2 Reset to Default Setting
Press the RESET button at the bottom of the camera until the green LED light off,
and release it. The camera will initialize itself again and back to default settings.
9. Tech Support
For technical issue, please contact your local distributor, or send us email at
support@mustcam.com.
For Mustcam IPC Viewer and Search Tool, please download at
www.mustcam.com/download.

无线网络摄像机
快速操作指导
====================
H 系列 V3.3
Mustcam Mustcam
iOS
App Store
Android
www.mustcam.com/download

1. 包装内容
网络摄像机
5V 电源适配器
安墙支架及钉子
Wi-Fi 天线
网线
快速操作指导
2. 安装使用
第一步、下载并安装 App
iOS: 从苹果商店 (App Store) 搜索并下载 Mustcam
安卓: 从 Google 商店搜索并下载 Mustcam 或者扫封面/彩盒上的二维码。
安装 App. 安装成功后,点击 即可启动。
注意:苹果和安卓的操作界面在个别地方会稍有不同。
第二步、安装摄像机
用自带的电源适配器给网络摄像机通上电,摄像机会启动并自检(上下左右云台各
转动一圈)。六点钟位置的绿色LED工作指示灯会闪烁,表示摄像机可以开始工作
了。

第三步、添加摄像机到 App
1) 通过Wi-Fi添加新摄像机:对于还没有入网的摄像机推荐采用这种方式。
打开App,从屏幕下方的主菜单进入摄像机页面,点击屏幕右上方的 + ,进入添
加摄像机信息页面,选择通过Wi-Fi添加新摄像机。
①②③④
UID:
可通过键入或者扫描机器底部的二维码输入摄像机的 UID。
网络:
这里自动显示的是智能手机所在的局域网,这也是摄像机要加入的网络。所以如果
该网络不是摄像机要加入的目标网络,请先将手机切换到目标网络。
密码:
输入 Wi-Fi 网络的密码。
开始配置 Wi-Fi 连接:
最后,点击开始配置Wi-Fi连接,摄像机会在大概5-90秒的时间内完成配置。完成
后,摄像机会列表出来,点击后即可开始工作。
注意:如果由于网络密码错误或者目标网络无效而导致配置失败,请将摄像机断电
重开,然后再配置一次。

2) 添加已联网摄像机:如果要添加进App的摄像机已经联网了,则用这种方式添加。
打开App,从屏幕下方的主菜单进入摄像机页面,点击屏幕右上方的 + ,进入添
加摄像机信息页面,选择添加已联网摄像机。
名称:您可以自定义摄像机显示名称,如客厅。
UID:
可通过键入或者扫描机器底部的二维码输入摄像机的 UID 。
您也可以通过搜索局域网找到并选择已在线(在同一个局域网)的摄像机。
密码:
默认密码为 8888。登录后请立即在高级设置页面修改 P2P 密码。
最后,点击OK确认添加。
注意:为确保使用安全,登录后请立即到高级设置页面里修改P2P密码。
①②③②
返回到摄像机页面,已添加成功的摄像机则会以列表的方式显示出来。这个时候开
启摄像机观看实时视频,请看以下第4点。
如果摄像机是以有线的形式连接的,您还可以将摄像机切换到Wi-Fi无线连接,请看
以下第3点。

3. 配置摄像机连接到 Wi-Fi 网络
如果需要的话,您可以通过以下操作把摄像机配置成Wi-Fi无线连接。
从摄像机页面,点击要配置的摄像机右边的 , 选择高级配置,然后选择配置 Wi-Fi
链接配置。
注意:进行配置的摄像机必须在线。
选择一个要加入的目标网络,输入密码,点击确认。然后在摄像机进行自检的时候
拔掉网线。完成自检后,摄像机会在 60 秒左右完成 Wi-Fi 切换并建立正常连接。
注意:请确保您有登录所选 Wi-Fi 网络的权限,密码是正确的,否则 Wi-Fi 配置将
会失败(尽管摄像机也会重启并自检),您则需要再次进行配置。

4. 观看实时视频
有两种方式进行实时视频观看:
4.1 从视频页面
① ② ③ ④
① 点击 ,在线的摄像机则会列表出来。如果没有摄像机在线,则会提示没有
摄像机在线,请到摄像机页面进行添加。
② 选择在线摄像机。
③ 实时视频即会显示出来。
④ 您可以点击右上角的 在单格和四格间切换。
4.2 从摄像机页面
点击在线的摄像
机,则可直接进入
视频预览窗口。

4.3 实时视频观看界面功能图标定义如下:
音频开/关 上下巡航
唛开/关,通话时按住
唛志,说完松开即可 左右巡航
抓拍 分辨率
录像 亮度
左右镜像 对比度
上下翻转 设置
单窗口 四窗口
5功能设置
5.1 通过点击 , 可以进入设置页面。
修改摄像机:
可修改摄像机名称/UID/密码
删除摄像机:
可删除在线摄像机
重新连接摄像机:
可重新连接摄像机
高级设置:
进入如下 5.2 所列高级功能设置
界面

5.2 高级设置:
移动侦测灵敏度: 设置移动侦测的灵敏度
报警间隔时间: 设置抓拍的间隔时间
把摄像机配置到另外一个 Wi-Fi 网络;
配置摄像机从有线切换到无线 Wi-Fi 连接。
详细请看 5.3
设置 SD 录像的时间,分辨率,每个录像文
件的时长
设置云台转动的速度
设置红外灯开启模式和启动的环境亮度
设置摄像机的日期,时间
修改 P2P 连接密码
重新启动摄像机
Table of contents
Other Mustcam IP Camera manuals