MWS MulchMaster HM46 Installation manual

HM46 / HM46A / PM53A
Betriebsanleitung Manual de instrucciones
Operation Manual Gebruiksaanwijzing
Notice d’utilisation Brugsanvisning
Istruzioni per l’uso Bruksanvisning
NL
S
E
D
K
ES
IT
FR
GB
DE

Funktionen / Functions / Fonctions / Funzioni
/
Funciones / Functies / Funktioner / Funktioner
0010 0020 0030
0040 0050 0060
00700080 0090
0100
HM / PM - 01/08 II
(10.1) (10)
(21)
(13)
(21)
B
(13)
A
(10.2)

Detailansicht
/Detailed View / Vue détaillées / Schema dettagliato /
Aspecto
de los detalles / Gedetailleerde afbeelding / Detailvisning / Detaljbild
(20)
(14)
(11)
(4)
(10)
(22)
(3)
(5)
(21)
(2) (18)(15) (4)(19)
(17)
(16)
(6)
(13)
(1)
(9)
(( (
(
1
2
)
III HM / PM - 01/08

Technical Data
No.
Description No. Description
1Handle bar 12 Fuel injection primer (PM)
2Frame 13
Engine brake bar
3Eccentric lever 14 Starter coil handle
4Grip protector 15 Air filter
5Speed lever (PM) 16 Engine cooling intake
6Oil infill spout/dipstick 17 Shielded exhaust pipe/muffler
7Mark for maximum oil level, MAX 18 Spark plug cap
8Mark for minimum oil level, MIN 19 Grass deflector on all wheels
9Fuel tank filler cap 20 Blade guard (cutter housing)
10 Cut height adjustment lever 21 Clutch lever for wheel drive (HM46A/PM)
11 Cable holder for starter handle/starter coil 22 Handle bar height adjustment
Model Specifications HM46 HM46A PM53A
Dimensions (max.) (L x W x H) (mm)
Packed for transport 820 x 530 x 430 840 x 590 x 430
Ready for operation 1260 x 530 x 1040 1330 x 520 x 1,060
Weight (dry weight kg) max. 29.5 max. 35.0 40.3
Cutting device Special mulching blade with turbodisc
Cutting width (mm) 460 530
T(Transport) 30 35
135 40
245 50
355 60
Cutting height
adjustment (mm)
in set positions
465 70
Height adjustment (mm)
Handle bar in steps (mm) from 0 to 1,040
94 dB 96 dB 97 dB
Work area noise level Tested acc. to EN 836/A2:2001-10 and
EN ISO 3744 1995-11
Tested acc. to EN 836/A2:2001-10 and
EN ISO 3744 1995-11
General Specifications
Locking torque for blade mounting
(Nm) 20
Driving speed (km/h) – 3.2 1st gear 2.8
2nd gear 3.2
Recommended fuel Unleaded regular petrol or alternative or unleaded premium petrol
Recommended oil SAE 30 (grade: SF or SG)
Fill only to MAX!
Engine Specifications
Manufacturer Briggs & Stratton
Displacement (cc) 190 190
Horsepower (3,600 RPM kW) 3.7 – Ready Start 4.0 – Ready Start 4.4 OHV – Easy Start
Operating RPM 3000 U/min +/- 100
Spark plug type RJ 19 LM or BR 2 LM RC 12 JC
Start mechanism Pull coil starter
Safety device Engine brake
Air filter type Paper filter Paper filter wtih PVC prefilter
Oil capacity 0.5 0.6
Fuel capacity (l) 1.5 1.5
GB
1Operation Manual HM / PM - 01/08

Contents
Page
Functions ....................................................................................................................................... II
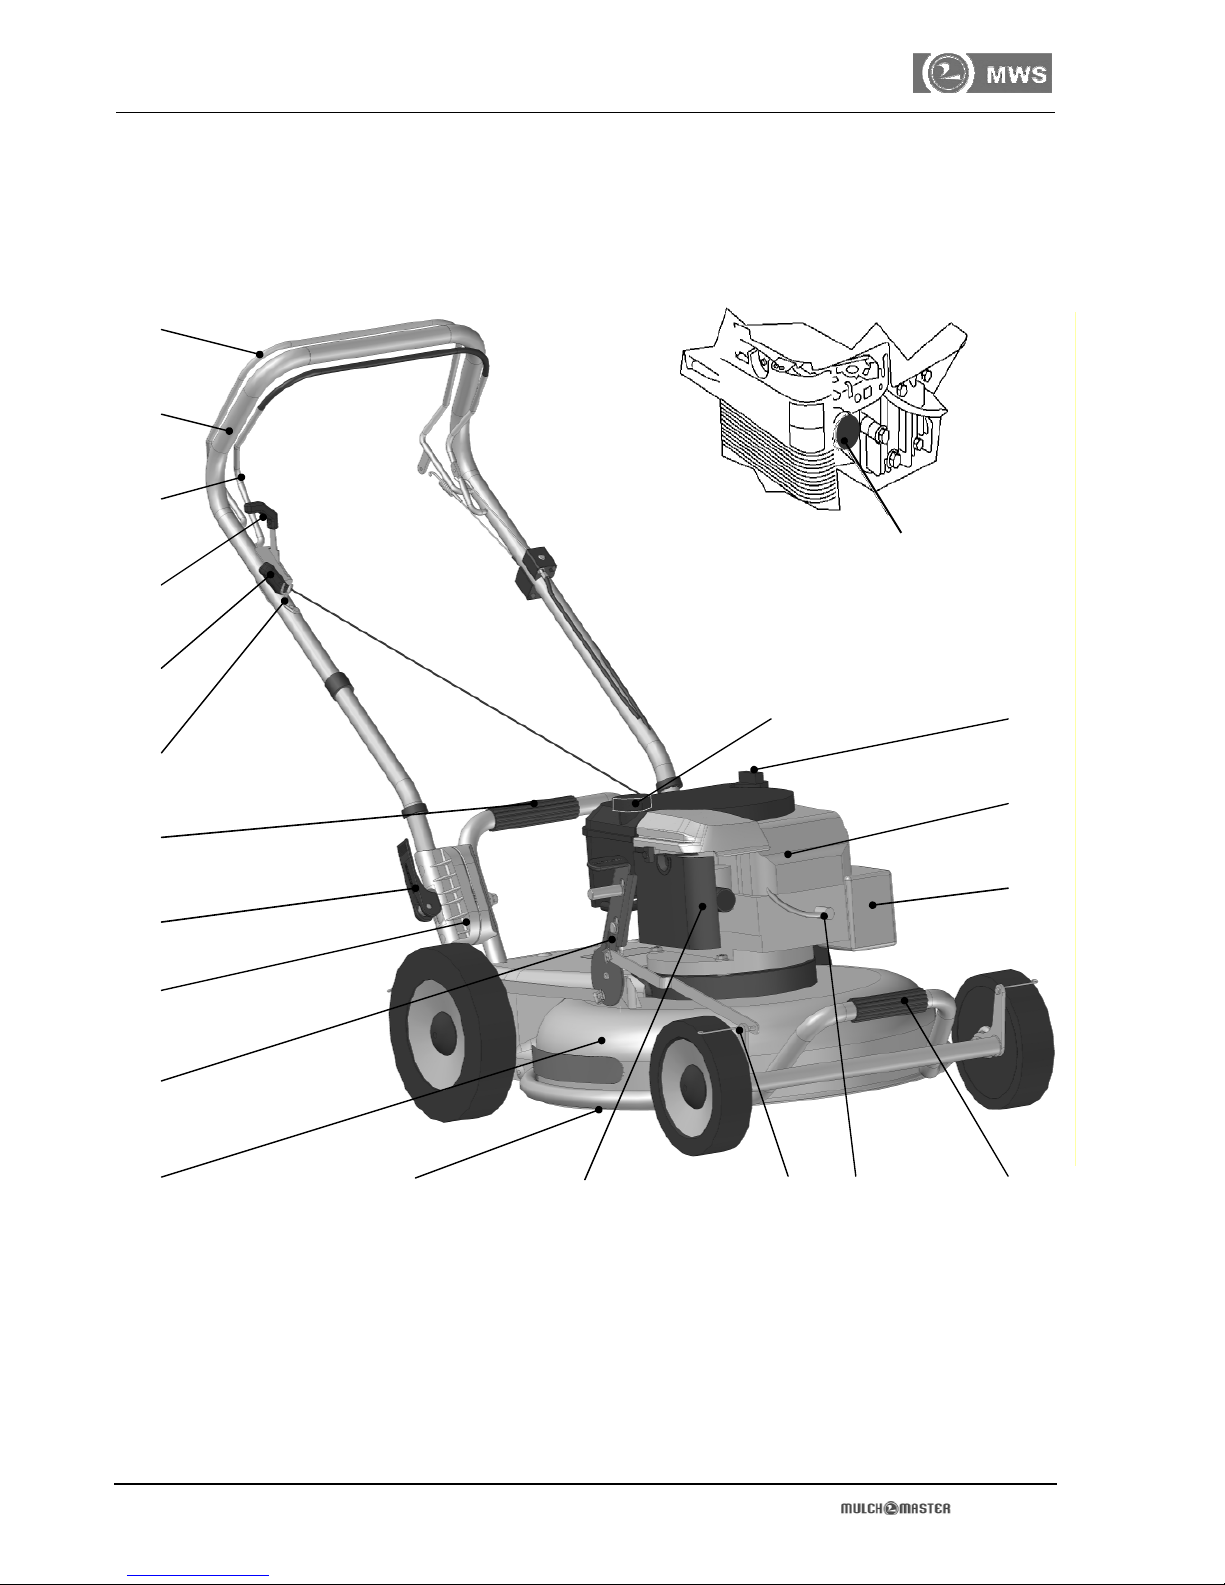
Detailed View .................................................................................................................................. III
Technical Data ................................................................................................................................ 1
Table of Contents ........................................................................................................................... 2
1Introduction.................................................................................................................................. 3
2Important Information ................................................................................................................. 3
3Use................................................................................................................................................ 3
Designated Use..................................................................................................................... 3
Improper Use ........................................................................................................................ 4
4Icons............................................................................................................................................. 4
Examples of Warning Icons................................................................................................... 4
Examples of Extra Icons........................................................................................................ 4
Warning Symbols on the Mower............................................................................................ 5
Basic Safety Instructions ....................................................................................................... 5
Prior to Start-up ......................................................................................................... 5
During Start-up .......................................................................................................... 6
Operation................................................................................................................... 6
5Description................................................................................................................................... 7
Setting Grip Handle............................................................................................................... 7
Hanging Starter Coil.............................................................................................................. 7
Adding Oil ............................................................................................................................. 8
Adding Fuel........................................................................................................................... 8
Setting Cutting Height ........................................................................................................... 9
Preparing for Starting Engine ............................................................................................... 9
Starting Engine...................................................................................................................... 9
Cutting Method...................................................................................................................... 11
Optimising Mowing ................................................................................................................ 11
Stopping Operation ............................................................................................................... 11
Parking ...................................................................................................................... 11
Storing ....................................................................................................................... 11
6Maintenance and Care................................................................................................................. 12
After Mowing/Before Parking and/or Storing.......................................................................... 12
Maintenance and Care Intervals............................................................................................ 13
Draining/Changing Oil ........................................................................................................... 13
Draining Oil with Hand Pump ..................................................................................... 13
Draining Oil without Hand Pump ................................................................................ 13
Sharpening Blade.................................................................................................................. 14
Obtaining Replacement Parts................................................................................................ 14
Opening/Closing Gear Box Cover ......................................................................................... 14
Cleaning Air Filter.................................................................................................................. 14
7Resuming Operation .................................................................................................................. 14
Resuming Operation after Parking ........................................................................................ 14
Resuming Operation after Storing ......................................................................................... 14
8Recycling ..................................................................................................................................... 15
9Troubleshooting .......................................................................................................................... 15
10 Warranty Terms ......................................................................................................................... 16
EC Declaration of Conformity........................................................................................................ IV
Operation Manual HM / PM - 01/08
GB
2

Introduction / Important Information / Use
1Introduction
Dear Customer,
we thank you for the trust you invested in us with the purchase of our
quality product. We wish you much success in the use of your
mower.
Please become familiar with this operation manual before using your
mower for the first time.
The operation manual informs you how to operate the mower
properly and safely and guides you step-by-step through all
procedures.
2Important
Information
All products from MWS Cutting Tools are developed and
manufactured under strict quality control for long-term and problem-
free usage.
This ensures the following:
superb quality and long life,
simple and safe operation,
functional design,
optimised for intended use.
This product from MWS Cutting Tools complies with recognised
technological specifications and bears the CE seal of approval.
Please read this operation manual carefully from beginning to end, in
order to familiarise yourself with your mower and avoid errors and
hazards. Other existing hazards are referred to in the operation
manual at appropriate places. Please also observe the warning
labels on the mower itself.
3Use
Designated Use
The mower is designated for the following use:
Type PM mowers: for private and commercial use.
Type HM mowers: only for private use! They are best suited for
regular mowing of yards and small gardens.
Any other usage of this mower is considered improper!
Proper usage entails the observance of this operation manual, all
warning labels on the mower itself and the operation manual from
the engine manufacturer. MWS Cutting Tools assumes no liability for
damage to persons or property arising from improper or negligent
operation.
GB
3Operation Manual HM / PM - 01/08

Use / Icons
Improper Use The mower may NOT be used:
if safety devices are defective or have been
manipulated,
if irregularities occur while the engine is running, or
you suspect that safety has been compromised,
by persons who have not read and understood this
operation manual,
by children and youth under 16 years of age,
by persons under the influence of alcohol or drugs
and persons whose alertness is limited (by
medications or other substances).
4Icons Please observe these warnings without fail, and abide
by the prescribed procedures or prohibitions.
Awarning instruction warns you before the occurrence
of a hazard and contains suggestions for protecting
yourself from harm.
Signal words indicate the kind of hazard; icons highlight
them visually.
Observe the prescribed measures for protecting the
operator or personal property from harm.
Examples of Warning
Icons
WARNING!
Danger of explosion!
Petrol is highly flammable and petrol vapours can
easily explode.
Turn off the engine. Refuel only in open spaces.
Keep a 5-metre radius from fire or open flame. No
smoking.
CAUTION!
Blade can cause injury. The blade is very sharp.
Always wear safety gloves.
ATTENTION!
Property damage hazard. Check oil level before use.
Operating the mower without oil causes engine
damage.
Examples of Extra Icons Additional instructions for complying with environmental
protective measures or other useful information and tips
are indicated as follows:
NOTE:
Useful information and tips.
Environmental Protection
Instructions for compliance with environmental
protective measures.
Operation Manual HM / PM - 01/08
GB
4

Icons
Warning Symbols on the
Mower
Observe all warning labels on the mower itself. They are found in
highly visible locations on the exterior covers. Replace any worn-out
labels.
Meaning of warning labels:
1. WARNING!
Read the operation manual before starting and heed all
warnings.
2. WARNING!
Unauthorised persons prohibited from access and use. No
persons other than the operator are permitted in the work
area. Keep away from animals.
3. WARNING!
Shut off engine and remove spark plug cap before working
on cutter. Tilt the mower forward from the rear to conduct
maintenance work. Wait until the blade comes to a complete
stop. A rotating cutter is extremely dangerous. The cutter
may continue to rotate after shutting off the engine.
4. WARNING!
Keep hands and feet clear of the cutting tool. Never place
hands or feet under the protective cover. Extremely
dangerous!
Basic Safety Instructions
These safety instructions apply universally to the use, care and
maintenance of the mower. They should always be observed and
are only generally listed here.
Prior to Start-up Please observe each time before starting up:
Read the operation manual (also for the engine) and keep in an
accessible place.
Check your mower for damages or leaks around the tank and
the engine.
Check the fuel and oil levels and add appropriate amounts and
grades as needed. Add fuel only in open spaces. Never smoke
while refuelling. Keep fuel and oil only in approved containers.
Ensure that filler caps for fuel and oil are tightly closed before
starting the engine.
Never exceed the MAX capacity for oil. Check the oil level
regularly. It should always be above MIN.
Change the oil after every 25 operating hours.
Do not refuel:
While the engine is running.
While the engine is warm.
Adjust the cutting height before starting the engine.
Check the following items before the first mowing:
The cutter is tightly fastened.
The handlebar and connections are tight.
The cables and controls are functioning properly.
GB
5Operation Manual HM / PM - 01/08
1
2
3
4

Icons
During Start-up Always wear appropriate shoes/boots with sufficient tread. The
cutting tool runs at a high speed and can throw foreign objects such
as stones or branches out from the mower. Protect yourself with
appropriate work attire.
Always begin mowing on an open surface, not in high grass. Start
the engine only when the mower is securely stationary and the blade
can rotate freely.
Do NOT start:
In enclosed areas, because a running engine produces carbon
monoxide, a poisonous, odourless, colourless gas.
If you are not standing behind the grip handle facing the direction
of travel.
If the starter coil is not in the cable holder hanging on the grip
handle.
If the mower is not stationary.
If there is discernible damage to the mower or safety equipment
is defective.
If persons or animals are in the hazard area (approx. a 5-metre
radius).
If fuel was spilled next to or on the mower during fuelling;
thoroughly clean up the spill prior to starting to avoid possible
ignition.
If brightness/daylight is insufficient to allow safe working
conditions.
Please observe all community ordinances regarding permissible
operating times for private use.
Further operating times apply to commercial use.
Operation Never modify the engine’s factory settings. The RPM is preset by the
manufacturer and may not be altered.
Prior to mowing, clear the area to be mowed of any stones, wood,
glass, wire and other foreign objects that could harm you or the
cutting tool.
Operation is permitted only if the grip handle is locked tightly in
position. This is the only way you can safely move the mower and
remain a safe distance from the rotating blade.
Always mow across inclined surfaces, as this is much safer. Inclined
surfaces such as hillsides at greater than 20° grade should not be
mowed. Mowing over loose surfaces or paths increased the risk of
impact from stones. Always turn off the engine when travelling
across such surfaces. Restart the engine only after reaching the
work area.
The exhaust pipe presents a burning hazard. T
emperatures can reach
up to 80°C. Keep fuel, oil, grass, leaves and other flammable or easily
ignitable materials a safe distance from the exhaust pipe and engine.
Operation Manual HM / PM - 01/08
GB
6

Icons / Description
Never transport the mower while the engine is running.
Remove the cutting tool blocks only when the engine is inactive
and the spark plug cap is removed.
Park the mower in buildings/enclosed areas only after the engine
has cooled.
Keep the air intake for engine cooling clean.
Shut off the engine immediately:
If you must leave the mower.
If you are distracted by other events and your alertness is
impaired.
If the mower runs rough after blocking the blade (vibration or
irregular idling).
If you perceive unusual noises coming from the engine of the
cutting tool.
If the safety equipment does not function normally.
In these cases it is necessary to have the mower checked at your
garage in order to ensure further safe operation.
5Description
Setting Grip Handle
0010(see p. II)
1. Park the mower on an even surface.
2. Adjust the handle bar (1) to your height and lock it in place (see
4). Keep an eye on the cables as you unfold it, so that they do
not get pinched.
3. Lock the handle bar by pressing the eccentric lever (3) on the
bar (eccentric lever grips should point up).
Hanging Starter Coil
0020(see p. II)
Hang the cable for the starter coil (14) in the available cable holder
(11) on the handle bar (1).
GB
7Operation Manual HM / PM - 01/08

Description
Adding Oil
ATTENTION!
Checking the oil level accurately is possible only
when the mower is parked on as level a surface as
possible. Deviations up to 3% incline are within an
acceptable range. Change the oil after very 25
hours of operation in order to avoid engine
damage.
Use only oil recommended by the engine
manufacturer.
Environmental Protection
Be careful when handling fuel and oil to make sure
nothing ends up in the environment.
Recycle residual fuel and used oil responsibly.
Proceed as follows to add oil:
1. Pour 500 ml (for HM models) or 600 ml (for PM
models) of oil into the infill spout using a funnel.
2. Replace the oil fill cap on the infill spout.
3. Remove the oil fill cap from the infill spout (6) again
and check the level on the dipstick (6). The oil level
should be close to MAX (7). A correct oil level
should always fall between MAX (7) and MIN (8).
4. Replace the infill spout cap (6) and hand-tighten it.
Note the notches in the infill spout.
Adding Fuel
WARNING!
Danger of explosion! Petrol is highly flammable and
petrol vapours can easily explode! Turn off the
engine. Refuel only in open spaces. Keep a 5-metre
radius from fire or open flame. No smoking. Never
refuel when the engine is warm.
1. Park the mower on a somewhat level surface. Let
the engine cool before refuelling.
2. Remove heavy soil around the filler cap (9) before
opening. Open the filler cap (9).
3. Add unleaded regular fuel (91 octane) using a
safety spout or a funnel. Maintain the maximum
fuel capacity recommended by the engine
manufacturer.
4. Make sure that there is sufficient air to allow
dissipation of fuel fumes.
Always keep away from shaken/foaming fuel. Do not
mix oil with fuel. Close the filler cap by hand-tightening
it.
Operation Manual HM / PM - 01/08
GB
8

Description
0030Set the cutting height with the adjustment lever (10).
Raising cutting height: Pull the locking lever (10.1) on
the adjustment lever (10) toward you. Pull the
adjustment lever (10) back. Lock the desired cutting
height in place.
Lowering cutting height: Pull the locking lever (10.1) on
the adjustment lever (10) toward you and push it
forward. Lock the desired cutting height in place.
Setting the adjustment lever (10) completely forward
(10.2) is only for transporting the mower (T) and is not
permitted for mowing.
Set the cutting height according to the indicator on the
mower.
Preparing for
Starting Engine
WARNING!
Injury hazard! Start the mower only when you are
standing behind the grip handle.
The starter coil handle (14) is easily reachable from this
position. If the starter coil handle is still coiled in the
engine, requiring you to stand beside the mower to start
it, your feet are in danger of injury because they are in
the cutting rotation zone. Starting the engine only while
standing behind the grip handle protects you from foot
injury from a running engine.
Park the mower on a level surface.
Avoid areas:
With high grass (hindering blade rotation).
With gravel, dust, and broken surfaces.
The cutting tool produces strong air movement.
Starting Engine
Easy-Start Engine 0050(see p. II) (for Type PM53A)
For a cold start, depress the rubber fuel injection primer
(12) once. After about 2 seconds, depress the primer
once more. The primer should be depressed only 2 or 3
times for a cold start. If the engine is warm, starting is
usually possible without depressing the primer. Do not
depress the primer (12) unnecessarily; each depression
injects fuel into the carburettor intake. Flooding the
engine may prevent ignition. In temperatures below
10°C, however, it may be necessary to pump the primer
up to 5 times.
Ready-Start Engines (for Types HM46 and HM46A)
No additional preparations are necessary.
Stand behind the mower and pull the engine brake bar
(13) to the handle bar (1) with one hand; with the other
hand grasp the starter coil handle (14) hanging in the
cable holder (11).
GB
9Operation Manual HM / PM - 01/08

Description
Starting Engine
0060(see p. II)
NOTE:
Starting with the starter coil is possible only when
the engine brake bar is retracted; otherwise the
engine brake prevents ignition.
With the engine brake bar (13), pull the starter coil
handle (14) swiftly with equally strong arm movements,
and hold onto it even after the engine has started.
Once the engine starts, slowly return the starter coil
handle (14) to the cable holder (11). If the engine does
not immediately start, repeat the attempt.
Do not begin mowing immediately after starting the
engine; rather, allow it to warm up for about 2 minutes.
ATTENTION!
Too many attempts to start the engine will flood it.
This allows too much fuel into the cylinder
chamber, and the spark plug will not ignite
anymore. If you are unable to start the engine after
multiple attempts, the cause should be determined.
Please also check your engine documentation.
NOTE:
If the engine becomes flooded after multiple
attempts to start it, proceed as follows:
1. Remove the spark plug cap.
2. Unscrew the spark plug.
3. Pull the starter coil several times to dry out the
cylinder chamber.
4. Dry off the spark plug and screw it back in
tightly.
5. Replace the spark plug cap.
6. Start the engine.
Model HM46A/PM53A (with wheel drive) 0060
If you would like to use the mower’s self-propelled
feature, pull the clutch lever for the wheel drive (21)
toward the handle bar; otherwise, you can push the
mower by hand without engaging the clutch.
Model PM53A 0080(see p. II)
To select the drive speed, move the speed lever (5) to
the desired position (slow/1st gear: I; fast/2nd gear: II).
Move the speed lever only when the wheel drive is
disengaged (clutch lever (21) is not pulled). Otherwise,
operate as described for Model HM46A.
Operation Manual HM / PM - 01/08
GB
10

Description
Cutting Method
The grass is chopped into very fine pieces by a special
blade, breaking up its structure.
These clippings are then pressed back down into the
surface through the topsoil.
The clippings decay in a very short time and thereby
supply the ground with nutrients.
This allows mowing grass regardless of the weather
without impairing the results.
Benefits:
No clipping removal.
No composting.
At least 50% time savings.
At least 50% savings in watering.
Outstanding cut with no remaining missed areas on
the topsoil.
Optimising Mowing
You will get the smoothest results
if you observe the following:
Set the cutting height according to the indicator on
the mower or as instructed in this operation manual.
Mow at maximum grass height of 120 mm.
Grass standing higher than 120 mm may leave uncut or
uneven areas and may also clog the mower and stop
the engine.
Mowing wet grass inevitably results in piles of clippings
left on the lawn after shutting off the mower, regardless
of the height of the mown area. These should be
removed after mowing.
Stopping Operation
0070(see p. II)
WARNING!
Injury hazard from continuing blade rotation!
The blade continues to rotate after the engine has
been shut off (for about 2 seconds). Do not place
your hands under the blade guard immediately after
shutting off the engine.
Release the engine brake bar (13) to stop the engine.
Wait for the blade to stop turning.
Conduct the following maintenance and care measures
before parking/storing the mower.
Parking Short-term storage of mower (up to 4 weeks) is
considered "parking".
Storing "Storing" is considered long-term non-use of the mower
for more than 4 weeks, e.g. over the winter.
GB
11 Operation Manual HM / PM - 01/08

Maintenance and Care
6Maintenance and
Care
ATTENTION!
Perform all maintenance and care procedures only
when the engine is shut off and the cutting tool is
stationary. Be sure also to heed the instructions
from the engine manufacturer when performing
maintenance and care procedures. Do not spray the
engine down. Pull the spark plug cap.
Tip the mower only after the cutting tool has come
to a stop.
Check the fuel tank level. The fuel tank must not be
filled to capacity, otherwise fuel will run out.
ATTENTION! The engine is warm after use. Touch
only the fuel tank cap when checking the level.
Always tip the mower toward the back 0040.
Check the fuel tank level in advance. The fuel tank must
not be filled to capacity, otherwise fuel will run out.
Park the mower securely on an even surface. Place the
height adjustment lever in the transport position; then
release the eccentric lever on the handle bar and fold
the handle bar forward completely. Grasp the handle
on the carrier and pull the mower upright.
After Mowing/Before
Parking and/or Storing
Wear gloves to protect your hands when working
around the blade.
Thoroughly clean the mower after use. Do not use a
pressure washer for cleaning. Remove clipping residue
by hand using only a brush or scraper.
Park the mower under a covered area. Petrol can
remain in the fuel tank.
The mower should not be parked in the sun and not
inside a residence, because of the emission of petrol
fumes.
Let the engine cool outdoors before parking.
For safety reasons, worn-out or damaged mower parts
must be replaced before further use.
If you sense vibrations during engine operation, consult
your dealer. Do not attempt to eliminate the vibrations
yourself.
Keep the locking torque at 20 Nm for mounting the
cutting tool. The use of torque wrench is mandatory.
Operation Manual HM / PM - 01/08
GB
12
For safety reasons, owner-
executed additions, modifica-
tions to the mower or provi-
sional repairs are prohibited.
Only original replacment parts
may be used. Please consult
your dealer.

Maintenance and Care
Maintenance and Care Intervals
Procedure Interval
Check oil level and add as needed Before every use
After the first 2 hours of operation
Every 5 engine operating hours
Check tightness of all fastened parts. Before every use
Change oil After the first 5 hours of operation
Every 25 hours of operation
Clean the air filter Every 25 hours of operation(blow clean only with air)
Check/clean spark plug Every 100 hours of operation
Clean the air intake grate Every 25 hours of operation
Sharpen or replace the blade Every 25 hours of operation
Clean the mower After each use
Every 25 hours of operation
Before parking/storing
The maintenance/care intervals should be shortened if the mower is frequently
operated in extreme temperatures or in dusty environments.
Draining/Changing
oil
Changing the oil should ideally take place while the
engine is warm, because the used oil and all residue
more easily drains from the engine. Oil should be
changed only through the infill spout (6).
Watch out for the cutting tool!
The exhaust pipe may remain very how after
stopping the engine. Injury hazard!
Draining Oil with Hand
Pump
The oil can be pumped out using a standard hand
pump. If necessary, go to your nearest service station
or your dealer (see engine service list). Please heed
your engine manufacturer’s operation manual.
Draining Oil without
Hand Pump
Pull the spark plug cap off the spark plug.
Raise the mower off the ground. Place next to the
mower an appropriate container the height of the infill
spout for catching the used oil.
Open the oil infill spout and tip the mower to the side
until all the oil has run out of the engine.
Protect the environment.
Recycle used oil responsibly by delivering it to a
service station, who will accept it at no charge. Oil
that ends up in the environment causes damage to
the water table.
GB
13 Operation Manual HM / PM - 01/08

Maintenance and Care / Resuming Operation
Sharpening Blade
WARNING!
Acutting tool (blade) that produces vibrations
must be replaced without fail. Do not attempt to
true the blade yourself, as you may get it out of
balance. This can cause an accident and create the
hazard of further damage to the mower.
Blade grinding is rarely necessary, since the blade is
manufactured from a specially hardened steel.
If it becomes necessary to resharpen your blade,
please bring it to us or to a dealer in your area.
Obtaining Replacement
Parts
ATTENTION!
Accident hazard from using damaged parts!
For safety reasons, worn or damaged parts must
be replaced. Only original replacement parts may
be used.
Opening/Closing
Gear Box Cover
The instructions on the maintenance label on the
mower 0100should be observed when opening or
closing the gear box cover on models with wheel drive.
The fasteners should be reusable if handled correctly.
Cleaning Air Filter Please heed your engine manufacturer’s operation
manual.
7Resuming
Operation
Resuming Operation
after Parking
Before starting the engine, check:
the oil level (make sure the mower is level),
the amount of fuel in the tank,
whether the cutting tool is fastened securely and
runs centrically,
whether the grip handle and other mechanical
connections are tight.
More instructions on page 9: “Setting Cutting Height”.
Resuming Operation
after Storing
As on page 8: “Adding Fuel”.
Before starting the engine, check:
Whether the cutting tool is fastened securely and
runs centrically (with the spark plug cap off!).
Whether the grip handle and other mechanical
connections are tight.
Perform any necessary maintenance, such as:
Changing the oil.
Sharpening the blade.
To do this, please observe the instructions for
maintenance and care.
Operation Manual HM / PM - 01/08
GB
14

Recycling / Troubleshooting
8Recycling
Please observe all environmental codes and avail
yourself of all opportunities to recycle. Recycle
parts according to regulations.
Plastic parts: Sorted by recycling process (look for the
Green Dot); otherwise dispose of as
rubbish
Metal parts: Scrap recycling
Electrical wires: Electrical appliance scrap or coloured
metal scrap
Used oil: Deliver to a service station for recycling
9Troubleshooting
Problem Cause/Solution
Insufficient fuel Add fuel; check for adequate venting
Poor quality or dirty fuel; clogged carburettor Fill with clean fuel or filter existing contents; clean
carburettor
Air filter clogged/oily Change air filter
No spark emitting from the spark plug electrode
Clean spark plug (or replace as needed); check for
proper spark gap and adjust as needed; check
ignition cable and system (service required!)
Engine flooded Dry out cylinder chamber by starting without spark
plug (see p. 10)
Engine brake is interrupting ignition Adjust engine brake cable (service required!)
Blade is obstructed, cannot rotate freely Use open surface for starting, not in high grass
Engine does
not start
Mowing deck clogged Remove residue (pull off spark plug cap first!)
Blade is obstructed, cannot rotate freely (clogged) Remove residue (without spark plug cap!); watch
cutting and grass height
Air filter dirty (engine is not getting enough air) Clean/replace air filter
Carburettor setting incorrect Adjust carburettor (service required!)
Blade dull Sharpen blade (service required!)
Spark plug not screwed in tightly Retighten spark plug to seal gasket
Poor engine
performance
Mowing deck clogged Remove residue (pull off spark plug cap first!)
Blade not sharp enough Sharpen blade (service required!)
RPM too low Check RPM (service required!)
Uneven cut
Incorrect cutting height Lower cutting height
Clutch level not retracted Pull clutch level to engage wheel drive
No propulsion even with clutch lever retracted Turn knurled nut in direct of arrow B(shorten
bowden cable) 0090
Speed lever not locked into position Set speed lever in locked position (1st or 2nd gear)
0080
Drive belt slipped off pulley Open gear box cover 0100;replace belt on pulley
(the drive is constantly spring-tensioned)
Wheel drive
does not
engage
Wheel blocked Clipping residue in wheel (service required!)
Clutch lever retracted Release clutch lever
Wheel drive
does not
disengage Drive continues despite released clutch lever Turn knurled nut in direct of arrow A(lengthen
bowden cable) 0090
Blade unbalanced True up blade
Mower
vibrates Crank shaft damaged Have serviced without fail
GB
15 Operation Manual HM / PM - 01/08

Warranty Terms
10 Warranty Terms
MWS Cutting Tools Ltd. & Co, located at Asbacher Str. 5, 98574 Schmalkalden, Germany (hereafter "MWS") hereby guarantees the end-
user that its walking mower is manufactured according to the latest engineering standards and is free of defects and
workmanship for its intended use. In accordance with this guarantee MWS will relieve the end-user of any costs related to the elimination of
defects in materials and workmanship through an MWS-contracted dealer or MWS itself (claim) under the following conditions:
1
The warranty period begins on the date of purchase - a completed warranty card, dealer stamp and dealer invoice.
2
The warranty period ends after 24 months from the date of delivery to the end-user (purchase) has passed. Exceptions to the are MWS
power equipment that is used for public or commercial purposes, even if only temporarily. In such cases the warranty expires after 12
months. Engines installed on the equipment are excluded from this warranty. For these, the manufacturer's conditions apply as shown
below.
Engine Warranty Periods (according to information supplied by each manufacturer)
Problems that MWS itself or its contract dealers are notified of after expiration of the warranty period have no basis for a warranty claim.
Each warranty claim is subject to a limitation of 6 months after discovery of the problem.
3
The manufacturer is not responsible for damages to the equipment or subsequent damages to persons or property that arise due to
inappropriate use; no warranty claims can be validated. Deficiencies and subsequent repairs are handled by our customer service
department. Further claims beyond the warranty are excluded. There is no guarantee of replacement.
4
The following are excluded from the warranty:
Maintenance and cleaning labour.
Installation of non-OEM parts.
User-serviced repairs and self-performed modifications.
Alterations in construction.
Normal wear and tear, as well as wear due to inappropriate use (overuse) such as filters, spark plugs, wheels, friction surfaces,
blades and turbodiscs, cutter housings, bent support frames, welded and attached parts broken off due to improper operation and
transport and other consumable parts, as well as accessories not belonging to the model.
Paint damage from use.
5
The service provider is responsible for any damage caused in transport, i.e. the carrier or shipper, not the manufacturer.
6
MWS reserves the right to repair defective parts or replace them. Replaced parts become the property of MWS without compensation. The
MWS contract dealer used to eliminate the problem does not have the authority to make binding declarations in the name of MWS.
7
MWS reserve the right to refuse fulfilment of warranty claims if and insofar as:
a) the MWS contract dealer engaged by the end-user for eliminating the problem has not correctly filed a completed warranty work order
b) Improper handling not in keeping with the operation manual, particularly overuse of the purchased item by the end-user, has led to the
occurrence of damage to the item due to defects in materials and workmanship
c) The end-user has not observed important instructions in the operation manual, particularly safety instructions
d) The purchased item has been in some way overhauled, modified, or outfitted with parts or accessories that do not belong to the
equipment expressed approved or recommended by MWS, or parts other than original replacement parts have been used in maintenance
or repair of the purchased item.
8
In addition to claims arising from this warranty, the end-user has other legal guarantees and rights arising from the sales contract with the
dealer that are not limited by this warranty.
Operation Manual HM / PM - 01/08
GB
16
Type Consumer Use Commercial USe
Briggs & Stratton „Quantum“ and
„Kool Bore Intek“ series
2years 3 months

DE
EG-Konformitätserklärung
ES
Declaración de Conformidad CE
GB
EC Declaration of Conformity
NL
EG-conformiteitsverklaring
FR
Déclaration de Conformité CE
D
K
EU Konformitetserklæring
IT
Dichiarazione di Conformità CE
S
E
EU Konformietsforklaring
Wir We Nous Noi Nosotros Wij Vi Vi
MWS Schneidwerkzeuge GmbH & Co. KG
An der Asbacher Str. 5, D-98574 Schmalkalden
erklären, dass die Maschine declare that the machine déclarons que la machine dichiariamo che la macchina
declaramos que la máquina verklaren dat de machine da stroje todistamme, että förklarar, att maskinen
Rasenmäher, handgeführt mit Verbrennungsmotor
Lawn mower, walk behind with combustion engine
Tondeuse à conducteur à pied à moteur combustion
Falciatrice manuale per prati con motore a combustione interna
Cortacésped conducir de la mano con motor de combustión
Grasmaaimachine, met de hand bediend met verbrandingsmotor
Plæneklipper, håndstyret med forbrændingsmotor
Handdriven gräsklippare med förbränningsmotor
Typ Type Type Tipo Tipo Type Type Typ:
HM46, HM46A, PM53A
mit folgenden EG-Richtlinien übereinstimmt conforms to the specifications of the following EC directives est conforme
aux spécifications des directives CE suivantes èconforme alle seguenti direttive CE es conforma con las
especificaciones prestados de las directivas CE met volgende EG-richtlijnen overeenstemt stemmer overens med
følgende EU-direktiver stämmer överens med följande EU-riktlinjer
98/37/EG, 2000/14/EG, 2005/88/EG
Angewandtes Konformitätsverfahren Conformity assessment procedure Procédure appliquée pour l‘évaluation de la
conformité Procedura di conformità applicata Procedimiento efectuado para la evaluación de la conformidad
Toegepaste conformiteitmethode Anvendte overensstemmelsesmetoder Använt konformitetsförfarande:
Anhang VI
Geprüft durch Tested by Examinée par Esaminato da Provado por Getest door Kontrolleret af Testad av:
TÜV Thüringen Anlagentechnik GmbH, Ichtershäuser Str. 32, D-99310 Arnstadt
GAF – Gesellschaft für Akustik und Fahrzeugmeßwesen mbH, Lessingstr. 4, D-08058 Zwickau
1. Gemessener Schalleistungspegel Measured sound power level Niveau de puissance acoustique mesuré Livello di potenza acustica rilevato
Nivel de potencia acústica detectado Gemeten geluidsniveau Målt støjniveau Uppmätt bullernivå
2. Garantierter Schalleistungspegel Guaranteed sound power level Niveau de puissance acoustique garanti Livello di potenza acustica garantito
Nivel de potencia acústica garantizado Gewaarworgd geluidsniveau Garanteret støjniveau Garanterad bullernivå
3. Vibrationswert am oberen Führungsholm Vibration level on the handle bar Niveau de vibrations sur le guidon Valore delle vibrazioni sul manico
Nivel de las vibraciones en la barra guiada Vibratiewaarde aan de handgreep Værdi for vibrationer på håndtaget Vibrationsvärde vid handtaget
Schmalkalden, 01.01.2008 H. Tröger (Geschäftsführer)
HM46 HM4A PM5A
Schnittbreite Cutting width Largeur de coupe Larghezza di taglio
Anchura de corte Maaibreedte Skærebredde Klippbredd 46 cm 46 cm 53 cm
Drehzahl R. P. M. Vitesse N. giri R. P. M. Toerental
Varvtal Kierrosluku
3.000
1/min
3.000
1/min
3.000
1/min
1. 94 dB (A) 95 dB (A) 96 dB (A)
2. 96 dB (A) 96 dB (A) 97 dB (A)
3. 2,4 m/s² 2,4 m/s² 2,4 m/s²
HM / PM - 01/08 IV
This manual suits for next models
2
Table of contents
Popular Lawn Mower manuals by other brands

AL-KO
AL-KO 127547 Translation of the original instructions for use

Snapper
Snapper 13 Series Operator's manual

Gardena
Gardena 300 C operating instructions

Ariens
Ariens 992807-ProZoom 2760S Owner's/operator's manual

Grizzly
Grizzly SGM Series Operator and parts manual

Yard-Man
Yard-Man 2320-0 Operating manual and parts list