CAUTION - TO REDUCE THE RISKS OF INJURY, DEVICE MALFUNCTION OR FAILURE:
1. The product should not be left unattended
when plugged into an electrical outlet.
2. Never drop or insert any foreign object into
any opening.
3. Make sure the voltage of the wall plug cord
is compatible with the power source.
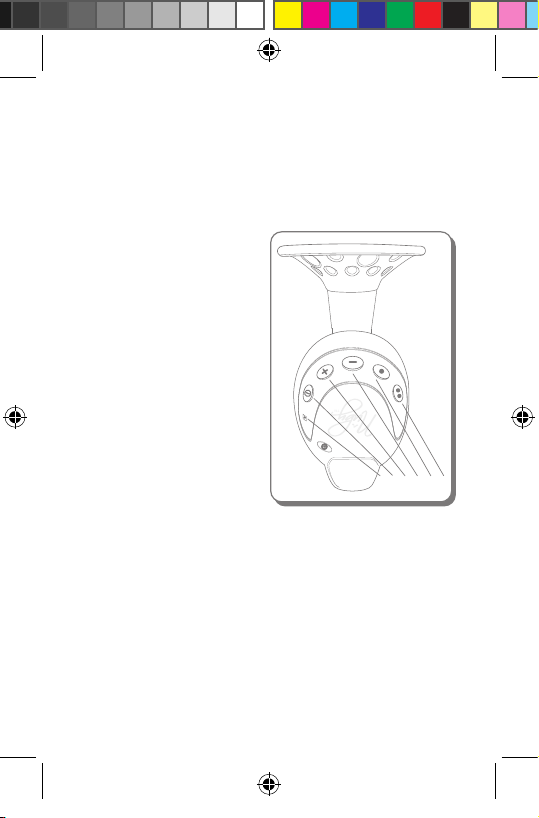
4. Plug the end of the wall plug cord into the
control handle first, then securely attach the
wall plug into the outlet.
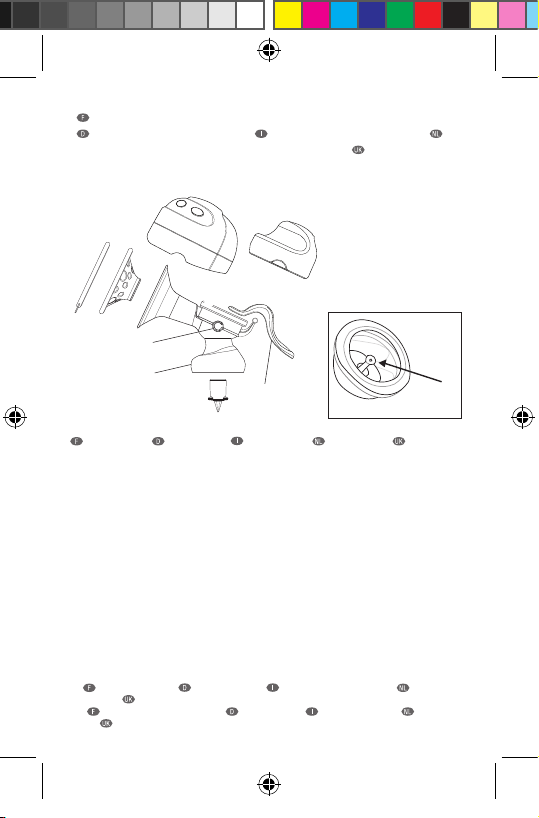
5. Wash and sanitise the appropriate pump
parts before each use.
6. Never put the Programmable Pump Unit,
battery pack or cord in water or a steriliser
as you can cause permanent damage to
the pump.
7. Do not continue pumping for more than five
minutes at a time if no result is achieved.
8. Do not use antibacterial or abrasive
cleaners/detergents when cleaning breast
pump parts
9. If the pressure generated is uncomfortable
or causing pain, turn the unit off, break the
seal between the breast and the pump body
with your finger and remove the pump from
your breast.
10. Although compliant with applicable
EMC requirements, this equipment may still
be susceptible to excessive emissions and/
or may interfere with other more sensitive
material. Using cords or cables other than
those provided may also negatively affect
EMC performance.
11. Portable and mobile RF communications
device can also affect the breast pump.
QUAND UTILISER VOTRE TIRE-LAIT NÛBY™
1. Deux à quatre semaines après la naissance, la production de lait devrait être bien établie.
C’est le moment idéal pour vous familiariser avec votre nouveau tire-lait.
2. Vous pouvez commncer plus tôt ou l’employer exceptionnellement si:
a. Vous devez tirer du lait pour le bébé lors de votre séjour en clinique.
b. Vos seins sont engorgés (douloureux et gonflés); le fait de tirer du lait avant ou entre les
repas du bébé peut réduire l’inconfort et aider lors de la mise au sein du bébé.
c. vous êtes séparée de votre enfant et désirez reprendre l’alimentation au sein quand vous le
retrouvez: en tirant régulièrement votre lait vous en stimulez la production.
3. Déterminez le moment de la journée qui vous convient le mieux pour tirer votre lait, par
exemple:
a. le matin tôt quand les seins sont pleins ou juste avant ou après le premier repas du bébé, ou
b. après un repas, si le bébé n’a pas vidé les deux seins, ou
c. entre les repas, ou pendant une pause, si vous avez repris le travail.
QUELQUES CONSEILS UTILES
1. L’utilisation de votre tire-lait Nûby demande
une certaine pratique - il faudra peut-être
plusieurs tentatives pour y arriver.
2. Le fait d’avoir votre bébé, ou sa photo, près
de vous peut encourager la montée de lait.
3. Placez un coussinet en gel Nûby Breast Aid
chauffé ou un tissu chaud sur le sein pendant
quelques minutes avant d’actionner la pompe.
Ceci peut encourager la montée de lait et
soulager les seins douloureux.
4. Entraînez-vous. Trouvez la technique qui
vous convient le mieux. Ne vous découragez
pas si le lait ne coule pas tout de suite.
Détendez-vous et persévérez. Commencez par
quelques minutes par sein. Si le processus
devient douloureux, ARRETEZ et demandez
conseil à un professionel.
NTNV3_insert_electricaldrive67705-SMALLER.indd 10 14/02/2011 10:33:46