BATTERY INFORMATION
The lithium ion batteries are certified for flying
according to UN 38.3 but the energy content of the
192Wh Power Canister is above the allowed upper
limit. To bring the canister on a flight you need to
disassemble the Power canister and remove one of the
batteries.
WARNING
The battery pack in this light is of Li-Ion type. This kind of
battery may explode if charged incorrectly, short circuited or
damaged in any way. Charge the light outside away from
flammable materials. Never charge the light in direct sunlight
or in temperatures above 35°C. If the canister or battery
becomes hot, immediately disconnect the charger, open the
canister and place the light in a fire proof area outside and
don’t use the canister again until a Nanight service center
has checked the canister. Never use a canister that has been
flooded. Regularly open the canister and check for over
pressure. Replace the battery if the battery is damaged or
has significantly lost capacity. Only use original Nanight
battery packs with this product.
Using an electric heating system may increase the risk of
getting decompression sickness.
Do not disassemble the canister while it’s still wet.
Never connect the two E/O connectors on the Power
canister to each other.
A blind plug must be used to seal the connectors if not used
during a dive.
It is not advised to disconnect the E/O connectors in the
water but if necessary, turn off the Power Canister before
disconnection.
Never connect the battery output (output 2) E/O connector
to an electric heat system.
Never set any power setting voltage above the maximum
voltage allowed by the electric heating system.
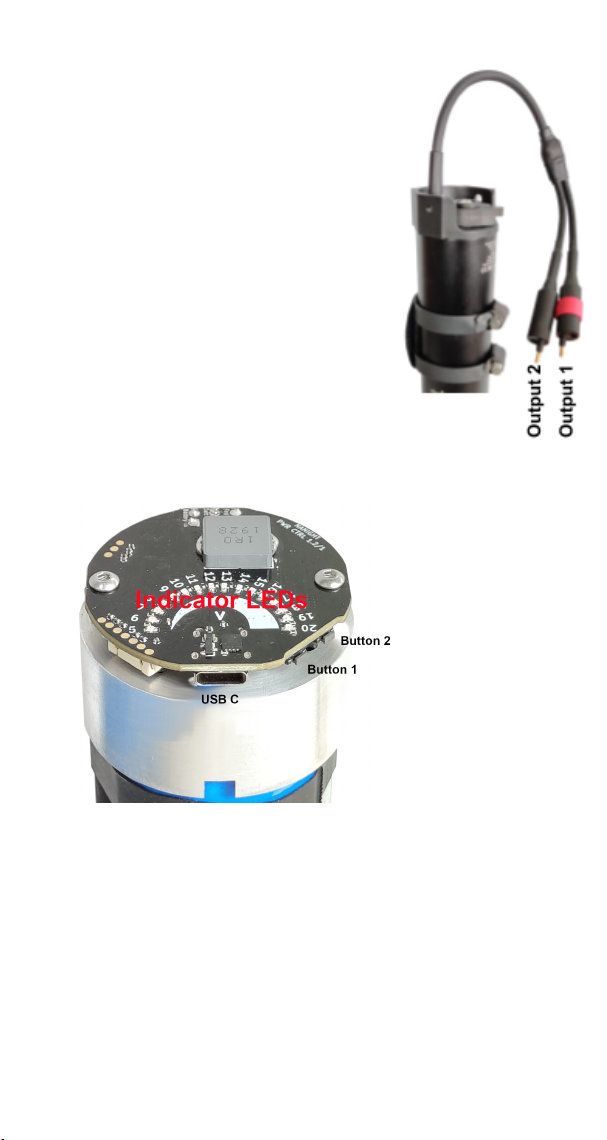
CANISTER PARTS
Depending on the Power Canister
configuration there can be one or two
E/O connectors available. If there are
two, the color coded connector is the
Regulated output, output 1. If only
one E/O connector is available then it
is a regulated output.
The second E/O connector, output 2)
supplies the battery voltage and is
intended to connect to a light head.
Output 2 shall never be connected to
the electric heat system.
Unscrew the canister tube to access
the buttons and USB C.
CHARGING
●Make sure the canister is turned off by turning the
switch to the locked position. All indicator LEDs
should be turned off.
●Connect the charger to any of the E/O connectors
on the power canister. The LED indicator on the
charger will turn red during charging. The indicator
LEDs in the bottom of the Power Canister will show
a running light.
●The charging is completed when the LED on the
charger is green.
OPTIONAL CHARGING METHOD
●It is possible to charge the power canister by applying
5-20V into the output 1 connector. The indicator LEDs
in the bottom of the Power Canister will indicate
charging with a running light pattern. The charging is
completed when the LEDs change from the running
pattern to a static LED indicating 16V. Warning: It is of
great importance to apply the voltage to the output 1
connector only or the battery might be damaged.
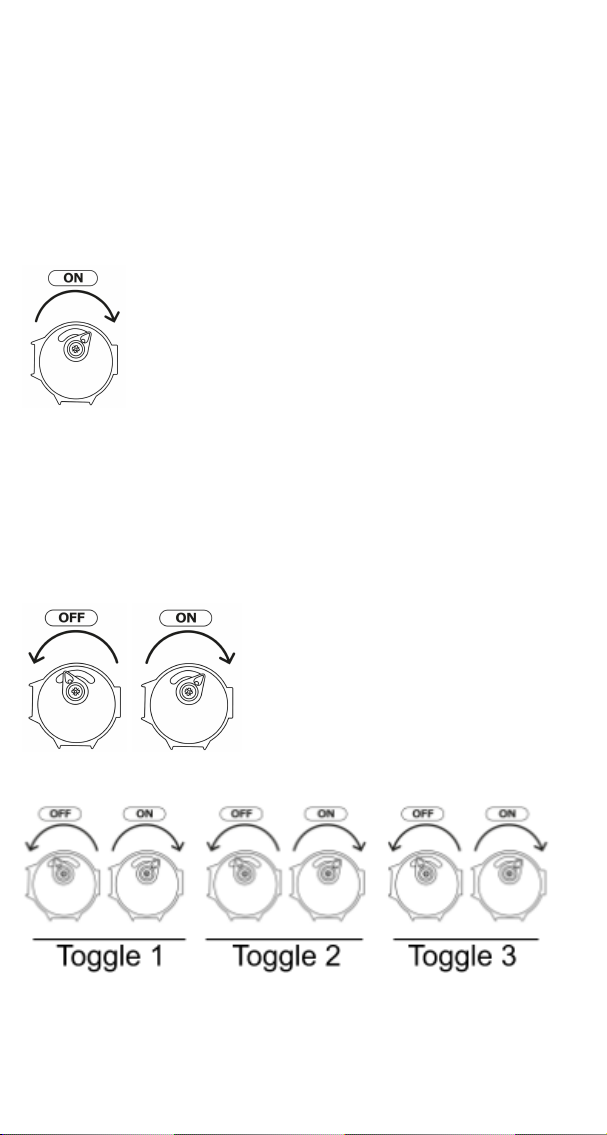
CONFIGURATION
Select Power Setting
The power canister has 4 power settings. The settings are
selected by toggling the switch off/on a number of times that
corresponds to the setting number.
Setting 1 is set to 12V by default. Setting 2-4 is set to 0V
To select a power setting:
1. Turn on the power canister with the switch.
2. Toggle the switch the number of times corresponding
to the setting number you would like to set. To make
one toggle. Turn the switch to the off position and
then back to on again within 1 second. (The switch
does not need to go all the way to the locked position)
Setting 1
Setting 3
Adjusting a Power Setting
After a power setting is selected the output voltage can be
adjusted. Use Button 1 and Button 2 to select a voltage.
Unscrew the canister tube to access the buttons. The red
indicator-LEDs show the current voltage that is set. 0V is set
when indicator LED 5 is flashing.
Press Button 1 to decrease the voltage and Button 2 to
increase the voltage.