NANJING WANLIDA TECHNOLOGY PC-81005 User manual

1
Directions
Meanings of icons:
Forbidding: forbid improper operations to avoid damaging the
Notebook PC.
Caution: cautions for operators to avoid potential damages.
Please note and remember.
Importance: important information, common notes, definitions,
general knowledge and references, etc.
Other trademarks and trade name may be used in this manual to refer
to either the entities claiming the marks and names or their products.
The manufacture disclaims any proprietary interest in trademarks and
trade names other than its own.
Information in this manual is subject to change without notice.
Reproduction in any manner whatsoever without the written
permission from the manufacture is strictly forbidden.
Product images in this manual are for your reference only.

6
Changes or modifications not expressly approved by the party responsible for
compliance could void the user's authority to operate the equipment.
This product has been tested and complies with the specifications for a Class B digital
device, pursuant to Part 15 of the FCC Rules. These limits are designed to provide
reasonable protection against harmful interference in a residential installation. This
equipment generates, uses, and can radiate radio frequency energy and, if not installed
and used according to the instructions, may cause harmful interference to radio
communications. However, there is no guarantee that interference will not occur in a
particular installation. If this equipment does cause harmful interference to radio or
television reception, which is found by turning the equipment off and on, the user is
encouraged to try to correct the interference by one or more of the following measures:
Reorient or relocate the receiving antenna
Increase the separation between the equipment or devices
Connect the equipment to an outlet other than the receiver's
Consult a dealer or an experienced radio/TV technician for assistance
Operations are subject to the following two conditions:
1. This device may not cause harmful interference, and
2. This device must accept any interference received, including interference that may
cause undesired operation
FCC Radiation Exposure Statement The antennas used for this transmitter must be
installed to provide a separation distance of at least 20 cm from all persons and must not
be collocated or operating in conjunction with any other antenna or transmitter.

2
Content
Directions.......................................................................................................................... 1
Safety Precautions ........................................................................................................... 4
1 Knowing Your Notebook PC......................................................................................... 5
1-1 Top Side.................................................................................................................. 5
1-2 Right Side ............................................................................................................... 6
1-3 Left Side.................................................................................................................. 6
1-4 Rear Side ................................................................................................................ 6
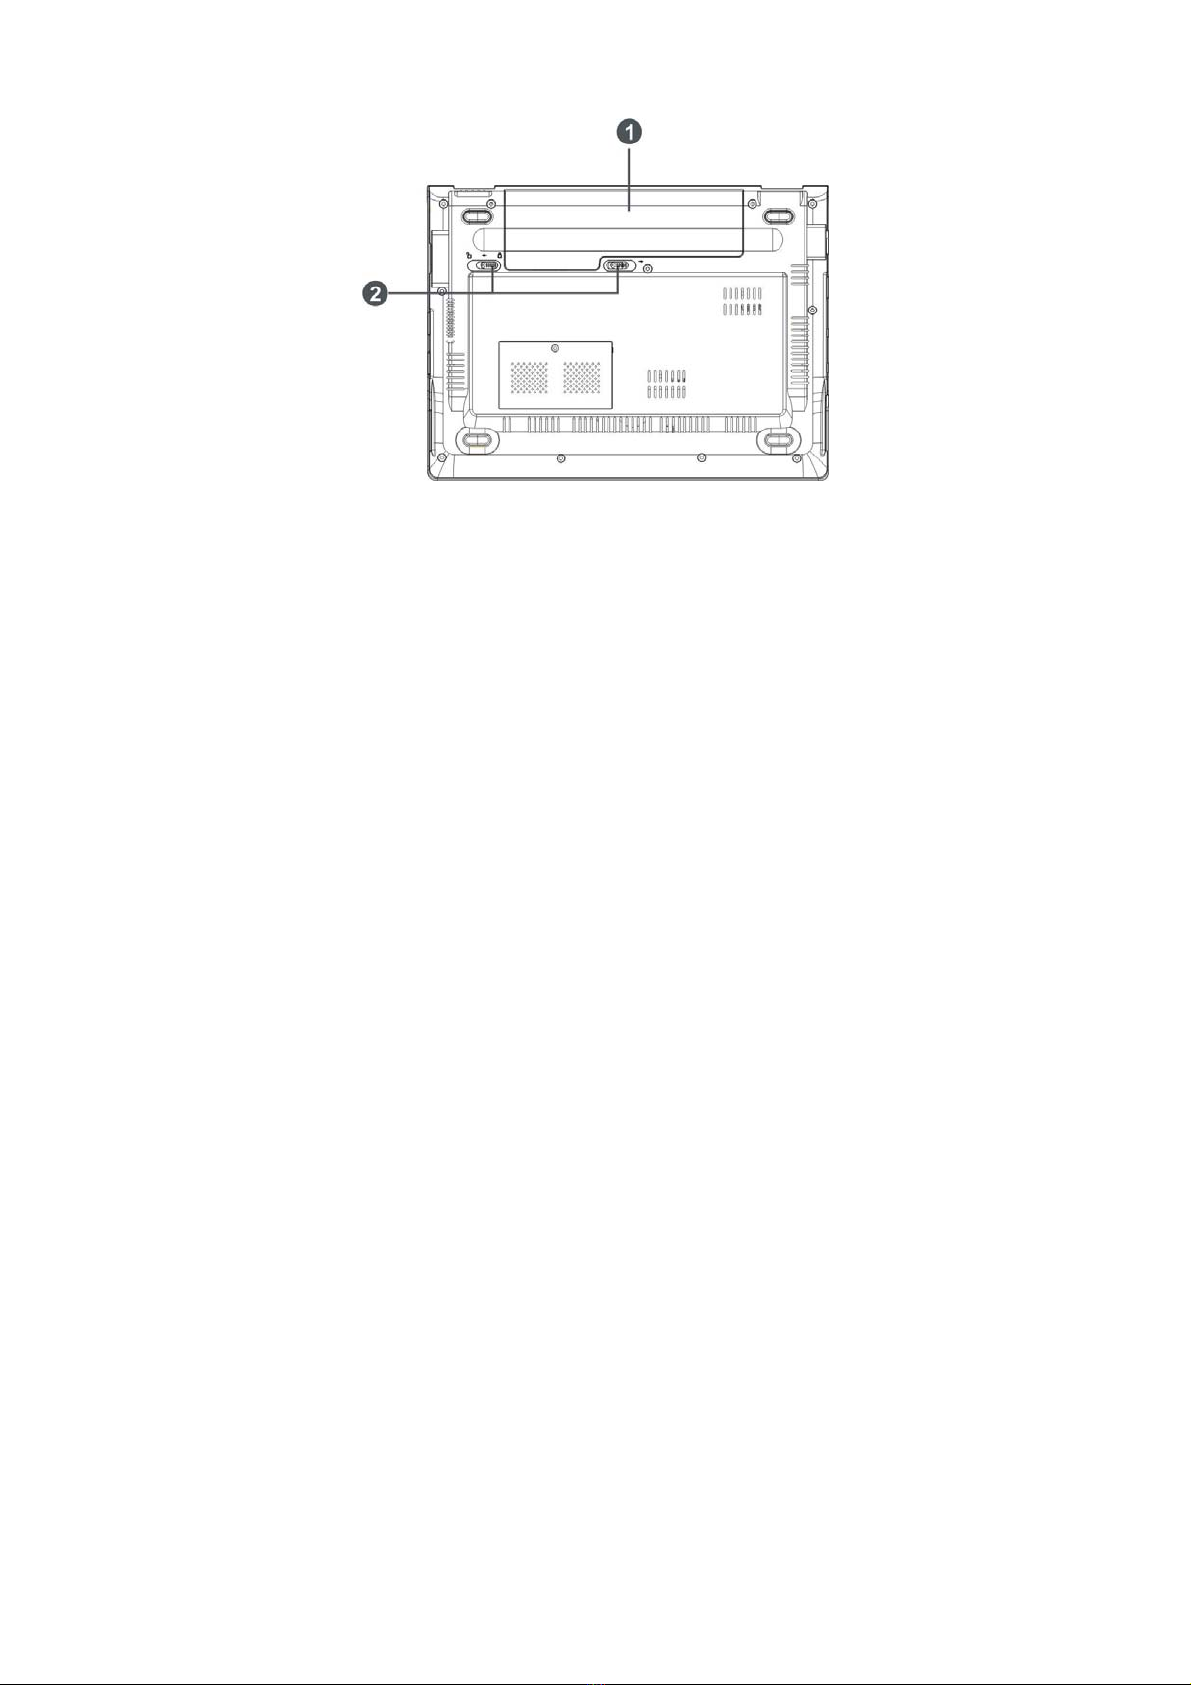
1-5 Bottom Side ............................................................................................................ 7
2 Caring the Notebook PC ............................................................................................... 8
2-1 LCD Screen ............................................................................................................ 8
2-2 Hard Disk Drive (HDD)............................................................................................ 8
2-3 Battery Pack............................................................................................................ 9
2-4 Keyboard................................................................................................................. 9
2-5 Touch Pad............................................................................................................... 9
2-6 Other accessories ................................................................................................... 9
2-7 If the water come into the Notebook PC ............................................................... 10
2-8 Other Notes........................................................................................................... 10
3 Traveling with the Notebook PC ................................................................................ 11
3-1 Attention................................................................................................................ 11
3-2 How to enter the suspend mode ........................................................................... 11
4 Keep the data for future possible use....................................................................... 12
4-1 HDD Partition ........................................................................................................ 12
4-2 Class the data in the HDD .................................................................................... 12
5 Getting Started............................................................................................................. 13
5-1 Install the Rechargeable Battery........................................................................... 13
5-2 Remove the Battery Pack ..................................................................................... 13
5-3 Connecting the Power Adapter ............................................................................. 14
6 Using Your Notebook PC............................................................................................ 15
6-1 Turning on the Notebook PC ................................................................................ 15
6-2 Adjust the Brightness of LCD Screen ................................................................... 15
6-3 Keyboard Usage ................................................................................................... 15
6-4 Card Reader Usage .............................................................................................. 16
6-5 The Memory Card ................................................................................................. 17
7 Internet Connection..................................................................................................... 17
7-1 Connect the Lineate LAN...................................................................................... 17
7-2 Wireless LAN ........................................................................................................ 18
7-3 Connecting with the network via Express Card .................................................... 19
8 Power Managing System............................................................................................ 19

3
8-1 Battery System...................................................................................................... 19
8-1-1 Checking Battery Power............................................................................... 19
8-1-2 Charging the Battery Pack ........................................................................... 20
8-1-3 Low Power Warning ..................................................................................... 21
8-1-4 Battery Power............................................................................................... 21
8-1-5 Store the Battery Pack ................................................................................. 21
8-1-6 Prolonging the Battery’s Life ........................................................................ 21
8-2 Power Management Modes .................................................................................. 22
8-2-1 Standby mode of the System ....................................................................... 22
8-2-2 Hibernate...................................................................................................... 22
8-2-3 Log Off.......................................................................................................... 22
8-2-4 Restart the System....................................................................................... 22
8-3 Power Saving........................................................................................................ 23
8-3-1 Connect the Adapter without using Battery Pack ......................................... 23
8-3-2 Adjust the brightness of LCD Screen ........................................................... 23
9 Upgrading Your Notebook PC.................................................................................... 24
9-1 Connect the External Monitor ............................................................................... 24
9-1-1 How to connect the External Monitor ........................................................... 24
9-1-2 Connect Keyboard and Mouse..................................................................... 24
9-1-3 Connect Audio Device.................................................................................. 24
9-1-4 Lock Port ...................................................................................................... 25
9-2 Enter the BIOS Setup Menu ................................................................................. 25
10 Appendix.................................................................................................................... 27
10-1 Troubleshooting .................................................................................................. 27
10-2 Specifications...................................................................................................... 29

4
Safety Precautions
1. DO NOT press or touch the LCD Screen. DO NOT place the Notebook PC with
small items, they may scratch LCD Screen or enter the Notebook PC.
2. DO NOT expose the Notebook PC to dirty or dusty environment. Keep the
environment clean and dry.
3. DO NOT place the Notebook PC on uneven or unstable work surface.
4. DO NOT place or drop objects on the top of the Notebook PC. DO NOT shove any
foreign objects into the Notebook PC. DO NOT cover the LCD Screen strongly.
5. DO NOT expose the Notebook PC to strong magnetic or electrical fields; DO NOT
place the floppy disk near or on the Notebook PC, that may loss the data of the
floppy disk.
6. DO NOT leave the Notebook PC facing the sun as it can damage the LCD Screen,
especially in the car.
7. SAFE TEMP: This Notebook PC should only be used in environments with ambient
temperatures between 5℃(41℉) and 35℃(95℉).
8. DO NOT expose the Notebook PC to or use near liquids, rain, or moisture.
9. DO NOT throw the Notebook PC in municipal waste. Check local regulations for
disposal of electronic products. Please recycle the Battery Pack, and check with
your Local Authority or retailer for recycling advice.
10. The Notebook PC and the Adapter may occur some heat during operating or
charging. DO NOT leave the Notebook PC on your lap or any part of the body in
order to prevent discomfort or injury from heat exposure.
11. INPUT RATING: Refer to the rating label on the Notebook PC and be sure that the
Power Adapter complies with the rating. Only use attachments or accessories
specified by the manufacturer.
12. Checking the connections between the main unit and attachments before turning on
the Notebook PC.
13. DO NOT use the Notebook PC during eating food avoid dirtying the Notebook PC.
14. DO NOT insert anything into the Notebook PC that may result in short circuit or
damage the circuit.
15. Powering off the Notebook PC, if you want install or remove some external devices,
which are not support hot-plug.
16. Disconnect the Notebook PC from the electrical outlet and remove any installed
batteries before cleaning. And Keep it away from children.
17. DO NOT disassemble the Notebook PC, only a certified service technician should
perform repairs on your computer. Otherwise, problem may result and the
manufacturer should not hold responsibility for the damage.
18. Only use Battery Packs approved by the manufacturer or else damage may occur.
19. The Notebook PC has some little metal flake to disperse heat. DO NOT place the
Notebook PC on soft objects (e.g.: bed, sofa, your lap), or else the Notebook PC
may become hot and halt the system operating.

5
1 Knowing Your Notebook PC
1-1 Top Side
1. Built-in Camera
Open “My Computer” and enter
“USB Video Device” to activate the
camera function.
2. LCD Screen
3. Speaker
4. Power button
5. Keyboard
6. Microphone
7. Power Indicator
8. HDD Status Indicator
Light is blue when the HDD is in
active mode.
9. WiFi Indicator
10. Numeric Keypad Indicator
Click Fn+NUMLK to turn on the
light and the numeric keypad is
unlocked.
11. Cap Lock Indicator
Light is blue when the cap keypad
is unlocked.
12. Charge Indicator
Light is blue during being charging
and is not active when the battery is
fully charged.
13. Left-key
14. Right-key
15. Touch Pad

6
1-2 Right Side
1. SD/MS/MMC Port
2. USB Port (2.0)
3. VGA Port
1-3 Left Side
1. Ethernet/LAN Port
2. USB Port (2.0)
3. Microphone Jack
4. Headphone Jack
5. Express Card Port
The USB card can only be inserted in one orientation. Force to insert the card
may in result of damage.
1-4 Rear Side
1. Power Jack
2. Lock Port

7
1-5 Bottom Side
1. Lithium Polymer Rechargeable Battery
2. Battery Latch

8
2 Caring the Notebook PC
The Notebook PC is a precision device; the error operation may damage the device.
2-1 LCD Screen
LCD Screen is the most delicate component of the Notebook PC and comprised of
thin glass. It may be broken up by external abrupt force. DO NOT scratch the cover of
the Notebook PC, or the scrape on the cover cannot remove.
DO NOT cover the LCD Screen strongly, or else damage may occur.
DO NOT place objects on the keyboard to avoid damaging the screen and
keyboard when you cover the LCD Screen.
Place the Notebook PC in carrying case to protect it from dirt, water, shock and
scratches before traveling.
DO NOT drop or place heavy objects on the LCD Screen.
DO NOT scratch the LCD Screen with your fingernails or any hard objects.
Use a soft and lint-free cloth to wipe your Notebook PC and wipe it gently in order to
avoid damaging the LCD Screen.
Shut down the LCD Screen, if the Notebook PC will not be used for a long time.
DO NOT clean the LCD Screen with chemical cleaners.
The LCD Screen DOES NOT come into contact with hard objects (E.g.: cloth button,
watchband).
Use a soft and lint-free dry cloth to wipe the LCD Screen smoothly. DO NOT use
your hand to wipe the LCD Screen directly.
DO NOT spill liquid into the Notebook PC as it can damage the components of the
Notebook PC.
Cover the LCD Screen smoothly in order to avoid moving the hinges and flashing
the LCD Screen.
DO NOT clean the Touch Pad with acidic cleaner or spray cleaning solution
directly on the Notebook PC.
2-2 Hard Disk Drive (HDD)
Place the operating Notebook PC in steady and even table. Poor handling of the
Notebook PC may damage the HDD.
The HDD is the most delicate component in turning on and powering off the
system. The HDD operates at unsteady fast speeds during turning on the
Notebook PC; the vibrancy may damage the track of HDD. If the axes of the HDD
have not stop completely at the powering off the Notebook PC, the vibrancy may
damage the HDD.

9
2-3 Battery Pack
Please recycle the Battery Pack, and check with your Local Authority or retailer for
recycling advice.
DO NOT put the Battery Pack near or into the fire, or else it may cause fire or
explode.
The Battery Pack will short circuit if the Battery Pack is punctured or reassembled
The ideal temperature range that the Battery Pack be used is between 20℃-30℃.
Any temperatures above or below this range will shorten the life of the Battery Pack.
2-4 Keyboard
Keyboard is the most often used component by finger directly. Use a little brush to
clean or a can of compressed air to remove dust from between the keys on the keyboard.
Moisten a soft, lint-free cloth with water or cleaner and wipe the surface of the keys
smoothly.
If the water seeps into the keyboard, the circuit will not be damaged directly because
of the no-power supply keyboard. But the deteriorate of the Printed circuit board will
occur and will result in malfunction of the keyboard. Contact your dealer for advises at
this moment.
2-5 Touch Pad
Keep your hand clean when using the Touch Pad, or else the cursor is out of
control.
If the Touch Pad is dirty, moisten a soft, lint-free cloth with water and wipe the
Touch Pad smoothly.
The Touch Pad is pressure sensitive, DO NOT scratch the Touch Pad with hard
objects, or rest heavy objects on it.
2-6 Other accessories
Following the below steps before cleaning your Notebook PC and the accessories.
1. Turn off the Notebook PC. Disconnect your Notebook PC and all external devices
from their electrical outlets and remove the installed battery.
2. Use the little dust collector to pump the dust from the slot of plug or keyboard.
3. Moisten a soft, lint-free cloth with water and wipe the surface of the Notebook PC
smoothly. DO NOT seep liquid into the Notebook PC in order to avoid shorting of
circuit and the damage of the Notebook PC.
4. Turn on the Notebook PC after drying it.

10
2-7 If the water come into the Notebook PC
DO NOT turn on the Notebook PC immediately.
Disconnect the outlet cable and detach the Battery Pack in order to turn off the
Notebook PC, instead of pressing the POWER button to turn off it. Disconnect all
external devices.
Spill out the water from the Notebook PC. Use a soft and waterish paper or cloth to
wipe the surface of the Notebook PC lightly.
Use the fanner to dry the Notebook PC and the accessories, and then send it to
the service center for advice.
DO NOT use hair drier to dry the Notebook PC, or the high temperature may distort
it.
DO NOT place the Notebook PC into the dirty carrying case again.
2-8 Other Notes
DO NOT expose the Notebook PC in hot environment for a long time, especially in
the car. Or the parts of the Notebook PC will metamorphic.
Keep the data for future possible use termly.
Renew the hardware or software termly in order to keep the Notebook PC
compatible and steady.

11
3 Traveling with the Notebook PC
Turn off the Notebook PC and disconnect all lines before moving it. Following the
below steps, if you want to travel with your Notebook PC.
3-1 Attention
1. Charge the Battery Pack and the spare Battery Pack fully.
2. Turn off the Notebook PC and disconnect from the wall outlets.
3. Shut down the LCD Screen completely and smoothly.
4. Disconnect the AC lines.
5. Disconnect all lines.
6. Place the Notebook PC in carrying case to protect it from dirt, water, shock and
scratches before traveling.
7. Check that you have taken the spare Battery Pack, AC Adapter, power lines,
manual and warranty card. DO NOT forget the passwords of the Notebook PC and
HDD.
8. Find out the voltage type in the countries you will visit. Your Notebook PC comes
with a universal AC-DC adapter, so you only need to buy the different power cords
to connect the different outlets or the hotel may provide universal outlets to support
your power cord as well as voltages.
If you drive your car with the Notebook PC, DO NOT leave the Notebook PC
facing the sun. Place it in the shady and cool area.
DO NOT remove the HDD immediately while or after operating. Set the
Notebook PC into the Standby mode or Hibernation mode, before moving it.
The connection between Internet and your Notebook PC will be interrupted
when the system enter the hibernation mode.
3-2 How to enter the suspend mode
Click the left button of the mouse on the “Start”→Click the left button of the mouse
on the “POWER OFF”,Click the left button of the mouse on“Standby”or“Hibernation”
items,then the system will enter the standby mode or Hibernate mode.
If you will attend a meeting with the Notebook PC and want still keep the Notebook
PC in the current state, please set the system into suspend mode. When you turn on the
Notebook PC again, the system will return the last state, which you want.

12
4 Keep the data for future possible use
Your computer has been fully tested and complies with the system specifications
before shipping. However, incorrect operations, mishandling or any other reasons may
loss your data, e.g.: Delete or cover the data by error, Damage the HDD by vibration,
Damaged by Network virus, Disaster, Loss the data because of being stolen.
4-1 HDD Partition
The damage of the HDD or the operating system may be result in the loss of the
data in the HDD.
So you need to save your data to another memory card to avoid losing the data.
In order to improve the performance of your Notebook PC, the HDD of your
Notebook PC can be formatted with some partitions, C, D and so on. Save files to the
any partitions except C partition. Then you can retrieval or reinstall the operating system
without damaging your data.
Select the available software to part the HDD, as you like.
4-2 Class the data in the HDD
1) Files: Office files,Pictures,Music and so on.
2) E-mail: Sent mail, Address List and so on.
3) Information of Website: The favorite of Explorer,Bookmarks of Net-scape and
so on.
Save these data to the same file, or else you may forget copying some files to
the spare HDD or the other memory card. Please save your data for future
possible use termly.

13
5 Getting Started
5-1 Install the Rechargeable Battery
Power the Notebook PC before using it. There are two ways to power the Notebook
PC: Use the AC Adapter to power it or use the removable Battery Pack.
The Notebook PC is designed to work with a removable Battery Pack. Your
Notebook PC may or may not have its Battery Pack installed. If your Notebook PC does
not have its Battery Pack installed, using the following procedures to install the Battery
Pack:
Push the Battery Pack toward the arrow into the Notebook PC until you hear it click
and lock into place.
5-2 Remove the Battery Pack
1. Turn off the Notebook PC,and disconnect all lines.
2. Shut down and turn over the computer to access its base in flat and clean work
surface.
3. Slide the Battery Latch toward the arrow ①.
4. Draw the Battery Pack towards the arrow ②to release the Battery Pack from the
Notebook PC.
WARNING! For safety reasons, DO NOT disassemble the Battery Pack, DO
NOT short the circuit, DO NOT throw the Battery Pack into fire and keep it
away from children.
When the Notebook PC with Battery Pack (disconnect the adapter) turns on,
the Power Indicator will turn on. And the light will turn off when in standby
mode or system halting.
DO NOT attempt to remove the Battery Pack while the Notebook PC turns on,
as this may result in the loss of working data.
Damage may occur if you use a different adapter to power the Notebook PC or
use the Notebook PC’s adapter to power other electrical devices.

14
5-3 Connecting the Power Adapter
The Notebook PC comes with a universal AC-DC adapter and the allowable input
voltage of adapter is from 100V to 240V.
Following the below steps to connect the adapter:
1. Take the adapter and the power cord, and then connect the adapter with the power
cord.
2. Plug the DC end of adapter into the power jack of the Notebook PC.
3. Insert the AC end to the wall outlet
4. Check the connections above correctly before turning on the Notebook PC.
DO NOT remove the Notebook PC if the HDD is being read or written, that
may result in the loss of the data and the damage of the disk. Follow the
system steps to turn off the Notebook PC.
Your Notebook PC and the accessories may differ from the pictures
shown.

15
6 Using Your Notebook PC
6-1 Turning on the Notebook PC
1. Open the LCD screen and adjust the angle of the Notebook PC’s LCD Screen
2. Press the POWER button to turn on the Notebook PC.
6-2 Adjust the Brightness of LCD Screen
The Notebook PC uses an active matrix TFT LCD and provides a Display (Monitor)
Output Port to connect the external monitor. The Notebook PC supports the function to
adjusting the LCD Screen through the OSD menu (On Screen Display: OSD).
Click Function
<Fn>+<F10> Shift between LCD Screen and external monitor
<Fn>+<F11> Decrease the brightness of screen
<Fn>+<F12> Increase the brightness of screen
LCD Screen is made of glass and may be damaged if the Notebook PC is
dropped or shoves any hard object.
6-3 Keyboard Usage
The Notebook PC’s integrated a U.S standard
keyboard with 85 keys.
Click the numeric/symbol keys to input the
desired keys after starting the keyboard.
Press <Num Lk> key to enable the keypad,
the light indicates that the keypad is
active; press <Num Lk> key again to disable
the keypad.
Each key on the keyboard may have multiple functions in different software.

16
Function Keys
These function keys with the color word or icon sign means that their function only
can be activated when clicking the function key and the <Fn> key at the same time.
<Fn>+<F2>:Turn on or turn off the WiFi.
<Fn>+<F3>:Turn on or turn off the mute.
<Fn>+<F4>:Turn down the volume.
<Fn>+<F5>:Turn up the volume.
<Fn>+<F6>:Play or pause the playback.
<Fn>+<F7>:Return to the previous track.
<Fn>+<F8>:Go to the next track.
<Fn>+<F9>:Stop the playback.
<Fn>+<F10>:Shift between LCD Screen and external monitor.
<Fn>+<F11>/<F12>:Decrease/Increase brightness of LCD Screen.
Other Key Combinations
Click <Ctrl>+<Shift>+<Esc> or
<Ctrl>+<Alt>+<Del> to open “Task Manager”
windows.
Click Windows Key +<R> to open “Run”
windows.
Click Windows Key +<F> to open “Search
Results” windows.
Click the left button of the mouse on the “Start”
=> “Control Panel”,double click the left button of
the mouse on “Keyboard” to enter the keyboard
setup windows.
Each key on the keyboard may have multiple functions in different software.
6-4 Card Reader Usage
The Notebook PC has a single built-in memory card reader that can read the
following flash memory cards: Secure Digital, Multi-Media Card, Memory Stick. See the
manual of the relevant card for more information.

17
6-5 The Memory Card
Insert The Memory Card
The card only can be inserted in one orientation (with the card’s electrical contacts
towards the bottom of the unit) Force to insert the card may in result of damage.
Push out the Memory Card
Stop the card’s operation, then eject the card lightly inby, the card will exit from the
port.
7 Internet Connection
7-1 Connecting with the network via Wired LAN
Before connecting the network with your computer, setup your network system first, and
then connect telecommunication line to your Notebook PC.
Setting the Network system
Click the right button of the mouse on the “Network Neighborhood”, click the left button of
the mouse on the “property” item to enter the “Network Connections” windows, as show
below:

18
Contact your Internet service provider for more information about the setting of
IP and DNS.
Click the right button of the mouse on the icon of
“Local Area Connections”, click left button of the
mouse on the “property” item to display the menu
of “Local Area Connection Properties”, as show
right:
On the menu of “Local Connections Property”, click the left button of the mouse on the
“Internet Protocol(TCP/IP)”→click the left button of the mouse on the “Property” to enter
the “Internet Protocol(TCP/IP)Property” windows.
Select the “General” label on the “Internet Protocol(TCP/IP)Property” windows, and
enter the address of your IP and DNS, or select “Obtain an IP address automatically”.
7-2 Wireless LAN
Click <Fn>+<F2> to turn the wireless network on or off. When the wireless network turns
on, the WIFI Indicator turns on and the icon of WIFI will display on the right-bottom of the
desktop.
Click the right button of the mouse on the icon of WIFI, click the left button of the mouse
on the “View Available Wireless Networks” of the pop-up menu or click the left button of
the mouse doubly on the icon of WIFI to enter the windows of “Wireless Network
Connection”, as show below:

19
Click the left button of the mouse on
the “Refresh” of the windows, the
system will search and list the
available wireless Networks. The
information of the Networks will be
displayed when you select the
relevant network. Some Networks
may need to type the password
before connecting.
7-3 The wireless LAN Express Card
The Notebook PC supplies Express Card/34 port. The Express Card that comes
with the wireless LAN Access Point can be purchased separately and is designed for
building a wireless LAN environment. See the manual of the Express Card for more
information.
If your computer cannot connect with network, you may have to reset your
network system, change the telecommunication line or contact your Internet
service provider for help.
8 Power Managing System
8-1 Battery System
The Notebook PC is designed to work with a removable and high capability Battery
Pack.
8-1-1 Checking Battery Power
Click the left button of the mouse on “Start”, click the left button of the mouse on
“Control Panel”, and click the left button of the mouse doubly on “POWER Options”, the
“Power Options” menu will display. Click the left button of the mouse on “Power Meter”
label to check the power of the battery.
Table of contents
Other NANJING WANLIDA TECHNOLOGY Laptop manuals