nanoskin EVERGREEN EG-1007 User manual

Extractor Gun
EG - 1007
Instruction Manual

EG1007001
EG1007002
EG1007003
EG1007004
EG1007005
EG1007006
EG1007007
EG1007008
EG1007009
EG1007010
EG1007011
EG1007012
EG1007013
EG1007014
EG1007015
EG1007016
EG1007017
EG1007018
EG1007019
EG1007020
EG1007021
EG1007022
EG1007023
EG1007024
EG1007025
EG1007026
EG1007027
EG1007028
EG1007029
EG1007030
EG1007031
EG1007032
EG1007033
Ref
No
.
.Part No. Description
Q ty
Tool
'
/
Ref
No
.
.Part No. Description
Q ty
Tool
'
/
1
2
3
4
5
6
7
8
9
10
11
12
13
14
15
1
1
1
1
1
1
1
1
1
1
1
1
1
1
1
Housing
Nozzle
Weighted Tube Ass y'
Pin
Trigger
Screw
Spring
O Ring2×1-
Gasket
Screw
Gasket
Valve Stem
Bushing
16 1
17
18
1
1
19 1
20 1
21
22
1
1
23 1
24
25
1
1
26 1
27 1
28
29
1
1
30 1
31 1
Screw
32 1
Bracket
Screw
Hose
Screw
Screw
Cone 1
Cone 2
Adapter 26
Adapter 27
Adapter 28
Clamp
33 1
Nipple
EG-1007 Extractor Gun
Screw
Hose
Cone

Nozzles :
Cone with Brush
Adaptor Joints :
Adaptor Joint (L) Adaptor Joint (M) Adaptor Joint (S) Snap
Body :
Standard Cone
Weighted Tube
Internal Cone
Air Tube Port
Trigger/Handle
Infusion Part
Liquid Adjusting Valve
Liquid Tube Port
Internal Liquid Tube
1
Extractor gun packs all the features of EVERGREEN into a lightweight, convenient
cleaning geek. Perfect tools for professionals. A hypersonic-like cleaning action with
detergent mist efficiently releases dirt and grease on short to medium pile fabric, carpet
or solid surfaces, and the extension vacuum hose allows to suck the dirt when being
connected with a wet/dry at the same time.
Extractor Gun
EG-1007
Instruction Manual

DIRECTION FOR USE (PREPARATION)
2
Cone Installation/Replacement
Attach standard cone with internal cone, and internal tube with internal liquid tube
(See inset below). Please notice that internal liquid tube might bend during the instal-
lation, please attach it with care. Make sure all the parts are
completely installed.
Please turn off the air compressor while disconnecting the air
plug.
Please connect the air plug and air coupler firmly.
Failure to connect properly might cause the air leaking while in operation.
Internal Liquid Tube
Internal Cone
Standard Cone
Liquid Tube
Internal Liquid Tube
If the internal liquid tube is damaged, the detergent mist will not be spray correctly.
Connection of Vac Hose
If the neck finish of the vac hose and extractor gun hose is different, please use
the joint adaptor to connect them together. (See figure below)
Please turn off the air compressor while connecting the air compressor and air plug.
First, connect the air tube with air plug firmly. Second, connect the air plug with air
coupler. Do not pull the trigger on the tool while connecting.
Vac Hose Joint Adaptor
**Extractor Gun Side** **Air Compressor Side**
Air Coupler
Air Tube
Air Plug
Caution
Connection of Compressed Air
Warning
Warning

Adjustment of Liquid Adjusting Valve
/ Fixed Valve
3
Method of Liquid Adjusting Valve / Fixed Valve
Internal Liquid Tube
Fixed Valve screw allows to adjust the air flow. Once the
Air pressure is fixed, please tighten the fixed valve.
Liquid Adjusting Valve
The tighter the liquid adjusting valve screw,
the thinner and smaller the spray volume is;
the looser the liquid adjusting valve screw,
the thicker and larger the spray volume is
Fixed Valve
Liquid Adjusting Valve
Caution During operation, please tighten the fixed valve firmly.
Failure to tight up the fixed valve might cause damages.
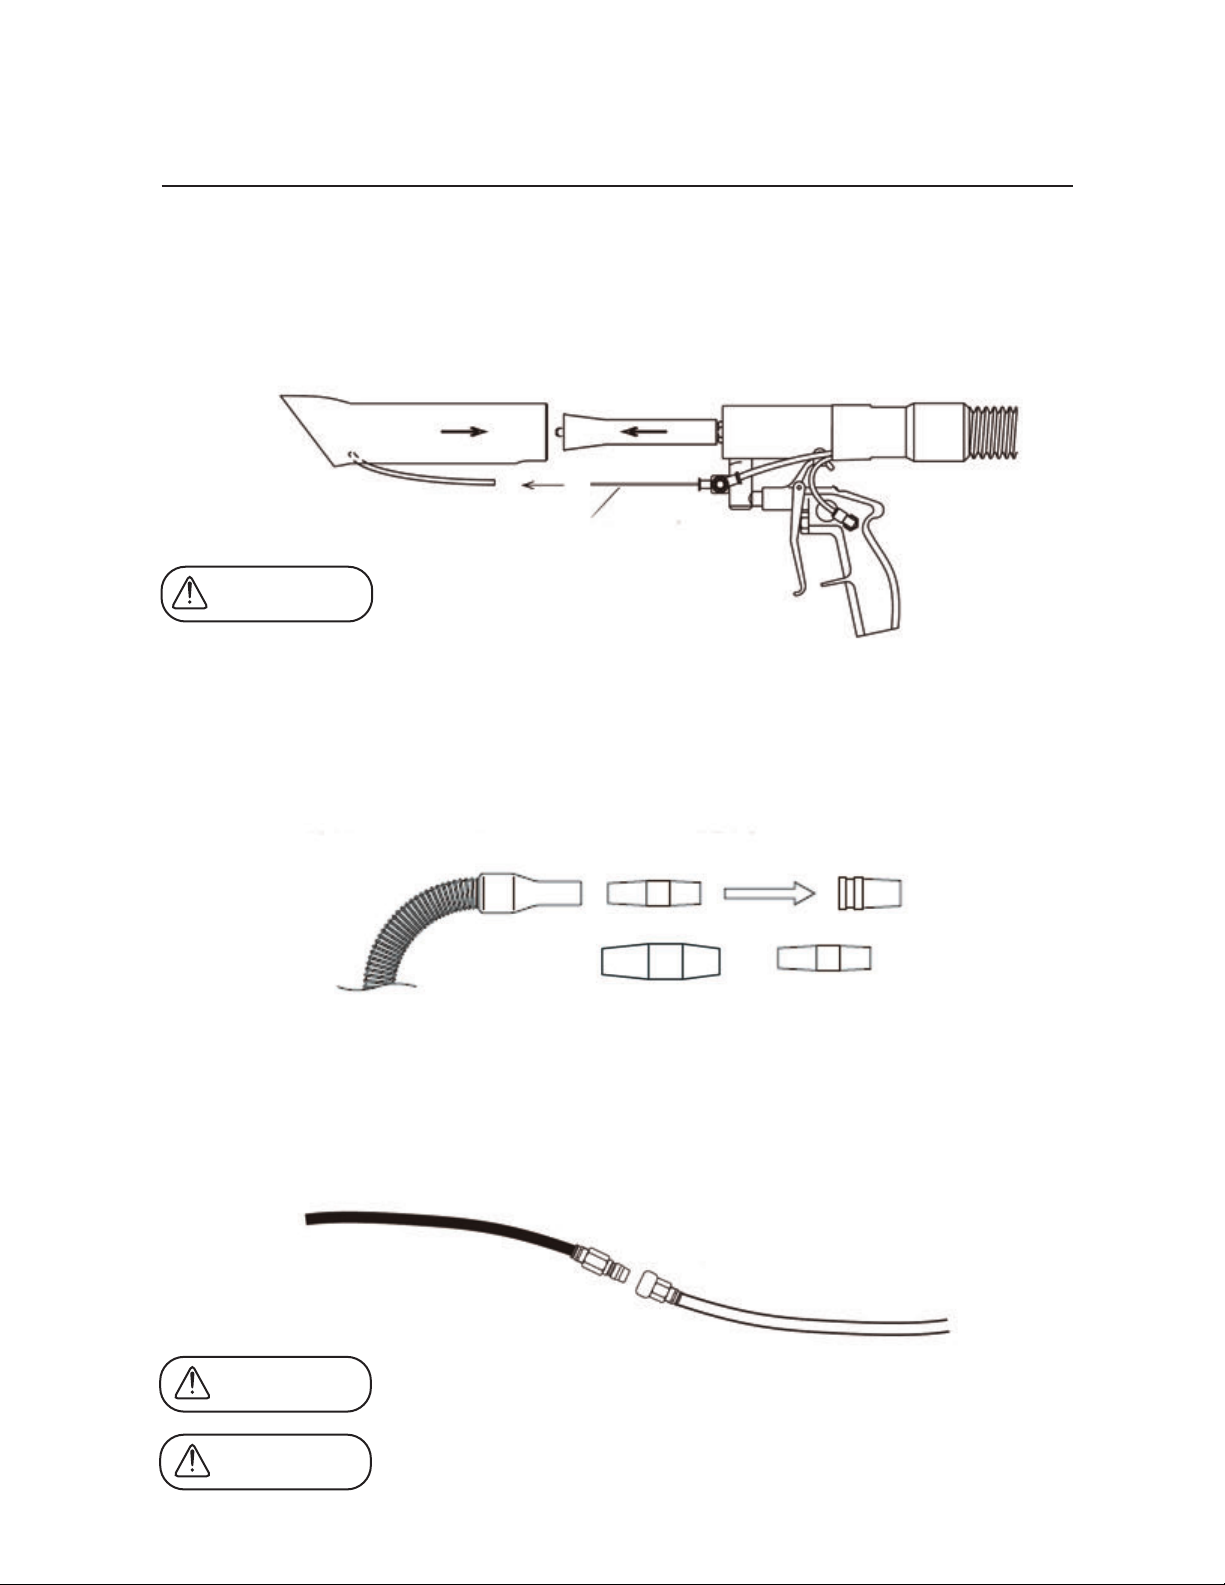
Installation of the Liquid Tube and Internal Liquid Tube
Attachment (See Figure 1 below)
Internal Liquid Tube might bend during the attachment, please attach with care. Attach the liquid
tube on the cone with internal liquid tube directly. Pull it lightly to check whether it is properly
installed. (Note: DO NOT pull too hard)
Attach the Internal Liquid Tube and Liquid Tube Firmly.
Failure to attach properly might cause fluid leaking while in operation.
Detachment (See Figure 2 below)
Press the joint with one hand, and pull out the liquid tube with the other hand .
Liquid Tube (on the cone)
Do Not pull the tubes too hard.
Detaching the tube without pressing the joint will cause serious damages to
the tube and socket.
Do Not bend or crush Internal Liquid Tube.
Attach liquid tube with internal liquid tube carefully.
Joint
Figure 2
Joint
Figure 1
Caution
Caution
Caution

DIRECTION FOR USE
4
First, turn off the air reverse switch. Vacuum the dirt without triggering the tool.
To achieve the best result, use the vacuum function ONLY to remove loose dirt
and dust first, then pull the trigger to break down stubborn dirt and contaminants
Second, please hold the tool securely while in operation. Move the tool back and
forth SLOWLY over the surface. (See figure below)
(NOTE: If you move the tool too fast, it doesn’t break down the stubborn dirt.)
Wear safety goggles and respirator when in operation.
NEVER point the tool in the direction of human body, face or eyes.
Please use the strainer to filter out all the liquid deposit in advance.
(Containers for water or other cleaning solvents are not included in this package)
If applicable, wear safety goggle and respirator when in operation.
Third, turn on the air reverse switch. Pull the trigger, then move back and forth to
remove stubborn dirt and contaminants with micro particle detergent mist. When
finished working, turn off the air reverse switch. Store the tool in a well-ventilated, dry
place without direct sun light.
Note: For the instruction of liquid adjusting valve and fixed valve, please see previous
page.
Warning

MAINTENANCE METHODS
5
Second, place the internal cone and
internal liquid tube into water tank, release
the pressure by pulling trigger of the tool.
The trapped dirt will be cleaned.
First, Detach the cone, and clean the
Standard Cone cone and joint adaptor.
Third, squeeze trigger of the tool for 1 minute.
Store in well ventilated, dry place without being exposed to direct sun light.
Standard Cone
(or cone with brush)
Caution Please detach the standard cone /cone with brush and
liquid tube with care.
It might cause damages to the device.
After finishing working, detach the
vacuum from the tool.
Stop the cleaning process when
the dirt and contaminents are released.
Use caution with the internal cone and internal liquid tube.
Caution

Read and observe the safety notes in the Instructions manual and the safety labels
located on the device.
1. The air pressure must be set below 115 Psi.
2. Use only as described in this manual. Use only the manufacturer’s recommended
attachments.
3. DO NOT use to pick up flammable or combustible liquids, such as gasoline, or use
in areas where they be present.
4. DO NOT use around explosive liquids or vapors
5. DO NOT pick up anything that is burning or smoking, such as cigarettes, matches,
or hot ashes.
6. DO NOT pick up the objects:
●Bigger than 5mm
●Sticky items, such as tape, seal.
●Objects with thread, such as a thin string of cotton, wool, silk
7. Use ONLY with neutral liquid. Specially note that organic solvent even in neutral
feature cannot be used, because it contains enormous factors which might cause
deterioration.
8. DO NOT use the tool if you are not working.
9. DO NOT operate the extractor gun unless all parts are properly installed.
10. If the consumable parts of this tool are damaged, they MUST be replaced only by
genuine replacement parts.
IMPORTANT SAFETY INSTRUCTIONS
6
Please use extractor gun with WET/DRY VAC only. Use regular dry vac might
cause damages to the device, and vac.
Warning

7
NANOSKIN CAR CARE PRODUCTS
Division of Total Import Solutions, Inc.
La Habra, CA 90631
Engineered in Japan
Designed in USA
Made in PRC
www.nanoskinusa.com
For Chemical Emergency: PERS – Day or Night
NORTH AMERICA :1-800-633-8253
INTERNATIONAL :1-801-629-0667
SAFETY AND OPERATION RULES
Safety precautions are essential when any mechanical equipment is involved.
These precautions are necessary when using, storing, and servicing mechanical
equipment. Using this equipment with the respect and caution demanded will
considerably lessen the possibilities of personal injury. If safety precautions are
overlooked or ignored, personal injury or property damage may occur. The follow-
ing symbols shown below are used extensively throughout this manual.
Identifies specific instructions or procedures which if not correctly
followed could result in personal injury or death.
Identifies specific instructions or procedures which, if not strictly
observed,could result in damage to, or destruction of equipment and/or
property.
Provides information on particular characteristics and how to operate
properly.
Warning
Notice
Caution
SPECIFICATION
Model No.
Weight (kg)
Air Pressure (Psi)
Air Consumption (L/min)
Detergent
Max. Spraying Volume (ml/min)
Working Temperature ( oC)
Air Inlet
EG-1007
1
75~115
190 @72Psi
Neutral
250
10~50
1/4”
Other manuals for EVERGREEN EG-1007
1
Table of contents
Popular Ventilation Hood manuals by other brands

Imperial Kitchen Ventilation
Imperial Kitchen Ventilation WH1900-10 Installation instructions & warranty information

DCS
DCS Vent Hood ES36 installation guide

Saivod
Saivod CES619W manual

Apelson
Apelson CHSV60 manual

Luisi Air
Luisi Air PAVIA Installation, Use and Maintenance Instruction

ELICA
ELICA LOL Series Instruction on mounting and use