manuals.online logo
Brands
  1. Home
  2. •
  3. Brands
  4. •
  5. Naterial
  6. •
  7. Garden House
  8. •
  9. Naterial LINEUS 6x6 User manual

Naterial LINEUS 6x6 User manual

183.5 cm
72.2" 185 cm
73.1"
226 cm
89.4"
LINEUS 6x6
A-2161 565577
10
17199711
2
REQUIRED TOOLS | OUTILS EXIGÉS | HERRAMIENTAS NECESARIAS | BENÖTIGTE WERKZEUGE |
BENODIGD GEREEDSCHAP | ATTREZZATURA OCCORRENTE | FERRAMENTAS NECESSÁRIAS
The following tools are required for shed assembly | Pour construire votre remise, vous aurez besoin des outils suivants | Für die Montage
des Gartenschuppens benötigen Sie folgende Werkzeuge | Las siguientes herramientas son necesarias para armar el cobertizo |
De volgende gereedschappen worden vereist voor het monteren van het schuurtje | Il montaggio richiede i seguenti
utensili | São necessárias as seguintes ferramentas para a montagem do abrigo de jardim:
SPATULA | SPATULE | ESPÁTULA | SPACHTEL | SPATEL | SPATOLA | ESPÃTULA
tUse spatula (part “SPA”) for easier insertion of panel into profile.
tUtilisez la spatule (partie « SPA ») pour une meilleure insertion du panneau dans le profil.
tUtilice una espátula (pieza “SPA”) para una mejor inserción del panel en el perfil.
tBenutzen Sie den Spachtel (Bezeichnung „SPA“), um die Platten leichter in die Nut
einführen zu können.
tGebruik spatel (onderdeel SPA) voor het gemakkelijk invoeren van het paneel in het profiel.
tUtilizzare la spatola (parte SPA) per inserire il pannello più facilmente nel profilo.
tUtilize uma espátula (peça “SPA”) para facilitar a inserção do painel no perfil. SPA X1
CUSTOMER SERVICE | SERVICE CLIENT | SERVICIO DE ATENCIÓN AL CLIENTE | SERVIÇO AO CLIENTE |
ASSISTENZA CLIENTI | ΕΞΥΠΗΡΕΤΗΣΗ ΠΕΛΑΤΩΝ | DZIAŁ OBSŁUGI KLIENTA | SERVICIUL CLIENŢI
Greece:
SA Elliniki Etaireia Idiokataskevon A.E,
453 Leoforos Irakliou –
14122 Iraklio, Athens,Greece
Tel: 0030 210 6256265
Fax: 0030 210 6203303
Cyprus:
SCB DIY Company Limited
KALAMON AVE 16
NICOSIA-1095
Tel: 0030 210 6256265
Fax: 0030 210 6203303
Spain/Portugal:
SPV Keter Plastic - Iberia
[email protected]
CÁRCABA EUROPA CENTRO S.L.
CÁRCABA GRUPO
Avenida Conde de Romanones 6-B
Polg. Ind. Miralcampo
19200 Azuqueca de Henares – Guadalajara
ESPAÑA
Tlf. +34.949 27 74 21
Fax +34.949 34 89 76
Brazil:
South America
International Home S.A.
Address: Gavilan 1750
CABA, CP 1416
Argentina
Phone +5411 4582 0777
Email: [email protected]
Poland:
VICTUS-EMAK Sp. z o.o.
ul. Karpia 37, 61-619 Poznań-Poland
Tel: (+48) 61 823 83 69
Fax (+48) 61 820 51 39
Email: [email protected], www.victus.pl
Italy/ Romania:
ESCHER SRL
Cavenago Brianza (MB)
Tel. 02/95339216
Fax. 02/9501617
Email: info@escher.it
France:
10, rue ampère
95500 Gonesse
Tel: 33 (0) 134079900
Fax: 33 (0) 134079919
Email: [email protected]
3
Option
Opción
Option
optie
opzione
opção
A
Option
Opción
Option
optie
opzione
opção
B
1 2
123
Clear area of stones | Remove all plants, roots and other obstacles | Rake the ground | Make ground level using a long, flat object (e.g. wood
beam) | Retirez toutes les pierres | Arrachez toutes les plantes, racines et autres obstacles | Ratissez le sol | Aplanissez le sol à l’aide d’unobjet
long et plat (une planche en bois par exemple) | Saque las piedras del área | Retire todas las plantas, raíces y otros obstáculos | Rastrille la
tierra | Nivele el suelo usando un objeto largo y plano (por ejemplo, una viga de madera) | Beseitigen Sie Steine | Entfernen Sie alle Pflanzen,
Wurzeln und andere Hindernisse | Pflügen Sie den Boden durch | Ebenen Sie den Boden mit Hilfe eines langen, flachen Objektes (wiez.B. eines
Holzbalken) aus |Verwijder stenen | Verwijder alle planten, wortels en andere obstakels | Hark de grond | Maak de grond met een lang, vlak
onderwerp (bijv. een houten balk) waterpas | Eliminare le pietre | Rimuovere piante, radici e altri ostacoli | Livellare il terreno | Mettere a livello
il terreno utilizzando un oggetto lungo e piatto (ad es. un asse di legno) | Retire as pedras do local | Retire todas as plantas, raízes e outros
obstáculos | Alise o local | Nivele o solo utilizando um objecto comprido e plano (por exemplo, uma trave de madeira)
Please select your construction site carefully | The ground surface must be level | it is highly recommended that you construct a wooden or
concrete base to use as a foundation | Veuillez sélectionner le site de votre construction avec précaution. La surface du sol doit être plane | il
est fortement recommandé de construireune base en bois ou solide afin de l’utiliser comme fondation | Seleccione con cuidado el lugar donde
colocará su cobertizo | la superficie del suelo debe ser pareja | le recomendamos especialmenteque construya una base de madera o
cemento para usar como cimiento | Bitte wählen sie ihren montagestandort sorgfältig aus | die bodenfläche muss eben sein. Es wird
empfohlen, dass sie eine holz-oder betonunterlageals fundament anlegen | Selecteer met zorg uw bouwplaats | het oppervlak van de grond
moet vlak zijn | het wordt ten zeerste aangeraden dat u een houten ofbetonnen basis maakt om als fundament te gebruiken | Scegliere con
cura la posizione ove montare la casetta | la superficie del terreno deve essere ben livellata | si raccomanda vivamente dicostruire un
basamento in legno o in calcestruzzo, da utilizzare come fondamenta | Por favor, escolha o local de construção cuidadosamente | a superfície
do solo deve ser nivelada | recomenda-se vivamente que construauma base de madeira ou de cimento para usar como fundações.
LEVEL THE GROUND | NIVELLEMENT DU SOL | NIVELE EL SUELO | SORGEN SIE FÜR EINE EBENE |
GRUNDFLÄCHE MAAK DE GROND WATERPAS | METTERE IL TERRENO A LIVELLO | NIVELAR O SOLO
4
CAUTION | AVERTISSEMENT | ADVERTENCIA | WICHTIG | WAARSCHUWING | ATTENZIONE | ATENÇÃO
BEFORE STARTING ASSEMBLY | AVANT DE COMMENCER LE MONTAGE | ANTES DE EMPEZAR EL
ARMADO | VOR MONTAGEBEGINN | VOORDAT U BEGINT TE MONTEREN | PRIMA DI INIZIARE IL
MONTAGGIO | ANTES DE INICIAR A MONTAGEM
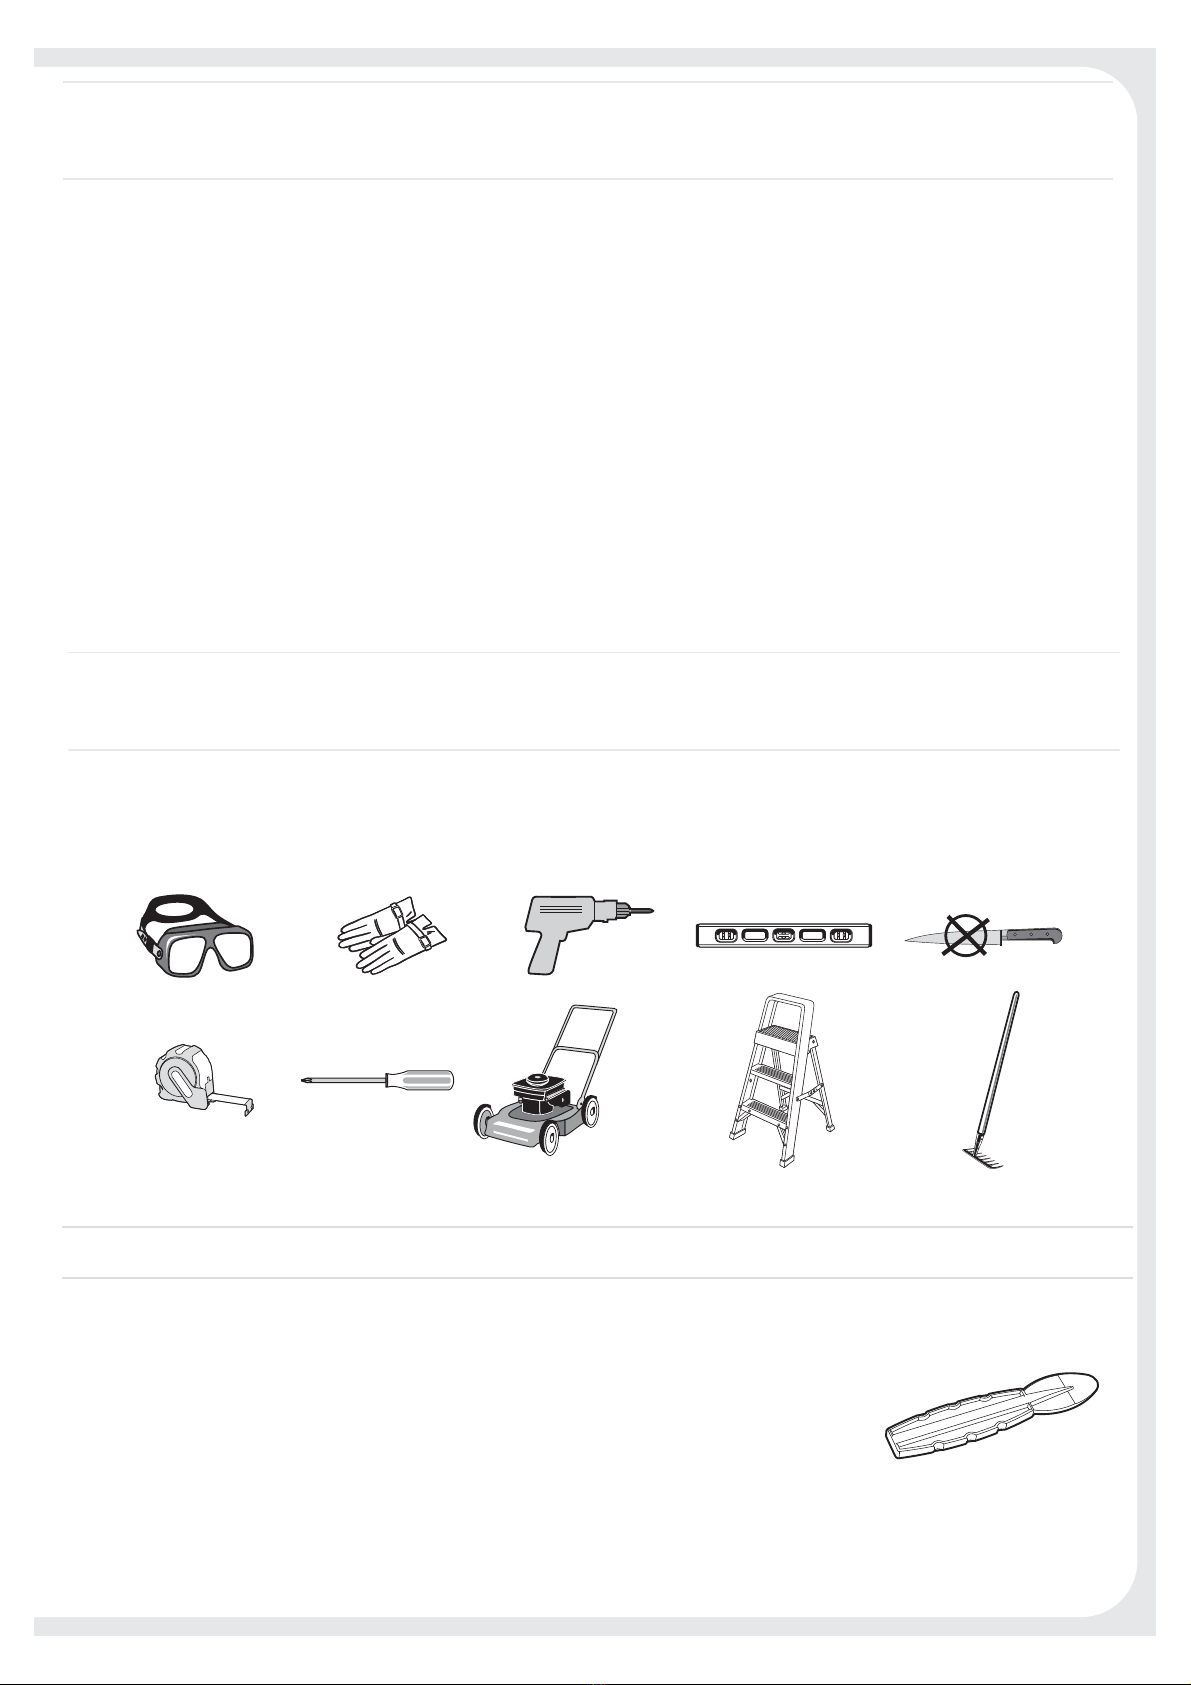
Some parts have steel edges | Please be careful when handling components | Always wear work gloves, eye protection and long sleeves
when assembling or performing any maintenance on your shed | Do not attempt assembly on days with strong winds or low temperatures.
Certaines pièces ont des bords en acier | Soyez prudent en les manipulant | Portez toujours des gants de travail, des lunettes de protection et
des vêtements à manches longues lors de l’assemblage ou de l’accomplissement d›activités de maintenance sur votre abri | N’essayez pas de
réaliser le montage les jours de grand vent ou de grand froid | Veuillez vérifier régulièrement que les vis sont bien serrées.
Algunas partes tienen bordes de acero | Tenga cuidado al manejar estos componentes | Use siempre guantes de trabajo, anteojos
protectores y mangas largas para armar el cobertizo o realizar cualquier tarea de mantenimiento en el mismo | No intente armar el
cobertizo en días de viento fuerte o de baja temperatura.
Manche Teile haben Stahlkanten, bitte seien Sie vorsichtig beim Umgang mit diesen | Tragen Sie bei der Montage des Gartenschuppens oder
Wartungsarbeiten stets Arbeitshandschuhe, eine Schutzbrille und Kleidungsstücke mit langen Ärmeln | Versuchen Sie nicht, den
Gartenschuppenbei starkem Wind oder niedrigen Temperaturen zu montieren.
Sommige onderdelen hebben stalen randen | Wees voorzichtig met het omgaan met deze onderdelen | Draag altijd werkhandschoenen,
oogbescherming en lange mouwen als u uw schuurtje monteert of onderhoud | Probeer niet te monteren op dagen met sterke wind of
lagetemperaturen.
Alcune parti presentano bordi in acciaio | Fare attenzione nel maneggiare i componenti | Indossare sempre guanti da lavoro, protezioni per gli
occhi e maniche lunghe durante il montaggio o durante la manutenzione | Evitare di effettuare il montaggio in presenza di forte vento o
bassetemperature.
Algumas peças têm extremidades de aço | Tenha cuidado ao manusear este componentes | Utilize sempre luvas e óculos de protecção,assim
como vestuário comprido ao montar ou efectuar qualquer procedimento de manutenção no seu abrigo de jardim | Não monte o abrigo de
jardim em dias de vento forte ou de baixas temperaturas.
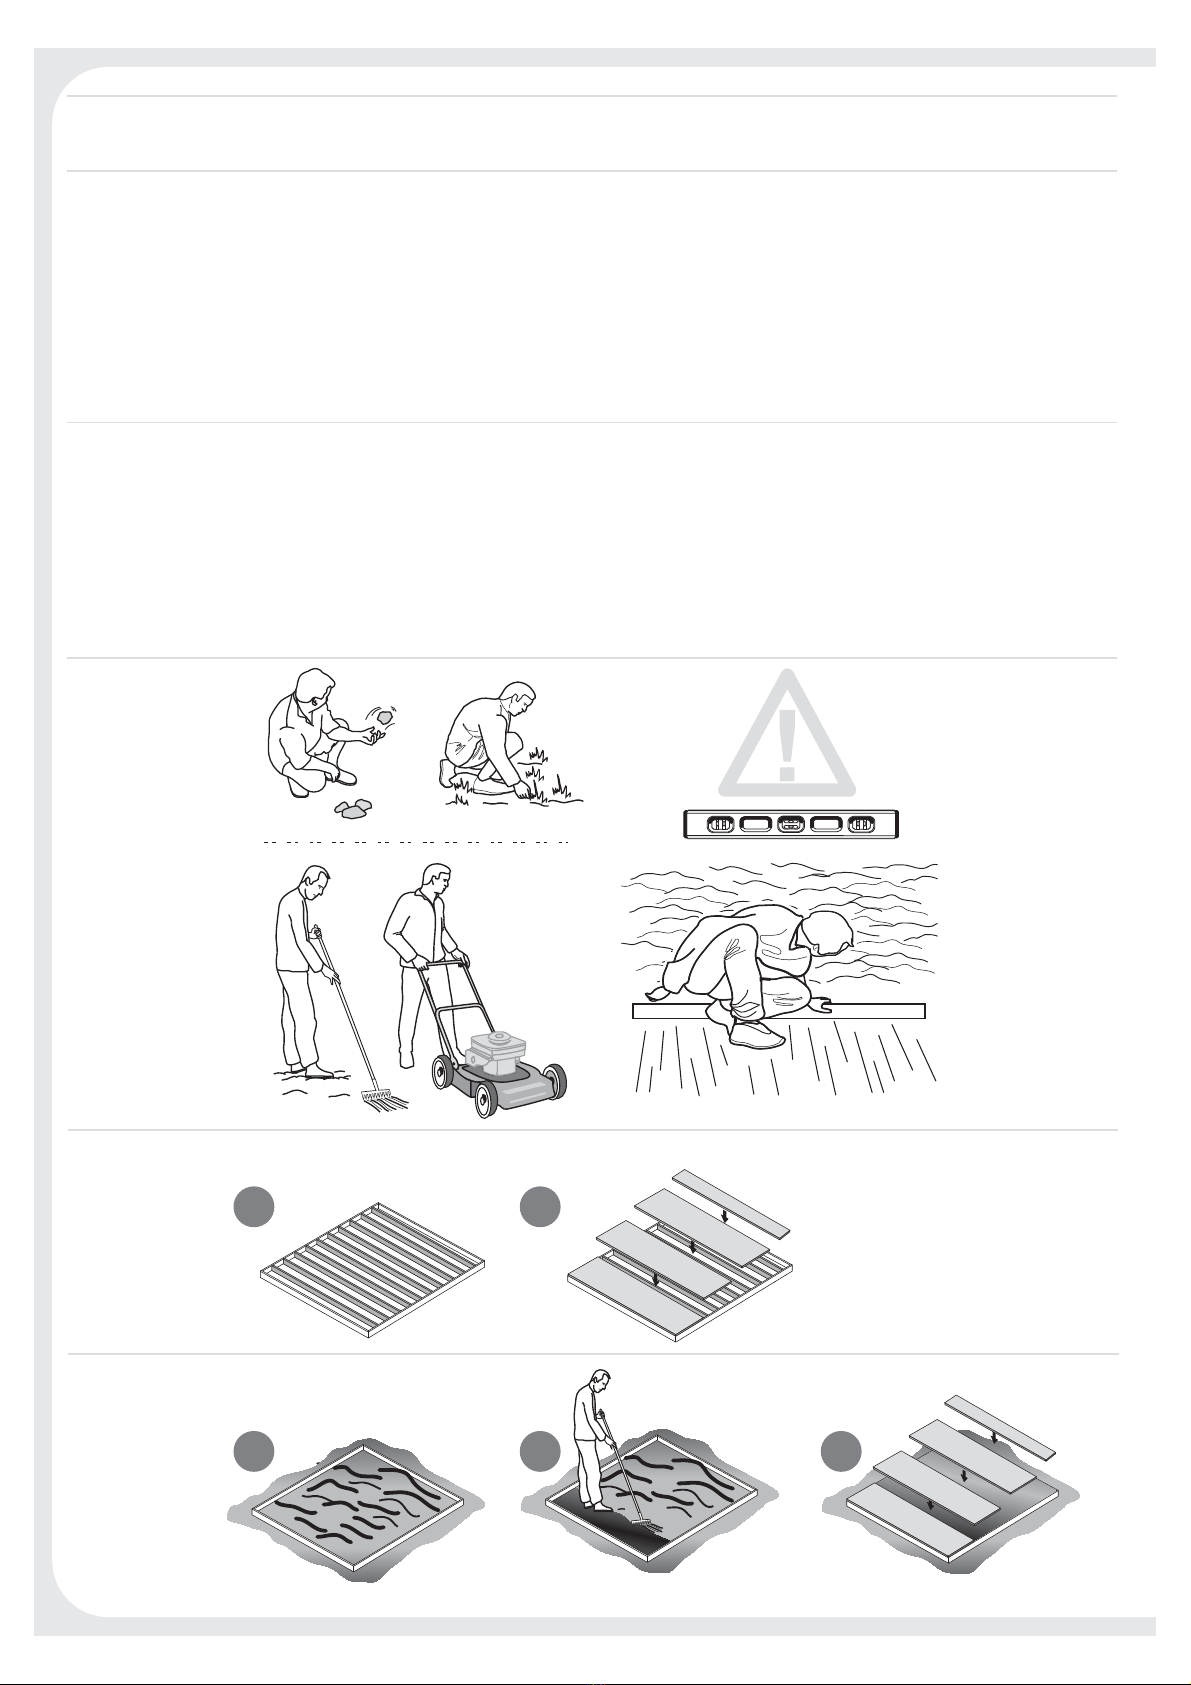
Remove all of the pieces from the package and spread them out on the ground | It is recommended to use a clean work surface tospread the
parts out and for pre-assembly steps | Review all instructions before you begin, continue to refer to instructions during assembly | Be sure
to follow all steps thoroughly | Parts are color coded in instructions to indicate which parts shall be used during a given stage | Please
prepare these components in advance at the beginning of each stage.
Sortez toutes les pièces du paquet et disposez-les sur le sol | Il est recommandé d’utiliser une surface de travail propre pourrépartir les pièces
à l’extérieur et pour les étapes de ré-montage | Lisez bien toutes les instructions avant de commencer et continuez à vous y référer pendant le
montage | Assurez-vous de suivre scrupuleusement toutes les étapes | Les pièces sont présentées suivant un code de couleurs dans les instruc-
tions pour indiquer clairement celles à utiliser à chaque étape | Veuillez les préparer à l’avance au fur et à mesure des étapes.
Saque todas las piezas del paquete y extiéndalas en el suelo | Se recomienda usar una superficie de trabajo limpia para diseminar las partes
y para realizar los pasos de prearmado | Lea todas las instrucciones antes de empezar, y siga remitiéndose a ellas durante el armado |
Asegúrese de seguir todos los pasos con atención | Observe que las partes están codificadas con colores diferentes en las instrucciones para
indicar qué parte se debe usar en cada etapa | Se recomienda preparar las partes antes de empezar cada etapa.
Alle Teile aus der Verpackung nehmen und auf dem Boden ausbreiten | Es wird empfohlen, die Einzelteile auf einer sauberen, glatten
Unterfläche auszubreiten und Vorbereitungen für den Zusammenbau zu treffen | Lesen Sie die Anleitung vor Beginn der Montage gründlich
durch und richten Sie sich dann nach dieser | Vergewissern Sie sich, dass Sie allen Montageschritten genau folgen | Inder Anleitung sind die
Teile farblich gekennzeichnet, um so anzuzeigen, welches Teil in welcher Aufbauphase benötigt wird | Bitte sortieren Sie die Teile zu Beginn
jeder dieser Phasen.
Verwijder alle onderdelen uit de verpakking en spreid ze uit op de grond | U wordt aanbevolen een schoon werkoppervlak te gebruiken om
de onderdelen op uit te spreiden en voor de voorbereiding op de montage | Bekijk alle instructies voordat u begint en raadpleeg tijdens de
montage de instructies | Zorg dat u alle stappen uitvoerig opvolgt | In de instructies zijn de onderdelen met kleurengecodeerd om aan te
geven welke onderdelen u tijdens een gegeven fase dient te gebruiken. Voordat u met elke fase begint, dient u de onderdelen klaar te leggen.
Rimuovere tutti i pezzi dall’imballaggio e disporli a terra | Si raccomanda l’uso di un piano da lavoro sgombro per la sistemazione dei compo-
nenti e lo svolgimento delle fasi di preassemblaggio | Rileggere tutte le istruzioni prima di iniziare e continuare a fare riferimento alle istruzioni
anche durante il montaggio | Accertarsi di seguire attentamente tutte le procedure | Nelle istruzioni le parti sono contraddistinte da codici
colorati che servono a indicare quelle da utilizzare nel corso di una particolare procedura | Preparare questicomponenti all›inizio di ogni fase.
Retire todas as peças da embalagem e espalhe-as no solo | Recomenda-se o uso de uma superfície de trabalho limpa para distribuir as peças
e para os passos de pré-montagem | Leia todas as instruções antes de iniciar e consulte-as durante a montagem. Siga atentamente os
seguintes passos | As peças estão marcadas com cores nas instruções para indicar quais deverão ser montadas numa determinada fase de
montagem | Prepare antecipadamente estes componentes no início de cada fase.
5
ASSEMBLY PARTS | PIÈCES À ASSEMBLER | PIEZAS DE ENSAMBLE | MONTAGETEILE |
MONTAGESTUKKEN | PARTI DA MONTARE | PEÇAS DE MONTAGEM
For easy identification of the parts, code letters are imprinted on them | Pour une identification plus aisée, des lettres sont imprimées au
dos de chaque pièce | Para una fácil identificación de las piezas, éstas llevan letras de código impresas | Für einfaches Identifizieren der
Teile haben wir die Kennbuchstaben auf diesen eingeprägt | Voor het makkelijk identificeren van de onderdelen zijn er codeletters op afgedrukt
| Per un’identificazione più semplice, le lettere del codice sono state stampate su ciascuna parte | Para uma fácil identificação das peças,
foram impressas letras nas mesmas.
Packaging may contain some additional small parts to be kept for use as spare parts | L'emballage peut contenir des petites pièces
supplémentaires à conserver comme pièce de rechange | El embalaje puede contener algunas partes pequeñas adicionales que se deben
guardar para ser usadas como repuestos | Die Verpackung kann eventuell zusätzliche Kleinteile enthalten, die in Zukunft als Ersatzteile
verwendet werden können | De verpakking kan enkele extra kleine onderdelen houden die als reserveonderdelen kunnen worden gebruikt
| A embalagem poderá conter algumas peças pequenas adicionais que servem para ser usadas como peças sobresselentes | La confezione
potrebbe contenere piccole parti supplementari da utilizzare come parti di ricambio.
rc (x4)
kc (x2)
e1h (x2)
163 cm
64.1”
r1c (x1)
178 x 195 cm
70” x 76.7”
e1a (x4)
87 cm
34.2”
fl6 (x1)
169 x 169 cm
66.5” x 66.5”
t (x4)
d1a (x1)
133 cm
52.4”
c1d (x2)
14.5 cm
5.6"
dsr (x1)
f-in (x1) f-out (x1) acw (x1) pls (x1)
dsl (x1)
ap (x1)
ac(x2)
ht (x2)
ROOF PARTS | PIÈCES DU TOIT | PARTES DEL TECHO | DACHELEMENTE | DAKONDERDELEN |
PARTI DEL TETTO | PEÇAS DO TELHADO
c1a (x3)
164 cm
64.5”
WINDOW PARTS | PIÈCES DE LA FENÊTRE | PARTES DE LA VENTANA | FENSTERELEMENTE |
VENSTERONDERDELEN | PARTI DELLA FINESTRA | PEÇAS DA JANELA
FLOOR PARTS |
ÉLÉMENTS DU PLANCHER
| PARTES DEL SUELO| BODENTEILE | VLOERPANELEN |
PARTI DEL PAVIMENTO | PEÇAS DO CHÃO
6
w1e (x3)
83 x 185 cm
32.6” x 72.8”
s1e (x1)
c1b (x4)
186 cm
73.2”
v (x2)
dfr (x1)
179 cm
70.4”
dfl (x1)
179 cm
70.4” db1 (x1)
dp1 (x2)dh (x4)
dpt (x2)
h1b (x1)
165 cm
65” dt (x2)lm (x1)
rm (x1)
h1a (x2)
184 cm
72.4”
WALL PARTS | PIÈCES DU CONTOUR | PARTES DE LAS PAREDES | WANDELEMENTE | MUURONDERDELEN |
PARTI DELLA PARETE | PAINÉIS LATERAIS
bd1a (x1)
169 x 109 cm
66.5” x 42.8”
fd1b (x2)
17 x 131 cm
6.6 ” x 51.5”
fu1a (x1)bu1a (x1)
dr1a (x1)dl1a (x1)
DOOR PARTS | PIÈCES DE LA PORTE | TÜRELEMENTE | PARTES DE LA PUERTA | DEURONDERDELEN |
PARTI DELLA PORTA | PEÇAS DAS PORTAS
"This
side in"
"This
side in"
7
s26b (x134) 26 mm / 1"
1234
cm
0.5 1 1.5
inch
s13b (x47) 12 mm / 0.47" sc15 (x17) 16 mm / 0.63"
tUse a powerful electric screwdriver. The screw should drill itself to a metal profile.
tUtilisez un tournevis électrique puissant. La vis doit percer elle-même une tablette de métal.
tUse un destornillador eléctrico potente. El propio tornillo debería perforar el contorno de metal.
tVerwenden Sie bitte einen leistungsstarken, elektrischen Schraubenzieher. Die Schraube soll sich in das
Metallprofil hineinschrauben, ohne vorzubohren.
tGebruik een krachtige electrische schroevendraaier. De schroef moet zichzelf in een metalen profiel boren.
tUsare un cacciavite elettrico con buona potenza. La vite si filetterà automaticamente nel profilo metallico.
tUtilize uma chave de fendas elétrica potente. O parafuso deve atarrachar-se num contorno de metal.
123
cm
0.5 1 1.5
inch
s10b (x8) 12 mm / 0.47"
12 3
cm
0.5 1 1.5
inch
dS2b (x10) 10 mm / 0.39"
Note: due to product variability, assembled size may be slightly different than listed dimensions | Note : en raison de la variabilité du produit,
ses dimensions une fois assemblé peuvent légèrement varier de celles mentionnées | Nota: debido a la variabilidad del producto, su tamaño
puede diferir de las dimensiones indicadas una vez ensamblado | Bitte beachten Sie: Die Maße des fertig errichteten Schuppens können
aufgrund von Produktschwankungen leicht von den angegebenen Maßen abweichen | Opmerking: als gevolg van productvariabiliteit kan de
geassembleerde grootte iets verschillen van de opgegeven dimensies | Nota: a causa della variabilità del prodotto, la dimensione dell'assemblato
potrebbe essere leggermente diversa rispetto alle dimensioni indicate sul listino | Nota: devido à variabilidade do produto, tamanho montado
pode ser ligeiramente diferente das dimensões mencionadas.
SCREWS | VIS | SCHRAUBEN |TORNILLOS |SCHROEVEN | VITI | PARAFUSOS
SELF-DRILLING SCREW | VIS AUTO-FOREUSE | TORNILLO DE AUTO-ATORNILLADO |
SELBSTBOHRENDE SCHRAUBE | ZELF TAPPENDE SCHROEF | VITE AUTOFILETTANTE | PARAFUSO
AUTORROSCANTE
ASSEMBLY REQUIRES TWO PEOPLE | LE MONTAGE DOIT ÊTRE EFFECTUÉ PAR DEUX PERSONNES |
SE NECESITAN DOS PERSONAS PARA ARMARLO | ZWEI PERSONEN ZUR MONTAGE NOTWENDIG |
MONTAGE VEREIST TWEE PERSONEN | MONTAGGIO RICHIEDE DUE PERSONE | A MONTAGEM EXIGE
DUAS PESSOAS
123
cm
0.5 1 1.5
inch
s23b (x4) 25 mm / 1"
1234
cm
0.5 1 1.5
inch
1234
cm
0.5 1 1.5
inch
8
d1a (x1)
133 cm
52.3”
This side up
~18 cm
7
”
tFit the panel accordingly within
the crevice
tPlacez le panneau convenable-
ment dans la fente
tColoque el panel adecuadamente
dentro de la hendidura
tPassen Sie das Panel genau in
den Spalt ein
tPlaats het paneel zo in de gleuf
tInserite il pannello seguendo la
scanalatura
tEncaixe o painel adequadamente
dentro da abertura
fl6 (x1)
169 x 169 cm
66.5” x 66.5”
front
tNote: The crease line of the floor must be underneath
tNote: la ligne du pli du sol doit se trouver en-dessous
tNota: la línea de pliegue del suelo debe quedar en la parte inferior
tDie Bruchlinie der Bodenplatte muss sich auf der Unterseite befinden
tLet op: De vouwlijn van de vloer moet zich onderaan bevinden
tLa linea di piegatura del pavimento deve rimanere al di sotto
tO Vinco do Piso Deve estar voltado para Baixo
1
2
FLOOR ASSEMBLY | MONTAGE DU SOL | ARMADO DEL PISO | MONTAGE DER BODENPLATTE |
VLOERMONTAGE | MONTAGGIO DEL PAVIMENTO | MONTAGEM DO PISO
~18 cm
7”
This side up
This side up
Front
Avant
Delante
Vorderseite
Voorkant
Anteriore
Frente
Front
Avant
Delante
Vorderseite
Voorkant
Anteriore
Frente
fl6 (x1)
169 x 169 cm
66.5” x 66.5”
9
dsr (x1)dsl (x1)
c1d (x2)
14.5 cm
5.6”
This side up
c1d
c1d
4
3
This side up
This side up
1 2
dsl
dsr
Front
Avant
Delante
Vorderseite
Voorkant
Anteriore
Frente
10
t (x4)c1a (x3)
164 cm
64.5”
sc15 (X4)
16 mm
0.63”
sc15
5
6
c1a
c1a
c1a
t
t
t
t
1
2
x4
11
s26b (x2)
26 mm
1”
sc15 (x6)
16 mm
0.63”
tFit the panel inside the profile screw on
mark line
tInsérez le panneau à l’endroit prévu pour
la vis sur la ligne dessinée
tEncaje el panel dentro del marco y
atorníllelo en la línea marcada
tVerschrauben Sie die Bodenplatte an der
markierten Linie auf dem Profil mit der
Schraube
tPlaats het paneel binnen het profiel,
schroef op de gemarkeerde lijn
tInserite il pannello nel profilo. Avvitate
sulla linea guida
tAjuste o Painel no Interior do Contorno.
Aparafuse na linha Marcada.
7
8
tTurn over the floor panel
tRetournez le panneau du sol
tDé la vuelta al panel del suelo
tDrehen Sie die Bodenplatte um
tDraai het vloerpaneel om
tCapovolgi il pannello del pavimento
tVire o painel do pavimento
~10cm
4” 15.7”
~40cm
s15b
s26b
s15b
s15b
s15b
175 cm
68.9”
s26b
s26b
12
tTurn over the floor panel
tRetournez le panneau du sol
tDé la vuelta al panel del suelo
tDrehen Sie die Bodenplatte um
tDraai het vloerpaneel om
tCapovolgi il pannello del pavimento
tVire o painel do pavimento
s26b (x10)
26 mm
1”
s26b
9
10
s26b
~10cm
4”
15.7”
~40cm
15.7”
~40cm
t'VMMZmUUIFQBOFMJOTJEFUIFQSPmMF
t'JYF[FOUJ¸SFNFOUMFQBOOFBVEBOT
la découpe
t$PMPRVFDPNQMFUBNFOUFFMQBOFM
dentro del perfil
t1BTTFO4JFEBT1BOFMHFOBVVOE
akkurat in das Profil ein
t1MBBUTIFUQBOFFMWPMMFEJHJOIFU
profiel
t*OTFSJSFDPSSFUUBNFOUFJMQBOOFMMP
all’interno delle guide
t&ODBJYFUPUBMNFOUFPQBJOFMEFOUSP
do contorno
13
2
c1b (x1)
187 cm
73.6”
w1e (x1)
83 x 185 cm
32.6” x 72.8”
IN OUT
t%&$*%*/(0/5)&-0$"5*0/0'8*/%08
t&.1-"$&.&/5%&4'&/æ53&
t%&$*%*3-"6#*$"$*î/%&-"47&/5"/"
t#&45*..6/(%&3104*5*0/70/'&/45&3
t07&3%&-0$"5*&7"/3".&/7&/45&3
t4$&(-*&3&-"104*;*0/&%&--&'*/&453"
t-0$"-*;"«ß0%"4+"/&-"
11
12
w1e
This side up
1
2
WALL ASSEMBLY | MONTAGE DU MUR | ARMADO DE PAREDES | MONTAGE DER WÄNDE |
MONTAGE VAN DE MUREN | ASSEMBLAGGIO DELLE PARETI | MONTAGEM DA PAREDE
c1b
tUse spatula (part “SPA”) for easier insertion of panel into profile.
tUtilisez la spatule (partie « SPA ») pour une meilleure insertion du panneau dans le profil.
tUtilice una espátula (pieza “SPA”) para una mejor inserción del panel en el perfil.
tBenutzen Sie den Spachtel (Bezeichnung „SPA“), um die Platten leichter in die Nut einführen zu können.
tGebruik spatel (onderdeel SPA) voor het gemakkelijk invoeren van het paneel in het profiel.
tUtilizzare la spatola (parte SPA) per inserire il pannello più facilmente nel profilo.
tUtilize uma espátula (peça “SPA”) para facilitar a inserção do painel no perfil.
14
bd1a (x1)
169 x 109 cm
66”.5 x 42.9”
bd1a
This side up
s26b (X8)
26 mm
1”
s26b
t'VMMZmUUIFQBOFMJOTJEFUIFQSPmMF
t'JYF[FOUJ¸SFNFOUMFQBOOFBVEBOTMB
découpe
t$PMPRVFDPNQMFUBNFOUFFMQBOFMEFOUSP
del perfil
t1BTTFO4JFEBT1BOFMHFOBVVOEBLLVSBU
in das Profil ein
t1MBBUTIFUQBOFFMWPMMFEJHJOIFUQSPmFM
t*OTFSJSFDPSSFUUBNFOUFJMQBOOFMMP
all’interno delle guide
t&ODBJYFUPUBMNFOUFPQBJOFMEFOUSPEP
contorno
Back
Arrière
Trasero
Hinterseite
Achterkant
Indietro
Traseiro
13
14
s26b
15
c1b (x1)
187 cm
73.6”
bu1a (x1)
c1b
h1b (x1)
165 cm
64.9”
h1b
t1BSUTBSFUBOHFOUUPPOF
another
t-FTQBSUJFTTPOUUBOHFOUFT
les unes aux autres
t-BTQJF[BTTPOUBOHFOUFT
entre sí
t%JFUFJMFCFSÈISFOFJOBOEFS
t%FMFOTUBBOIBBLTPQFMLBBS
t-FQBSUJTPOPUBOHFOUJUSBMPSP
t"TQF¶BTT´PUBOHFOUFTVNB
à outra
15
16
"This
side in"
"This
side in"
bu1a
16
h1a (x1)
184 cm
72.4”
s26b (x7)
26 mm
1”
17
18
tFully fit the panel inside the profile
t'JxF[FOUJ¸rement le panneau dans la
découpe
t$Ploque completamente el panel
dentro del perfil
tPassen Sie das Panel genau und
akkurat in das Profil ein
t1MBBUTIFUQBOFFMvolledig in het profiel
t*OTFSJre correttamente il pannello
all’interno delle guide
t&Ocaixe totalmente o painel dentro do
contorno
"This
side in"
s26b
h1a
2
1
t'VMMZmUUIFQBOFMJOTJEFUIFQSPmMF
t'JYF[FOUJ¸SFNFOUMFQBOOFBVEBOT
la découpe
t$PMPRVFDPNQMFUBNFOUFFMQBOFM
dentro del perfil
t1BTTFO4JFEBT1BOFMHFOBVVOE
akkurat in das Profil ein
t1MBBUTIFUQBOFFMWPMMFEJHJOIFU
profiel
t*OTFSJSFDPSSFUUBNFOUFJMQBOOFMMP
all’interno delle guide
t&ODBJYFUPUBMNFOUFPQBJOFMEFOUSP
do contorno
17
s1e (x1) c1b (x1)
187 cm
73.6”
s1e
s13b (x2)
12 mm
0.47”
19
20 s26b (x5)
26 mm
1”
c1b
s26b
s13b
s13b
t'VMMZmUUIFQBOFMJOTJEFUIFQSPmMF
t'JYF[FOUJ¸SFNFOUMFQBOOFBVEBOT
la découpe
t$PMPRVFDPNQMFUBNFOUFFMQBOFM
dentro del perfil
t1BTTFO4JFEBT1BOFMHFOBVVOE
akkurat in das Profil ein
t1MBBUTIFUQBOFFMWPMMFEJHJOIFU
profiel
t*OTFSJSFDPSSFUUBNFOUFJMQBOOFMMP
all’interno delle guide
t&ODBJYFUPUBMNFOUFPQBJOFMEFOUSP
do contorno
18
h1a (x1)
184 cm
72.4”
w1e (x1)
83 x 185 cm
32.6” x 72.8”
w1e
This side up
h1a
s26b (x5)
26 mm
1”
w1e
This side up
w1e (x1)
83 x 185 cm
32.6” x 72.8”
21
22
s26b
tFully fit the panel inside the profile
t'JxF[FOUJ¸rement le panneau dans la
découpe
t$Ploque completamente el panel
dentro del perfil
tPassen Sie das Panel genau und
akkurat in das Profil ein
t1MBBUTIFUQBOFFMvolledig in het profiel
t*OTFSJre correttamente il pannello
all’interno delle guide
t&Ocaixe totalmente o painel dentro do
contorno
"This
side in"
"This
side in"
t'VMMZmUUIFQBOFMJOTJEFUIFQSPmMF
t'JYF[FOUJ¸SFNFOUMFQBOOFBVEBOT
la découpe
t$PMPRVFDPNQMFUBNFOUFFMQBOFM
dentro del perfil
t1BTTFO4JFEBT1BOFMHFOBVVOE
akkurat in das Profil ein
t1MBBUTIFUQBOFFMWPMMFEJHJOIFU
profiel
t*OTFSJSFDPSSFUUBNFOUFJMQBOOFMMP
all’interno delle guide
t&ODBJYFUPUBMNFOUFPQBJOFMEFOUSP
do contorno
19
fd1b (x2)
17 x 123 cm
6.6” x 48.4”
s26b (x6)
26 mm
1”
fd1b
fd1b
s26b (x5)
26 mm
0.63”
c1b (x1)
186 cm
73.2”
c1b
23
24
s26b
s26b
FRONT WALL & DOOR FRAME ASSEMBLY | ASSEMBLAGE DU MUR DE DEVANT ET DU CADRE DE LA PORTE |
MONTAJE DEL MARCO DE LA PUERTA Y DE LA PARED FRONTAL | MONTAGE DER VORDEREN WAND & DES
TÜRRAHMENS | MONTEREN VOORSTE MUUR EN DEURFRAME | ASSEMBLAGGIO DEL MURO FRONTALE E
DEL TELAIO DELLA PORTA | MONTAGEM DA PAREDE FRONTAL E DA ESTRUTURA DA PORTA
s13b (x2)
12 mm
0.47”
s13b
s13b
fd1b
t'VMMZmUUIFQBOFMJOTJEFUIFQSPmMF
t'JYF[FOUJ¸SFNFOUMFQBOOFBVEBOT
la découpe
t$PMPRVFDPNQMFUBNFOUFFMQBOFM
dentro del perfil
t1BTTFO4JFEBT1BOFMHFOBVVOE
akkurat in das Profil ein
t1MBBUTIFUQBOFFMWPMMFEJHJOIFU
profiel
t*OTFSJSFDPSSFUUBNFOUFJMQBOOFMMP
all’interno delle guide
t&ODBJYFUPUBMNFOUFPQBJOFMEFOUSP
do contorno
This side
up
20

Other Naterial Garden House manuals

Naterial 80132362 User manual

Naterial

Naterial 80132362 User manual

Naterial Kluane Owner's manual

Naterial

Naterial Kluane Owner's manual

Naterial 80132358 User manual

Naterial

Naterial 80132358 User manual

Naterial Kuma Evolution+ User manual

Naterial

Naterial Kuma Evolution+ User manual

Naterial Kipo Axess User manual

Naterial

Naterial Kipo Axess User manual

Naterial 65944S926 Owner's manual

Naterial

Naterial 65944S926 Owner's manual

Popular Garden House manuals by other brands

Palmako Saale installation manual

Palmako

Palmako Saale installation manual

Power Pent instruction manual

Power

Power Pent instruction manual

Alfer combitech manual

Alfer

Alfer combitech manual

Shire Bison Workshop Assembly

Shire

Shire Bison Workshop Assembly

Billyoh APEX General instructions

Billyoh

Billyoh APEX General instructions

Palmako FR44-5341-2 installation manual

Palmako

Palmako FR44-5341-2 installation manual

Mercia Garden Products 01DTSHRAX0705SDNW-V1 manual

Mercia Garden Products

Mercia Garden Products 01DTSHRAX0705SDNW-V1 manual

Palmako FR34-2940 installation manual

Palmako

Palmako FR34-2940 installation manual

Summer Garden Buildings Octagonal Summerhouse 272 Assembly instructions

Summer Garden Buildings

Summer Garden Buildings Octagonal Summerhouse 272 Assembly instructions

Palmako Helena 18.6m2 Assembly instructions

Palmako

Palmako Helena 18.6m2 Assembly instructions

Tiger Caspian General assembly instructions

Tiger

Tiger Caspian General assembly instructions

Biohort GS 90 Assembly manual

Biohort

Biohort GS 90 Assembly manual

Hoggar ANJALA 15,5m2 user manual

Hoggar

Hoggar ANJALA 15,5m2 user manual

Palmako EL16-1808 installation manual

Palmako

Palmako EL16-1808 installation manual

Best Barns the Elm R Assembly Book

Best Barns

Best Barns the Elm R Assembly Book

Solid S8509 Accessories assembly

Solid

Solid S8509 Accessories assembly

Lemeks Palmako FRI40-5050 installation manual

Lemeks

Lemeks Palmako FRI40-5050 installation manual

Décor et Jardin 62243S900 Assembly Notice

Décor et Jardin

Décor et Jardin 62243S900 Assembly Notice

manuals.online logo
manuals.online logoBrands
  • About & Mission
  • Contact us
  • Privacy Policy
  • Terms and Conditions

Copyright 2025 Manuals.Online. All Rights Reserved.