Navibe CN800 User manual

Portable Navigation Device
User Manual

Table of Content
Table of Content................................................................... 1
Product Overview................................................................. 2
Front View .............................................................................................................2
Back View..............................................................................................................2
Bottom View..........................................................................................................2
Left-side View/Right-side View.............................................................................2
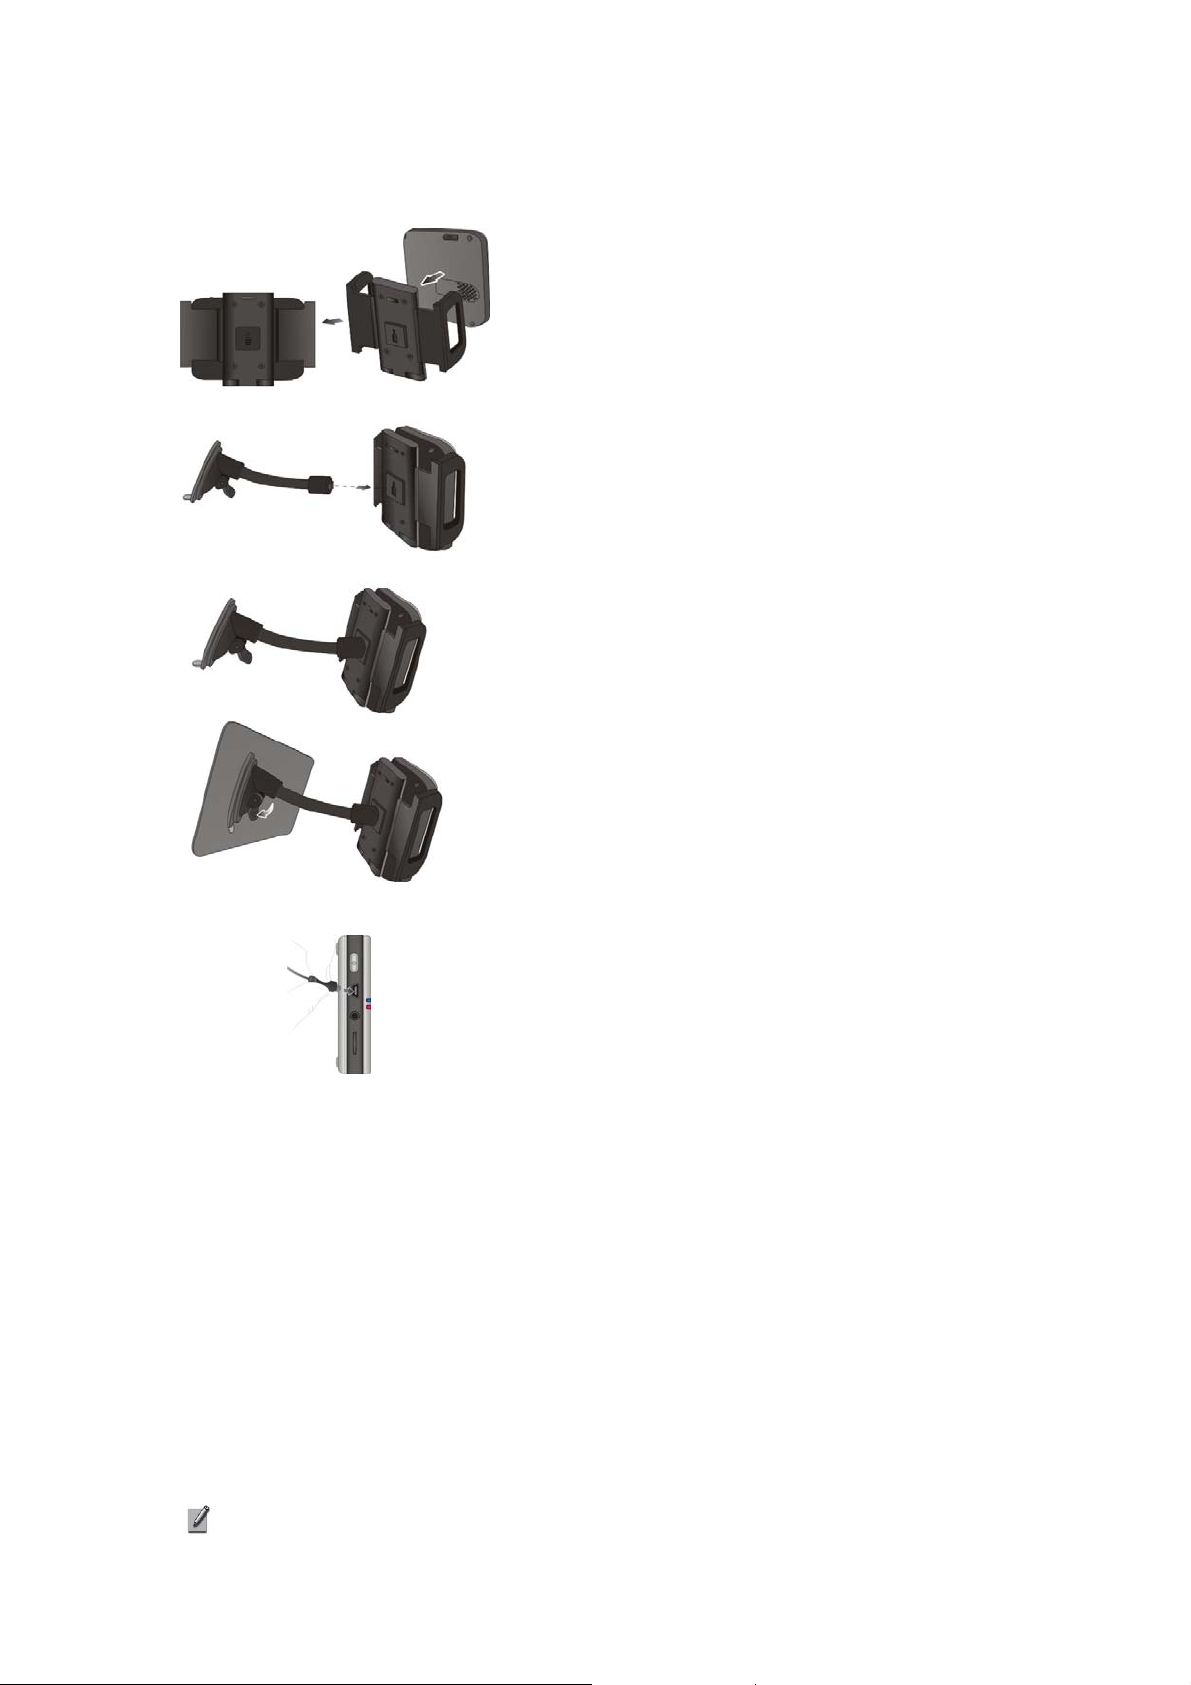
Install the Device to Your Car................................................................................3
Package Contents...................................................................................................3
Status Indicators.....................................................................................................4
Navigation............................................................................ 4
To Start the Navigation..........................................................................................4
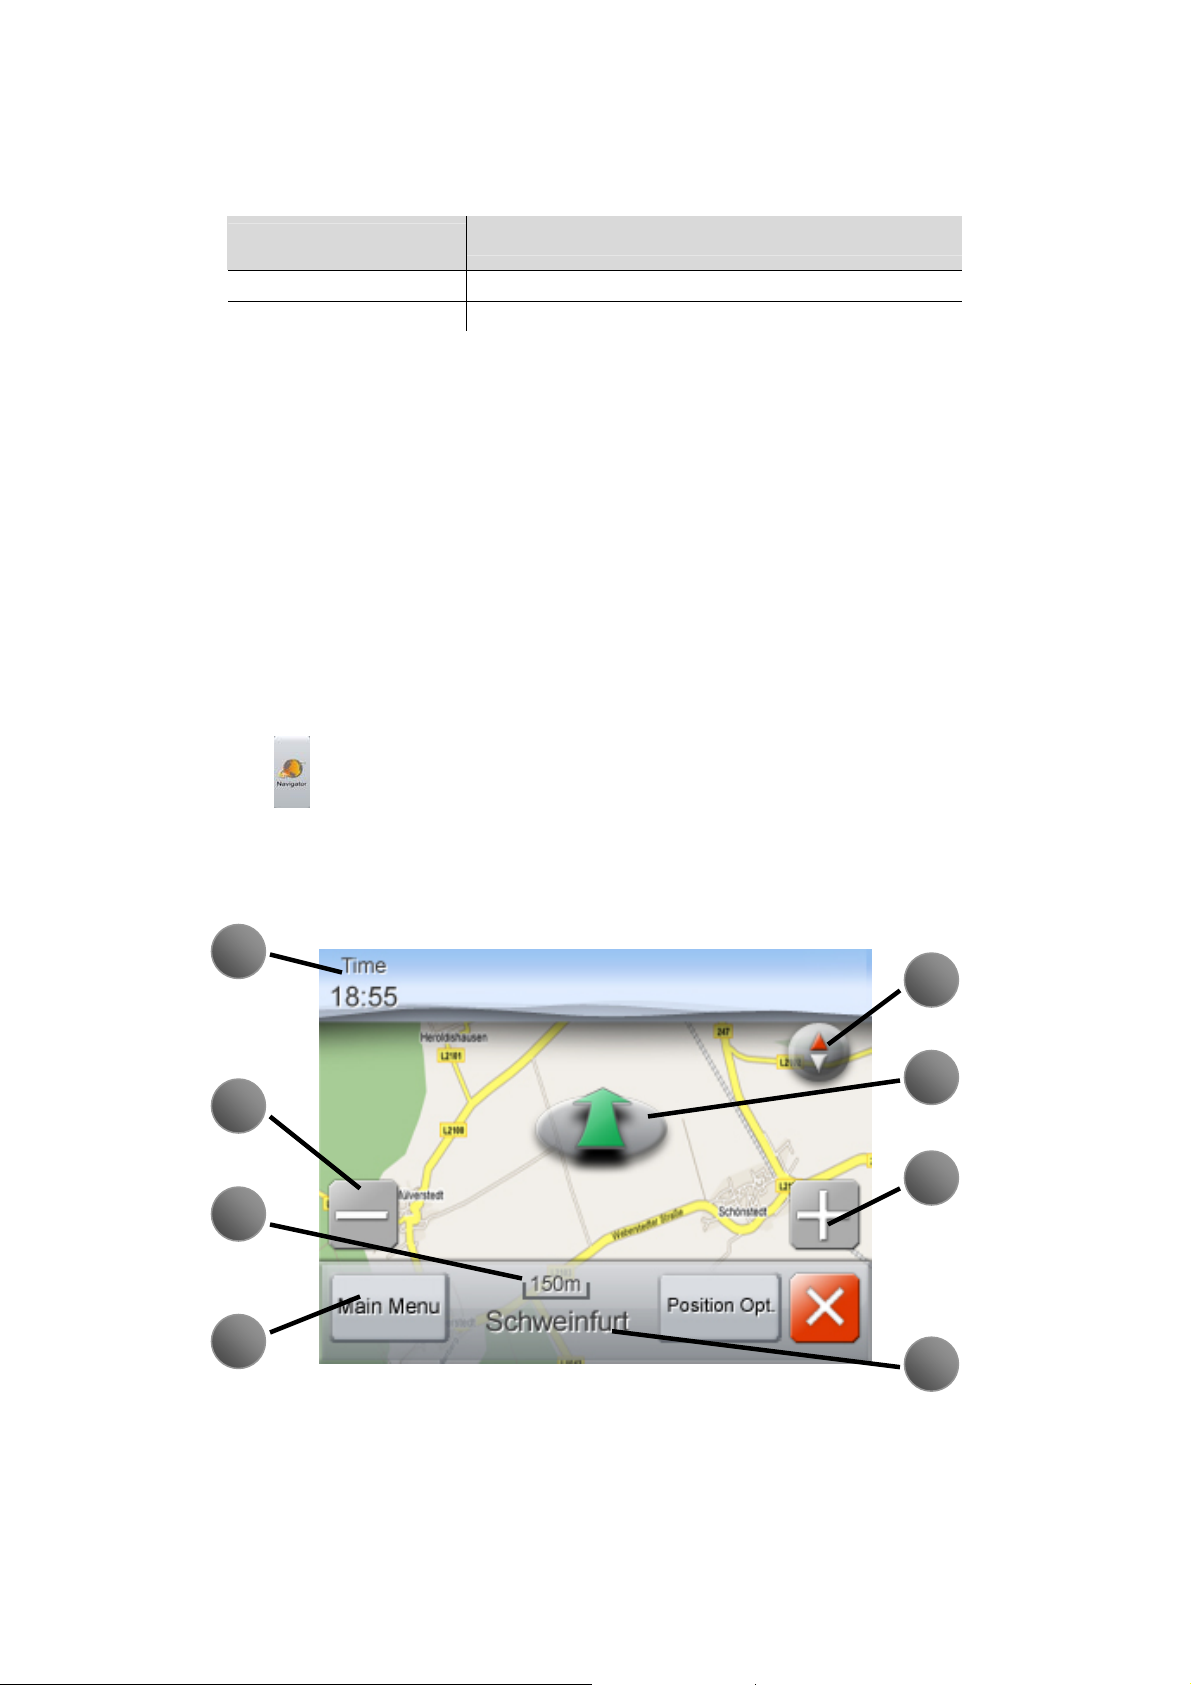
Overview of the GPS Screen .................................................................................4
Main Menu.............................................................................................................5
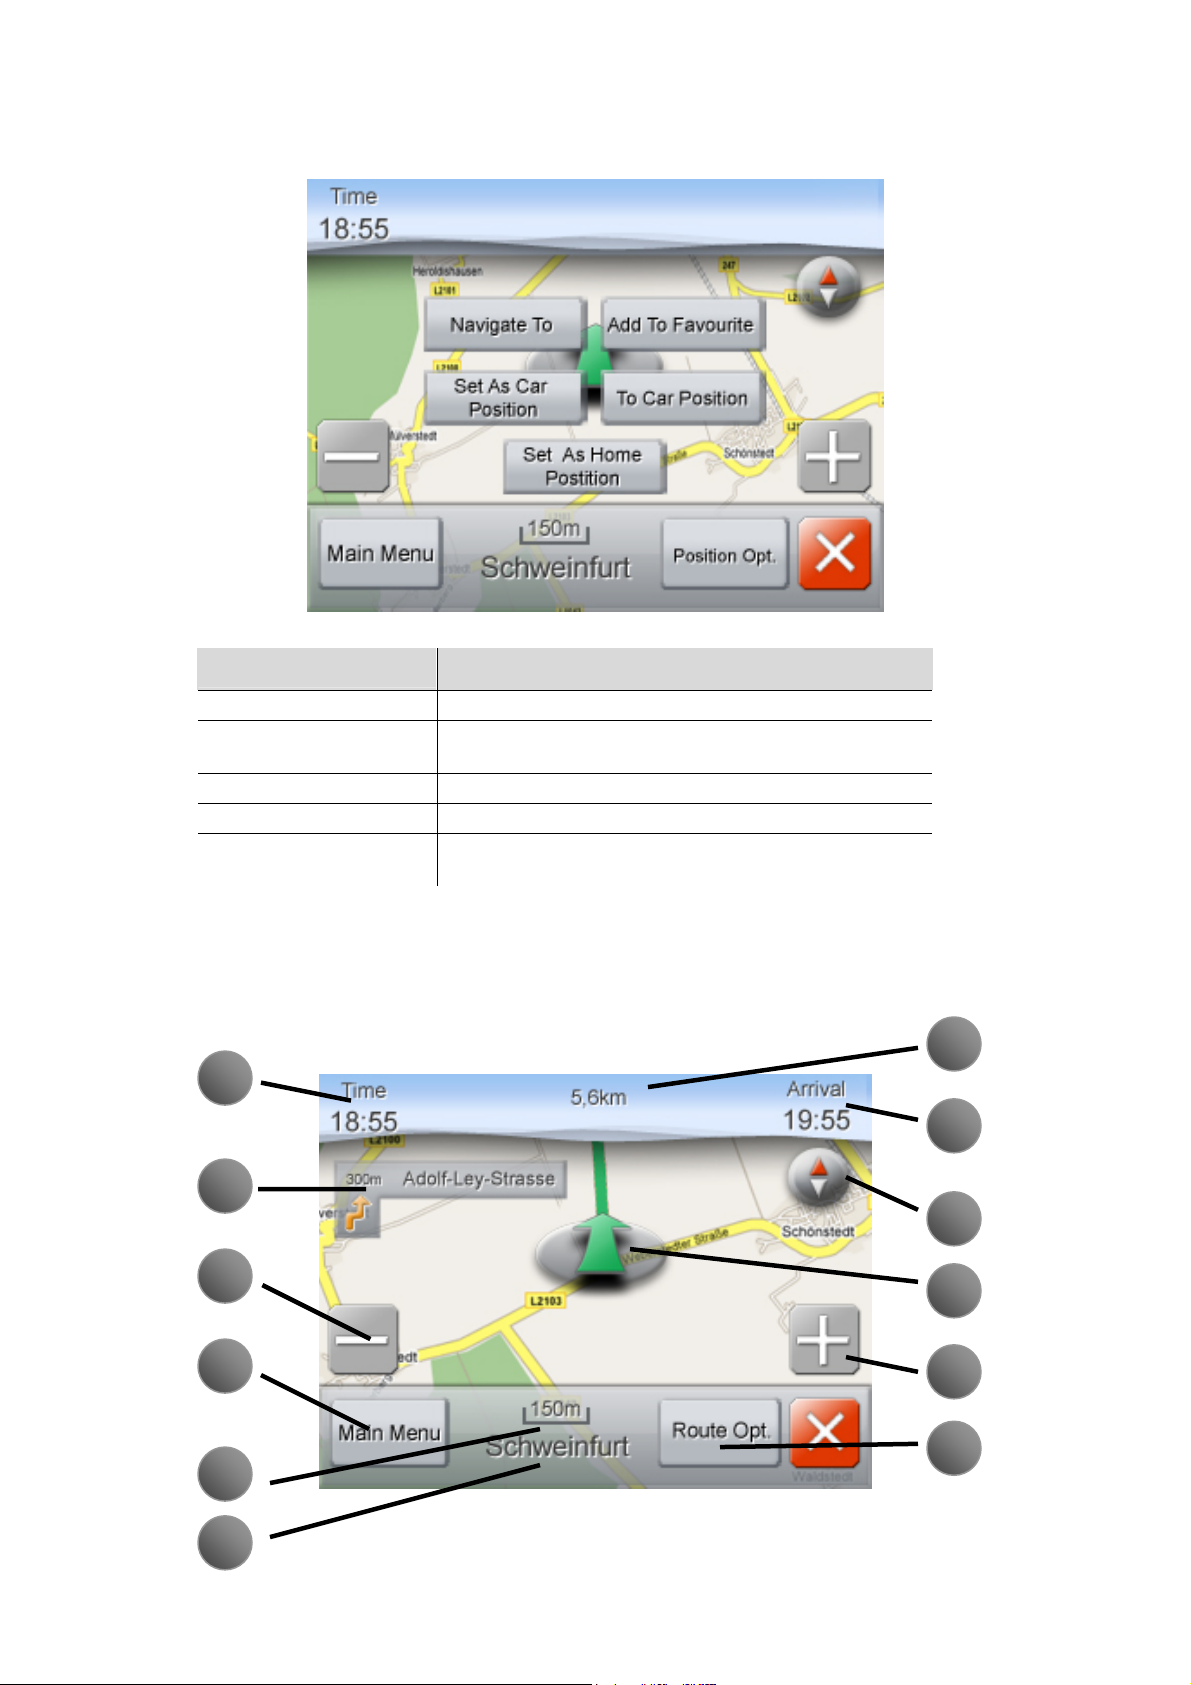
Insert the Destination.............................................................................................5
Find a New Destination .........................................................................................6
Search the Destination from Map..........................................................................8
Overview of the Navigation Mode ........................................................................9
Options after Setting a Route...............................................................................10
Other Settings.......................................................................................................11
Entertainment .................................................................... 14
Audio Player ........................................................................................................14
Video Player.........................................................................................................15
Photo Viewer........................................................................................................15
Settings.............................................................................. 16
Index.................................................................................. 17
Cautions ...............................................................................................................17
Troubleshooting...................................................................................................18
Specification ........................................................................................................19
1

Product Overview
Front View
Back View
Bottom View
Left-side View Right-side View
2

Install the Device to Your Car
1. Insert the device into the car holder.
2. Insert the car holder into the slot of the
gooseneck.
3. Attach the gooseneck to the windshield
in your car.
4. Connect the USB car charger to the device,
and the other end (with the cigarette lighter plug) to
the car cigarette lighter outlet.
Package Contents
Carefully open the packing box and ensure that you have the following items.
zThe device
zCar holder
zGooseneck
zMicroSD card
zUSB cable (with the cigarette lighter plug)
zSoftware CD
zQuick Start Guide
Note: If any items are missing or damaged, please contact your dealer.
3

Status Indicators
LED Indicator
Des
cription
Blue Power on.
Orange Charging.
Navigation
This chapter will introduce all the functions of the navigation engine in this
device. You only need to assign a destination and the device will take you
there. If needed, you can also set your home location, current car position,
address, intersection, and points of interest as explained in the following.
To Start the Navigation
1. Turn the device on.
2. Tap in the main page.
3. After the safety notice, you will see the map and the current car position.
Overview of the GPS Screen
A
B
C
E
H
G
F
D
4

Option
Des
cription
A. Time Current time.
B. Zoom-out Zoom-out.
C. Map scale Current scale of map data.
D. Main menu Back to main menu of navigation mode.
E. Direction of north zFixed upward direction (just like a conventional
printed map)
zReal- time direction (corresponding to the direction
of the current car position)
F. Current car position Current car position.
G. Zoom-out Zoom-out.
H. Current position Current position of the device.
Main Menu
Option
Des
cription
Insert Destination Select the destination by searching intersection or POI, or
from your favorites or last destination.
Map Search the destination from map.
Settings Personalize your navigation software.
Note: The download GPS map, the displayed language, and icons may
vary depending on your currently located country or region.
Insert the Destination
5

Option
Des
cription
New Select a new destination by searching intersection, POI, or
proximate POI.
Home Back home.
Favorites Select one of your favorites as the destination.
Last Destinations Select one of the past destinations as this time
destination.
Find a New Destination
6

zBy address/intersection
1. Choose “Insert Destination By Direction”.
2. Tap one search option (by city or zip code).
3. While you key in the keyword (such as city, street name, and address
number), the device will display available choices by letters automatically.
4. If you do not know the exact address number, select the second street
name to search by intersection instead.
5. After selecting the destination, then choose the way of planning the route.
6. The device will play a voice message indicating the route is being
calculated. You can then start driving and follow the ongoing voice and screen
instructions when driving to the destination.
zBy point of interest (POI)
1. Choose “Insert Destination By POI”.
2. Tap one search option (by city or zip code).
3. As you enter the search keyword, available choices displays by letters that
you can tap.
4. Tap to select a place under the selected category.
5. Tap to select a category such as hotel.
6. After selecting the destination, then choose the way of planning the route.
7. The device will play a voice message indicating the route is being
calculated. You can then start driving and follow the ongoing voice and screen
instructions when driving to the destination.
zBy proximate POI
1. Choose “Proximate POI’s”.
2. Tap to select a category such as bank.
3. Tap to select a place under the selected category.
4. After selecting the destination, then choose the way of planning the route.
5. The device will play a voice message indicating the route is being
calculated. You can then start driving and follow the ongoing voice and screen
instructions when driving to the destination.
7

zBy keyword
1. Choose “Insert Destination By Keyword”.
2. Tap one search option (by city or zip code).
3. As you insert the search keyword of the POI, available choices displays by
letters that you can tap.
4. After selecting the destination, then choose the way of planning the route.
5. The device will play a voice message indicating the route is being
calculated. You can then start driving and follow the ongoing voice and screen
instructions when driving to the destination.
Search the Destination from Map
1. Tap the arrow which means your car current position, then you will find four
arrows disappeared around the map.
2. Tap those arrows to search your destination. While searching, tap to
zoom-in or to zoom-out as needed.
3. Once you find the destination, tap “Position Opt.”.
4. Then tap “Navigate To”.
5. The device will play a voice message indicating the route is being
calculated. You can then start driving and follow the ongoing voice and
screen instructions when driving to the destination.
When searching points in the map, there are still other options after tapping
“Position Opt.”.
8

Option
Des
cription
Navigate To Sets the current cursor position as the destination.
To Car Position Returns the map view to the area where your car is
currently located.
Add To Favorites Sets the current cursor position as a point of interest.
Set As Home Position Sets the current cursor position as your home location.
Set As Car Position Sets the current cursor position as your current car
position. (When no GPS signal)
Overview of the Navigation Mode
After planning a route, you will see the following screen.
9
A
B
C
D
E
L
K
J
I
H
G
F

Option
Des
cription
A. Time Current time.
B. Next turn informationNext turn direction & remaining distance.
C. Zoom-out Zoom-out.
D. Main menu Back to main menu of navigation mode.
E. Map scale Current scale of map data.
F. Current position Current position of the device.
G. Remain distance Remaining distance of the destination.
H. Arrival time Estimating time of arrival.
I. Direction of north zFixed upward direction (just like a conventional
printed map)
zReal- time direction (corresponding to the direction
of the current car position)
J. Current car position Current car position.
K. Zoom-in Zoom-in.
L. Route opt. zRoute List: the list of all streets in the route.
zRoute Simulation: simulate all the conditions of
this route.
zCancel Route: cancel this route and back to
normal map mode.
zRe-route: re-plan a new route to the destination.
Options after Setting a Route
Once a route is planned, you can tap “Route Opt.” and then select one of the
following options.
10

Option
Des
cription
Route List Shows a list of intersections, street names, and distanc
e
(by section) along the route.
Route Simulation Dynamically shows you how you would be driving if you
follow the route. Use this feature to preview the route
before you start driving as needed.
Stop Routeguidance Stop routing.
Recalculate Route Re-calculates the route.
Other Settings
Tap “Settings”, and then select one of the following options.
zOptions
11

You can customize your device in this page by tapping , . After
accomplishing the settings, please tap to store the settings. Instead, tap
to quit this page without storing the settings.
Option
Des
cription
Day/Night Sets the degree of backlight to fit the lighting condition
during daytime or nighttime.
Perspective Sets the viewing angle between 2D and 3D.
Zoom Sets the default map scale.
Brightness Sets the degree of backlight.
Auto-Zoom Automatically adjusts the map scale as you drive.
Avoid Ferry Automatically avoid the ferry when planning a route.
zModify Points of Interest
This page will let you choose what kinds of POI will be shown in the navigation.
zGPS-Signal
12

This page will display the current date, time, speed, longitude, latitude, and
height.
zLongitudes and Latitudes
1. Tap , to enter the parameters (by longitude and latitude) of your
destination.
2. Tap after inserting the coordinates you want.
3. Choose the way of planning the route.
4. The device will play a voice message indicating the route is being
calculated. You can then start driving and follow the ongoing voice and screen
instructions when driving to the destination.
13

zNavi System Info
This page will list all the information of this navigation engine and map data.
Entertainment
You can insert a microSD card for music, video, or photo playback. Once the
card is inserted, three folders (“Music”, “Video”, and “Photo”) will be
automatically generated on the card. Please use the following supported file
formats.
Player
Supported formats
Photo Viewer Supports JPEG GIF and BMP formats.
Video Player Supports 3GP and MP4 formats.
Audio Player Supports MP3, WMA, WAV, Audio ASF formats.
Audio Player
1. Turn the device on.
2. Tap in the main page.
3. Select the music track you want.
4. Tap the music track icon or tap to start playback.
Play Delete
Stop Properties
Pause Plays only the selected music track
Next track Continuously plays the selected music track
Previous track Continuously plays all music tracks
Forward Back (when reading the properties)
Rewind
14

Video Player
1. Turn the device on.
2. Tap in the main page.
3. Select the video file you want.
4. Tap the video icon or tap to start playback.
Play Delete
Stop Properties
Pause Plays only the selected video file
Next video Continuously plays the selected video file
Previous video Continuously plays all video files
Forward Full screen
Rewind Normal screen
Back (when reading the properties)
Photo Viewer
1. Turn the device on.
2. Tap in the main page.
3. Select the photo file you want.
4. Tap the photo icon or tap to start viewing.
15

View photo Properties
Next photo Delete
Previous photo Rotate counter-clockwise
Slide show Rotate clockwise
Settings
1. Turn the device on.
2. Tap in the main page.
Option
Des
cription
GPS Display the satellite information.
Language Sets the OSD (On-Screen Display) language.
Speaker Adjust the volume of this device.Turns on/off the touch tone
sound.
Power Sets the waiting time for the device to turn off the backlight
and the remaining power when the device decides to turn off
the system.
Clock Set the time and time zone of this device.
Display Sets the degree of screen brightness. Calibrate the display.
USB Connect the device with your computer and
upload/download the files between them.
System Info Shows the hardware and software information of this device.
16

Note: You can also adjust the volume of the speakers by tapping the
speaker icon on the left-top side of the main page.
Index
Cautions
Be far away the electronic device
zPlease be far away the cell phone when using the device. The
electromagnetic wave will influence the display and speakers of the
device.
zThe electromagnetic wave from other speakers or motors will influence
the image or sound generated by the device.
Be far away from the communication base station or high-voltage power
tower
zThe strong electromagnetic wave will influence the performance of the
device.
Do not spray high volatility chemical on your device
zOnce this chemical sprayed on the device, it will corrode its housing.
zPrevent the device being attached rubber or plastic too long.
Prevent water or sand being into your device
zOnce water intrudes into the device, it will cause it unstable.
zSand intrudes into the device may cause memory card broken.
Prevent dropping or hit
zDropping or hit may cause the housing broken or function unstable.
Fog effect
zWhen using the device in a very cold environment, once the temperature
increases immediately, the device may cause fog effect. Please turn off
the device first, one hour later, the temperature inside the device will be
similar with the temperature outside. Once the outside temperature closes
to inside temperature, the fog effect will disappear.
Storage environment
zPlease pull out the MicroSD card from the device before storage.
17

zStorage temperature: -10~70 (14 ~158 )℃℉ ℉
zStorage Humidity: 5%~90%
Memory card
zPrevent high temperature, insolation, electromagnetic, or static electricity.
zDo not twist or drop the memory card, which may cause the data stored
inside broken.
zRemember to pull out the memory card after using.
zDo not touch the connector of the memory card, which may cause sand or
water intruding into the card.
LCD display
zIf the temperature changes immediately, it may cause the fog on the
display. Please use the soft and dry cloth to wipe it.
zWhen starting in a very cold environment, the brightness of the display
may be a little dark. Along with the increasing temperature, the brightness
of display will become brighter.
zDo not use the high volatility chemical when wiping the display.
zDo not expose the display surface to any excessive shocks or scratches.
Troubleshooting
The device cannot start
zCheck that the power LED indicator which is on the left side of the device
is on or off first (the upper one).
zIf the power LED indicator is off, maybe the device is in the low power
stage, please try again after plugging in the USB cable which can be
applied with the cigarette lighter plug.
LCD backlight is too dark or too bright
zPlease adjust the brightness of the display in the “Display” setting page.
The volume of the speaker is too large or the small
zPlease adjust the volume of the speakers in the “Speaker” setting page or
by the speaker icon on the upper left side.
The device cannot play the image files, music files, or video files
zBe sure that your SD card is inserted into the device.
zBe sure that the file you want to play is in your SD card.
18

zBe sure that the format of the file is supported by the device.
No GPS signal
zBe sure that there is nothing covering the device to influence receiving
GPS signal.
zPlease connect the external GPS antenna and try again.
Cannot upload files from the device to your desktop/laptop or cannot
download files from your desktop/laptop to the device
zBe sure that you turn on the connection in the “USB” setting page.
zBe sure that the setting of the desktop/laptop is appropriate.
zToo long USB cable will decrease the signal and let the desktop/laptop
cannot identify the device.
No responses from the device
zPlease press the power switch for 4 seconds to turn off the device and
restart again after turning off.
zOr press the reset button to restart the device.
Specification
Hardware
Processor ARM 9 (143MHz)
Memory 16MByte or 32MByte SDRAM (Depending on
navigation software), 32MByte NAND Flash
Display 3.5” touch screen, 320(H)x240(V)
GPS Compass EB818 with built-in antenna
Card Reader MicroSD card, support to 2GB
I/O Port Mini USB 2.0 Slave x1, Earphone Jack x1, MicroSD
card portx1
Speaker 8rohm,1W Speaker x 1
Battery Polymer battery, 1300mAh
Key Control Power key x1, Reset button*1
LED Power LED*1, Charging LED*1
Power Supply 5V@370mA
Power Consumption 5V@380mA(full function)
19
Table of contents
Other Navibe GPS manuals