Naxa ND-855 User manual

ND-855

Table of Contents
Warnings
Features & Attention
General Features
Front Panel and Rear Panel
Speaker Control
Remote Control
Basic Operation
Program Setting
JPEG Picture CD & KARAOKE
Using the Setup Menu
The Card Reader & USB Function Operation
Troubleshootiong
Specifications
Accessories
BASIC CONNECTION
1-2
3
4
5
5
6
7
8-12
13-14
15
16
17-18
18
19
20


-3-

-4-

123.45 678
91011 12 1314
1. Power button
2. Disc Tray
3. Open/Close
4. Remote receiver
5. LED Display
6. Prev button
7. Stop button
8. Next button
9. Mic1 jack
10. Mic 2 jack
11. MIC Volume control
12. Card jack
13. USB jack
14. Play button
1 2
45673
1. Y/ Pb/Cb / Pr/Cr / output jack
2. Video output jack
3. 5.1 CH output jack
4. 2 CH output jack(L.R)
5. Digital signal COAXIAL output jack
6. S-VIDEO output jack
7. Digital signal OPTICAL output jack
PBC
TIME
DVD/
USB/CARD
MIC
ND-854
Accessories
Front Panel
Rear Panel
MIC VOL

M/D: 1909-01-2012
18 Watts
Power ON/OFF
5.1 CH Audio Input Jack
2.0CH Audio Input Jack
5.1 CH Audio Output Jack
Audio input switch
Speaker Control
1 FRONT panel
.:
2 Rear panel:.
-6-

PBC
1
2
3
4
5
7
8
9
10
11
12
13
14
15
16
17
18
19
21
22
23
24
25
26
27
28
29
6
20
1. Open/Close button
2. 0-9/10+ button
3. Menu
4. Move
5. Prev/Next button
6. Fast reverse/Fast forward button
7. OSD button
8. Subtitle button
9. DVD/USB/CARD button
10. Angle button
11. Zoom button
12. Repeat button
13. A-B button
14. Program button
15. Mic button
16. Power button
. Vol+/ - button
18. Mute button
19. Setup button
20
button
◄►/ Enter
17
. Play/Pause button
21. Title button
22. Audio button
23. Stop button
24. Video button
25. PBC button
26. Step button
27. Slow button
28. Time button
29. Random button
▲▼
TIME
DVD/
USB/CARD
MIC
ND-855
-7-
Note:
The same buttons on remote control and front panel have identical functions.

BASIC CONNECTION
Ensure that the power switch of this unit and other equipment to be connected is turned off before
commencing connection.
Read through the instructions before connecting other equipment.
Ensure that you observe the colour-coding when connecting audio and video cords.
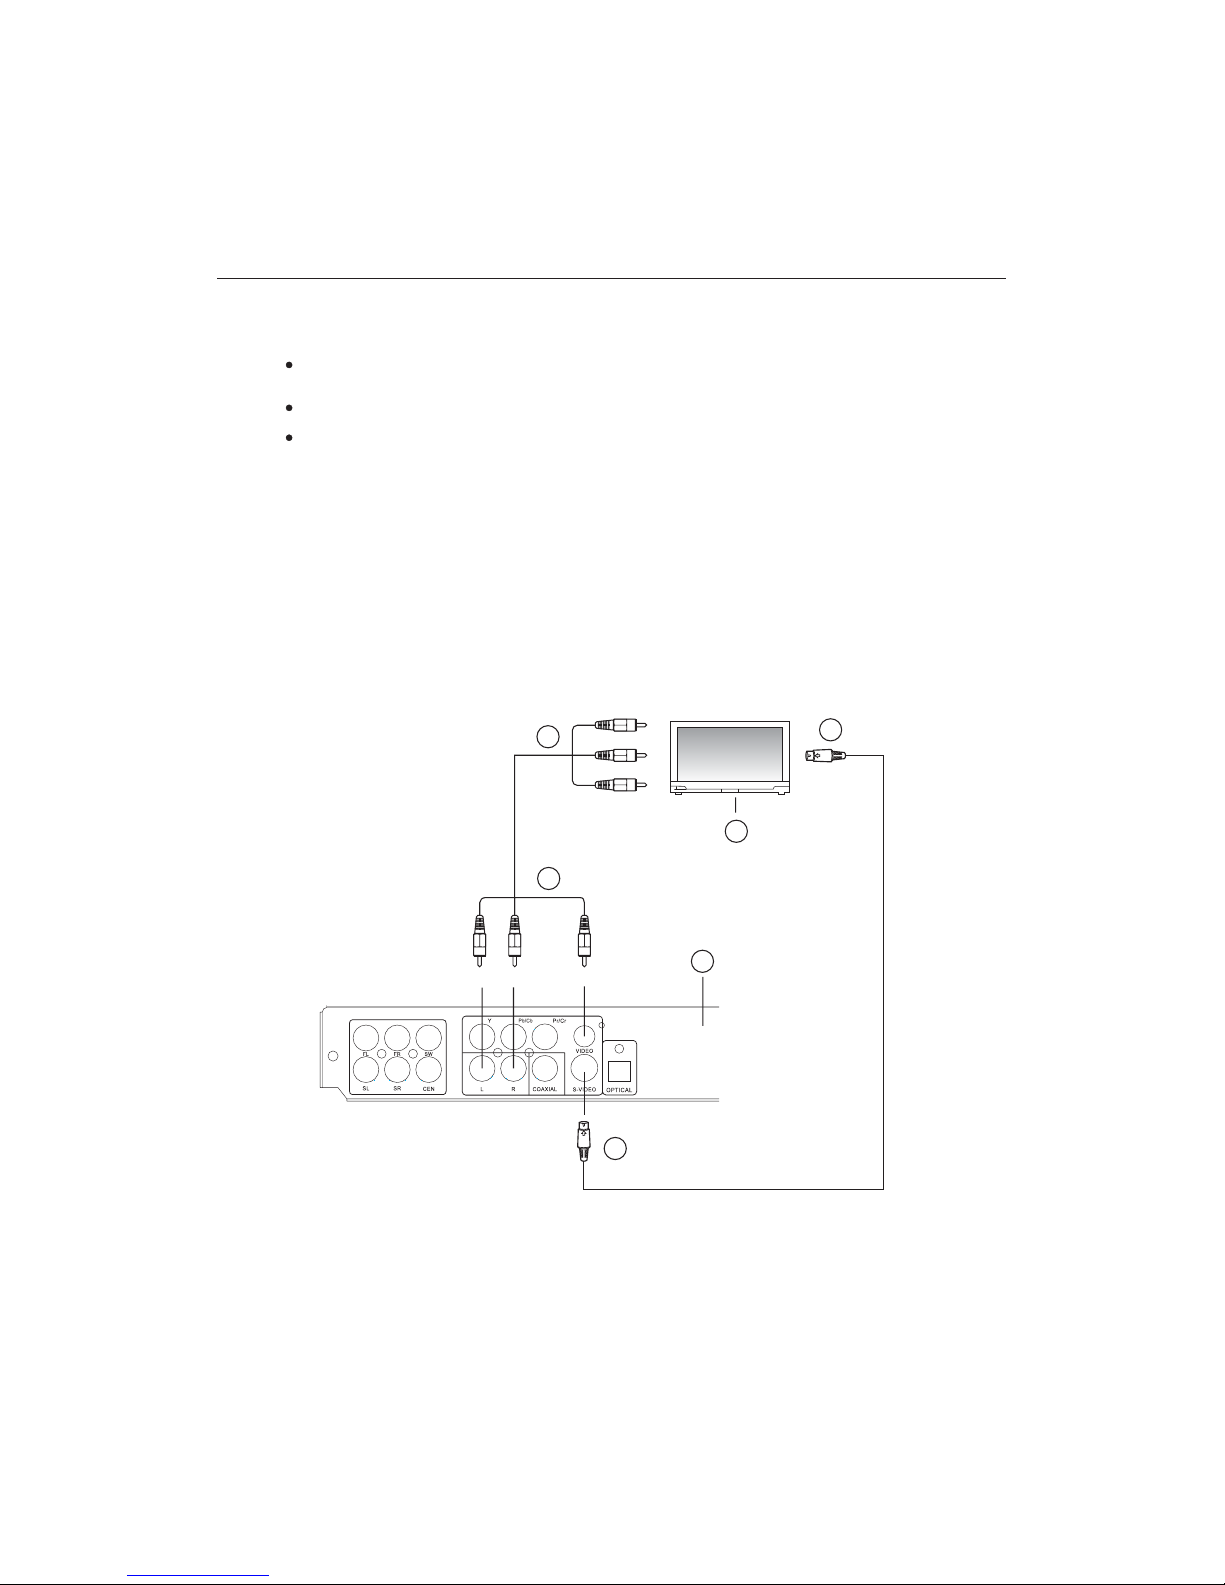
A: Connecting to a TV with an AV Cable or S-VIDEO Cable
1. TV set (optional)
2. DVD/CD player
3. Video, R/L audio
4. To TV Audio and Video input connection
5. Video
6. To TV S-Video input connection
Note:
DVD/CD player Output Jack
DVD/CD player S- Output Jack(Video Output and S-Video Output optional insert).
Video = yellow, Audio Left = white, and Audio Right = red
DVD PLAYER
White Red Yellow
White
Red
Yellow
1
2
3
4
S-Video Cable
(not included)
5
6
AV Cable
-8-

BASIC CONNECTION
B:
1. TV set (optional)
2. DVD/CD player
3. DVD/CD player audio Output Jack
4. To TV set audio input Jack
5. DVD/CD player (Y/ Pb/Cb/ Pr/Cr) Video Output Jack
6. To TV set (Y/ Pb/Cb/ Pr/Cr) Video input Jack
Connecting to a TV with an AV Cable and Y/ Pb/Cb/ Pr/Cr Cable.
Audio Left = white, Audio Right = red. The yellow cable do not input.Note:
DVD PLAYER
1
2
5
6
White
Red
Yellow
White
Red
Yellow
AV Cable
Y / PbPr/ CbCr Cable
(not included)
4
3
-9-

BASIC CONNECTION
C: Connection to speaker 5.1 CH
1. TV set (optional)
2. DVD/CD player
3. DVD/CD player Video Output Jack(
4. To TV set Video input Jack(
5. DVD/CD player 5.1 CH Audio Output Jack
6. The main speaker 5.1 CH Audio Input Jack
7. The main speaker Audio Output Jack
8. Connecting Speakers
Video
The white and red cable do not input).
=Yellow . The white and red cable do not input.Note:
DVD PLAYER
1
2
White
Red
Yellow
White
Red
Yellow
AV Cable
M/D:1909-01-2012
18Watts
5.1CH Audio Cable
(not included)
4
3
5
6
7
8
Speakers Wiring:
1. Press the lever down firmly.
2. Insert the corresponding colored bare wire into the center of the hole, making sure none of
the insulation is touching, and release the lever.
3. Note: The negative wires are marked by a stripe on the insulation, please be sure to put the
negative and postive wires into their corresponding holes.
-10-

BASIC CONNECTION
D:
1. TV set (optional)
2. DVD/CD player
3. DVD/CD player Video and Audio Output Jack
4. W to main speaker 2.0 CH Audio Input Jack. To TV set Video input Jack.
5. The speaker Audio Output Jack
6. Connecting Speakers
Connecting to a Stereo System and TV with an AV Cable
hite and red cable Yellow cable
DVD PLAYER
1
Yellow
AV Cable
3
White
Red
White
Red
Yellow
M/D:1909-01-2012
18Watts
2
4
6
5
-11-

BASIC CONNECTION
DVD PLAYER
E: Connecting to Digital Speaker
1. TV set (optional)
2. DVD/CD player
3. DVD/CD player Video Output Jack(
4. To TV set Video input Jack(
5. DVD/CD player Coaxial Output Jack
6 DVD/CD player Optical Output Jack
7. Amplifier with decoder Digital Speaker Coaxial Optical input Jack
8.Amplifier with decoder Digital Speaker
Coaxial Output and Optical Output optional insert.
.
(
()
)/
The white and red cable do not input).
Note:
1
2
White
Red
Yellow
White
Red
Yellow
AV Cable 4
3
5
8
6
7
(optional) Digital Inputs
-12-

PLAY/PAUSE
2.Press OPEN/CLOSE button
PLAY/PAUSE
TIME
OSD
8.Mic function
Press MIC button, ENTER for confirmation. Then select
to select the MIC volume, reverberation
and tune .
cursor keys
10. DVD/USB/CARD
Press DVD/USB/CARD button, then select
to switch DVD, USB and CARD
function.
.
cursor keys
6.Slow Motion play
6.Step function
7.Cursor function
-13-
PLAY/PAUSE
PLAY/PAUSE
Press PLAY/PAUSE button to resume normal play.
Press Cursor button to select the desired feature in the
menu, and then press the ENTER button to confirm a
selection.
OSD
TIME
TIME
TIME

19.
20.
21.
23.
24.
25.
26.
1 Press the PROG button to display the program
playback window 20 tracks or chapters can be
programmed
2 Press the buttons to select your desired track/
title / chapter and then press the ENTER button
to confirm
3 Press the buttons to select your desired track/
title/ chapter then press the STOP button to
delete a selected setting
4 Press the PLAY button to play after you have
finished the program setting
.
,
.
.
.
.
.
.
.
22 Program.
27.PBC function
When playing VCD 2.0 Press PBC button to display
title menu use number key choice and ENTER button
to play music.
28.RANDOM function
Press to select a random chapter.
-14-
Repeat Chapter
Repeat Title
Repeat off
Repeat Single
Repeat all
Repeat off
Repeat Single
Repeat Folder
Repeat all
Repeat off
Repeat all
Repeat all
S-video. YUV. Y Pb Pr.

-15-
twice

-16-

Video
Audio
Misc
Language
Subtitle
Audio
DVD menu
Language
:English
:English
:English
:English
Video
Audio
Misc
Subtitle
Audio
DVD menu
Language
English
French
Spanish
German
Language
Audio
Misc
View Mode
TV System
Video out
Language
4:3
16:9
Aspect Ratio
Video
Audio
Misc
Video out
Language
NTSC
PAL
Auto
Aspect Ratio
Video
TV System
Audio
Misc
Language
S-VIDEO
YUV
YPbPr
Aspect Ratio
Video
TV System
Video out
-17-
Using the setup Menu
Press the SETUP key to enter the DVD player setup
menu.(This can only be accessed when the unit is not
playing back a disc)
Press ◄ ►to change items
Press ENTER to enter the submenu
Press ENTER to confirm and return to upper menu
press the SETUP button at and time to exit the setup
menu
Language :language selection
Video: Video setup.
Audio: Audio setup.
Misc: Further audio /video setting
note: Language Setup
This option is used to set the language of “OSD”
“Language” “Subtitle” “Audio”, and “DVD menu”.
Video
Video selection
The aspect ratio of the picture provided by the DVD
player can be varied in line with the feature available
on the TV in use.
4:3: Choosing this setting if your DVD player is
connected to a nomal ratio TV.
16:9: When you connect to a wide screen TV (16:9) this
setting will allow the original aspect ratio to be displayed.
TV System: TV option output are NTSC, PAL and AUTO,
Please set to suitably TV.
Video Output: According to the S-Video / YUV / Y Pb Pr
Cable for connection Used to select the appropriate
signal type.
Misc
Language
Video
Audio
Select channel
Front speakers
Center Speaker
Surround Speakers
Subwoofer
Test tones
Center delay
Surr delay
Digital Output
Down Sampling
Press the up and down cursor keys to select the audio
type.
5.1
Large
Large
Large
Present
PCM
Off
No Delay
No Delay
Off
Misc
Language
Stereo
Video
Audio
Select channel
Front speakers
Center Speaker
Surround Speakers
Subwoofer
Test tones
Center delay
Surr delay
Digital Output
Down Sampling: off
5.1
AUDIO
Audio selection

-18-
Misc
Language
Video
Audio
Front speakers
Center Speaker
Surround Speakers
Subwoofer
Digital Output
Down Sampling: off
Off
PCM
Raw
Misc
Language
Video
Audio
Screen saver
Misc
Language
Video
Audio
Use Default Settings
Screen saver :On
Digital Output
1. Off: Does not output digital signal.
2. PCM: Converts to PCM(2CH) 48KHz audio. Select
PCM when using the Analog Audio Output.
3. RAW:Outputs Bitstream through the digital output
without any conversion.
Misc
Use Default Settings: All functions resume initial
statuses if you choose “Yes” this option.
Misc
Language
Video
Audio
Use Default Settings
Screen saver
Off
On
Can set the screen saver, Standby mode can be
screensavers.
The Card Reader & USB Funcion Operation
After insert SD/MS/MMC Card or USB, and the player
will auto search the directories saved Mp3 / JPEG
/BMP / GIF files.
After searching, it will auto go to the first directory
saved mp3 or JPEG files(to the disc containing both
mp3 and JPEG files; To the disc containing single type
of files, it will auto go to the first directory) and play the
first song in the directory ( Pa01001” is highlighted).
The screen displays as the picture below:
“
Choose the table of contents you want to play by moving the dir-
rection keys.
Play the first track under this contents list.
You may choose the file you want to play by moving the direction
Table of contents
Other Naxa Home Theater System manuals