NEFF B46C74.0GB User manual

2
ÚTable of contents
[en]Instructionmanual
Safety precautions..................................................................... 3
Before installation ...............................................................................3
Information for your safety ................................................................3
Causes of damage .............................................................................3
Energy and environment tips ................................................... 4
Saving energy......................................................................................4
Environmentally-friendly disposal.....................................................4
Your new appliance ................................................................... 4
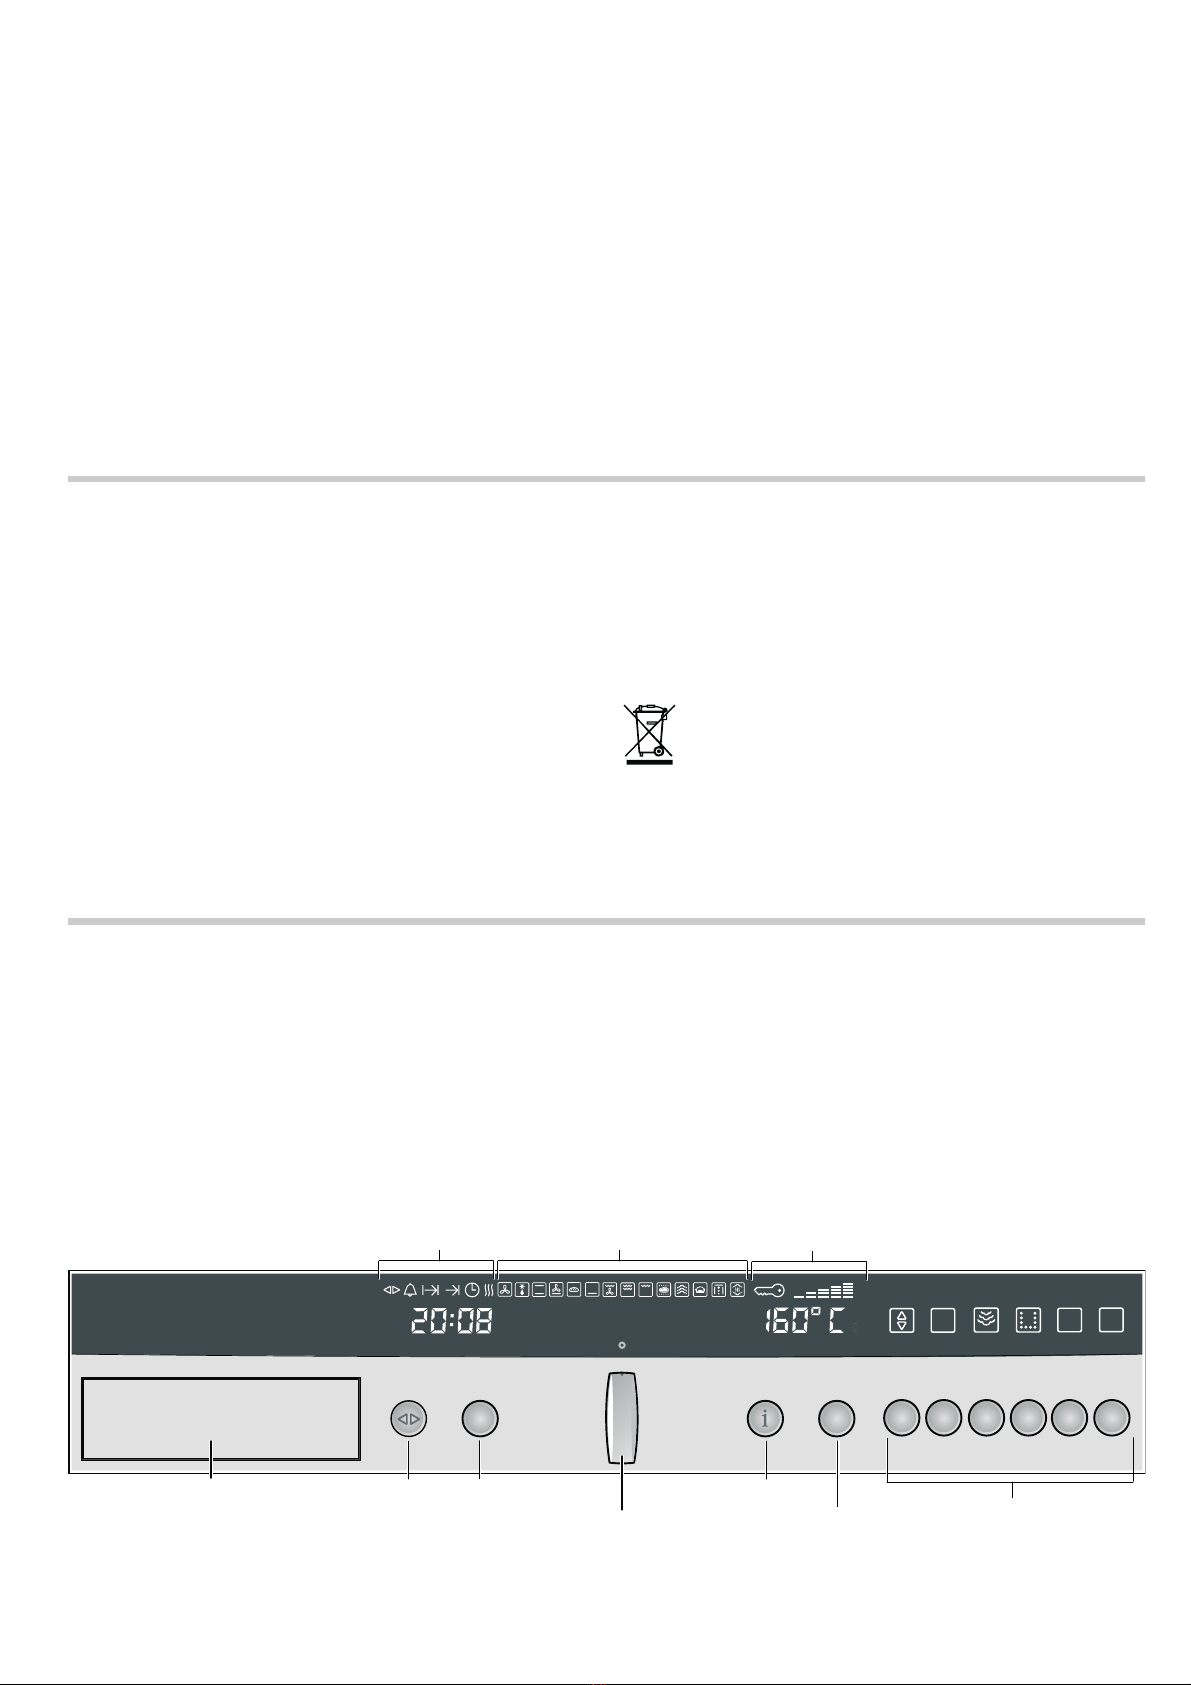
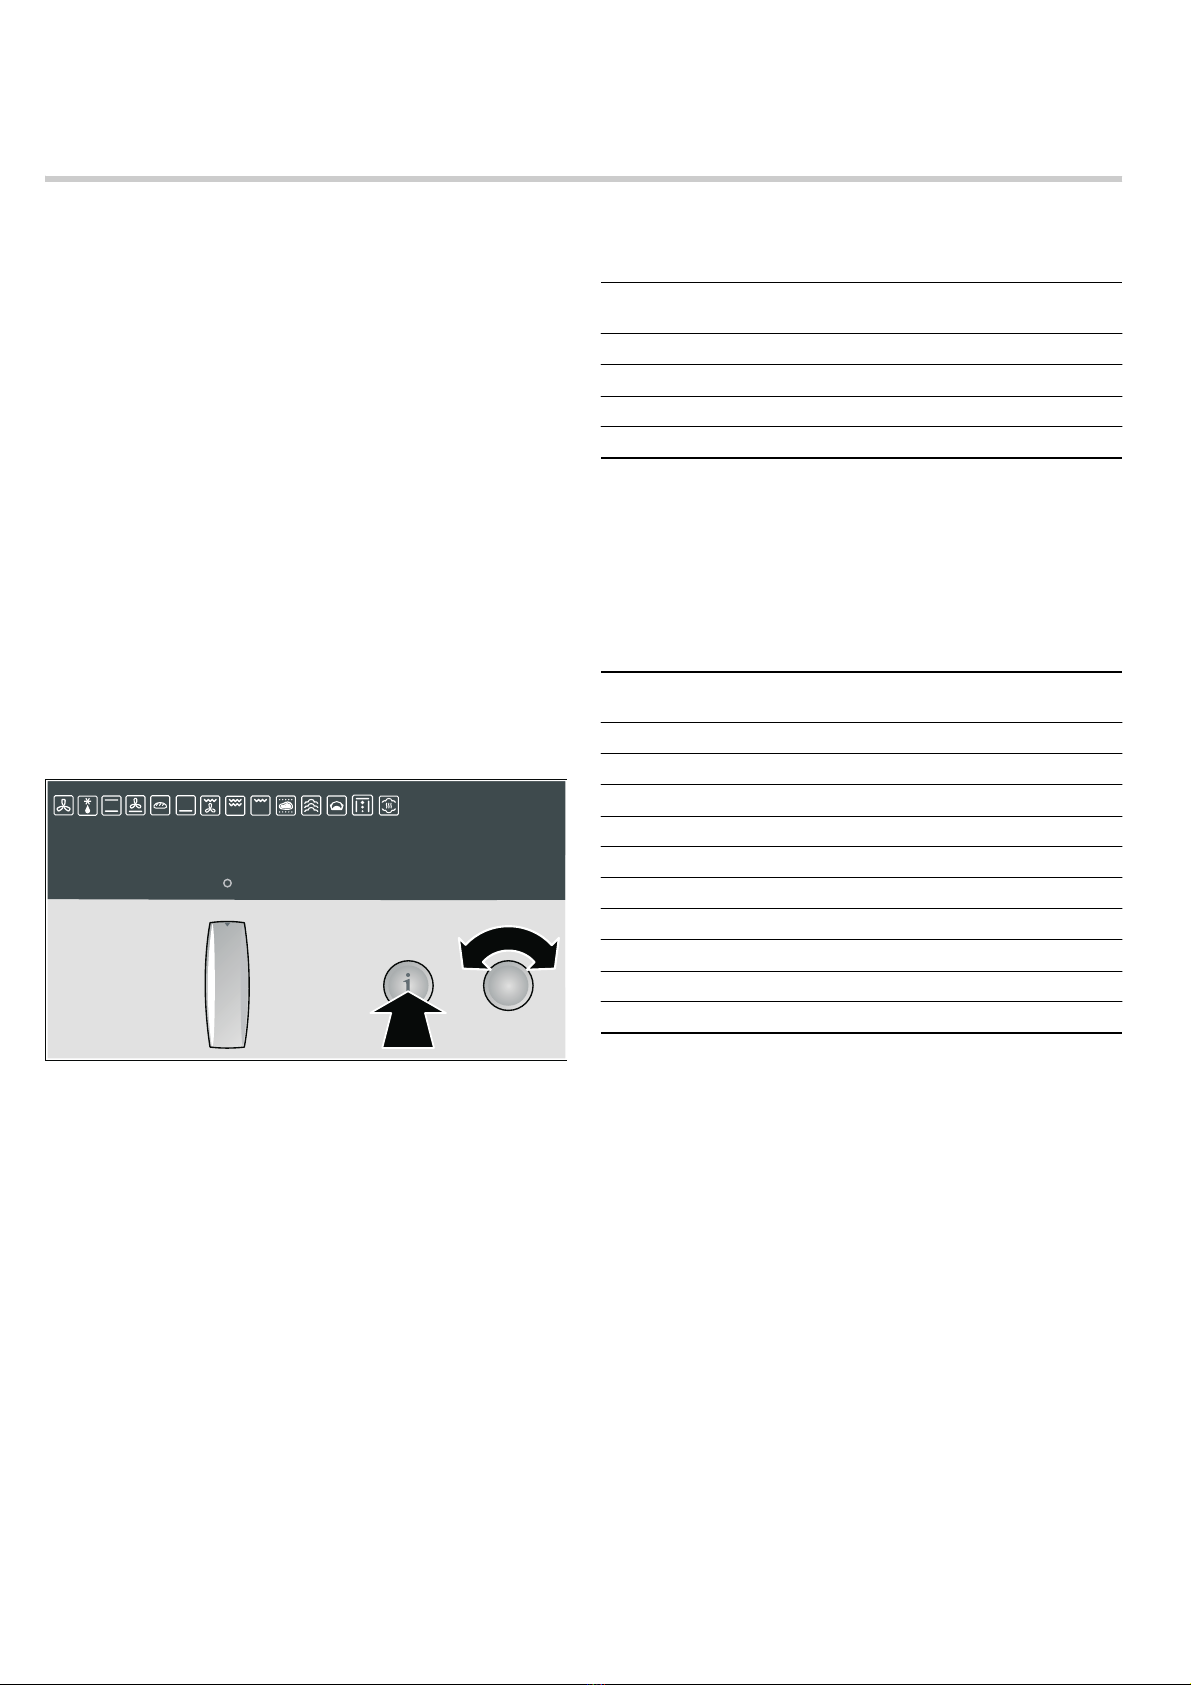
Control panel .......................................................................................4
Operating modes................................................................................5
Shelf positions .....................................................................................6
NeffLight® ............................................................................................6
Accessories .........................................................................................6
Before using the appliance for the first time........................... 7
Setting the language ..........................................................................7
Setting the water hardness ...............................................................7
Altitude calibration ..............................................................................7
Setting the clock .................................................................................7
Cleaning the appliance......................................................................8
Operating the appliance............................................................ 8
Switching on the appliance...............................................................8
Selecting operating mode and temperature..................................8
Filling and emptying the water tank ................................................9
Switching off the appliance............................................................ 10
After each steam-assisted use...................................................... 10
Automatic safety cut-out................................................................. 10
Changing the basic settings................................................... 10
Electronic clock ....................................................................... 11
Clock display .................................................................................... 11
Timer .................................................................................................. 12
Cooking time .................................................................................... 12
End of operation .............................................................................. 12
Preset operation............................................................................... 12
Setting the clock .............................................................................. 12
Rapid heat up................................................................................... 13
Checking, correcting or deleting settings ................................... 13
Childproof lock......................................................................... 13
Lock.................................................................................................... 13
Permanent lock ................................................................................ 13
Baking....................................................................................... 14
Baking on one level......................................................................... 14
Baking on two or more levels ....................................................... 14
Baking table...................................................................................... 14
Baking table for ready-made products........................................ 15
Tips and tricks .................................................................................. 16
Roasting and braising ............................................................. 17
Roasting............................................................................................. 17
Braising.............................................................................................. 17
Tables for roasting and braising................................................... 17
Tips and tricks .................................................................................. 19
Low-temperature cooking....................................................... 19
Using Low-temperature cooking................................................... 19
Table for Low-temperature cooking ............................................. 19
Tips and tricks .................................................................................. 20
Grilling .......................................................................................20
Circo-roasting ................................................................................... 20
Radiant grilling ................................................................................. 20
Grilling table...................................................................................... 21
Dough proving ..........................................................................22
Yeast dough ..................................................................................... 22
Yoghurt .............................................................................................. 23
Steam .........................................................................................23
Steam cooking ................................................................................. 23
AquaAssist - steam-assisted cooking.......................................... 24
Automatic programmes.................................................................. 25
Reheat - warming using steam................................................27
Defrosting..................................................................................28
Defrosting with CircoTherm®........................................................ 28
Defrost ............................................................................................... 28
Cleaning and care.....................................................................28
Cleaning the appliance exterior .................................................... 29
Cleaning the cooking compartment............................................. 29
Descaling .......................................................................................... 29
Self-cleaning surfaces..................................................................... 30
Oven cleaning .................................................................................. 30
Removing and fitting the appliance door.................................... 31
Cleaning the door panels............................................................... 32
Cleaning the cooking compartment ceiling................................ 32
Cleaning the hook-in racks............................................................ 32
Cleaning the telescopic shelves ................................................... 33
Faults and repairs.....................................................................33
Replacing the oven light bulb ....................................................... 34
Changing halogen bulbs................................................................ 34
Changing the door seal.................................................................. 35
After-sales service....................................................................35
E number and FD number ............................................................. 35
Test dishes ................................................................................36
Produktinfo
Additional information on products, accessories, replacement
parts and services can be found at www.neff-
international.com and in the online shop www.neff-
eshop.com

3
ã=Safety precautions
Read these instructions for use
carefully. Please keep the instructions
for use and installation instructions in
a safe place. If the appliance changes
owners, the instructions should
always be included.
Before installation
Damage during transport
Check the appliance for damage after unpacking it. Do not
connect the appliance if it has been damaged in transit.
Electrical connection
Only a licensed expert may connect the appliance. You will lose
your warranty entitlement in the event of any damage caused
by incorrect connection.
Information for your safety
This appliance is intended for domestic use only. This
appliance must only be used for food preparation. Only operate
the appliance in frost-free rooms.
Adults and children must not operate the appliance without
supervision,
■if they are physically or mentally incapable of doing so or
■if they have insufficient knowledge or experience.
Never let children play with the appliance.
Risk of burning!
Never touch the internal surfaces of the cooking compartment
or the heating elements when they are hot. Open the appliance
door carefully. Hot steam may escape. Small children must be
kept at a safe distance from the appliance.
Risk of fire!
Never store combustible items in the cooking compartment.
Never open the appliance door if smoke can be seen in the
appliance. Switch off the appliance. Pull out the mains plug or
disconnect the fuse in the fuse box.
Risk of short circuit!
Never trap connecting cables of electrical appliances in the hot
appliance door. The cable insulation could melt.
Risk of scalding!
The water in the water tank may become very hot if you
continue to operate the appliance. Empty the water tank after
each use of the appliance with steam operation.
Risk of scalding!
Never pour water into the cooking compartment when it is hot.
This will create hot steam.
Risk of scalding!
Hot steam may escape when the appliance door is opened.
Open the appliance door carefully during or after operating the
appliance. When opening the door, do not lean over it. Ensure
that, depending on the temperature, steam is not visible.
Risk of scalding!
Hot steam is generated in the cooking compartment. Steam is
generated in particular in the area around the steam inlet (top
right in the cooking compartment). Do not reach into the
cooking compartment while using the appliance with steam
operation. You may burn yourself.
Risk of injury and risk of fire!
Only fill the water tank with water or with the descaling solution
that is recommended by us.
Do not pour any flammable liquids (e.g. alcoholic drinks) into
the water tank.
Due to hot surfaces, vapours from flammable liquids may catch
fire in the cooking compartment (explosion). The appliance
door may spring open. Hot steam and jets of flame may
escape.
Risk of burning!
Never prepare food containing large quantities of drinks with a
high alcohol content. Alcoholic vapours can catch fire in the
cooking compartment. Only use small quantities of drinks with
a high alcohol content and take care when opening the
appliance door.
Risk of burning!
Never remove hot accessories or ovenware from the cooking
compartment without oven gloves.
Risk of electric shock!
Incorrect repairs are dangerous. Repairs may only be carried
out by one of our trained aftersales engineers. If the appliance
is defective, pull out the mains plug or switch off the appliance
at the circuit breaker in the fuse box. Call the aftersales
service.
Causes of damage
Caution!
■Do not place accessories on the cooking compartment floor.
Do not line the cooking compartment floor with foil of any
kind or greaseproof paper. Do not place ovenware on the
cooking compartment floor if a temperature of over 50 ºC is
set.This will cause heat accumulation. The baking and
roasting times will no longer be correct and the enamel will
be damaged.
■Never pour water into the cooking compartment when it is
hot. This will create steam. The temperature change can
damage the enamel.
■Do not store moist food in the closed cooking compartment
for long periods. This will damage the enamel.
■When baking very moist fruit flan, do not put too much on the
baking tray. Fruit juice dripping from the baking tray leaves

4
stains that cannot be removed. If possible, use the deeper
universal pan.
■Only leave the cooking compartment to cool with the door
closed. Even if the appliance door is only slightly open, the
fronts of adjacent units may be damaged over time.
■If the oven seal is very dirty, the oven door will no longer
close properly when the oven is in use. The fronts of adjacent
units could be damaged. Always keep the oven seal clean.
■Do not stand or sit on the open oven door. Do not place
cookware or accessories on the oven door.
■Do not carry or hold the appliance by the door handle. The
door handle cannot support the weight of the appliance, and
could break.
■Aluminium foil in the cooking compartment must not come
into contact with the door panel. This could cause permanent
discolouration of the door panel.
■Ovenware must be heat and steam resistant. Silicone baking
tins are not suitable for combined operation with steam.
■Do not use ovenware that shows signs of rust. Even the
smallest spots of rust can lead to corrosion in the cooking
compartment.
■Hot water can damage the pump. Only fill the water tank with
cold water.
■Do not allow descaling solution to come into contact with the
control panel or other sensitive surfaces. These will damage
the surfaces. If this does happen, remove the descaling
solution immediately with water.
■Do not clean the water tank in the dishwasher. Otherwise, the
water tank will be damaged. Clean the water tank with a soft
cloth and commercially available detergent.
Energy and environment tips
Here you can find tips on how to save energy when baking and
roasting and how to dispose of your appliance properly.
Saving energy
Only preheat the oven if this is specified in the recipe or in the
operating instruction tables.
Use dark, black lacquered or enamelled baking tins. They
absorb the heat particularly well.
Open the appliance door as little as possible during cooking,
baking or roasting.
It is best to bake several cakes one after the other. The cooking
compartment is still warm. This may reduce the baking time for
the second cake.
For longer cooking times, you can switch the oven off
10 minutes before the end of the cooking time and use the
residual heat to finish cooking.
Environmentally-friendly disposal
Dispose of packaging in an environmentally-friendly manner.
Your new appliance
In this section, you will find information on
■the control panel
■the operating modes
■the shelf positions
■the NeffLight®
■accessories
Control panel
This appliance complies with European Directive
2002/96/EC on Waste Electrical and Electronic
Equipment (WEEE). The directive gives a framework for
the collection and recycling of old appliances, which is
valid across the EU.
6WRS
3
6WDUW
:DWHUWDQN
2SHUDWLQJPRGHVHOHFWRU
5RWDU\VHOHFWRU ,QIREXWWRQ
7HPSHUDWXUHVHOHFWRU %XWWRQV
(OHFWURQLFFORFN 7H[WGLVSOD\ 7HPSHUDWXUHGLVSOD\
&ORFNIXQFWLRQ
EXWWRQ

5
Pop-out operating knob
The rotary, temperature and operating mode selectors can all
be popped out. Push the required operating knob to pop it in or
out.
Operating modes
Here is an overview of the operating modes of your appliance.
Control element Use
Operating mode selector Switches the appliance on and off
Selects the required operating mode
Water tank For steam-assisted applications (see section: Filling and emptying the water tank)
Electronic clock (rapid heat up)
KJ Clock function button Selects the required clock function or Rapid heat up
(see section: Electronic clock)
Rotary selector: Makes settings within a clock function or activates Rapid heat up (see section: Electronic
clock)
Temperature display (Basic settings)
±Info button Press briefly: calls up additional information, e.g. displays the current temperature during
heating up
Press and hold: calls up the Basic settings menu (see section: Changing the Basic set-
tings)
Temperature selector Sets the temperature
Changes the settings in the Basic settings menu
(see section: Changing the Basic settings)
Buttons
iNavigation button Switches between the different lines of the text display. The settings are saved as you do
so. If the Msymbol lights up in the text display, there are further selection options. Press
the inavigation button to move to these.
XProgramme button Calls up automatic programmes with steam-assisted cooking
(see section: Steam).
ŸAquaAssist button Sets the desired steam intensity
(see section: AquaAssist - steam-assisted cooking)
ÍDescaling button Descales the appliance
ƒStart button Starts operation
„Stop button Short press: stops operation (pause)
Press and hold: ends operation
Operating mode Use
3CircoTherm® For baking and roasting on one or more levels
ADefrost For gentle defrosting of pieces of meat, bread and delicate pastries (e.g. cream gateau)
%Top/bottom heat For baking and roasting on one level. Especially suitable for cakes with moist toppings
(e.g. cheesecake)
0Circotherm intensive For pre-prepared frozen products and dishes which require a lot of heat from underneath
(see section: Baking)
ëBread-baking For baked goods which need to be baked at high temperatures
$Bottom heat For food and baked goods which should form a crust or require more browning on the
underside. Only activate Bottom heat for a short time at the end of the baking time.
4Circo-roasting For poultry and larger pieces of meat
+Full-surface grill For large amounts of flat, small items for grilling (e.g. steaks, sausages)
(Centre-area grill For small amounts of flat, small items for grilling (e.g. steaks, bread)

6
Shelf positions
The cooking compartment has four shelf positions. The shelf
positions are counted from the bottom up.
ã=Risk of burns!
The telescopic shelves become hot when the appliance is in
use. Take special care not to get burnt when they are pulled
out.
The individual shelf units can be inserted into your preferred
shelf positions. This simple insertion system allows flexible and
quick handling when changing shelves.
Note: Do not use shelf height 2 when baking and roasting
with CircoTherm®. This will adversely affect air circulation and
your baking and roasting results will not be as good.
NeffLight®
Your appliance is equipped with a NeffLight®. The NeffLight®
consists of two halogen bulbs and a system of mirrors which
help to brightly illuminate the cooking compartment.
Door contact switch
The NeffLight® switches off when the appliance door is opened
and on when the door is closed.
Saving energy
You can switch off the NeffLight® in order to save energy. To
do this, you must move the door contact switch. This is located
in the gap in between the appliance door and the bottom right
of the kitchen unit.
To switch off the NeffLight®:
Slide the door contact switch to the right.
To switch on the NeffLight®:
Slide the door contact switch to the left.
Accessories
The following accessories are supplied with your appliance:
Slide the flat wire racks in so that the rear upstand, for
preventing items sliding off the back of the shelf, is at the rear
and facing upwards (see illustration below). Otherwise, the tilt
protection feature will not work properly.
You can obtain further accessories from specialist retailers:
/Low-temperature cooking For tender pieces of meat, that are to be cooked medium/medium-rare or à point
éSteam cooking For gentle preparation of vegetables, meat and fish
êDough proving For preparing yeast dough and yoghurt
zOven cleaning For regeneration of the self-cleaning surfaces in the cooking compartment
(see section: Oven cleaning)
äReheat For plated meals and baked items
Cooked food is gently reheated using steam. The food does not dry out.
Operating mode Use
Enamelled universal pan
for baking moist cakes, roasting,
grilling and collecting dripping
liquids
Wire rack, stepped, close-meshed
For baking, roasting and grilling,
can be inserted in the universal pan
Wire rack, flat, with tilt protection
For baking
Accessories Order no.
System steamer N8642X0EU
Grill set Z1240X2
Glass pan Z1262X0
Roasting pan, enamelled Z1272X0
Baking tray, aluminium Z1332X0
Baking tray, enamelled Z1342X0
Baking tray, non-stick Z1343X0
Baking and roasting shelf, close meshed Z1453X0
Roasting tray, enamelled, two-piece Z1512X0
Single telescopic extension rail retrofit kit Z1784X0
Tilt protection retrofit kit, pull-out stop Z9110X0
Universal roasting dish, enamelled Z9930X0

7
Note: The baking tray or universal pan may become distorted
during use. This is caused by the considerable temperature
differences acting on the accessories. This may happen when
only a part of the accessory is covered with food or when
frozen items such as pizza have been placed on the accessory.
Before using the appliance for the first time
Once your new appliance has been connected, "Select
language" appears in the text display. Before you can use the
appliance, you must make some settings:
■Set the language
■Set the water hardness
■Calibrate the altitude
■Set the time of day
■Clean the appliance before using it for the first time.
Note: You can correct these settings at any time. To change
the language, water hardness and altitude calibration,
see section: Changing basic settings; to change the time, see
section: Electronic clock.
Setting the language
"Select language English" is preset. If necessary, set another
language for the text display.
1. Turn the temperature selector until the language you require
appears on the text display.
2. Press and hold the ±info button for 3 seconds.
Your setting is saved. "Water hardness 3 - hard" appears in
the text display.
Setting the water hardness
Caution!
The appliance may become damaged due to the use of
unsuitable liquids.
Do not use distilled water, highly chlorinated tap water
(> 40 mg/l) or other liquids.
Only use cold, fresh tap water, softened water or uncarbonated
mineral water.
"Water hardness 3 - hard" is preset. Change this setting if your
water is softer.
You can use the test strip supplied to determine the water
hardness, or you can ask your water supplier.
Notes
■If your water is very hard, we recommend that you use
softened water.
■If you use only softened water, you can set your appliance to
"Water hardness (softened)".
■If you use mineral water, set the hardness to "Water hardness
3 - hard".
■If you use mineral water, you must only use non-carbonated
mineral water (see section "Filling and emptying the water
tank").
1. Use the temperature selector to set the water hardness.
2. Press and hold the ±info button for 3 seconds.
Your setting is saved. "Altitude calibration 0 - 300 m" is
shown in the text display.
Altitude calibration
The altitude range is preset to "0 - 300m". Change this setting if
the location of your appliance is at a higher or lower altitude.
1. Use the temperature selector to set the altitude range.
2. Press and hold the ±info button for 3 seconds.
Your setting is saved.
Setting the clock
Note: When you press the KJ clock function button, you have
3 seconds to set the clock using the rotary selector. Should this
have been insufficient for you, you can amend the clock time
later.
‹:‹‹ flashes in the clock display.
1. Briefly press the KJ clock function button to go to the
setting mode.
The KJ and 3symbols light up. ‚ƒ:‹‹ appears in the
clock display.
2. Set the current time using the rotary selector.
Your setting is accepted after 3 seconds.
6HOHFWODQJXDJH
(QJOLVK
Water hardness Setting symbol (temperature
display)
softened ™†‹
1 soft ™†‚
2 medium ™†ƒ
3 hard ™†„
Altitude range Setting symbol (temperature
display)
below 0 m ™‡‹
0 - 300m ™‡‚
300 - 600m ™‡ƒ
600 - 900m ™‡„
900 - 1200m ™‡…
1200 - 1500m ™‡†
1500 - 1800m ™‡‡
1800 - 2100m ™‡ˆ
2100 - 2400m ™‡‰
above 2400m ™‡Š

8
Changing the clock
To subsequently change the time, press the KJclock function
button repeatedly until the KJ and 3symbols light up again.
Change the time with the rotary selector.
Cleaning the appliance
Clean your appliance before using it for the first time.
1.Remove the accessories from the cooking compartment.
2.Completely remove any residual packaging (e.g. chips of
polystyrene) from the cooking compartment.
3.Clean the accessories and cooking compartment with hot
soapy water (see section: Cleaning and care).
4.Fill the water tank with 400 ml water (see section: Filling and
emptying the water tank).
5.Slide in the water tank all the way.?
6.Switch on the appliance. To do this, press the operating
mode selector so that it pops out (see section: Operating the
appliance).
The appliance is then ready for use.
7.Use the operating mode selector to set %Top/bottom heat.
8.Use the temperature selector to set the temperature to
240 °C.
9.Press the ŸAquaAssist button repeatedly until "High steam
intensity" appears in the text display (see section:
AquaAssist - steam-assisted cooking).
10.Press the ƒStart button.
11.Switch off the appliance if the water tank is empty. To do
this, turn the operating mode selector to the Ûoff position
and push it in.
The remaining water is pumped out of the evaporator system.
12.Empty the water tank (see section: Filling and emptying the
water tank)
13.Afterwards, wipe the cooled cooking compartment with hot,
soapy water.
Note: Remove limescale marks with a cloth soaked in
vinegar, then wipe with clean water and rub dry with a soft
cloth.
14.Clean the outside of the appliance with a soft, damp cloth
and soapy water.
Operating the appliance
In this section, you can read about
■how to switch your appliance on and off
■how to select an operating mode and temperature
■how to fill and empty the water tank
■when your appliance switches off automatically
Switching on the appliance
Press the operating mode selector to make it pop out.
This switches on the appliance, and it is now ready for use.
"Appliance is ready for use" and "Oven light" appear in the text
display.
Selecting operating mode and temperature
ã=Risk of scalding!
The water in the water tank may become very hot if you
continue to operate the appliance. Empty the water tank after
each steam-assisted application.
Notes
■The operating modes /Low-temperature cooking, éSteam
cooking and êDough proving can only be started if the
cooking compartment has cooled down. No residual heat
should be displayed in the temperature display (neither •nor
œ).
■For cooking with steam, you must fill the water tank (see
section: Filling and emptying the water tank).
1.Switch on the appliance.
2.Turn the operating mode selector until the desired operating
mode appears on the text display.
3.Turn the temperature selector to change the default
temperature.
Note: If no default temperature is displayed, the temperature
of your selected operating mode is a fixed setting. You
cannot change this temperature.
4.Press the ƒStart button.
Notes
■Depending on the operating mode that you have selected,
you will hear a pumping noise after the operation has started.
The appliance is checking whether the pumps are working
correctly.
■If you cannot start a steam-assisted application, check
whether the water tank has been filled and fully inserted.
Operating mode Default temper-
ature in °C Temperature
range in °C
3CircoTherm®* 160 40 - 200
ADefrost Fixed setting A A A
* In this operating mode you can activate steam operation
** Turn the temperature selector to above 275 °C. ‚Ÿ£
appears in the temperature display
&LUFR7KHUP

9
Changing the operating mode
1. Turn the operating mode selector until the desired operating
mode is selected.
2. Turn the temperature selector to change the temperature.
3. Press the ƒStart button.
Current temperature
Press the ±info button. The current temperature appears for
3seconds.
Note: The current temperature can only be displayed with
operating modes with a default temperature.
Heating indicator
The heating indicator displays the rising temperature in the
cooking compartment.
■Temperature reached (figure A)
■Appliance reheating (figure B)
Filling and emptying the water tank
ã=Risk of injury and risk of fire!
Only fill the water tank with water or with the descaling solution
that is recommended by us.
Do not pour any flammable liquids (e.g. alcoholic drinks) into
the water tank.
Due to hot surfaces, vapours from flammable liquids may catch
fire in the cooking compartment (explosion). The appliance
door may spring open. Hot steam and jets of flame may
escape.
Caution!
The appliance may become damaged due to the use of
unsuitable liquids.
Do not use distilled water, highly chlorinated tap water
(> 40 mg/l) or other liquids.
Only use cold, fresh tap water, softened water or uncarbonated
mineral water.
Note: If you use mineral water, set the hardness to "Water
hardness - hard".
Filling the water tank
Fill the water tank before each use with steam assistance.
1. Press lightly on the centre of the lower edge of the water tank
(picture A).
2. Pull out the water tank (picture B).
3. Fill the water tank with cold water up to the "max" mark
(picture C).
4. Slide in the water tank all the way.
Refilling the water tank
If the water tank is empty, a signal sounds. "Fill water tank and
slide in fully" appears in the display. Steam-assisted operation
is interrupted.
1. Pull out the water tank.
2. Fill the water tank up to the "max" mark and slide it in fully.
The steam-assisted operation continues.
Emptying the water tank
Empty the water tank after each steam-assisted use of the
appliance.
1. Turn the operating mode selector back to the Ûoff position
and push it in.
"Pumping-out" appears in the text display and ˜ž© (pumping
out) appears in the temperature display. The remaining water
in the evaporator system is pumped back into the water tank.
After the pumping, "Pumping-out finished" appears.
2. Pull out the water tank slowly and level.
3. Remove the cover (Picture A).
4. Empty the water tank (Picture B).
5. Thoroughly dry the water tank recess and the water tank.
6. Slide in the water tank.
%Top/bottom heat* 170 50 - 275
0Circotherm intensive* 220 50 - 275
ëBread-baking* 200 180 - 220
$Bottom heat 200 50 - 225
4Circo-roasting* 170 50 - 250
+Full-surface grill
+Full-surface grill (inten-
sive)**
220 50 - 275
Fixed setting
(Centre-area grill
(Centre-area grill (inten-
sive)**
180 50 - 275
Fixed setting
/Low-temperature cooking Fixed setting üüü
éSteam cooking Fixed setting ¨©¨
êDough proving Fixed setting AƒA
zOven cleaning Fixed setting ‹
äReheat 120 80 - 180
Operating mode Default temper-
ature in °C Temperature
range in °C
* In this operating mode you can activate steam operation
** Turn the temperature selector to above 275 °C. ‚Ÿ£
appears in the temperature display
$ %
$ %
&
$ %

10
Switching off the appliance
ã=Risk of scalding!
When you open the appliance door, hot steam can escape.
Open the appliance door carefully after cooking.
Note: The appliance has a cooling fan. After the appliance is
switched off, the cooling fan may continue to run.
1.Turn the operating mode selector back to the Ûoff position
2.Press the operating mode selector in so that it stays in.
The appliance switches off.
Note: If the appliance is switched off after a steam-assisted
operation, you will hear a pumping sound. The appliance is
pumping the remaining water out of the evaporator system
back into the water tank. "Pumping-out" appears in the text
display. Only empty the water tank once "Pumping-out finished"
is displayed.
You can see in the temperature display whether there is high or
low residual heat in the cooking compartment.
Turning off the operation
Press and hold the „Stop button. The appliance turns off the
current operation. The appliance is not switched off. You can
now start a different operating mode.
Interrupting and continuing an operation (Pause)
Briefly press the „Stop button. The appliance interrupts the
current operation. Press the ƒStart button to continue the
paused operation.
After each steam-assisted use
1.Switch off the appliance.
The remaining water is pumped out of the evaporator system
and back into the water tank. "Pumping-out" appears in the
text display.
2.Only empty the water tank once "Pumping-out finished" has
been displayed.
3.Empty and wash the water tank, and leave it to dry with the lid
open.
4.Wipe the cooled cooking compartment down with a soft
cloth.
5.Remove any dirt from the cooking compartment.
Note: Remove limescale marks with a cloth soaked in
vinegar, then wipe with clean water and rub dry with a soft
cloth.
Automatic safety cut-out
The automatic safety cut-out is only activated if you have not
made any settings on your appliance for a prolonged period.
You can adjust the period of time after which your appliance
shuts off.
"Safety cut-out" appears in the text display and ‹‹‹ flashes in
the temperature display. Appliance operation is interrupted.
Turn the operating mode selector to the Ûposition to
deactivate it.
Changing the basic settings
Your appliance has various basic settings, which are preset at
the factory. You can change these basic settings as required.
1.Switch on the appliance.
2.Press and hold the ±info button for 3 seconds to go to the
basic settings menu.
The text display shows "Select language: English". If the
appliance controls are locked, you must unlock them first.
3.Press the ±info button repeatedly until the current basic
setting for the relevant submenu is displayed on the text
display (e.g. "Audible signal off").
4.Using the temperature selector, set the required basic setting
within a submenu (e.g. "Audible signal 2 minutes").
5.Press and hold the ±info button for 3 seconds.
Your basic setting is saved.
Note: If nothing is entered after 15 seconds, the Basic settings
menu is automatically closed. "Appliance is ready for use"
appears in the text display.
You can change the following basic settings:
Temperature
display Text display Meaning
•Residual heat
high Residual heat high
(above 120 °C)
œResidual heat
low Residual heat low
(between 60 °C and 120 °C)
Basic settings menu
Submenu Basic setting Setting
symbol
Language Select language
Childproof lock Appliance unlocked ™‚‹
Appliance locked ™‚‚
Appliance perma-
nently locked
™ƒ‚
Audible signal Audible signal off ™„‹
Audible signal
30 seconds
™„‚
Audible signal
2 minutes ™„ƒ
Audible signal
10 minutes
™„„
Adjust individually* AÙÙÙØÙÙÙ@™…...
Water hardness softened ™†‹
1-soft ™†‚
2-medium ™†ƒ
3-hard ™†„

11
Electronic clock
In this section, you can read about
■how to set the timer
■how to switch off your appliance automatically
■how to switch your appliance on and off automatically
(preset operation)
■how to set the time
■find out how to activate rapid heat up
Clock display
Notes
■When you set a clock function, the time interval increases
when you set higher values (e.g. cooking time up to‚:‹‹œ to
the minute, using ‚:‹‹œ
to the nearest 5 minutes).
■For the Qminute minder, xcooking time, yend of
operation and preselection mode clock functions, a signal
sounds when the settings have elapsed and the Qor y
symbol flashes. To cancel the audible signal before it ends,
press the KJ clock function button.
■Briefly press the KJ clock function button to select a clock
function. You then have 3 seconds to set the selected clock
function. After this time, the setting mode is exited
automatically.
Switching the clock display on and off
1. Press and hold the KJclock function button for 6 seconds.
The clock display switches off. If a clock function is active,
the associated symbol remains lit.
2. Press the KJclock function button briefly.
The clock display switches on.
Altitude calibration below 0 m ™‡‹
0-300m ™‡‚
300 - 600 m ™‡ƒ
600 - 900 m ™‡„
900 - 1200 m ™‡…
1200 - 1500 m ™‡†
1500 - 1800 m ™‡‡
1800 - 2100 m ™‡ˆ
2100 - 2400 m ™‡‰
above 2400 m ™‡Š
Restore factory settings Do not restore ™ˆ‹
Restore ™ˆ‚
* You can use this basic setting to adjust the browning level for
all automatic programmes (see section: Automatic pro-
grammes).
Basic settings menu
Submenu Basic setting Setting
symbol
&ORFNIXQFWLRQEXWWRQ 5RWDU\VHOHFWRU
Clock function Use
QTimer You can use the minute minder as an egg timer or a kitchen timer. The appliance does
not switch on or off automatically
xCooking time The appliances switches off automatically after a cooking time setting has elapsed
(e.g. ‚:„‹ hours)
yEnd of operation The appliance switches off automatically at a set time (e.g. ‚ƒ:„‹ )
Preset operation The appliance switches on and off automatically. Cooking time and end of operation
have been combined.
3Clock Setting the clock
fRapid heat up Shortens the heat up time

12
Timer
1.Press the KJclock function button repeatedly until the KJ
and Qsymbols light up.
2.Set the duration using the rotary selector (e.g. †:‹‹ minutes).
The setting is applied automatically. Then the clock is
displayed again and the minute minder starts counting down.
Cooking time
Automatic switch-off after a cooking time setting has elapsed.
1.Set the operating mode and temperature.
2.Press the KJ clock function button repeatedly until the KJ
and xsymbols light up.
3.Set the cooking time with the rotary selector
(e.g. ‚:„‹ hours).
The setting is applied automatically. The time of day is then
displayed again.
4.Press the ƒStart button.
The appliance heats up and the set cooking time starts
counting down.
Once the cooking time has elapsed, the appliance switches off
automatically.
Turn the operating mode selector to the Ûposition and push it
in.
End of operation
Automatic switch-off at a set time.
1.Set the operating mode and temperature.
2.Press the KJ clock function button repeatedly until the KJ
andysymbols light up.
3.Set the end of operation using the rotary selector
(e.g. ‚ƒ:„‹ o'clock).
The setting is applied automatically. The time of day is then
displayed again.
4.Press the ƒStart button.
The appliance heats up.
Once the cooking time has elapsed, the appliance switches off
automatically.
Turn the operating mode selector to the Ûposition and push it
in.
Preset operation
The appliance switches on automatically, then switches off
automatically at the time preselected for the end of operation.
To set this function, combine the cooking time and end of
operation clock functions.
Bear in mind that food which spoils easily should not be left in
the cooking compartment for too long.
1.Set the operating mode and temperature.
2.Press the KJ clock function button repeatedly until the KJ
andxsymbols light up.
3.Set the cooking time with the rotary selector
(e.g. ‚:„‹ hours).
The setting is applied automatically.
4.Press the KJ clock function button repeatedly until the KJ
and ysymbols light up.
5.Set the end of operation using the rotary selector
(e.g. ‚ƒ:„‹ o'clock).
6.Press the ƒStart button.
The appliance switches off and waits until the appropriate
time to switch on (‚‚:‹‹ in the example). The appliance
switches off automatically at the time set for the end of
operation (‚ƒ:„‹ ). A signal sounds and the ysymbol
flashes.
7.Turn the operating mode selector to the Ûposition and push
it in.
Setting the clock
You can only change the clock when no other clock function is
active.
1.Press the KJ clock function button repeatedly until
the KJand 3symbols light up.
2.Set the clock using the rotary selector.
The setting is applied automatically.

13
Rapid heat up
Depending on the appliance features, you can reduce the
preheat time for the 3Hot air and ëBread-baking operating
modes if the set temperature is higher than 100 °C.
Note: During Rapid heat up, do not place any food in the
cooking compartment until the fsymbol goes out.
1. Set the operating mode and temperature.
2. Press the KJ clock function button repeatedly until the KJ
and fsymbols light up and Œis displayed in the clock
display.
3. Turn the rotary selector clockwise.
Žis displayed in the clock display and the fsymbol lights
up. Rapid heat up is activated.
4. Press the ƒStart button.
The appliance heats up.
After reaching the set temperature, Rapid heat up switches off.
The fsymbol goes out.
Checking, correcting or deleting settings
1. To check your settings, press the KJ clock function button
repeatedly until the corresponding symbol lights up.
2. If necessary, you can correct your setting using the rotary
selector.
3. If you wish to cancel your setting, turn the rotary selector anti-
clockwise to the original value.
Childproof lock
In this section, you can read about
■how to lock your appliance
■how to lock your appliance permanently
Lock
Once it has been locked, the appliance cannot be switched on
accidentally or by unauthorised users (e.g. by children playing).
To switch the appliance on again, you must unlock it. After
appliance operation, the appliance is not automatically locked.
Lock it again if necessary or activate the permanent lock.
Locking the appliance
1. Switch on the appliance.
2. Press and hold the ±info button until™‚‹ (Appliance
unlocked) appears.
3. Turn the temperature selector until ™‚‚ (Appliance locked)
appears.
4. Press and hold the ±info button until the‚symbol appears.
Note: If you try to switch the locked appliance on, -†-
(Appliance locked) appears.
Unlocking the appliance
1. Press and hold the ±info button until™‚‚ (Appliance locked)
appears.
2. Turn the temperature selector until ™‚‹ (Appliance
unlocked) appears.
3. Press and hold the ±info button until the ‚symbol goes
out.
Permanent lock
Once it has been permanently locked, the appliance cannot be
switched on accidentally or by unauthorised users (e.g. by
children playing).
To switch the appliance on, you must interrupt the permanent
lock briefly. After you have switched your appliance off, it locks
again automatically.
Locking the appliance permanently
1. Switch on the appliance.
2. Press and hold the ±info button until™‚‹ (Appliance locked)
appears.
3. Turn the temperature selector until™ƒ‚ (Appliance
permanently locked) appears.
4. Press and hold the ±info button for 3 seconds.
Your appliance will be locked after 30 seconds. The
‚symbol appears.
Note: If you try to switch the locked appliance on, -†˜ -
(Appliance permanently locked) appears.
Interrupting permanent lock
1. Press and hold the ±info button until ™ƒ‚ (Appliance
permanently locked) appears.
2. Turn the temperature selector until ™ƒ‹ (Appliance unlocked
once) appears.
3. Press and hold the ±info button until the ‚symbol goes
out.
The permanent lock is interrupted.
4. Switch the appliance on within 30 seconds.
After switching it off, the permanent lock is reactivated after
30 seconds.
Unlocking the appliance permanently
1. Press and hold the ±info button until ™ƒ‚ (Appliance
permanently locked) appears.
2. Turn the temperature selector until ™ƒ‹ (Appliance unlocked
once) appears.
3. Press and hold the ±info button until the ‚symbol goes
out.
4. Within 30 seconds, press and hold the info button ±again for
3seconds.
5. Turn the temperature selector until™‚‹ (Appliance unlocked)
appears.
6. Press and hold the ±info button for 3 seconds.
The appliance is permanently unlocked.

14
Baking
In this section, you will find information on
■Baking on one level
■Baking on two or more levels
■The baking table
■The baking table for ready-made products
■Tips and tricks for baking
Note: Do not use shelf height 2 when baking with 3
CircoTherm®. The air circulation is impaired and this will have
a negative effect on your baking.
We recommend that you use dark baking tins made from metal.
Tinplate and glass dishes increase the baking time required
and the cake will not brown evenly.
If you wish to bake using tinplate tins and %Top/bottom heat,
you should use shelf height 1.
Always slide the universal pan in carefully as far as it will go
and make sure that the sloping edge is facing the appliance
door.
Slide the flat wire racks in so that the rear upstand is at the rear.
The baking tins therefore cannot slide off the back of the shelf.
Baking on one level
If you are baking on one level with 3CircoTherm®, always
place a round tin in the centre (Figure A) and always place a
loaf tin diagonally (Figure B).
If you are baking on one level with 3CircoTherm, always place
two round baking tins diagonally from each other on the
stepped wire rack (Figure C).
Baking on two or more levels
When baking on several levels, only use the 3CircoTherm
or ëBread-baking operating modes.
Bear in mind that your items may brown at different rates on
each level. The items on the top level will brown more quickly
and can be taken out earlier.
Two baking tins on two levels
When baking with two round baking tins or two baking trays,
slide the stepped wire rack in at shelf position 1 and the
straight wire rack in at shelf position 3.
Place the lower baking tin to the left (Figure A) and the upper
baking tin to the right (Figure B) on their respective wire racks.
Four baking tins on two levels
When baking with four round baking tins, slide the stepped wire
rack in at shelf position 1 and the straight wire rack in at shelf
position 3.
Place the lower baking tins diagonally from each other as
shown in Figure C and the upper baking tins diagonally from
each other as shown in Figure D on their respective wire racks.
Baking table
The details given in the table are guidelines and apply to dark
baking tins. The values may vary depending on the type and
amount of the dough/mixture and on the baking tin.
We recommend that you set the lower of the specified
temperatures the first time. Lower temperatures will generally
allow more even browning.
If you are baking according to your own recipe, use similar
recipes in the table as a guide.
Observe the notes in the table about preheating.
$%
&&
$%
&
Meal Setting Level Temperature in °C Time in minutes
Victoria sponge cake 31 160 170* 25 - 30
%2 160 170* 20 30
31 + 3 150 160* 25 35
Scones 31 180 200* 10 - 15
%3 210 220* 8 - 10
31 + 3 180 200* 10 - 15
* Preheat oven
** Preheat the oven to 130 °C

15
Baking table for ready-made products
Notes
■Use the universal pan
■Only use greaseproof paper that is suitable for the selected
temperature
■Spread chips out in a single layer
■Turn frozen potato products half way through the baking time
■Only season frozen potato products after they have finished
baking
■Leave a little space between the dough when baking bread
rolls. Do not place too many in the universal pan
■Cover the lasagne with plenty of cheese so that the top
browns evenly
Small cakes 31 160 170* 20 30
%3 150 160* 25 35
31 + 3 150 160* 25 35
Light fruit cake 31 140 150* 80 100
Rich fruit cake 31 140 150* 210 - 240
Jam tarts 31 190 200* 15 - 20
%3 200 210* 15 - 20
31 + 3 190 200* 20 25
Swiss roll 31 180 190* 10 - 15
%2 190 200* 10 - 15
Tart 31 160 170* 50 - 60
01 180 190* 45 - 55
31 + 3 160 170* 50 - 60
Pies 31 170 180* 65 - 75
01 170 180* 65 - 75
31 + 3 170 180* 65 - 75
Biscuits 31 160 170* 15 - 20
%2 170 180* 15 - 20
31 + 3 160 170* 20 25
31 + 3 + 4 160 170* 20 25
Meringue 31 80* 100 130
%3 80* 100 130
Pavlova 3190100** 90 120
%3 80 90** 90 120
Fruit crumble 31 170 180* 45 - 55
%2 190 200* 45 - 55
Yorkshire pudding ë1 200 220* 15 - 20
01 210 220* 10 - 15
ë1 + 3 200 220* 15 - 20
Vol au vents 31 190 200* 20 30
01 180 190* 20 25
Quiche 31 180 200* 45 - 55
01 180 190* 30 - 40
(White) bread ë1 210 220* 20 25
01 200 220* 20 25
Home-made pizza 31 190 200* 20 30
01 180 190* 15 - 20
31 + 3 180 190* 35 45
Jacket potatoes 31 160 170 60 70
01 160 170 50 - 55
31 + 3 160 170 65 - 75
Meal Setting Level Temperature in °C Time in minutes
* Preheat oven
** Preheat the oven to 130 °C

16
■Do not use frozen products with freezer burn
■Do not use frozen products that are heavily frosted
■Follow the manufacturer's instructions.
The details given in the table are guidelines and apply to the
universal pan.
We recommend that you set the lower of the specified
temperatures the first time. Lower temperatures will generally
allow more even browning.
When baking on several levels, only use the CircoTherm® 3
or Bread-baking ëoperating modes.
Observe the notes in the table about preheating.
Tips and tricks
Meal Setting Level Temperature in °C Time in minutes
Frozen pizza 31 180 200* 15 25
01 180 200* 10 - 20
31 + 3 170 190* 20 30
Chilled pizza 01 190 200* 10 - 15
ë1 200 210* 10 - 15
Part-baked white bread 31 180 190* 10 - 20
01 180 190* 5 - 15
31 + 3 170 180* 15 - 20
Oven chips 31 180 200* 25 - 30
01 180 190* 20 25
Potato wedges 31 180 190* 20 25
01 180 190* 15 - 20
Croquettes 31 180 190* 25 - 30
01 180 190* 20 25
Fish fingers 31 180 200* 15 - 20
01 180 200* 10 - 15
Lasagne, frozen (400 g) 31 180 190* 40 - 45
01 180 190* 35 - 40
Lasagne, frozen (1200 g) 31 180 190* 45 - 50
01 180 190* 40 - 45
Lasagne, chilled (400 g) 31 170 180* 35 - 40
%2 190 200* 35 - 40
Lasagne, chilled (1200 g) 31 170 180* 40 - 45
%2 190 200* 40 - 45
* Preheat oven
The cake is too light in colour Check the shelf height.
Check whether you have used the bakeware that we have recommended.
Place your tin on the wire rack and not on the baking tray.
If the shelf height and the bakeware are correct, then you should either extend the bak-
ing time or increase the temperature.
The cake is too dark Check the shelf height.
If the shelf height is correct, you should either shorten the baking time or reduce the
temperature.
The cake is unevenly browned in the bak-
ing tin Check the shelf height.
Check the temperature.
Make sure that your baking tin is not placed directly in front of the air outlets in the rear
panel of the cooking compartment.
Check that the baking tin is in the correct position on the wire rack.
The cake is too dry Set a slightly higher temperature and a slightly shorter baking time.
The cake is too moist in the centre Set a slightly lower temperature.
Note: Higher temperatures may not mean shorter baking times (cooked on the outside,
but not on the inside).
Select a longer baking time and allow the cake mixture to prove for longer.
Add less liquid to the mixture.

17
Roasting and braising
In this section, you will find information on
■Roasting
■Braising
■Tables for roasting and braising
■Tips and tricks
ã=There is a risk of injury if you use roasting dishes that
are not heat-resistant!
Only use roasting dishes that are marked as being suitable for
use in the oven.
Do not use shelf height 2 when roasting with 3CircoTherm®.
The air circulation would be impaired and this will have a
negative effect on your roast.
Roasting
Roasting dish without a lid is used for roasting.
When you are roasting with %Top/bottom heat, turn the roast
approximately half to two thirds of the way through the roasting
time.
Roasting in the universal pan
Juices escape from the roasting meat and are collected in the
universal pan. You can use these juices as the basis for a tasty
gravy.
Deglaze the pan of the juices with hot water, stock, wine or
similar. Bring to the boil, thicken with cornflour, season and
pass through a sieve if necessary.
You can also cook side dishes (e.g. vegetables) at the same
time as roasting meat in the universal pan.
For smaller joints, you can use a smaller roasting dish instead
of the universal pan. Place this directly on the wire rack.
Roasting in the universal pan with stepped wire rack
Place the stepped wire rack on the universal pan and slide
them in together at the same shelf position.
For fatty meat and poultry, add Xto ¼ litre water to the
universal pan, depending on the size and type of the joint.
While the meat is roasting, the liquid in the roasting dish will
evaporate. Pour in more hot water if required.
Roasting in the universal pan with roasting sheet
The roasting sheet reduces dirt in the cooking compartment.
Place the roasting sheet in the universal pan and slide them in
together at the same shelf position.
Dripping fat and meat juices are caught in the universal pan.
Braising
For braising, a roasting dish with a lid is used. Ensure that the
roasting dish and lid fit together well and close properly.
First, sear the meat if required.
Add the meat, vegetables and liquid to the roasting dish in
equal proportions and place the dish with the lid closed on the
wire rack at shelf position 1.
While the meat is braising, the liquid in the roasting dish will
evaporate. Pour in more liquid if required.
Tables for roasting and braising
The details given in the table are guidelines and apply to food
placed in a cold oven and for meat taken directly from the
refrigerator.
Poultry
The information in the tables applies to unstuffed poultry. Turn
the poultry after half of the cooking time.
Lean meat
Coat lean meat with fat or oil as required and cover it with strips
of bacon.
Cooking time and temperature
The cooking time and temperature depend on the size, height,
type and quality of the food and the roasting dish.
As a general rule: the larger the item, the lower the temperature
and the longer the roasting time.
You should set the lower of the specified temperatures the first
time. Lower temperatures will generally allow more even
browning.
The values for cooking time apply to 0.5 - 2 kg of food. For
greater weights, reduce the temperature and increase the
cooking time. For multiple pieces, apply the cooking time for
the weight of the heaviest piece.
Standing time
At the end of the cooking time, switch the oven off and leave
the roast to stand for approximately 10 minutes in the cooking
compartment with the door closed. The recommended standing
time is not included in the cooking times specified.
The cake collapses when you take it out of
the oven Use less liquid for the mixture.
Set a longer baking time or a slightly lower temperature.
The specified baking time is not correct For small items, check the quantity on the baking tray. Small items must not be touch-
ing each other.
Frozen products are not browned evenly
after baking Check whether the frozen product is unevenly pre-browned before baking. This uneven
browning will remain after the baking time.
Several cakes on one level are unevenly
browned Check the position of the baking tins on the wire rack.
Frozen products are not browned, not
crispy or the specified times are not cor-
rect
Remove ice from frozen products before baking. Do not use frozen products that are
heavily frosted
Saving energy Only preheat the appliance when it is specified in the baking table that you should do
so.
Use dark baking tins as these absorb the heat better.
Make use of the residual heat with longer baking times and switch the oven off
510 minutes before the end of the baking time.

18
Meal Setting Level Temperature in °C Time in minutes
(per 500 g)
Duck 31 180* 20 + 20
%2 190 - 200* 20 + 20
Beef
Slow roast joint 31 140* 40 + 40
%2 150* 40 + 40
Top side / top rump 31 160* 30 + 25
%2 190* 30 + 25
Lamb
Leg 31 170* 30 + 25
%2 200* 30 + 25
Shoulder (bone-in) 31 170* 25 + 20
%2 200* 25 + 20
Shoulder (boned and rolled) 31 170* 30 + 25
%2 200* 30 + 25
Rack of lamb 31 180* 25 + 25
%2 200* 25 + 25
Pork
Roast joint 31 180* 35 + 35
%2 180* 35 + 35
Loin joint 31 180* 30 + 30
%2 180* 30 + 30
Belly 31 160* 30 + 25
%2 190* 30 + 25
Gammon
Joint 31 160* 30 + 30
%2 180* 30 + 30
Chicken
Whole chicken 31 170 - 180* 20 + 25
%2 190 - 200* 20 + 25
Portion (boned) 31 190* 20 + 25
%2 200 - 210* 20 + 25
Quarter 31 190* 20 + 25
%2 200 - 210* 20 + 25
Turkey
Drumstick 31 180* 20 + 20
Crown 31 160* 25 + 20
Whole 2 - 4 kg 31 160 - 170* 16 + 20
4,5 - 7 kg 31 150 - 160* 15 + 15
7,5 - 12 kg 31 150 - 160* 13 + 13
Complete Meal
with beef 31 + 3 160* 30 + 25**
*Preheatoven
** + time for yorkshire pudding

19
Tips and tricks
Low-temperature cooking
In this section, you will find information on
■Low-temperature cooking /
■Tips and tricks
Low-temperature cooking is a method of cooking slowly at low
temperatures, and is also known as slow cooking.
Low-temperature cooking is ideal for all prime cuts of meat (e.g.
tender portions of beef, veal, pork, lamb and poultry) that are to
be cooked medium/medium rare or "à point". The meat will
remain succulent and tender.
Using Low-temperature cooking
Notes
■Only use fresh, clean meat
■The meat will always look pink on the inside after Low-
temperature cooking. This does not mean that the cooking
time was too short
■Only use boned meat
■Do not use defrosted meat
■You can also use seasoned or marinated meat
■Always use shelf height 1 for Low-temperature cooking
■Do not cover the meat while it is cooking in the cooking
compartment
■Do not turn pieces of meat during the low-temperature
cooking process
■The size, thickness and type of meat will have a significant
influence on the searing and low-temperature cooking times
■The properties of the pan and the heat output of the hotplate
can influence the searing time
■Do not use the Low-temperature cooking mode together with
the Preselection mode clock function
Only switch the Low-temperature cooking mode on when the
cooking compartment has completely cooled down (room
temperature).
If "Not possible" appears in the text display when the Low-
temperature cooking mode is switched on and •or œand üüü
appear alternately in the temperature display, the cooking
compartment has not cooled down completely.
Wait until the cooking compartment has cooled down and
switch Low-temperature cooking on again.
1. Place a glass or porcelain plate on a wire rack and insert at
shelf height 1 to warm the plate.
2. Switch on /Low-temperature cooking.
"Please wait" appears in the text display during the heating
up phase (15 - 20 minutes).
3. Remove fat and sinews from the meat.
4. Sear the meat on all sides to seal the meat and to create a
roasted flavour.
5. When a signal sounds and "In operation" appears on the text
display, place the meat on the glass or porcelain plate in the
cooking compartment.
6. Take out the meat at the end of the cooking time and switch
off the appliance.
Note: Meat cooked at a low temperature does not need to rest,
and can easily be kept warm at a low temperature.
Table for Low-temperature cooking
The information in the table contains only guide values. The
searing time is for searing in a hot pan with fat.
Place the duck breast in a cold pan and fry the skin side first.
Following Low-temperature cooking, insert at shelf height 3 and
grill at 250 °C for 3 5 minutes until crispy.
You can find information on how to proceed, further instructions
and recipes in the accompanying cookbook.
Casseroles Setting Level Temperature in °C Time in minutes
(per 500 g)
Diced meat (beef, pork, lamb, chicken) 31 140 40 + 80
$1 140* 40 + 80
Braising steak 31 140 45 + 80
$1 140* 45 + 80
Chicken pieces (boned) 31 140 50 + 70
%2 140* 50 + 70
* Preheat oven
Crust too thick and/or roast too dry Reduce the temperature or shorten the roasting time.
Check the shelf height.
Crust too thin Increase the temperature or switch on the grill briefly at the end of the roasting time.
The meat is not cooked right through Remove any accessories that are not required from the cooking compartment.
Increase the roasting time.
Check the core temperature of the joint using a meat thermometer.
Steam in the cooking compartment is con-
densing on the appliance door The steam dries during the course of the cooking. If there is an excessive volume of
steam, you can carefully open the door briefly to dissipate the steam more quickly.
The meat is burned slightly during braising Add the meat, vegetables and liquid to the roasting dish in equal proportions.
The roasting dish and lid must fit together well and close properly.
Reduce the temperature.

20
Tips and tricks
Grilling
In this section, you will find information on
■Grilling in general
■Circo-roasting 4
■Radiant grilling (Full-surface +and Centre-area grill ()
■The grilling table
ã=There is a risk of injury if you use roasting dishes that
are not heat-resistant!
Only use roasting dishes that are marked as being suitable for
use in the oven.
Notes
■Always use the stepped wire rack and the universal pan when
grilling.
■Place the insert grid into the universal pan and slide the two
in together at the shelf position specified in the grilling table
■Always place the food to be grilled in the centre of the
stepped wire rack
■If you are grilling more than one piece of meat, make sure
that they are the same sort of meat and that they are of
similar thickness and weight.
Circo-roasting
The 4Circo-roasting operating mode is particularly suitable for
poultry or meat (e.g. roast pork with crackling) that is to be
crispy.
Turn large items of food after approximately half to two-thirds of
the grilling time. For items of food with rind, place them on the
wire rack rind-side down for the first half of the grilling time.
Pierce duck and goose skin under the wings and legs to allow
the fat to escape.
Depending on the type of food you are cooking, the cooking
compartment may become very dirty when you cook food on
the wire rack using Circo-roasting. You should therefore clean
the cooking compartment after every use so that the dirt does
not become burnt on.
At the end of the cooking time, switch the grill off and leave the
food to stand for approximately 10 minutes in the cooking
compartment with the door closed. The recommended standing
time is not included in the grilling times specified.
Radiant grilling
For grilling large quantities of flat items, use the + Full-surface
grill (Fig. A).
For grilling small quantities of flat items, use the (Centre-area
grill. Place the food to be grilled in the centre of the wire rack
(Fig. B). Using the Centre-area grill operating mode will save
energy.
Brush the items to be grilled with a little oil to taste.
Turn the items after half to two-thirds of the grilling time.
You can influence the grilling result by changing the position of
the wire rack.
Searing in
minutes Low-tem-
perature
cooking in
minutes
Pork
Fillet, whole (approx. 500 g) 5 - 6 100 - 120
Loin (approx. 1 kg, 4 - 5 cm thick) 5 - 6 120 - 150
Medallions (5 cm thick) 3 - 4 45 - 60
Loin steaks (2 3 cm thick) 2 - 3 30 - 45
Beef
Fillet, whole (1.5 kg) 6 - 7 160 - 200
Sirloin
(approx.1.5kg,5-6cmthick) 6 - 7 180 - 210
Centre-cut rump (6 - 7 cm thick) 6 - 7 240 - 300
Medallions (5 cm thick) 3 - 4 60 - 80
Rump steak (3 cm thick) 3 - 4 50 - 70
Steak-cut rump (3 cm thick) 3 - 4 50 - 70
Veal
Fillet, whole (approx. 800 g) 4 - 5 150 - 180
Flank (approx. 2 kg, 8 - 9 cm thick) 6 - 7 360 - 420
Centre-cut rump
(approx.1.5kg,4-5cmthick) 6 - 7 240 - 300
Medallions (4 cm thick) 3 - 4 70 - 90
Lamb
Loin, boned (approx. 200 g) 2 - 3 30 - 40
Leg, boned, tied (approx. 1 kg) 6 - 7 240 - 300
Poultry
Chicken breast (150 - 200 g)* 4 - 5 90 - 120
Duck breast (300 - 400 g)** 10 - 12** 70 - 90**
Turkey breast (1 kg)* 4 - 5 150 - 180
Turkey steaks (2 - 3 cm)* 3 - 4 40 - 60
* well-done
** see the note below
Meat cooked at a low
temperature cools
down too quickly
Serve on warmed plates with a very
hot sauce
Keeping meat cooked
at a low temperature
warm
Switch on %Top/bottom heat and set
the temperature to 60 °C. Small
pieces of meat can be kept warm for
up to 45 minutes and large pieces for
up to 2 hours
Searing in
minutes Low-tem-
perature
cooking in
minutes
$ %
Other manuals for B46C74.0GB
2
Table of contents
Other NEFF Oven manuals

NEFF
NEFF U1ACE2H 0B Series User manual

NEFF
NEFF C17E64 3 Series User manual

NEFF
NEFF B47FS34H0B User manual

NEFF
NEFF C17DR02.1 User manual

NEFF
NEFF U14S32 5GB Series User manual

NEFF
NEFF B1644N0GB Safety guide

NEFF
NEFF U1ACE2HG0B User manual

NEFF
NEFF B15FS22.0 User manual

NEFF
NEFF B8732.0 User manual

NEFF
NEFF B1ACC2A 0 Series User manual

NEFF
NEFF B15E54 0GB Series User manual

NEFF
NEFF C17MS22 1 Series User manual

NEFF
NEFF B64FS31.0B User manual

NEFF
NEFF B1ACE4H.0B User manual

NEFF
NEFF N50 B3AVH4H 0B Series User manual

NEFF
NEFF U1320W2GB - annexe 1 User manual

NEFF
NEFF B1GCC0AN.B User manual

NEFF
NEFF B15M62.0GB User manual

NEFF
NEFF B1641 User manual

NEFF
NEFF B15E44N0AU User manual